文件上传自然是一个网站必不可少的元素之一,SpringMVC这个网站编程框架自然也有这个东西,下一面举一个例子说明这个问题。
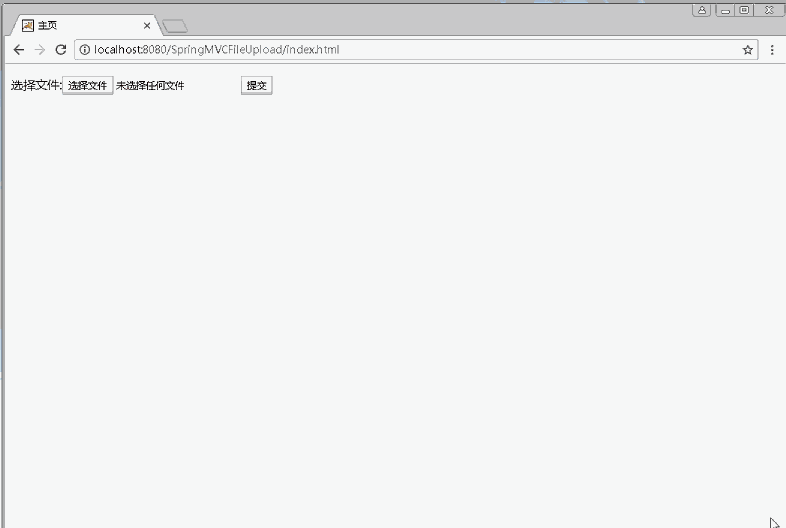
如下图所示,一个简单的上传控件,只让上传bmp、gif、jpg/jpeg、png这些图片文件,成功上传之后并现实,而类似exe这些东西则不让上传,返回信息。
一、基本配置
1、首先,在做SpringMVC的文件上传之前,除了在《【Spring】Spring3.x的下载与配置》(点击打开链接)提到的所有Spring包,还需要自己配个commons-io.jar、commons-fileupload.jar,这两个东西Apache的官网直接有,网址如下:
Apache Commons IO 2.6 (requires JDK 1.7+):http://commons.apache.org/proper/commons-io/download_io.cgi
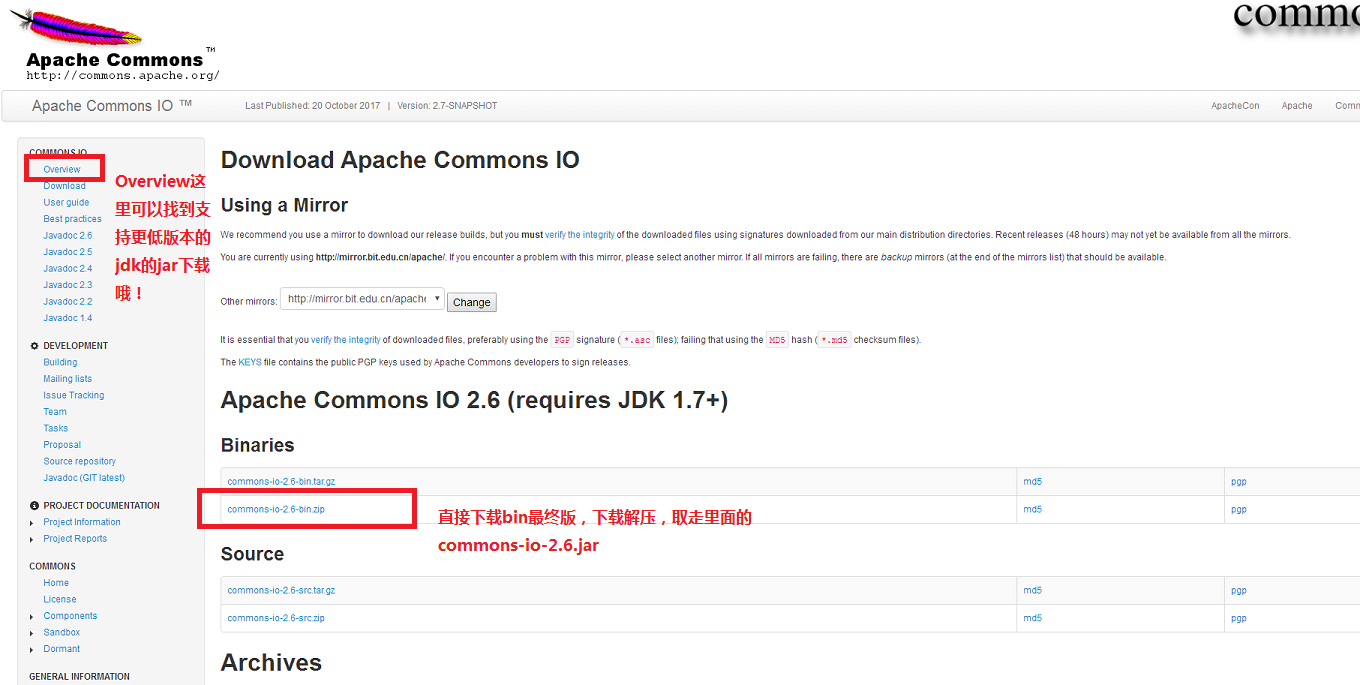
Apache Commons FileUpload 1.3.3 (requires Java 1.5 or later):http://commons.apache.org/proper/commons-fileupload/download_fileupload.cgi

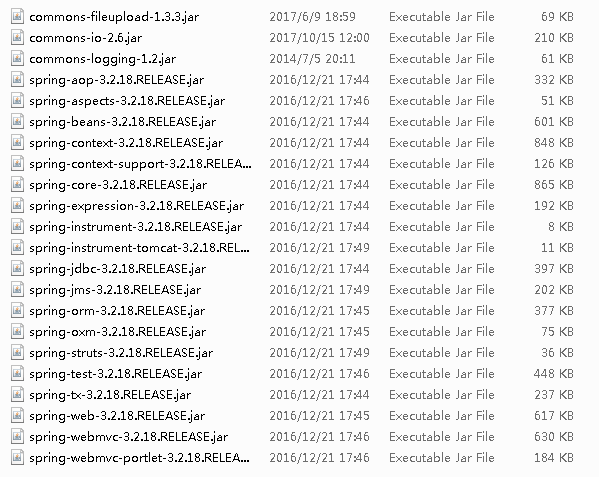
下载之后解压,取走里面的commons-io-2.6.jar和commons-fileupload-1.3.3.jar放到你的网站project下的WEB-INF\lib里面,lib文件夹最终应该有的包,如下图所示:
这就配置完毕了
好吧,我也不知道为何SpringMVC不将这2个这么重要和常用的jar包都不和自己的Spring捏在一起,只能自己配一下咯!
二、制作过程
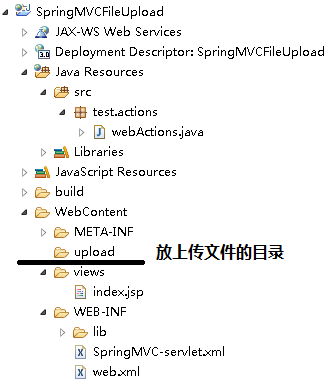
1、目录结构和《【SpringMVC】Helloworld》(点击打开链接)可以说是几乎完全一样。只是多了一个upload文件夹用来放上传文件。
然后web.xml也做了点小修改,所有action都加了个.html后缀,伪静态。具体见《【SpringMVC】指明actions的后缀》(点击打开链接),这不是本文的重点。
<?xml version="1.0" encoding="UTF-8"?>
<web-app xmlns:xsi="http://www.w3.org/2001/XMLSchema-instance"
	xmlns="http://java.sun.com/xml/ns/javaee"
	xsi:schemaLocation="http://java.sun.com/xml/ns/javaee http://java.sun.com/xml/ns/javaee/web-app_3_0.xsd"
	version="3.0">
	<servlet>
		<servlet-name>SpringMVC</servlet-name>
		<servlet-class>org.springframework.web.servlet.DispatcherServlet</servlet-class>
	</servlet>
	<servlet-mapping>
		<servlet-name>SpringMVC</servlet-name>
		<url-pattern>*.html</url-pattern>
	</servlet-mapping>
</web-app>
2、在SpringMVC-servlet.xml这个文件中,需要初始化multipartResolver这个系统自带的类,并且写入上传设置的信息。
<?xml version="1.0" encoding="UTF-8"?>
<beans xmlns="http://www.springframework.org/schema/beans"
	xmlns:xsi="http://www.w3.org/2001/XMLSchema-instance" xmlns:p="http://www.springframework.org/schema/p"
	xmlns:context="http://www.springframework.org/schema/context"
	xmlns:mvc="http://www.springframework.org/schema/mvc"
	xsi:schemaLocation="http://www.springframework.org/schema/beans
    http://www.springframework.org/schema/beans/spring-beans-2.5.xsd
    http://www.springframework.org/schema/context
    http://www.springframework.org/schema/context/spring-context-2.5.xsd
    http://www.springframework.org/schema/mvc http://www.springframework.org/schema/mvc/spring-mvc-3.0.xsd">
	<context:component-scan base-package="test.actions" />
	<bean
		class="org.springframework.web.servlet.view.InternalResourceViewResolver">
		<property name="prefix" value="/views/" />
		<property name="suffix" value=".jsp" />
	</bean>
	<!-- 上传文件的设置,maxUploadSize=-1,表示无穷大。 -->
	<bean id="multipartResolver"
		class="org.springframework.web.multipart.commons.CommonsMultipartResolver"
		p:defaultEncoding="UTF-8" p:maxUploadSize="-1" />
</beans>
3、之后在主页views/index.jsp写一个基本前端布局,打印提示信息的p、文件上传域还有一个放图片的img,很基本的前端知识,没什么好讲的。
<%@ page language="java" contentType="text/html; charset=UTF-8"
    pageEncoding="UTF-8"%>
<!DOCTYPE html PUBLIC "-//W3C//DTD HTML 4.01 Transitional//EN" "http://www.w3.org/TR/html4/loose.dtd">
<html>
<head>
	<meta http-equiv="Content-Type" content="text/html; charset=UTF-8">
	<title>主页</title>
</head>
<body>
	<p style="color:red">${message}</p>
	<form action="fileUpload.html" method="post" enctype="multipart/form-data">
		选择文件:<input type="file" name="file"><input type="submit" value="提交">
	</form>
	<img src="${upload_url}" />
</body>
</html>
4、最后关键是在webActions.java这个文件,具体见注释。
package test.actions;

import java.io.File;

import javax.servlet.http.HttpServletRequest;

import org.springframework.stereotype.Controller;
import org.springframework.ui.ModelMap;
import org.springframework.web.bind.annotation.RequestMapping;
import org.springframework.web.bind.annotation.RequestParam;
import org.springframework.web.multipart.MultipartFile;

@Controller
public class webActions {

	/* 跳转到主页 */
	@RequestMapping(value = "/index")
	public String index() {
		return "index";
	}

	/* 上传的action */
	@RequestMapping("/fileUpload")
	public String fileUpload(@RequestParam("file") MultipartFile file,
			HttpServletRequest request, ModelMap model) {
		// 判断文件是否为空
		if (!file.isEmpty()) {
			String prefix = file.getOriginalFilename().substring(
					file.getOriginalFilename().lastIndexOf(".") + 1);// 取文件的后缀名,取文件名是file.getOriginalFilename(),而不是file.getName(),那是取表单文件域的name,这里是file。
			if (prefix.equals("bmp") || prefix.equals("jpg")
					|| prefix.equals("jpeg") || prefix.equals("gif")
					|| prefix.equals("png")) {// 如果是图片
				try {
					String filePath = request.getSession().getServletContext()
							.getRealPath("/")
							+ "upload/" + file.getOriginalFilename();// 文件保存路径,先取出本工程在服务器的真实物理路径再补个upload
					file.transferTo(new File(filePath));// 转存文件
					model.addAttribute("message", file.getOriginalFilename()
							+ "文件上传成功!");// 提示信息
					String contextpath = request.getScheme() + "://"
							+ request.getServerName() + ":"
							+ request.getServerPort()
							+ request.getContextPath();// 取去当前的网站的url
					String upload_url = contextpath + "/upload/"
							+ file.getOriginalFilename();// 再补个/upload/文件名,则是文件在网络的真实url
					model.addAttribute("upload_url", upload_url);// 压给前端的img使用
				} catch (Exception e) {
					e.printStackTrace();
				}
			} else {
				model.addAttribute("message", "请上传图片!");
			}
		}
		return "index";
	}
}
至此,制作完成。