maven + spring + springMVC + Mybatis + Mysql实现增删改查
版本信息:
- eclipse: Neon.3 Release (4.6.3)
- java: JDK 8
- maven: 3.5.2
- spring-framework: 4.3.14.RELEASE
- mybatis: 3.4.6
- mysql:5.1.46
1、搭建环境
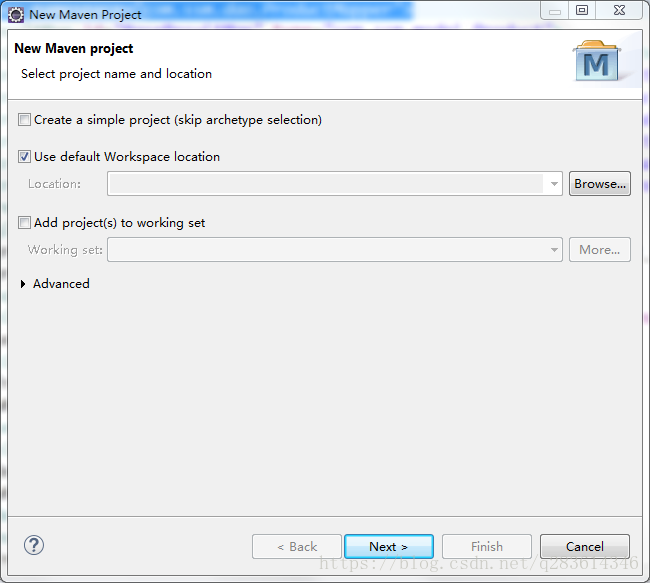
第一步:创建maven工程
- 选择“file”->”new”->”maven project”,如果没有,就点“other”
- 全默认,点“next”

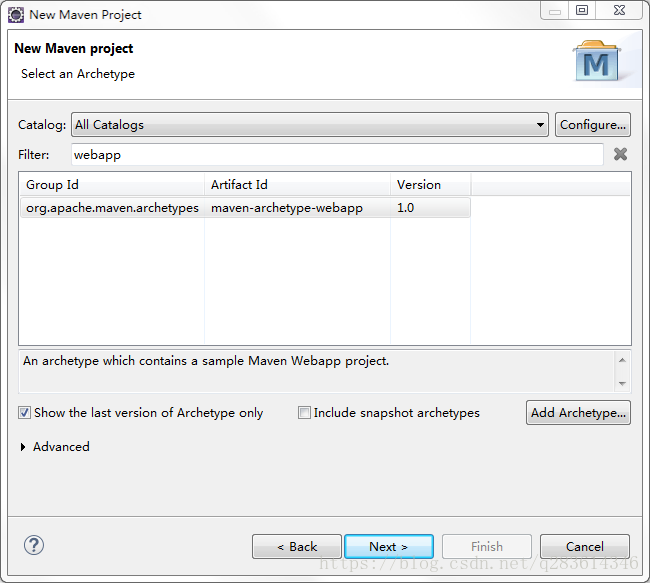
- filter中输入webapp,创建Maven Webapp project,点”next”
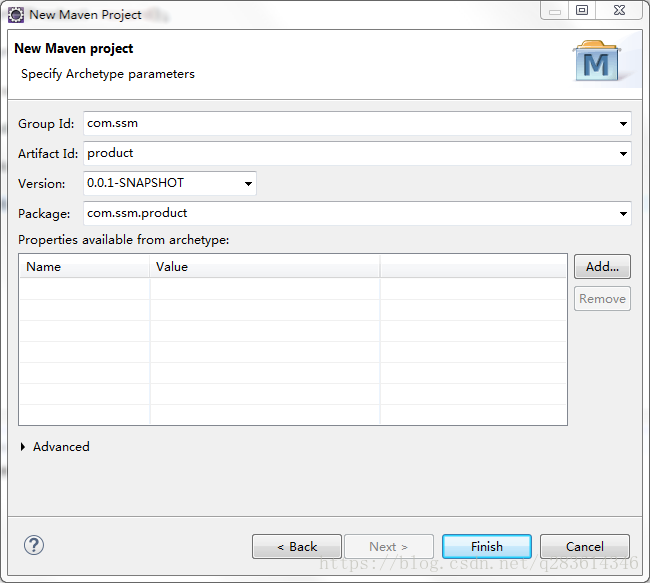
- GROUP id:随便填,最好是公司加项目名,如com.ssm
- Artifact id:项目名,如product
- 点“finish”,完成创建
第二步:修改maven工程默认配置
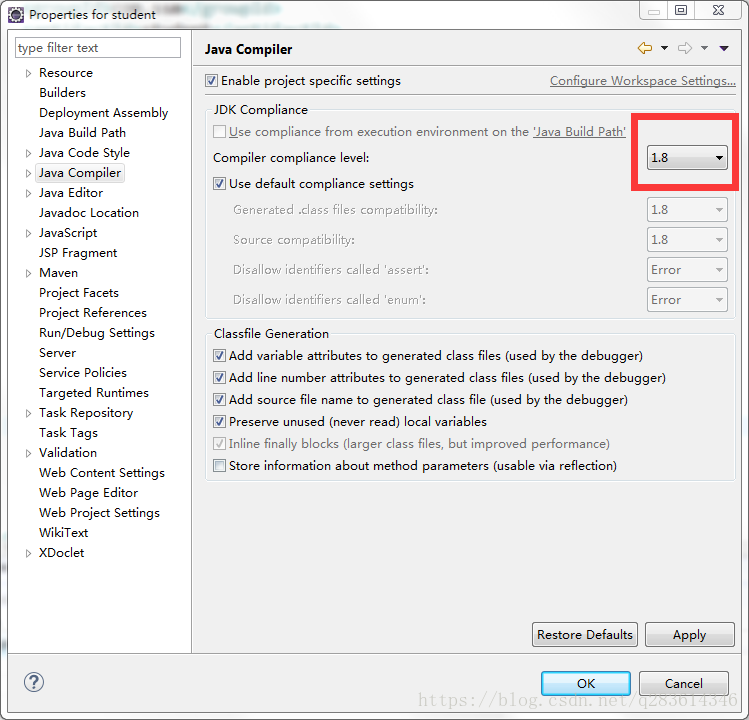
- 因为创建的maven工程默认jdk 1.5要修改为与eclipse一样,在项目product点右键,选“Properties”

- 选“java build path” ->选”JRE System Library[J2SE-1.5]” ->
点”edit”,修改为JDK1.8,如果没有就自行点“Install JRE”添加JDK,选完后点“finish”,点“OK”

- 完成后工程报错(如图):The superclass “javax.servlet.http.HttpServlet” was not found on the Java Build Path

- 原因是缺少javaee-api-8.0.jar包,版本如下:
- JDK 8: javaee-api-8.0.jar
- JDK 7: javaee-api-7.0.jar
JDK 6: javaee-api-6.0.jar
解决方法:在pom.xml中加入导入语句
<!-- 导入java ee jar 包 -->
        <dependency>
            <groupId>javax</groupId>
            <artifactId>javaee-api</artifactId>
            <version>8.0</version>
</dependency>- 修改java compiler 版本与JDK一致,如JDK 8改为1.8
- 完成后工程报错(如图):Java compiler level does not match the version of the installed Java project facet.
解决方法:右键工程,选“Properties”->”project facets”,如图,java改为1.8,Dynamic Web Module为3.1
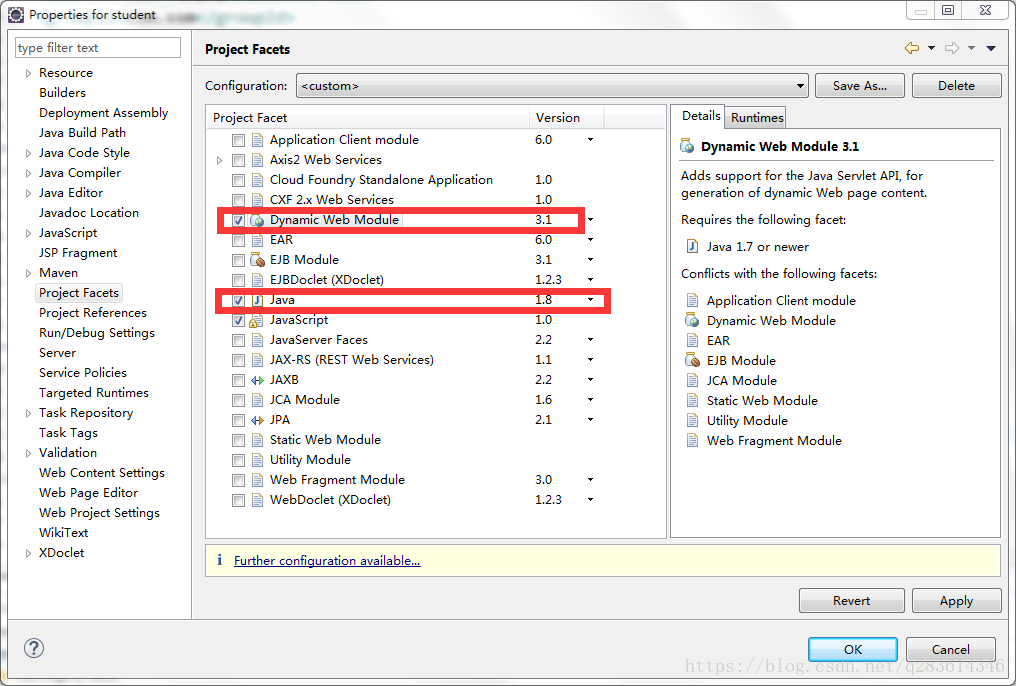
PS:如果Dynamic Web Module不能改,就选改java为1.8,然后点“apply”,然后把Dynamic Web Module前面的勾去掉,选了3.1后再勾上,然后点“OK”。如果还不行就进到项目的文件夹XXX\product.settings,找到org.eclipse.wst.common.project.facet.core.xml,如图修改

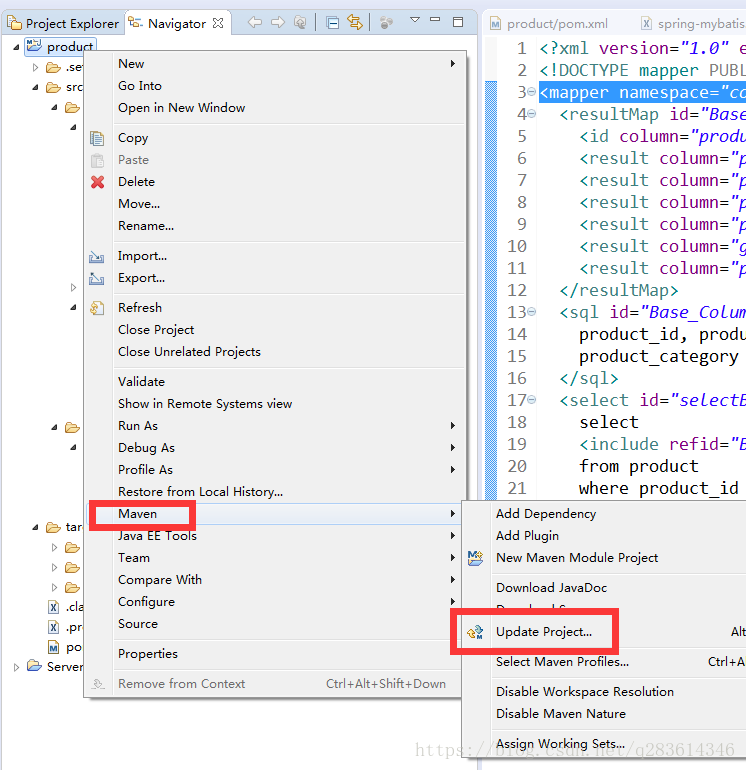
改完后,右键项目,选“maven”-“update projects”,如图:
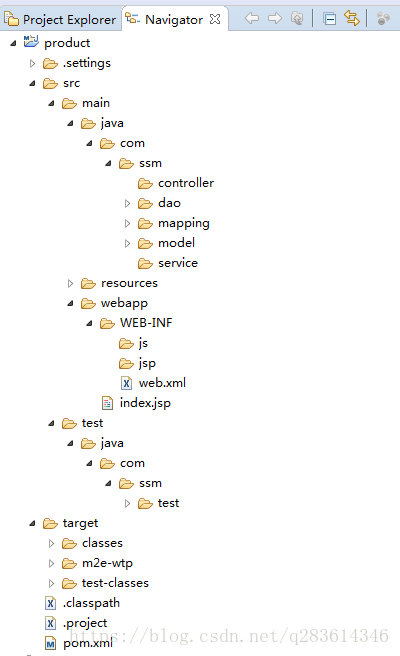
第二步:创建项目相关文件夹,最终目录结构
2、SSM文件配置
第一:pom.xml文件,maven管理jar包的配置文件。把项目相关的jar包引入
maven jar包查询网址:http://search.maven.org/#search
pom.xml
<project xmlns="http://maven.apache.org/POM/4.0.0" xmlns:xsi="http://www.w3.org/2001/XMLSchema-instance"
    xsi:schemaLocation="http://maven.apache.org/POM/4.0.0 http://maven.apache.org/maven-v4_0_0.xsd">
    <modelVersion>4.0.0</modelVersion>
    <groupId>com.ssm</groupId>
    <artifactId>product</artifactId>
    <packaging>war</packaging>
    <version>0.0.1-SNAPSHOT</version>
    <name>product Maven Webapp</name>
    <url>http://maven.apache.org</url>

    <properties>
        <project.build.sourceEncoding>UTF-8</project.build.sourceEncoding>
        <maven.compiler.source>1.8</maven.compiler.source>
        <maven.compiler.target>1.8</maven.compiler.target>

        <!-- spring版本号 -->
        <spring.version>4.3.14.RELEASE</spring.version>

        <!-- mybatis版本号 -->
        <mybatis.version>3.4.6</mybatis.version>

        <!-- log4j日志文件管理包版本 -->
        <slf4j.version>1.7.7</slf4j.version>
        <log4j.version>1.2.17</log4j.version>
    </properties>

    <dependencies>
        <dependency>
            <groupId>junit</groupId>
            <artifactId>junit</artifactId>
            <version>4.12</version>
            <scope>test</scope>
        </dependency>

        <!-- spring核心包 -->
        <dependency>
            <groupId>org.springframework</groupId>
            <artifactId>spring-core</artifactId>
            <version>${spring.version}</version>
        </dependency>

        <dependency>
            <groupId>org.springframework</groupId>
            <artifactId>spring-web</artifactId>
            <version>${spring.version}</version>
        </dependency>

        <dependency>
            <groupId>org.springframework</groupId>
            <artifactId>spring-oxm</artifactId>
            <version>${spring.version}</version>
        </dependency>

        <dependency>
            <groupId>org.springframework</groupId>
            <artifactId>spring-tx</artifactId>
            <version>${spring.version}</version>
        </dependency>

        <dependency>
            <groupId>org.springframework</groupId>
            <artifactId>spring-jdbc</artifactId>
            <version>${spring.version}</version>
        </dependency>

        <dependency>
            <groupId>org.springframework</groupId>
            <artifactId>spring-webmvc</artifactId>
            <version>${spring.version}</version>
        </dependency>

        <dependency>
            <groupId>org.springframework</groupId>
            <artifactId>spring-aop</artifactId>
            <version>${spring.version}</version>
        </dependency>

        <dependency>
            <groupId>org.springframework</groupId>
            <artifactId>spring-context-support</artifactId>
            <version>${spring.version}</version>
        </dependency>

        <dependency>
            <groupId>org.springframework</groupId>
            <artifactId>spring-test</artifactId>
            <version>${spring.version}</version>
        </dependency>

        <!-- mybatis核心包 -->
        <dependency>
            <groupId>org.mybatis</groupId>
            <artifactId>mybatis</artifactId>
            <version>${mybatis.version}</version>
        </dependency>

        <!-- mybatis/spring包 -->
        <dependency>
            <groupId>org.mybatis</groupId>
            <artifactId>mybatis-spring</artifactId>
            <version>1.3.2</version>
        </dependency>

        <!-- 导入java ee jar 包 -->
        <dependency>
            <groupId>javax</groupId>
            <artifactId>javaee-api</artifactId>
            <version>8.0</version>
        </dependency>

        <!-- 导入Mysql数据库链接jar包 -->
        <dependency>
            <groupId>mysql</groupId>
            <artifactId>mysql-connector-java</artifactId>
            <version>5.1.46</version>
        </dependency>

        <!-- 导入dbcp的jar包,用来配置数据库 -->
        <dependency>
            <groupId>commons-dbcp</groupId>
            <artifactId>commons-dbcp</artifactId>
            <version>1.4</version>
        </dependency>

        <!-- JSTL标签类 -->
        <dependency>
            <groupId>jstl</groupId>
            <artifactId>jstl</artifactId>
            <version>1.2</version>
        </dependency>

        <!-- 日志文件管理包 -->
        <!-- log start -->
        <dependency>
            <groupId>log4j</groupId>
            <artifactId>log4j</artifactId>
            <version>${log4j.version}</version>
        </dependency>

        <!-- 格式化对象,方便输出日志 -->
        <dependency>
            <groupId>com.alibaba</groupId>
            <artifactId>fastjson</artifactId>
            <version>1.1.41</version>
        </dependency>

        <dependency>
            <groupId>org.slf4j</groupId>
            <artifactId>slf4j-api</artifactId>
            <version>${slf4j.version}</version>
        </dependency>

        <dependency>
            <groupId>org.slf4j</groupId>
            <artifactId>slf4j-log4j12</artifactId>
            <version>${slf4j.version}</version>
        </dependency>
        <!-- log end -->

        <!-- 映入JSON -->
        <dependency>
            <groupId>org.codehaus.jackson</groupId>
            <artifactId>jackson-mapper-asl</artifactId>
            <version>1.9.13</version>
        </dependency>

        <dependency>
            <groupId>com.fasterxml.jackson.core</groupId>
            <artifactId>jackson-core</artifactId>
            <version>2.8.5</version>
        </dependency>
        <dependency>
            <groupId>com.fasterxml.jackson.core</groupId>
            <artifactId>jackson-databind</artifactId>
            <version>2.8.5</version>
        </dependency>
        <dependency>
            <groupId>com.fasterxml.jackson.core</groupId>
            <artifactId>jackson-annotations</artifactId>
            <version>2.8.5</version>
        </dependency>

        <dependency>
            <groupId>javolution</groupId>
            <artifactId>javolution</artifactId>
            <version>5.5.1</version>
        </dependency>

        <!-- 上传组件包 -->
        <dependency>
            <groupId>commons-fileupload</groupId>
            <artifactId>commons-fileupload</artifactId>
            <version>1.3.1</version>
        </dependency>

        <dependency>
            <groupId>commons-io</groupId>
            <artifactId>commons-io</artifactId>
            <version>2.4</version>
        </dependency>

        <dependency>
            <groupId>commons-codec</groupId>
            <artifactId>commons-codec</artifactId>
            <version>1.9</version>
        </dependency>
    </dependencies>

    <build>
        <finalName>product</finalName>
    </build>
</project>
第二:数据库文件jdbc.properties
在/product/src/main/resources下创建文件jdbc.properties,内容如下:
#驱动及连接
driver=com.mysql.jdbc.Driver
url=jdbc:mysql://127.0.0.1/ssm?useSSL=false&characterEncoding=utf8
username=hqh
password=Mysql123
#定义初始连接数
initialSize=0
#定义最大连接数
maxActive=20
#定义最大空闲
maxIdle=20
#定义最小空闲
minIdle=1
#定义最长等待时间
maxWait=60000
第三:日志文件log4j.properties
在/product/src/main/resources下创建文件log4j.properties,内容如下:
log4j.rootLogger=INFO,Console,File
#定义日志输出目的地为控制台
log4j.appender.Console=org.apache.log4j.ConsoleAppender
log4j.appender.Console.Target=System.out
#可以灵活地指定日志输出格式,下面一行是指定具体的格式
log4j.appender.Console.layout = org.apache.log4j.PatternLayout
log4j.appender.Console.layout.ConversionPattern=[%c] - %m%n

#文件大小到达指定尺寸的时候产生一个新的文件
log4j.appender.File = org.apache.log4j.RollingFileAppender
#指定输出目录
log4j.appender.File.File = logs/ssm.log
#定义文件最大大小
log4j.appender.File.MaxFileSize = 10MB
# 输出所以日志,如果换成DEBUG表示输出DEBUG以上级别日志
log4j.appender.File.Threshold = ALL
log4j.appender.File.layout = org.apache.log4j.PatternLayout
log4j.appender.File.layout.ConversionPattern =[%p] [%d{yyyy-MM-dd HH\:mm\:ss}][%c]%m%n
第四:spring-mvc.xml配置,内容如下:
<?xml version="1.0" encoding="UTF-8"?>
<beans xmlns="http://www.springframework.org/schema/beans"
    xmlns:xsi="http://www.w3.org/2001/XMLSchema-instance" xmlns:p="http://www.springframework.org/schema/p"
    xmlns:context="http://www.springframework.org/schema/context"
    xmlns:mvc="http://www.springframework.org/schema/mvc"
    xsi:schemaLocation="http://www.springframework.org/schema/beans
    http://www.springframework.org/schema/beans/spring-beans-3.1.xsd
    http://www.springframework.org/schema/context
    http://www.springframework.org/schema/context/spring-context-3.1.xsd
    http://www.springframework.org/schema/mvc
    http://www.springframework.org/schema/mvc/spring-mvc-4.0.xsd">

    <!-- 自动扫描该包,使SpringMVC认为包下用了@controller注解的类是控制器 -->
    <context:component-scan base-package="com.ssm.controller" />

    <!-- 扩充了注解驱动,可以将请求参数绑定到控制器参数 -->
    <mvc:annotation-driven/>

    <!-- 静态资源处理css js imgs -->
    <mvc:resources location="/resources/**" mapping="/resources"/>
    <mvc:resources location="/WEB-INF/js/" mapping="/js/**"></mvc:resources>

    <!--避免IE执行AJAX时,返回JSON出现下载文件 -->
    <bean id="mappingJacksonHttpMessageConverter"
        class="org.springframework.http.converter.json.MappingJackson2HttpMessageConverter">
        <property name="supportedMediaTypes">
            <list>
                <value>text/html;charset=UTF-8</value>
            </list>
        </property>
    </bean>

    <!-- 启动SpringMVC的注解功能,完成请求和注解POJO的映射 -->
    <bean
        class="org.springframework.web.servlet.mvc.annotation.AnnotationMethodHandlerAdapter">
        <property name="messageConverters">
            <list>
                <ref bean="mappingJacksonHttpMessageConverter" /> <!-- JSON转换器 -->
            </list>
        </property>
    </bean>

    <!-- 配置文件上传,如果没有使用文件上传可以不用配置,当然如果不配,那么配置文件中也不必引入上传组件包 -->
    <bean id="multipartResolver"
        class="org.springframework.web.multipart.commons.CommonsMultipartResolver">
        <!-- 默认编码 -->
        <property name="defaultEncoding" value="utf-8" />
        <!-- 文件大小最大值 -->
        <property name="maxUploadSize" value="10485760000" />
        <!-- 内存中的最大值 -->
        <property name="maxInMemorySize" value="40960" />
        <!-- 启用是为了推迟文件解析,以便捕获文件大小异常 -->
        <property name="resolveLazily" value="true"/>
    </bean>

    <!-- 配置ViewResolver 。可用多个ViewResolver 。使用order属性排序。 InternalResourceViewResolver 放在最后-->
    <bean id="contentNegotiationManager"  class="org.springframework.web.accept.ContentNegotiationManagerFactoryBean">
       <property name="favorParameter" value="true"/>
       <property name="parameterName" value="format"/>
       <property name="ignoreAcceptHeader" value="false"/>
       <property name="mediaTypes">
           <value>
                json=application/json
                xml=application/xml
                html=text/html
            </value>
       </property>
       <property name="defaultContentType" value="text/html"/>
    </bean>

    <!-- 定义跳转的文件的前后缀 ,视图模式配置-->
    <bean class="org.springframework.web.servlet.view.InternalResourceViewResolver">
        <!-- 这里的配置我的理解是自动给后面action的方法return的字符串加上前缀和后缀,变成一个 可用的url地址 -->
        <property name="prefix" value="/WEB-INF/jsp/" />
        <property name="suffix" value=".jsp" />
    </bean>
</beans>
第五:spring-mybatis.xml,内容如下:
<?xml version="1.0" encoding="UTF-8"?>
<beans xmlns="http://www.springframework.org/schema/beans"
    xmlns:xsi="http://www.w3.org/2001/XMLSchema-instance" xmlns:p="http://www.springframework.org/schema/p"
    xmlns:context="http://www.springframework.org/schema/context"
    xmlns:mvc="http://www.springframework.org/schema/mvc"
    xmlns:aop="http://www.springframework.org/schema/aop"
    xmlns:tx="http://www.springframework.org/schema/tx"
    xsi:schemaLocation="http://www.springframework.org/schema/beans
    http://www.springframework.org/schema/beans/spring-beans-3.1.xsd
    http://www.springframework.org/schema/context
    http://www.springframework.org/schema/context/spring-context-3.1.xsd
    http://www.springframework.org/schema/tx
    http://www.springframework.org/schema/tx/spring-tx.xsd
    http://www.springframework.org/schema/aop
    http://www.springframework.org/schema/aop/spring-aop.xsd
    http://www.springframework.org/schema/mvc
    http://www.springframework.org/schema/mvc/spring-mvc-4.0.xsd">
    <!-- 自动扫描 -->
    <context:component-scan base-package="com.ssm" />

    <!-- 引入配置文件 -->
    <bean id="propertyConfigurer"
        class="org.springframework.beans.factory.config.PropertyPlaceholderConfigurer">
        <property name="location" value="classpath:jdbc.properties" />
    </bean>

    <bean id="dataSource" class="org.apache.commons.dbcp.BasicDataSource" destroy-method="close">
        <property name="driverClassName" value="${driver}" />
        <property name="url" value="${url}" />
        <property name="username" value="${username}" />
        <property name="password" value="${password}" />

        <!-- 初始化连接大小 -->
        <property name="initialSize" value="${initialSize}"></property>

        <!-- 连接池最大数量 -->
        <property name="maxActive" value="${maxActive}"></property>

        <!-- 连接池最大空闲 -->
        <property name="maxIdle" value="${maxIdle}"></property>

        <!-- 连接池最小空闲 -->
        <property name="minIdle" value="${minIdle}"></property>

        <!-- 获取连接最大等待时间 -->
        <property name="maxWait" value="${maxWait}"></property>

        <!-- 配置间隔多久才进行一次检测,检测需要关闭的空闲连接,单位是毫秒 -->
        <property name="timeBetweenEvictionRunsMillis" value="60000" />

        <!-- 配置一个连接在池中最小生存的时间,单位是毫秒 -->
        <property name="minEvictableIdleTimeMillis" value="300000" />

        <property name="validationQuery" value="SELECT 1" />
        <property name="testOnBorrow" value="true"/>
    </bean>

    <!-- spring和MyBatis完美整合,不需要mybatis的配置映射文件 -->
    <bean id="sqlSessionFactory" class="org.mybatis.spring.SqlSessionFactoryBean">
        <property name="dataSource" ref="dataSource" />
        <!-- 自动扫描mapping.xml文件 -->
        <property name="mapperLocations" value="classpath:com/ssm/mapping/*.xml"></property>
    </bean>

    <!-- DAO接口所在包名,Spring会自动查找其下的类 -->
    <bean class="org.mybatis.spring.mapper.MapperScannerConfigurer">
        <property name="basePackage" value="com.ssm.dao" />
        <property name="sqlSessionFactoryBeanName" value="sqlSessionFactory"></property>
    </bean>

    <!-- (事务管理)transaction manager, use JtaTransactionManager for global tx -->
    <bean id="transactionManager"
        class="org.springframework.jdbc.datasource.DataSourceTransactionManager">
        <property name="dataSource" ref="dataSource" />
    </bean>

    <!-- 开启注解进行事务管理   transaction-manager:引用上面定义的事务管理器-->
    <tx:annotation-driven transaction-manager="transactionManager"/>

</beans>
第六:web.xml,内容如下:
<?xml version="1.0" encoding="UTF-8"?>
<web-app xmlns="http://xmlns.jcp.org/xml/ns/javaee"
      xmlns:xsi="http://www.w3.org/2001/XMLSchema-instance"
      xsi:schemaLocation="http://xmlns.jcp.org/xml/ns/javaee http://xmlns.jcp.org/xml/ns/javaee/web-app_3_1.xsd"
      version="3.1">
  <display-name>ArchetypeCreatedWebApplication</display-name>
  <filter>
    <filter-name>encodingFilter</filter-name>
    <filter-class>org.springframework.web.filter.CharacterEncodingFilter</filter-class>
    <async-supported>true</async-supported>
    <init-param>
      <param-name>encoding</param-name>
      <param-value>UTF-8</param-value>
    </init-param>
  </filter>
  <filter-mapping>
    <filter-name>encodingFilter</filter-name>
    <url-pattern>/*</url-pattern>
  </filter-mapping>
  <listener>
    <listener-class>org.springframework.web.context.ContextLoaderListener</listener-class>
  </listener>
  <context-param>
    <param-name>contextConfigLocation</param-name>
    <param-value>classpath:spring-mybatis.xml</param-value>
  </context-param>
  <listener>
    <listener-class>org.springframework.web.util.IntrospectorCleanupListener</listener-class>
  </listener>
  <servlet>
    <servlet-name>SpringMVC</servlet-name>
    <servlet-class>org.springframework.web.servlet.DispatcherServlet</servlet-class>
    <init-param>
      <param-name>contextConfigLocation</param-name>
      <param-value>classpath:spring-mvc.xml</param-value>
    </init-param>
    <load-on-startup>1</load-on-startup>
    <async-supported>true</async-supported>
  </servlet>
  <servlet-mapping>
    <servlet-name>SpringMVC</servlet-name>
    <url-pattern>/</url-pattern>
  </servlet-mapping>
  <welcome-file-list>
    <welcome-file>/index.jsp</welcome-file>
  </welcome-file-list>
</web-app>
3、创建数据库表及mybatis的dao,mapping,model
product表创建语句
CREATE TABLE
product
(
product_id VARCHAR(20) NOT NULL,
product_name VARCHAR(20),
product_price DECIMAL(18,2),
product_company VARCHAR(60),
product_area VARCHAR(60),
guarantee_period VARCHAR(20),
product_category VARCHAR(20),
PRIMARY KEY (product_id)
)
ENGINE=InnoDB DEFAULT CHARSET=utf8;
--测试数据
INSERT INTO product (product_id, product_name, product_price, product_company, product_area, guarantee_period, product_category)
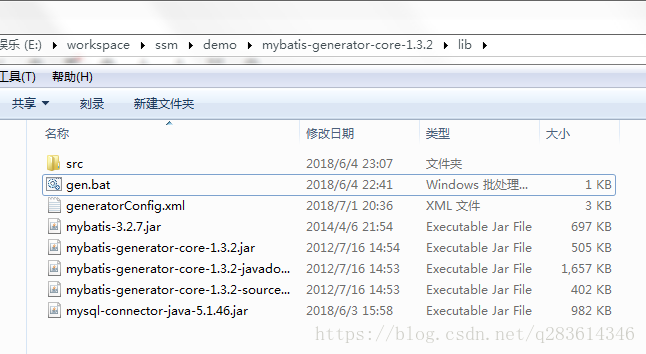
VALUES ('1', '东美特饮', 3.50, '鼓捣鼓捣食品有限公司', '广东省广州', '12个月', '饮料');使用mybatis代码生成工具生成dao,mapping,model,下载mybatis-generator-core-1.3.2,解压后打开generatorConfig.xml,配置如下:
<?xml version="1.0" encoding="UTF-8"?>
<!DOCTYPE generatorConfiguration
PUBLIC "-//mybatis.org//DTD MyBatis Generator Configuration 1.0//EN"
"http://mybatis.org/dtd/mybatis-generator-config_1_0.dtd">
<generatorConfiguration>
<!-- 数据库驱动 -->
<classPathEntry location="mysql-connector-java-5.1.46.jar"/>
<context id="mysql" targetRuntime="MyBatis3">
<commentGenerator>
<property name="suppressDate" value="true"/>
<!-- 是否去除自动生成的注释 true:是 : false:否 -->
<property name="suppressAllComments" value="true"/>
</commentGenerator>
<!--数据库链接URL,用户名、密码 -->
<jdbcConnection driverClass="com.mysql.jdbc.Driver"
connectionURL="jdbc:mysql://127.0.0.1/ssm?autoReconnect=true&useUnicode=true&characterEncoding=utf8&useSSL=false"
userId="hqh" password="Mysql123">
</jdbcConnection>
<javaTypeResolver>
<property name="forceBigDecimals" value="false"/>
</javaTypeResolver>
<!-- 生成模型的包名和位置 -->
<javaModelGenerator targetPackage="com.ssm.model" targetProject="src">
<property name="enableSubPackages" value="true"/>
<property name="trimStrings" value="true"/>
</javaModelGenerator>
<!-- 生成映射文件的包名和位置 -->
<sqlMapGenerator targetPackage="com.ssm.mapping" targetProject="src">
<property name="enableSubPackages" value="true"/>
</sqlMapGenerator>
<!-- 生成DAO的包名和位置 -->
<javaClientGenerator type="XMLMAPPER" targetPackage="com.ssm.dao" targetProject="src">
<property name="enableSubPackages" value="true"/>
</javaClientGenerator>
<!-- 要生成的表 tableName是数据库中的表名或视图名 domainObjectName是实体类名 -->
<table tableName="product" domainObjectName="Product" enableCountByExample="false" enableUpdateByExample="false"
enableDeleteByExample="false" enableSelectByExample="false" selectByExampleQueryId="false">
<property name="useActualColumnNames" value="false"/>
</table>
</context>
</generatorConfiguration>新建一个gen.bat文件,内容如下:
java -jar mybatis-generator-core-1.3.2.jar -configfile generatorConfig.xml -overwritemybatis-generator-core-1.3.2目录如下:
双击gen.bat文件,生成product表的dao,mapping,model,然后把src下东西复制到工程的dao,mapping,model包下,
把dao下的ProductMapper.java改为IProductDao.java(也可以不改)
如图:
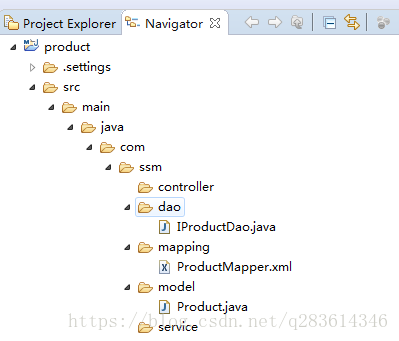
接着修改ProductMapper.xml的
<mapper namespace="com.ssm.dao.ProductMapper">改为
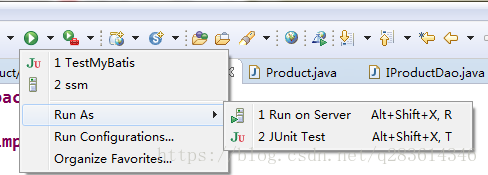
<mapper namespace="com.ssm.dao.IProductDao">测试一下工程的配置是否正确:在test下面建一个TestMybatis.java,内容如下:
package com.ssm.test;

import javax.annotation.Resource;

import org.apache.log4j.Logger;
import org.junit.Test;
import org.junit.runner.RunWith;
import org.springframework.test.context.ContextConfiguration;
import org.springframework.test.context.junit4.SpringJUnit4ClassRunner;

import com.ssm.dao.IProductDao;
import com.ssm.model.Product;

@RunWith(SpringJUnit4ClassRunner.class)
@ContextConfiguration(locations = { "classpath:spring-mybatis.xml" })
public class TestMyBatis {
    private static Logger logger = Logger.getLogger(TestMyBatis.class);

    @Resource
    private IProductDao dao = null;

    @Test
    public void test1() {
        Product product = dao.selectByPrimaryKey("1");
        logger.info("select product = " + product.toString());
    }
}
点击“run as” ->”junit test”
运行结果,能把数据库的记录查出来了说明配置正确,如下:

4、运用springMVC实现查询功能
第一步:新建service包,创建IProductService类,如下:
package com.ssm.service;

import java.util.List;

import org.apache.ibatis.annotations.Param;

import com.ssm.model.Product;

public interface IProductService {
    int deleteByPrimaryKey(String productId);

    int insert(Product record);

    int insertSelective(Product record);

    Product selectByPrimaryKey(String productId);

    // 指定mybatis参数名,当productId为空时查所有,mapping中用到
    List<Product> findProductList(@Param("productId")String productId);

    int updateByPrimaryKeySelective(Product record);

    int updateByPrimaryKey(Product record);
}
同时把findProductList方法加到IProductDao中
// 指定mybatis参数名,当productId为空时查所有,mapping中用到
List<Product> findProductList(@Param("productId")String productId);
第二步:创建IProductService实现类ProductServiceImpl,位于service.impl包下
package com.ssm.service.impl;

import java.util.List;

import javax.annotation.Resource;

import org.springframework.stereotype.Service;

import com.ssm.dao.IProductDao;
import com.ssm.model.Product;
import com.ssm.service.IProductService;

@Service("productService")
public class ProductServiceImpl implements IProductService {
    // 定义DAO
    @Resource
    private IProductDao productDao = null;

    @Override
    public int deleteByPrimaryKey(String productId) {
        return productDao.deleteByPrimaryKey(productId);
    }

    @Override
    public int insert(Product record) {
        return productDao.insert(record);
    }

    @Override
    public int insertSelective(Product record) {
        return productDao.insertSelective(record);
    }

    @Override
    public Product selectByPrimaryKey(String productId) {
        return productDao.selectByPrimaryKey(productId);
    }

    @Override
    public List<Product> findProductList(String productId) {
        return productDao.findProductList(productId);
    }

    @Override
    public int updateByPrimaryKeySelective(Product record) {
        return productDao.updateByPrimaryKeySelective(record);
    }

    @Override
    public int updateByPrimaryKey(Product record) {
        return productDao.updateByPrimaryKey(record);
    }
}
第三步:在ProductMapper.xml中增加findProductList对应的配置
<select id="findProductList" resultMap="BaseResultMap">
    select
    <include refid="Base_Column_List" />
    from product
    <if test="productId != null and productId !=''" >
         where product_id = #{productId,jdbcType=VARCHAR}
    </if>
</select>
第四步:编写查询的controller,在controller包下创建ProductController类
package com.ssm.controller;

import java.util.List;

import javax.annotation.Resource;

import org.springframework.stereotype.Controller;
import org.springframework.ui.ModelMap;
import org.springframework.web.bind.annotation.RequestMapping;
import org.springframework.web.bind.annotation.RequestMethod;

import com.ssm.model.Product;
import com.ssm.service.IProductService;

@Controller
@RequestMapping("/find")
public class ProductController {
    @Resource
    private IProductService productService = null;

    /**
     * 查询产品列表
     * @param product
     * @param model
     * @return
     */
    @RequestMapping(value="/list", method=RequestMethod.GET)
    public String findProductList(@ModelAttribute("product")Product product, ModelMap model) {
        List<Product> productLists = productService.findProductList(null);
        model.addAttribute("productLists", productLists);
        return "productList";
    }
}
在WEB-INF/jsp下创建productList.jsp,需要引入jstl和springMVC的标签,如图:
<%@ taglib prefix="c" uri="http://java.sun.com/jsp/jstl/core"%>
<%@ taglib uri="http://www.springframework.org/tags/form" prefix="form"%>
productList.jsp
<?xml version="1.0" encoding="UTF-8" ?>
<%@ page language="java" contentType="text/html; charset=UTF-8"
    pageEncoding="UTF-8"%>
<%@ taglib prefix="c" uri="http://java.sun.com/jsp/jstl/core"%>
<%@ taglib uri="http://www.springframework.org/tags/form" prefix="form"%>
<!DOCTYPE html PUBLIC "-//W3C//DTD XHTML 1.0 Transitional//EN" "http://www.w3.org/TR/xhtml1/DTD/xhtml1-transitional.dtd">
<html xmlns="http://www.w3.org/1999/xhtml">
<head>
<meta http-equiv="Content-Type" content="text/html; charset=UTF-8" />
<title>产品管理</title>
</head>
<body>
    <h2>产品列表</h2>
    <div id="flushDIV">
        <table border="1" cellpadding="10" cellspacing="0">
            <tr>
                <th>产品编号</th>
                <th>产品名称</th>
                <th>单价</th>
                <th>生产商</th>
                <th>产地</th>
                <th>保质期</th>
                <th>类别</th>
            </tr>
            <c:forEach items="${productLists}" var="product">
                <tr>
                    <td>${product.productId}</td>
                    <td>${product.productName}</td>
                    <td>${product.productPrice}</td>
                    <td>${product.productCompany}</td>
                    <td>${product.productArea}</td>
                    <td>${product.guaranteePeriod}</td>
                    <td>${product.productCategory}</td>
                </tr>
            </c:forEach>
        </table>
    </div>
</body>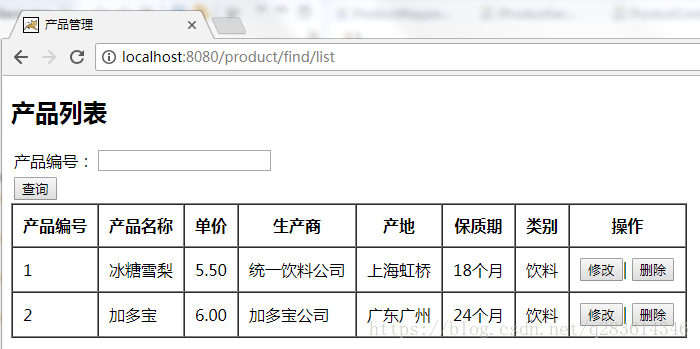
</html>第五步:把工程放到tomcat中,打开浏览器输入地址:http://localhost:8080/product/find/list
出现以下结果,说明配置全部正确,如图:

第六步:把查询条件框加上,按输入的产品编号查。利用AJAX发送异步请求生成一个HTML,然后再用div加载实现局部刷新。需要用到jquery-3.3.1.min.js和bootstrap.min.js,自行下载,然后放到WEB-INF/js下
- productList.jsp修改如下:
<?xml version="1.0" encoding="UTF-8" ?>
<%@ page language="java" contentType="text/html; charset=UTF-8"
    pageEncoding="UTF-8"%>
<%@ taglib prefix="c" uri="http://java.sun.com/jsp/jstl/core"%>
<%@ taglib uri="http://www.springframework.org/tags/form" prefix="form"%>

<!DOCTYPE html PUBLIC "-//W3C//DTD XHTML 1.0 Transitional//EN" "http://www.w3.org/TR/xhtml1/DTD/xhtml1-transitional.dtd">
<html xmlns="http://www.w3.org/1999/xhtml">
<head>
<meta http-equiv="Content-Type" content="text/html; charset=UTF-8" />

<script type="text/javascript" src="../js/jquery-3.3.1.min.js"></script>
<script type="text/javascript" src="../js/bootstrap.min.js"></script>

<title>产品管理</title>
</head>
<body>
    <h2>产品列表</h2>
    <form:form modelAttribute="product" id="productForm">
        <table>
            <tr>
                <td><form:label path="productId">产品编号:</form:label></td>
                <td><form:input path="productId" /></td>
            </tr>
        </table>
    </form:form>
    <table>
        <tr>
            <td colspan="2"><input type="button" onclick="query()" value="查询" /></td>
        </tr>
    </table>
    <div id="flushDIV">
        <table border="1" cellpadding="10" cellspacing="0">
            <tr>
                <th>产品编号</th>
                <th>产品名称</th>
                <th>单价</th>
                <th>生产商</th>
                <th>产地</th>
                <th>保质期</th>
                <th>类别</th>
                <th>操作</th>
            </tr>
            <c:forEach items="${productLists}" var="product">
                <tr>
                    <td>${product.productId}</td>
                    <td>${product.productName}</td>
                    <td>${product.productPrice}</td>
                    <td>${product.productCompany}</td>
                    <td>${product.productArea}</td>
                    <td>${product.guaranteePeriod}</td>
                    <td>${product.productCategory}</td>
                    <td>
                        <input type="button" onclick="showEditPage(${product.productId})" value="修改" />|
                        <input type="button" onclick="delProduct(${product.productId})" value="删除" />
                    </td>
                </tr>
            </c:forEach>
        </table>
    </div>

    <script type="text/javascript">
        function query() {
            $('#flushDIV').html("");
            var productId = $("#productId").val();
            $.ajax({
                type : "POST",
                url : "/product/find/query",
                data : {
                    "productId" : productId
                },
                dataType : "html", //返回值类型使用json的话也可以,但是需要在JS中编写迭代的html代码,如果格式样式
                cache : false,
                success : function(data) {
                    $('#flushDIV').html(data);
                },
                error : function(error) {
                    alert(error);
                }
            });
        }
    </script>
</body>
</html>- product.jsp,局部刷新table数据
<?xml version="1.0" encoding="utf-8" ?>
<%@ page language="java" contentType="text/html; charset=utf-8"
    pageEncoding="utf-8"%>
<!DOCTYPE html PUBLIC "-//W3C//DTD XHTML 1.0 Transitional//EN" "http://www.w3.org/TR/xhtml1/DTD/xhtml1-transitional.dtd">
<%@ taglib prefix="c" uri="http://java.sun.com/jsp/jstl/core"%>

<table border="1" cellpadding="10" cellspacing="0">
    <tr>
        <th>产品编号</th>
        <th>产品名称</th>
        <th>单价</th>
        <th>生产商</th>
        <th>产地</th>
        <th>保质期</th>
        <th>类别</th>
        <th>操作</th>
    </tr>
    <c:forEach items="${productLists}" var="product">
        <tr>
            <td>${product.productId}</td>
            <td>${product.productName}</td>
            <td>${product.productPrice}</td>
            <td>${product.productCompany}</td>
            <td>${product.productArea}</td>
            <td>${product.guaranteePeriod}</td>
            <td>${product.productCategory}</td>
            <td>
                <input type="button" onclick="showEditPage(${product.productId})" value="修改" />|
                <input type="button" onclick="delProduct(${product.productId})" value="删除" />
            </td>
        </tr>
    </c:forEach>
</table>- 在ProductController中添加query请求:
/**
* 按条件查
* @param request
* @param response
* @return
*/
@RequestMapping("/query")
public ModelAndView queryList(HttpServletRequest request, HttpServletResponse response) {
String productId = request.getParameter("productId");
List<Product> productLists = productService.findProductList(productId);
ModelAndView modelAndView = new ModelAndView();
modelAndView.addObject("productLists", productLists);
modelAndView.setViewName("product");
return modelAndView;
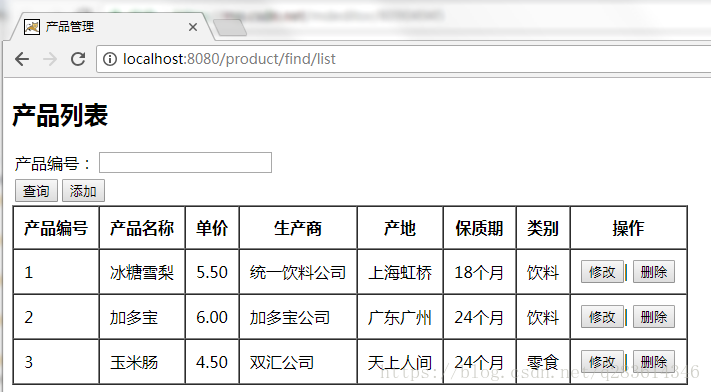
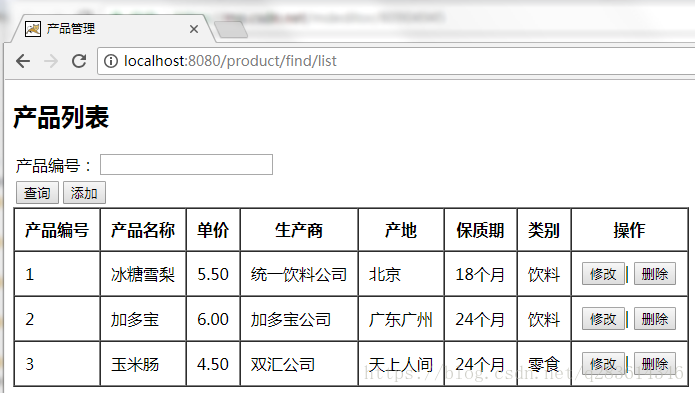
}- 以上内容完成后,在浏览器中输入:http://localhost:8080/product/find/list
- 显示以下界面:
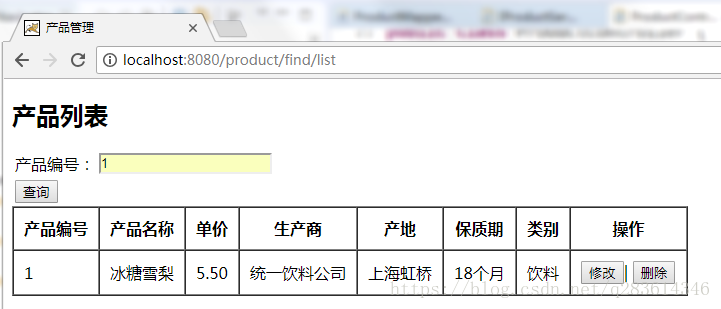
产品编号输入1,点“查询”,查出产品为1的记录:
查询功能已完成,下面进行添加功能。
5、实现添加功能
- 第一步:在productList.jsp中“查询”按钮下增加“添加”按钮,加完后如下:
<td colspan="2"><input type="button" onclick="query()" value="查询" /></td>
<td colspan="2"><input type="button" onclick="showAddPage()" value="添加" /></td>- productList.jsp中query()方法后面增加showAddPage()方法,用于打开新增页面,代码如下:
function showAddPage() {
    window.location = "/product/find/showAdd";
}- 在ProductController类中增加mapping(“/showAdd”)和/insert,代码如下:
   /**
     * 显示添加页面
     * @param product
     * @return
     */
    @RequestMapping(value="/showAdd", method=RequestMethod.GET)
    public String showAddPage(@ModelAttribute("product")Product product) {
        return "addProduct";
    }

    /**
     * 添加产品
     * @param product
     * @return
     */
    @RequestMapping(value="/insert", method=RequestMethod.POST)
    public String createProduct(@ModelAttribute("product")Product product) {
        productService.insert(product);
        return "redirect:list";
}- 在WEB-INF/jsp下增加addProduct.jsp文件,内容如下:
<?xml version="1.0" encoding="utf-8" ?>
<%@ page language="java" contentType="text/html; charset=utf-8"
    pageEncoding="utf-8"%>
<%@ taglib uri="http://www.springframework.org/tags/form" prefix="form"%>

<!DOCTYPE html PUBLIC "-//W3C//DTD XHTML 1.0 Transitional//EN" "http://www.w3.org/TR/xhtml1/DTD/xhtml1-transitional.dtd">
<html xmlns="http://www.w3.org/1999/xhtml">
<head>
<meta http-equiv="Content-Type" content="text/html; charset=utf-8" />

<script type="text/javascript" src="../js/jquery-3.3.1.min.js"></script>
<script type="text/javascript" src="../js/bootstrap.min.js"></script>

<title>Insert title here</title>
</head>
<body>
    <h2>添加产品信息</h2>
    <form:form modelAttribute="product" id="productAddForm" action="/product/find/insert" method="post">
        <table>
            <tr>
                <td><form:label path="productId">产品编号:</form:label></td>
                <td><form:input path="productId" /></td>
            </tr>
            <tr>
                <td><form:label path="productName">产品名称:</form:label></td>
                <td><form:input path="productName" /></td>
            </tr>
            <tr>
                <td><form:label path="productPrice">单价:</form:label></td>
                <td><form:input path="productPrice" /></td>
            </tr>
            <tr>
                <td><form:label path="productCompany">生产商:</form:label></td>
                <td><form:input path="productCompany" /></td>
            </tr>
            <tr>
                <td><form:label path="productArea">产地:</form:label></td>
                <td><form:input path="productArea" /></td>
            </tr>
            <tr>
                <td><form:label path="guaranteePeriod">保质期:</form:label></td>
                <td><form:input path="guaranteePeriod" /></td>
            </tr>
            <tr>
                <td><form:label path="productCategory">类别:</form:label></td>
                <td><form:input path="productCategory" /></td>
            </tr>
            <tr>
                <td colspan="2"><input type="submit" value="提交" /></td>
            </tr>
        </table>
    </form:form>
</body>
</html>- 在浏览器中输入http://localhost:8080/product/find/list 如下:
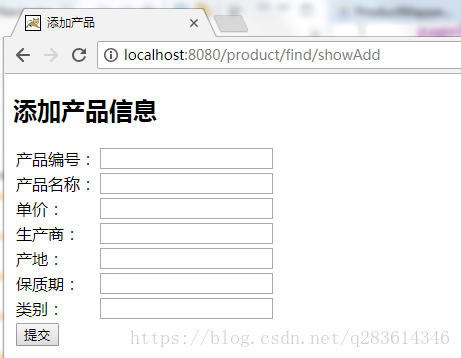
- 点“添加”,如下:
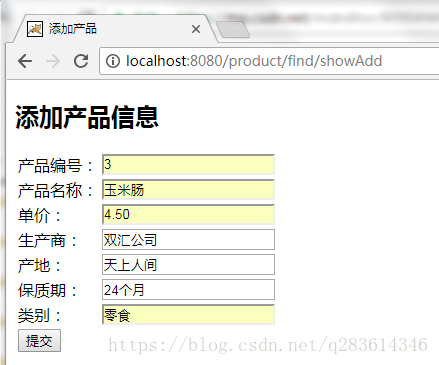
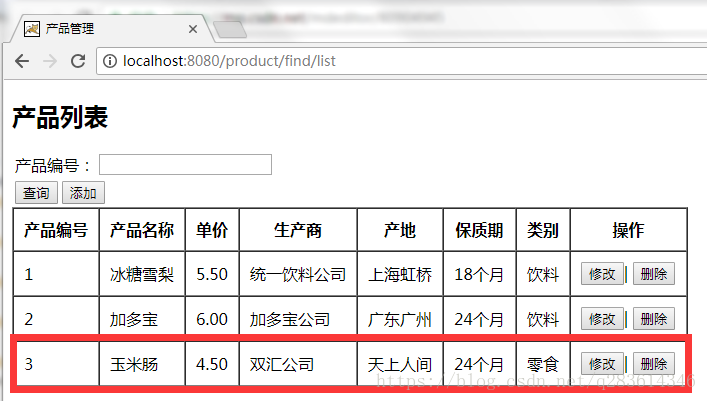
- 输入信息后点“提交”后会转到/list并显示刚才添加的产品,程序并未作任何的检验或异常处理

6、实现修改功能
- 在productList.jsp中添加showEditPage()方法,如下
function showEditPage(productId) {
    window.location = "/product/find/showEdit?productId=" + productId;
}- 在ProductController类中增加mapping(“/showEdit”)和/update,代码如下:
   /**
     * 显示修改页面
     * @param request
     * @param response
     * @return
     */
    @RequestMapping("/showEdit")
    public ModelAndView showEditPage(HttpServletRequest request, HttpServletResponse response) {
        String productId = request.getParameter("productId");
        Product product = productService.selectByPrimaryKey(productId);
        ModelAndView modelAndView = new ModelAndView();
        modelAndView.addObject("product", product);
        modelAndView.setViewName("editProduct");
        return modelAndView;
    }

    /**
     * 修改产品信息
     * @param product
     * @return
     */
    @RequestMapping(value="/update", method=RequestMethod.POST)
    public String update(@ModelAttribute("product")Product product) {
        productService.updateByPrimaryKey(product);
        return "redirect:list";
}- 在WEB-INF/jsp下增加editProduct.jsp文件,内容如下:
<?xml version="1.0" encoding="utf-8" ?>
<%@ page language="java" contentType="text/html; charset=utf-8"
    pageEncoding="utf-8"%>
<%@ taglib uri="http://www.springframework.org/tags/form" prefix="form"%>

<!DOCTYPE html PUBLIC "-//W3C//DTD XHTML 1.0 Transitional//EN" "http://www.w3.org/TR/xhtml1/DTD/xhtml1-transitional.dtd">
<html xmlns="http://www.w3.org/1999/xhtml">
<head>
<meta http-equiv="Content-Type" content="text/html; charset=utf-8" />

<script type="text/javascript" src="../js/jquery-3.3.1.min.js"></script>
<script type="text/javascript" src="../js/bootstrap.min.js"></script>

<title>修改产品</title>
</head>
<body>
    <h2>修改产品信息</h2>
    <form:form modelAttribute="product" id="productEditForm" action="/product/find/update" method="post">
        <table>
            <tr>
                <td><form:label path="productId">产品编号:</form:label></td>
                <td><form:input path="productId" value="${product.productId}" readonly="true"/></td>
            </tr>
            <tr>
                <td><form:label path="productName">产品名称:</form:label></td>
                <td><form:input path="productName" value="${product.productName}" /></td>
            </tr>
            <tr>
                <td><form:label path="productPrice">单价:</form:label></td>
                <td><form:input path="productPrice" value="${product.productPrice}" /></td>
            </tr>
            <tr>
                <td><form:label path="productCompany">生产商:</form:label></td>
                <td><form:input path="productCompany" value="${product.productCompany}" /></td>
            </tr>
            <tr>
                <td><form:label path="productArea">产地:</form:label></td>
                <td><form:input path="productArea" value="${product.productArea}" /></td>
            </tr>
            <tr>
                <td><form:label path="guaranteePeriod">保质期:</form:label></td>
                <td><form:input path="guaranteePeriod" value="${product.guaranteePeriod}" /></td>
            </tr>
            <tr>
                <td><form:label path="productCategory">类别:</form:label></td>
                <td><form:input path="productCategory" value="${product.productCategory}"/></td>
            </tr>
            <tr>
                <td colspan="2"><input type="submit" value="提交" /></td>
            </tr>
        </table>
    </form:form>
</body>
</html>- 在浏览器中输入http://localhost:8080/product/find/list 如下:
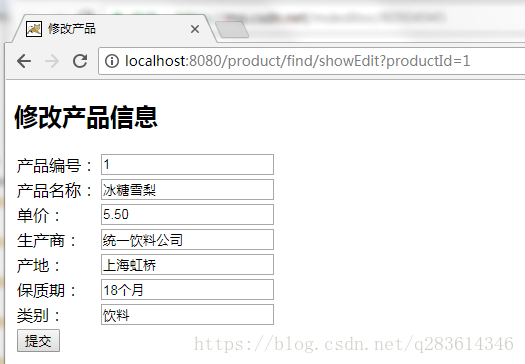
- 选产品编号为1的点“修改”,弹出修改页面,如下:
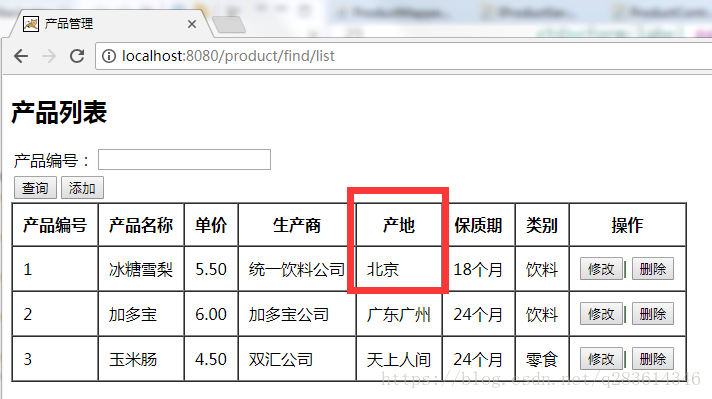
- 把产地改为“北京”,然后点“提交”,在/list会看到产品编号1的产地变为了“北京”,如下:
7、实现删除功能
- 在productList.jsp中添加delProduct()方法,如下
function delProduct(productId) {
    window.location = "/product/find/delete?productId=" + productId;
}- 在ProductController类中增加mapping(“/delete”),代码如下:
   /**
     * 删除产品信息
     * @param request
     * @param response
     * @return
     */
    @RequestMapping(value="/delete", method=RequestMethod.GET)
    public String delete(HttpServletRequest request, HttpServletResponse response) {
        String productId = request.getParameter("productId");
        productService.deleteByPrimaryKey(productId);
        return "redirect:list";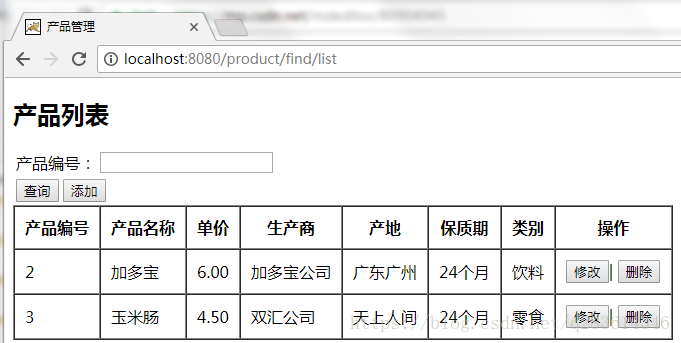
}- 在浏览器中输入http://localhost:8080/product/find/list 如下:
- 选产品编号为1的产品点“删除”,页面刷新后发现产品编号为1的已删除,如下:
文章到此结束。
demo下载:这里写链接内容