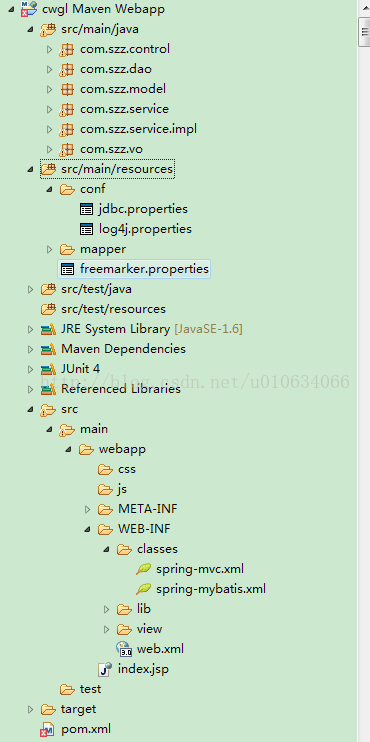
在公司实习的时候 公司用的是 MAVEN_SPRING+SPRINGMVC+MYBATIS+FREEMARKER 框架; 用了2个月;就想自己来整合一下框架;
一:
在整合的时候我也参考了很多博文;但是都不一样,比如配置文件,我就不知道怎么样子分才好;有人分2个,有人分3个之类的;这里我分了两个配置文件
一个是;spring-mvc.xml 这个就专门用来配置springmvc的; 一个是spring-mybatis.xml;用来整合spring和mybatis;
整体如下:
二,maven引入相应的jar包;
<project xmlns="http://maven.apache.org/POM/4.0.0" xmlns:xsi="http://www.w3.org/2001/XMLSchema-instance"
  xsi:schemaLocation="http://maven.apache.org/POM/4.0.0 http://maven.apache.org/maven-v4_0_0.xsd">
  <modelVersion>4.0.0</modelVersion>
  <groupId>com.szz</groupId>
  <artifactId>cwgl</artifactId>
  <packaging>war</packaging>
  <version>0.0.1-SNAPSHOT</version>
  <name>cwgl Maven Webapp</name>
  <url>http://maven.apache.org</url>
  <dependencies>
    <dependency>
      <groupId>junit</groupId>
      <artifactId>junit</artifactId>
      <version>3.8.1</version>
      <scope>test</scope>
    </dependency>

       <!-- guava  maps.newhashmap() 用来方便出来hashmap -->
     <dependency>
      <groupId>com.google.guava</groupId>
      <artifactId>guava</artifactId>
      <version>15.0</version>
    </dependency>

    <dependency>
         <groupId>org.springframework</groupId>
         <artifactId>spring-web</artifactId>
         <version>3.0.5.RELEASE</version>
    </dependency>

	<dependency>
         <groupId>org.springframework</groupId>
        <artifactId>spring-webmvc</artifactId>
         <version>3.0.5.RELEASE</version>
     </dependency>

   <dependency>
       <groupId>mysql</groupId>
       <artifactId>mysql-connector-java</artifactId>
       <version>5.1.26</version>
	</dependency>

	<dependency>
	<groupId>org.springframework</groupId>
	<artifactId>spring-jdbc</artifactId>
	<version>4.1.4.RELEASE</version>
	</dependency>

	<!-- mybatis核心包 -->
     <dependency>
            <groupId>org.mybatis</groupId>
            <artifactId>mybatis</artifactId>
            <version>3.2.3</version>
        </dependency>


     <dependency>
      <groupId>org.mybatis</groupId>
      <artifactId>mybatis-spring</artifactId>
      <version>1.2.1</version>
    </dependency>


     <dependency>
			<groupId>org.freemarker</groupId>
			<artifactId>freemarker</artifactId>
			 <version>2.3.20</version>
		</dependency>


       <!-- 日志文件管理包 -->
        <!-- log start -->
        <dependency>
            <groupId>log4j</groupId>
            <artifactId>log4j</artifactId>
            <version>${log4j.version}</version>
        </dependency>


        <!-- 格式化对象,方便输出日志 -->
        <dependency>
            <groupId>com.alibaba</groupId>
            <artifactId>fastjson</artifactId>
            <version>1.1.41</version>
        </dependency>


        <dependency>
            <groupId>org.slf4j</groupId>
            <artifactId>slf4j-api</artifactId>
            <version>${slf4j.version}</version>
        </dependency>

        <dependency>
            <groupId>org.slf4j</groupId>
            <artifactId>slf4j-log4j12</artifactId>
            <version>${slf4j.version}</version>
        </dependency>
        <!-- log end -->

</dependencies>
  <build>
    <finalName>cwgl</finalName>
  </build>
</project>
三、整合Spring与MyBatis
这个文件就是用来完成spring和mybatis的整合的。这里面也没多少行配置,主要的就是自动扫描,自动注入,配置数据库。注释也很详细,大家看看就明白了。
spring-mybatis.xml
<?xml version="1.0" encoding="UTF-8"?>

<beans xmlns="http://www.springframework.org/schema/beans"
       xmlns:xsi="http://www.w3.org/2001/XMLSchema-instance"
       xmlns:p="http://www.springframework.org/schema/p"
       xmlns:context="http://www.springframework.org/schema/context"
       xmlns:mvc="http://www.springframework.org/schema/mvc"
       xmlns:jee="http://www.springframework.org/schema/jee"
       xmlns:aop="http://www.springframework.org/schema/aop"
       xmlns:tx="http://www.springframework.org/schema/tx"
       xsi:schemaLocation="
           http://www.springframework.org/schema/beans
           http://www.springframework.org/schema/beans/spring-beans.xsd
           http://www.springframework.org/schema/context
           http://www.springframework.org/schema/context/spring-context.xsd
           http://www.springframework.org/schema/mvc
           http://www.springframework.org/schema/mvc/spring-mvc.xsd
           http://www.springframework.org/schema/jee
           http://www.springframework.org/schema/jee/spring-jee.xsd
           http://www.springframework.org/schema/aop
           http://www.springframework.org/schema/aop/spring-aop.xsd
           http://www.springframework.org/schema/tx
           http://www.springframework.org/schema/tx/spring-tx.xsd">


      <!-- 自动扫描.. -->
    <context:component-scan base-package="com.szz" />

     <!-- 引入jdbc配置文件 -->
    <context:property-placeholder location="classpath:conf/jdbc.properties"/>


        <!--        配置DataSource数据源   配置mysql方式     -->
    <bean id="dataSource" class="org.springframework.jdbc.datasource.DriverManagerDataSource" >
        <property name="driverClassName" value="com.mysql.jdbc.Driver" />
        <property name="url" value="jdbc:mysql://localhost:3306/financial_m?characterEncoding=utf-8" />
        <property name="username" value="root" />
        <property name="password" value="123456" />
    </bean>

   <!-- mybatis文件配置,扫描所有mapper文件,不需要mybatis的配置映射文件; -->
	<bean id="sqlSessionFactory" class="org.mybatis.spring.SqlSessionFactoryBean">
		<property name="dataSource" ref="dataSource" />
	<!-- 自动扫描mapping.xml文件 -->
		<property name="mapperLocations" value="classpath:mapper/*.xml"></property>
	</bean>

  <!-- DAO接口所在包名,Spring会自动查找其下的类 -->
	 <bean class="org.mybatis.spring.mapper.MapperScannerConfigurer">
		<property name="basePackage" value="com.szz.dao" />
		<property name="sqlSessionFactoryBeanName" value="sqlSessionFactory"></property>
	</bean>

	 <!-- 对数据源进行事务管理 -->
	 <!--略 -->

</beans>
<?xml version="1.0" encoding="UTF-8"?>


<beans xmlns="http://www.springframework.org/schema/beans"
       xmlns:xsi="http://www.w3.org/2001/XMLSchema-instance"
       xmlns:p="http://www.springframework.org/schema/p"
       xmlns:context="http://www.springframework.org/schema/context"
       xmlns:mvc="http://www.springframework.org/schema/mvc"
       xmlns:jee="http://www.springframework.org/schema/jee"
       xmlns:aop="http://www.springframework.org/schema/aop"
       xmlns:tx="http://www.springframework.org/schema/tx"
       xsi:schemaLocation="
           http://www.springframework.org/schema/beans
           http://www.springframework.org/schema/beans/spring-beans.xsd
           http://www.springframework.org/schema/context
           http://www.springframework.org/schema/context/spring-context.xsd
           http://www.springframework.org/schema/mvc
           http://www.springframework.org/schema/mvc/spring-mvc.xsd
           http://www.springframework.org/schema/jee
           http://www.springframework.org/schema/jee/spring-jee.xsd
           http://www.springframework.org/schema/aop
           http://www.springframework.org/schema/aop/spring-aop.xsd
           http://www.springframework.org/schema/tx
           http://www.springframework.org/schema/tx/spring-tx.xsd">


<span style="white-space:pre">	</span>   <!-- 扫描controller(controller层注入) -->
<span style="white-space:pre">		</span><context:component-scan base-package="com.szz.control"></context:component-scan>

  <span style="white-space:pre">		</span> <context:annotation-config />
<span style="white-space:pre">		</span><mvc:annotation-driven />

<span style="white-space:pre">		</span><bean id="viewResolver" class="org.springframework.web.servlet.view.InternalResourceViewResolver">
<span style="white-space:pre">			</span><property name="prefix">
<span style="white-space:pre">				</span><value>/WEB-INF/view/</value>
<span style="white-space:pre">			</span></property>
<span style="white-space:pre">			</span><property name="suffix">
<span style="white-space:pre">				</span><value>.jsp</value>
<span style="white-space:pre">			</span></property>
<span style="white-space:pre">		</span></bean>
<span style="white-space:pre">	</span> </beans>
四、 Log4j的配置
为了方便调试,一般都会使用日志来输出信息,Log4j是Apache的一个开放源代码项目,通过使用Log4j,我们可以控制日志信息输送的目的地是控制台、文件、GUI组件,甚至是套接口服务器、NT的事件记录器、UNIX Syslog守护进程等;我们也可以控制每一条日志的输出格式;通过定义每一条日志信息的级别,我们能够更加细致地控制日志的生成过程。
Log4j的配置很简单,而且也是通用的,下面给出一个基本的配置,换到其他项目中也无需做多大的调整,如果想做调整或者想了解Log4j的各种配置,参看我转载的一篇博文,很详细:
http://blog.csdn.net/zhshulin/article/details/37937365
下面给出配置文件目录:
log4j.properties
[html] view plaincopyprint?在CODE上查看代码片派生到我的代码片
#定义LOG输出级别
log4j.rootLogger=INFO,Console,File
#定义日志输出目的地为控制台
log4j.appender.Console=org.apache.log4j.ConsoleAppender
log4j.appender.Console.Target=System.out
#可以灵活地指定日志输出格式,下面一行是指定具体的格式
log4j.appender.Console.layout = org.apache.log4j.PatternLayout
log4j.appender.Console.layout.ConversionPattern=[%c] - %m%n

#文件大小到达指定尺寸的时候产生一个新的文件
log4j.appender.File = org.apache.log4j.RollingFileAppender
#指定输出目录
log4j.appender.File.File = logs/ssm.log
#定义文件最大大小
log4j.appender.File.MaxFileSize = 10MB
# 输出所以日志,如果换成DEBUG表示输出DEBUG以上级别日志
log4j.appender.File.Threshold = ALL
log4j.appender.File.layout = org.apache.log4j.PatternLayout
log4j.appender.File.layout.ConversionPattern =[%p] [%d{yyyy-MM-dd HH\:mm\:ss}][%c]%m%n
利用MyBatis Generator自动创建代码
参考博文:http://blog.csdn.net/zhshulin/article/details/23912615
mapper.xml生成的文件;
<?xml version="1.0" encoding="UTF-8" ?>
<!DOCTYPE mapper PUBLIC "-//mybatis.org//DTD Mapper 3.0//EN" "http://mybatis.org/dtd/mybatis-3-mapper.dtd" >
<mapper namespace="com.szz.dao.IAdditionalDao" >
  <resultMap id="BaseResultMap" type="com.szz.model.Additional" >
    <id column="ID" property="id" jdbcType="INTEGER" />
    <result column="EmplID" property="emplid" jdbcType="INTEGER" />
    <result column="Totalincome" property="totalincome" jdbcType="DECIMAL" />
    <result column="percent" property="percent" jdbcType="REAL" />
    <result column="TotalEarn" property="totalearn" jdbcType="DECIMAL" />
    <result column="remark" property="remark" jdbcType="VARCHAR" />
  </resultMap>
  <sql id="Base_Column_List" >
    ID, EmplID, Totalincome, percent, TotalEarn, remark
  </sql>
  <select id="selectByPrimaryKey" resultMap="BaseResultMap" parameterType="java.lang.Integer" >
    select
    <include refid="Base_Column_List" />
    from additional
    where ID = #{id,jdbcType=INTEGER}
  </select>

 <!-- 自己添加的 -->
  <sql id="find_condition" >
  	<if test="condition !=null">
  	  <if test="condition.id != null" >
        and ID=#{condition.id}
      </if>
      <if test="condition.emplid != null" >
         and EmplID=#{condition.emplid}
      </if>
      <if test="condition.totalincome != null" >
       and Totalincome=#{condition.totalincome}
      </if>
      <if test="condition.percent != null" >
       and percent=#{condition.percent}
      </if>
      <if test="condition.totalearn != null" >
       and TotalEarn=#{condition.totalearn}
      </if>
      <if test="condition.remark != null" >
       and remark=#{condition.remark}
      </if>
     </if>
  </sql>

  <select id="find" resultMap="BaseResultMap" parameterType="java.util.Map" >
  		select * from additional
  		 <trim prefix="WHERE" prefixOverrides="AND">
  		   <include refid="find_condition" />
  		   </trim>
  </select>

  <!-- end  自己添加的 -->
  <delete id="deleteByPrimaryKey" parameterType="java.lang.Integer" >
    delete from additional
    where ID = #{id,jdbcType=INTEGER}
  </delete>
  <insert id="insert" parameterType="com.szz.model.Additional" >
    insert into additional (ID, EmplID, Totalincome,
      percent, TotalEarn, remark
      )
    values (#{id,jdbcType=INTEGER}, #{emplid,jdbcType=INTEGER}, #{totalincome,jdbcType=DECIMAL},
      #{percent,jdbcType=REAL}, #{totalearn,jdbcType=DECIMAL}, #{remark,jdbcType=VARCHAR}
      )
  </insert>
  <insert id="insertSelective" parameterType="com.szz.model.Additional" >
    insert into additional
    <trim prefix="(" suffix=")" suffixOverrides="," >
      <if test="id != null" >
        ID,
      </if>
      <if test="emplid != null" >
        EmplID,
      </if>
      <if test="totalincome != null" >
        Totalincome,
      </if>
      <if test="percent != null" >
        percent,
      </if>
      <if test="totalearn != null" >
        TotalEarn,
      </if>
      <if test="remark != null" >
        remark,
      </if>
    </trim>
    <trim prefix="values (" suffix=")" suffixOverrides="," >
      <if test="id != null" >
        #{id,jdbcType=INTEGER},
      </if>
      <if test="emplid != null" >
        #{emplid,jdbcType=INTEGER},
      </if>
      <if test="totalincome != null" >
        #{totalincome,jdbcType=DECIMAL},
      </if>
      <if test="percent != null" >
        #{percent,jdbcType=REAL},
      </if>
      <if test="totalearn != null" >
        #{totalearn,jdbcType=DECIMAL},
      </if>
      <if test="remark != null" >
        #{remark,jdbcType=VARCHAR},
      </if>
    </trim>
  </insert>
  <update id="updateByPrimaryKeySelective" parameterType="com.szz.model.Additional" >
    update additional
    <set >
      <if test="emplid != null" >
        EmplID = #{emplid,jdbcType=INTEGER},
      </if>
      <if test="totalincome != null" >
        Totalincome = #{totalincome,jdbcType=DECIMAL},
      </if>
      <if test="percent != null" >
        percent = #{percent,jdbcType=REAL},
      </if>
      <if test="totalearn != null" >
        TotalEarn = #{totalearn,jdbcType=DECIMAL},
      </if>
      <if test="remark != null" >
        remark = #{remark,jdbcType=VARCHAR},
      </if>
    </set>
    where ID = #{id,jdbcType=INTEGER}
  </update>
  <update id="updateByPrimaryKey" parameterType="com.szz.model.Additional" >
    update additional
    set EmplID = #{emplid,jdbcType=INTEGER},
      Totalincome = #{totalincome,jdbcType=DECIMAL},
      percent = #{percent,jdbcType=REAL},
      TotalEarn = #{totalearn,jdbcType=DECIMAL},
      remark = #{remark,jdbcType=VARCHAR}
    where ID = #{id,jdbcType=INTEGER}
  </update>
</mapper>
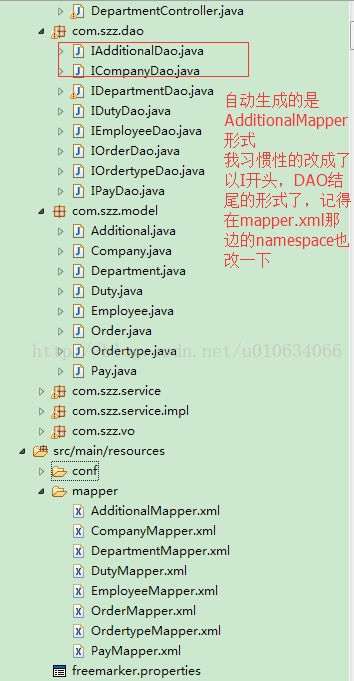
自动生成的mapper.xml文件大部分能满足增删改查的要求; 但是查询只给了一个select by primarykey ;只能查询一条数据; 我自己写了一个多条件查询的;但是我不知道怎么修改
MyBatis Generator 让它也自动生成我添加的代码; 等以后有空研究下; 有知道怎么修改的能否告知一二;
public interface DepartmentService {
<span style="white-space:pre">	</span>//这里没有写全;  就写了2个方法;
	List<Department> find(DepartmentVO condition);
	Department get(Integer id);
}
@Service("departmentImplService")
public class DepartmentImplService implements DepartmentService{

	@Resource
	private IDepartmentDao departmentDAO;
	@Override
	public List<Department> find(DepartmentVO condition) {
		// TODO Auto-generated method stub
		/*HashMap<String,Object> param = new HashMap<String,Object>();*/
		Map<String,Object> params = Maps.newHashMap();
		params.put("condition", condition);
		return departmentDAO.find(params);
	}
	@Override
	public Department get(Integer id) {
		// TODO Auto-generated method stub
		return departmentDAO.selectByPrimaryKey(id);
	}

}
@Controller
@RequestMapping("/department")
public class DepartmentController {

	@Resource
	private DepartmentImplService departmentService;

	@RequestMapping("/index")
	public String index(Model model){
		Department dp = departmentService.get(1);
		DepartmentVO condition = new DepartmentVO();
		condition.setStatus("1");
		List<Department> dep = departmentService.find(condition);
		model.addAttribute("dp_name", dep.get(0).getDpName());
		return "/test";
	}
}
<html>
<head>
<title>hello!</title>
</head>
<body>
.........
<h1>hello ${dp_name}</h1>
</body>
</html>
运行

<bean id="freemarkerSettings" class="org.springframework.beans.factory.config.PropertiesFactoryBean">
    <property name="location" value="classpath:freemarker.properties" />
  </bean>

  <bean id="freemarkerConfigurer" class="org.springframework.web.servlet.view.freemarker.FreeMarkerConfigurer">
    <property name="freemarkerSettings" ref="freemarkerSettings" />
    <property name="templateLoaderPath" value="/WEB-INF/view/" />
  </bean>

  <bean id="freemarkerViewResolver" class="org.springframework.web.servlet.view.freemarker.FreeMarkerViewResolver">
    <property name="contentType" value="text/html; charset=UTF-8" />
    <property name="suffix" value=".ftl" />
    <property name="exposeRequestAttributes" value="true" />
    <property name="requestContextAttribute" value="request" />
  </bean>

  <bean id="viewResolver" class="org.springframework.web.servlet.view.InternalResourceViewResolver">
  </bean>
并且maven的pom文件中引入freemarker的jar就行了
 <dependency>
			<groupId>org.freemarker</groupId>
			<artifactId>freemarker</artifactId>
			 <version>2.3.20</version>
		</dependency>