今天我们讲解一下CAS的自定义认证,在上一篇文章中我们讲解了CAS基础服务的搭建,完成了CAS认证服务中心的简单部署,如果忘记了话,可以先去复习一下——CAS单点登录(二)——搭建基础服务。
CAS自定义认证方式有多种方式,我们可以根据自己的需求来实现。在前一篇文章中搭建服务中我们其实就把CAS的JDBC自定义认证讲解了,在读取用户名我们可以指定为从数据库的表中读取数据。
一、JDBC认证
我们还是接着上次的代码进行讲解,你可以先下载先前的代码——Chapter1。上次在CAS基本服务搭建的代码中,我们只是简单的使用了一下,今天我们将完善更多的配置。
在前面我们设计了一个user表,表的字段为:
| 字段名 | 字段类型 | 备注 |
|---|---|---|
| id | bigint | ID |
| username | varchar | 用户名 |
| password | varchar | 用户密码 |
| expired | bigint | 过期字段,1为过期,需修改密码 |
| disabled | bigint | 不可用字段,1为不可用,禁用 |
常用单向加密算法:MD5、SHA、HMAC。
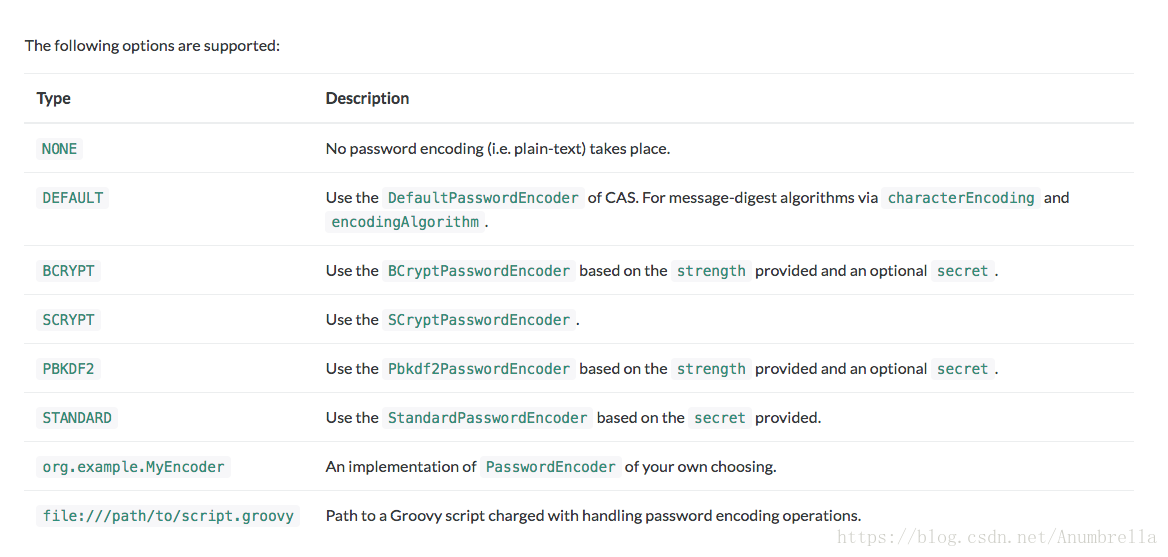
一般我们常用的加密算法就这几种。在JDBC认证中我们也可以选择配置加密算法,加密算法一般为上面的三种,MD5、SHA、HMAC,加密类型为NONE|DEFAULT|STANDARD|BCRYPT|SCRYPT|PBKDF2这几种,我们在配置文件中选择加密类型,指定加密算法。
前面配置不变指定JDBC配置,后面的配置为密码加密策略,配置如下:
##
# JDBC配置
#
#查询账号密码SQL,必须包含密码字段
cas.authn.jdbc.query[0].sql=select * from user where username=?

#指定上面的SQL查询字段名(必须)
cas.authn.jdbc.query[0].fieldPassword=password

#指定过期字段,1为过期,若过期不可用
cas.authn.jdbc.query[0].fieldExpired=expired

#为不可用字段段,1为不可用,需要修改密码
cas.authn.jdbc.query[0].fieldDisabled=disabled

#数据库连接
cas.authn.jdbc.query[0].url=jdbc:mysql://127.0.0.1:3306/cas?useUnicode=true&characterEncoding=UTF-8&autoReconnect=true&useSSL=false

#数据库dialect配置
cas.authn.jdbc.query[0].dialect=org.hibernate.dialect.MySQLDialect

#数据库用户名
cas.authn.jdbc.query[0].user=root

#数据库用户密码
cas.authn.jdbc.query[0].password=123

#数据库事务自动提交
cas.authn.jdbc.query[0].autocommit=false

#数据库驱动
cas.authn.jdbc.query[0].driverClass=com.mysql.jdbc.Driver

#超时配置
cas.authn.jdbc.query[0].idleTimeout=5000

#默认加密策略,通过encodingAlgorithm来指定算法,默认NONE不加密
# NONE|DEFAULT|STANDARD|BCRYPT|SCRYPT|PBKDF2
cas.authn.jdbc.query[0].passwordEncoder.type=DEFAULT
# 字符类型
cas.authn.jdbc.query[0].passwordEncoder.characterEncoding=UTF-8
# 加密算法
cas.authn.jdbc.query[0].passwordEncoder.encodingAlgorithm=MD5
# 加密盐
#cas.authn.jdbc.query[0].passwordEncoder.secret=
# 加密字符长度
#cas.authn.jdbc.query[0].passwordEncoder.strength=16
然后我们启动应用,可以不用打包在放置Tomcat下运行。在IDE里面可以配置运行Tomcat跑CAS,同时也可以使用命令运行。
Windows:
运行命令:
build.cmd run打包命令:
build.cmd packageUnix:
运行命令:
build.sh run打包命令:
build.sh package当我们运行起CAS,输入原来的用户名和密码——anumbrella/anumbrella,并不能登录,因为我们更改密码验证为MD5加密模式了。将anumbrella使用md5加密后,填入数据库,再次登录,可以发现登录成功。由此验证我们加密成功!
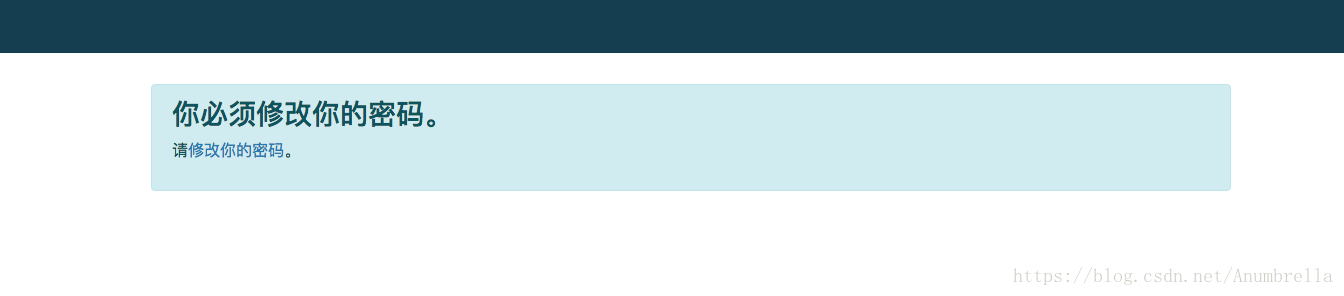
接着我们再新增用户test、test2、test3,密码分别为用户名md5加密,而test2的expired,test3的disabled都为1。如下:

因此当我们登录test2和test3用户时,将会有需要更改密码和禁用提示。

除此之外如果我们要自定义加密类型,就需要实现org.springframework.security.crypto.password.PasswordEncoder接口,并且把类名配置在passwordEncoder.type。
这里配置为自定义加密,新建类MyPasswordEncoder。
package net.anumbrella.sso;

import org.springframework.security.crypto.password.PasswordEncoder;

/**
 * @author anumbrella
 */
public class MyPasswordEncoder implements PasswordEncoder {

    @Override
    public String encode(CharSequence charSequence) {
        // charSequence为输入的用户密码
        return charSequence.toString();
    }

    @Override
    public boolean matches(CharSequence charSequence, String str) {
        // 当encode方法返回不为null时,matches方法才会调用,charSequence为encode返回的字符串
        // str字符串为数据库中密码字段返回的值
        String encodeStr = charSequence.toString() + "aa";
        if (encodeStr.equals(str)) {
            return true;
        }
        return false;
    }
}
更改配置为:
cas.authn.jdbc.query[0].passwordEncoder.type=net.anumbrella.sso.MyPasswordEncoder更改anumbrella用户密码为11aa,启动应用,根据加密算法只要我们登录输入密码11即可验证成功。
如果要密码无加密,调整passwordEncoder.type=NONE。
如果要加密策略为SHA,调整passwordEncoder.encodingAlgorithm=SHA。
到此JDBC的认证我们就讲解完毕了,关于更多的使用参考文档:
密码加密配置:
二、白名单(Whitelist)认证
CAS同时也支持白名单认证方式,主要是File和JSON格式。
File形式:
添加依赖包:
<dependency>
  <groupId>org.apereo.cas</groupId>
  <artifactId>cas-server-support-generic</artifactId>
  <version>${cas.version}</version>
</dependency>
在配置文件中添加如下配置:
##
# 白名单——file配置
#
cas.authn.file.separator=::
cas.authn.file.filename=file:///Users/anumbrella/file
cas.authn.file.name=
在/Users/anumbrella目录下,新建file文件,内容如下:
anumbrella::anumbrella
test::test
test2::test2
该文件配置对应的就是用户名和密码,重启CAS,可以发现配置生效了。
同样的如果我们要配置密码加密,与上面JDBC配置加密一样,更改配置文件如下:
#默认加密策略,通过encodingAlgorithm来指定算法,默认NONE不加密
# NONE|DEFAULT|STANDARD|BCRYPT|SCRYPT|PBKDF2
cas.authn.file.passwordEncoder.type=DEFAULT
# 字符类型
cas.authn.file.passwordEncoder.characterEncoding=UTF-8
# 加密算法
cas.authn.file.passwordEncoder.encodingAlgorithm=MD5
其他都完全一致,只是更改配置文件前部分更改为对应的认证类型的即可。
JSON形式:
与File相似,一样添加依赖包:
<dependency>
  <groupId>org.apereo.cas</groupId>
  <artifactId>cas-server-support-generic</artifactId>
  <version>${cas.version}</version>
</dependency>
在配置文件中添加如下配置:
##
# 白名单——json配置
#
cas.authn.json.location=file:///Users/anumbrella/file.json
cas.authn.json.name=
在/Users/anumbrella目录下,新建file.json文件,内容如下:
{
  "@class" : "java.util.LinkedHashMap",
  "anumbrella" : {
    "@class" : "org.apereo.cas.adaptors.generic.CasUserAccount",
    "password" : "anumbrella",
    "attributes" : {
      "@class" : "java.util.LinkedHashMap",
      "firstName" : "shu",
      "lastName" : "yun"
    },
    "status" : "OK",
    "expirationDate" : "2018-10-19"
  }
}
用户名和密码仍然为anumbrella/anumbrella。
同样的如果我们要配置密码加密,更改配置文件如下:
#默认加密策略,通过encodingAlgorithm来指定算法,默认NONE不加密
# NONE|DEFAULT|STANDARD|BCRYPT|SCRYPT|PBKDF2
cas.authn.json.passwordEncoder.type=DEFAULT
# 字符类型
cas.authn.json.passwordEncoder.characterEncoding=UTF-8
# 加密算法
cas.authn.json.passwordEncoder.encodingAlgorithm=MD5三、黑名单(Blacklist)认证
在CAS中黑名单的配置就比较简单,配置如下:
##
# 黑名单配置
#
cas.authn.reject.users=test,anumbrella
cas.authn.reject.name=
当不在黑名单中的用户,就会全部接受,用户甚至乱输入密码都可实现登录。
同样的如果我们要配置密码加密,更改配置文件如下:
#默认加密策略,通过encodingAlgorithm来指定算法,默认NONE不加密
# NONE|DEFAULT|STANDARD|BCRYPT|SCRYPT|PBKDF2
cas.authn.reject.passwordEncoder.type=DEFAULT
# 字符类型
cas.authn.reject.passwordEncoder.characterEncoding=UTF-8
# 加密算法
cas.authn.reject.passwordEncoder.encodingAlgorithm=MD5四、Shiro认证
我们知道Shiro是个一个强大且易用的Java安全框架,执行身份验证、授权、密码学和会话管理。通过使用Shiro可以快速搭建一套角色、权限控制的流程,因此Shiro使用的机会还是很大的。
添加依赖包如下:
<dependency>
  <groupId>org.apereo.cas</groupId>
  <artifactId>cas-server-support-shiro-authentication</artifactId>
  <version>${cas.version}</version>
</dependency>
在配置文件添加如下:
##
# Shiro配置
#
#允许登录的用户,必须要有以下权限,否则拒绝,多个逗号隔开
cas.authn.shiro.requiredPermissions=staff
#允许登录的用户,必须要有以下角色,否则拒绝,多个逗号隔开
cas.authn.shiro.requiredRoles=admin
#shir配置文件位置
cas.authn.shiro.location=classpath:shiro.ini
#shiro name 唯一
cas.authn.shiro.name=cas-shiro
在resources下新建shiro.ini文件,配置如下:
[main]
cacheManager = org.apache.shiro.cache.MemoryConstrainedCacheManager
securityManager.cacheManager = $cacheManager

[users]
anumbrella = 123, admin
test = test, developer

[roles]
admin = system,admin,staff,superuser:*
developer = commit:*
这里的shiro.ini文件,主要是看shiro的配置情况,可以根据具体的需求进行更改。
重启CAS服务,根据我们的配置可以发现anumbrella用户可以登录,test用户登录失败,没有相应的权限。
同样的如果我们要配置密码加密,更改配置文件如下:
#默认加密策略,通过encodingAlgorithm来指定算法,默认NONE不加密
# NONE|DEFAULT|STANDARD|BCRYPT|SCRYPT|PBKDF2
cas.authn.shiro.passwordEncoder.type=DEFAULT
# 字符类型
cas.authn.shiro.passwordEncoder.characterEncoding=UTF-8
# 加密算法
cas.authn.shiro.passwordEncoder.encodingAlgorithm=MD5五、Rest认证
这里的Rest认证就是指通过数据接口对用户进行认证,通过发起一个POST请求来进行认证。
当用户点击登录后,CAS会发送POST请求到在请求头中包含一个Authorization认证,里面的值为Basic XYZ,而这个XYZ就是通过Base64编码后的用户信息。
比如:
若输入用户名密码为:anumbrella/123
那么请求头包括:
authorization=Basic Base64(anumbrella:123)
同样的添加依赖包:
<dependency>
    <groupId>org.apereo.cas</groupId>
    <artifactId>cas-server-support-rest-authentication</artifactId>
    <version>${cas.version}</version>
</dependency>
然后再配置文件中添加配置:
##
# Rest配置
#
cas.authn.rest.uri=http://localhost:8088/login
cas.authn.rest.name=
如果登录成功响应200,返回响应中包含id和attributes字段,如下:
{"@class":"org.apereo.cas.authentication.principal.SimplePrincipal","id":"casuser","attributes":{}}如果失败,返回的结果可能如下:
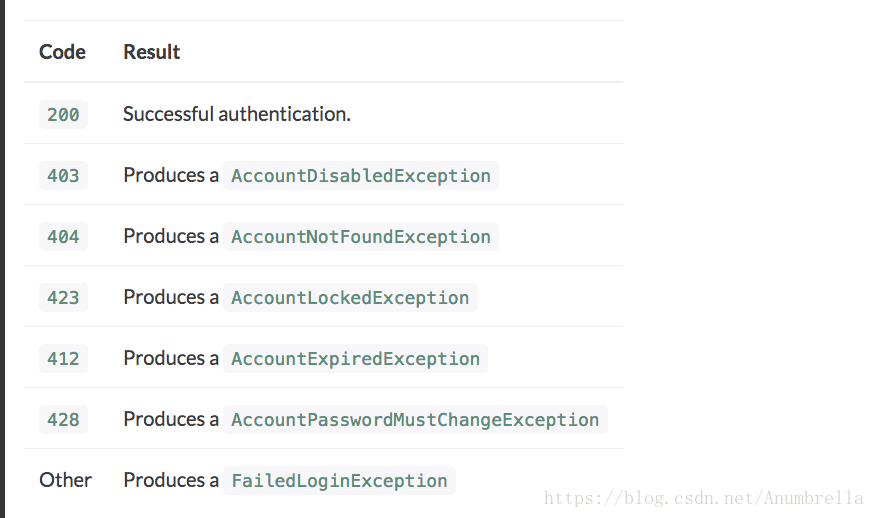
返回状态码:403用户不可用;404账号不存在;423账户被锁定;412过期;428密码需要更改;其他登录失败
我们新建一个Spring Boot服务,用来模拟Rest请求的地址的服务,新建SysUser类,用来定义返回约束的json。
public class SysUser {

    @JsonProperty("id")
    @NotNull
    private String username;

    @JsonProperty("@class")
    //需要返回实现org.apereo.cas.authentication.principal.Principal的类名接口
    private String clazz = "org.apereo.cas.authentication.principal.SimplePrincipal";


    @JsonProperty("attributes")
    private Map<String, Object> attributes = new HashMap<String, Object>();

    @JsonIgnore
    @NotNull
    private String password;

    @JsonIgnore
    //用户是否不可用
    private boolean disable = false;


    @JsonIgnore
    //用户是否过期
    private boolean expired = false;

    @JsonIgnore
    //是否锁定
    private boolean locked = false;

    public boolean isLocked() {
        return locked;
    }

    public SysUser setLocked(boolean locked) {
        this.locked = locked;
        return this;
    }

    public boolean isDisable() {
        return disable;
    }

    public SysUser setDisable(boolean disable) {
        this.disable = disable;
        return this;
    }

    public boolean isExpired() {
        return expired;
    }

    public SysUser setExpired(boolean expired) {
        this.expired = expired;
        return this;
    }

    public String getPassword() {
        return password;
    }

    public SysUser setPassword(String password) {
        this.password = password;
        return this;
    }

    public String getUsername() {
        return username;
    }

    public SysUser setUsername(String username) {
        this.username = username;
        return this;
    }

    public String getClazz() {
        return clazz;
    }

    public Map<String, Object> getAttributes() {
        return attributes;
    }

    public SysUser setAttributes(Map<String, Object> attributes) {
        this.attributes = attributes;
        return this;
    }

    @JsonIgnore
    public SysUser addAttribute(String key, Object val) {
        getAttributes().put(key, val);
        return this;
    }
}
然后再Controller层里,定义路径/login的POST方法。
@RestController
public class RestAuthController {

    private static final Logger LOGGER = LoggerFactory.getLogger(RestAuthController.class);

    /**
     * 1. cas 服务端会通过post请求,并且把用户信息以"用户名:密码"进行Base64编码放在authorization请求头中
     * 2. 返回200状态码并且格式为{"@class":"org.apereo.cas.authentication.principal.SimplePrincipal","id":"casuser","attributes":{}} 是成功的
     * 2. 返回状态码403用户不可用;404账号不存在;423账户被锁定;428过期;其他登录失败
     *
     * @param httpHeaders
     * @return
     */
    @PostMapping("/login")
    public Object login(@RequestHeader HttpHeaders httpHeaders) {
        LOGGER.info("Rest api login.");
        LOGGER.debug("request headers: {}", httpHeaders);
        SysUser user = null;
        try {
            UserTemp userTemp = obtainUserFormHeader(httpHeaders);
            //尝试查找用户库是否存在
            user = new SysUser();
            user.setUsername("anumbrella");
            user.setPassword("123");
            if (user != null) {
                if (!user.getPassword().equals(userTemp.password)) {
                    //密码不匹配
                    return new ResponseEntity(HttpStatus.BAD_REQUEST);
                }
                if (user.isDisable()) {
                    //禁用 403
                    return new ResponseEntity(HttpStatus.FORBIDDEN);
                }
                if (user.isLocked()) {
                    //锁定 423
                    return new ResponseEntity(HttpStatus.LOCKED);
                }
                if (user.isExpired()) {
                    //过期 428
                    return new ResponseEntity(HttpStatus.PRECONDITION_REQUIRED);
                }
            } else {
                //不存在 404
                return new ResponseEntity(HttpStatus.NOT_FOUND);
            }
        } catch (UnsupportedEncodingException e) {
            LOGGER.error("", e);
            new ResponseEntity(HttpStatus.BAD_REQUEST);
        }
        LOGGER.info("[{}] login is ok", user.getUsername());
        //成功返回json
        return user;
    }

    /**
     * 根据请求头获取用户名及密码
     *
     * @param httpHeaders
     * @return
     * @throws UnsupportedEncodingException
     */
    private UserTemp obtainUserFormHeader(HttpHeaders httpHeaders) throws UnsupportedEncodingException {
        /**
         *
         * This allows the CAS server to reach to a remote REST endpoint via a POST for verification of credentials.
         * Credentials are passed via an Authorization header whose value is Basic XYZ where XYZ is a Base64 encoded version of the credentials.
         */
        //当请求过来时,会通过把用户信息放在请求头authorization中,并且通过Basic认证方式加密
        String authorization = httpHeaders.getFirst("authorization");//将得到 Basic Base64(用户名:密码)
        String baseCredentials = authorization.split(" ")[1];
        String usernamePassword = Base64Utils.decoder(baseCredentials);//用户名:密码
        LOGGER.debug("login user: {}", usernamePassword);
        String credentials[] = usernamePassword.split(":");
        return new UserTemp(credentials[0], credentials[1]);
    }

    /**
     * 解析请求过来的用户
     */
    private class UserTemp {
        private String username;
        private String password;

        public UserTemp(String username, String password) {
            this.username = username;
            this.password = password;
        }
    }
}我们使用PostMan模拟CAS服务登录,向http://localhost:8088/login发起一个POST请求,请求中包含用户名和密码的认证信息,在Rest服务中,我将用户名和密码写死了,定为anumbrella/123,当然这里可以按具体需求连接数据库来实现。如下:

最后返回我们期望的结果,现在我们更改CAS配置rest地址为http://localhost:8088/login,重启服务,然后输入密码登录测试。

可以发现登录成功,我们实现了Rest服务认证。
同样的,这里我们密码没有进行加密配置。如果我们要配置密码加密,更改配置文件如下:
#默认加密策略,通过encodingAlgorithm来指定算法,默认NONE不加密
# NONE|DEFAULT|STANDARD|BCRYPT|SCRYPT|PBKDF2
cas.authn.rest.passwordEncoder.type=DEFAULT
# 字符类型
cas.authn.rest.passwordEncoder.characterEncoding=UTF-8
# 加密算法
cas.authn.rest.passwordEncoder.encodingAlgorithm=MD5到这里CAS的自定义认证就讲完了,当然CAS的认证还有很多种,可以去查看官方的文档——配置文档。
代码实例:Chapter2