版权声明:作者原创,转载请注明出处。
本系列文章目录地址:http://blog.csdn.net/u011961421/article/details/79416510
简介
Swagger 是一个规范和完整的框架,用于生成、描述、调用和可视化 RESTful 风格的 Web 服务。总体目标是使客户端和文件系统作为服务器以同样的速度来更新。文件的方法,参数和模型紧密集成到服务器端的代码,允许API来始终保持同步。 Swagger 让部署管理和使用功能强大的API从未如此简单。
实战
直接正题,SpringBoot集成Swagger同样简洁明了,下面开始介绍集成过程以及简单运用,而关于Swagger的深层介绍这里不作扩展。
1.pom.xml加入Swagger依赖包
<!-- http://mvnrepository.com/artifact/io.springfox/springfox-swagger2 -->
<dependency>
    <groupId>io.springfox</groupId>
    <artifactId>springfox-swagger2</artifactId>
    <version>2.5.0</version>
</dependency>

<!-- http://mvnrepository.com/artifact/io.springfox/springfox-swagger-ui -->
<dependency>
    <groupId>io.springfox</groupId>
    <artifactId>springfox-swagger-ui</artifactId>
    <version>2.5.0</version>
</dependency>
swagger-ui是swagger的子模块,提供了统一的API展示页面,同样swagger还有其他模块,如Swagger Editor,Swagger CodeGen等,对于一般运用swagger-ui已经足够。
2.编写config配置类
直接贴demo,如下:
@EnableSwagger2
@Configuration
public class SwaggerConfig {

    @Bean
    public Docket api() {
        return new Docket(DocumentationType.SWAGGER_2)
                .groupName("demo")
                .genericModelSubstitutes(DeferredResult.class)
                .useDefaultResponseMessages(false)
                .forCodeGeneration(false)
                .pathMapping("/")
                .select()
                .paths(PathSelectors.any())
                .build()
                .apiInfo(demoApiInfo());
    }

    private ApiInfo demoApiInfo() {
        ApiInfo apiInfo = new ApiInfo(
                "SPRING BOOT AND SWAGGER TEST API",//大标题
                "Test REST API, all the applications could access the Object model data via JSON.",//小标题
                "1.0",//版本
                "NO terms of service",//服务条款
                new Contact("test","66666","双击关注"),//作者
                "Spring Boot Demo",//链接显示文字
                "http://localhost:8080/demo/getAll"//网站链接
        );
        return apiInfo;
    }
}
3.添加swagger注解
由于swagger是侵入式的,但好在只需要添加相关注解,无需改动其他代码,所以即使是旧工程新引入swagger的改动也是可以接受的,例在前面学习的demo中引入swagger如下:
@Controller
@RequestMapping(value = "/demo", method = RequestMethod.GET)
@Api(description = "swagger测试接口DemoController",tags = {"DemoController"})
public class DemoController {
    private static final Logger log = LoggerFactory.getLogger(DemoController.class);

    @Autowired
    DemoService demoService;

    @Autowired
    RedisManager redisManager;

    @Value("${spring.profiles.active}")
    private String profileActive;

    @ApiOperation(value = "获取所有信息接口" , notes = "swagger测试接口")
    @RequestMapping(value = "/getAll")
    public String testDemo(Map<String, Object> map) {
        System.out.println("入参key为:"+map.toString());
        List<Demo> demos = demoService.getDemos();
        map.put("data", demos);
        System.out.println(demos.toString());
        System.out.println(profileActive);
        log.debug("debug---log-------------" + demos.toString());
        log.info("info---log-------------" + demos.toString());
        log.warn("warn---log-------------" + demos.toString());
        log.error("error---log-------------" + demos.toString());
        return ("/testDemo");
    }

    @ApiOperation(value = "redis测试" , notes = "redis测试接口")
    @RequestMapping(value = "/testRedis", method = RequestMethod.GET)
    @ResponseBody
    public String testRedis(@RequestParam String key) {
        System.out.println("入参key为:"+key);
        if(StringUtils.isEmpty(key)) {
            return "入参为空";
        }
        String s = "查询结果为:"+redisManager.getStr(key);
        return s;
    }
}
常用注解有如下几个:
- @Api()用于类;
表示标识这个类是swagger的资源
- @ApiOperation()用于方法;
表示一个http请求的操作
- @ApiParam()用于方法,参数,字段说明;
表示对参数的添加元数据(说明或是否必填等)
- @ApiModel()用于类
表示对类进行说明,用于参数用实体类接收
- @ApiModelProperty()用于方法,字段
表示对model属性的说明或者数据操作更改
- @ApiIgnore()用于类,方法,方法参数
表示这个方法或者类被忽略
- @ApiImplicitParam() 用于方法
表示单独的请求参数
- @ApiImplicitParams() 用于方法,包含多个 @ApiImplicitParam
关于更详细的注解使用,在网上找了个不错的介绍以供参考https://www.jianshu.com/p/12f4394462d5
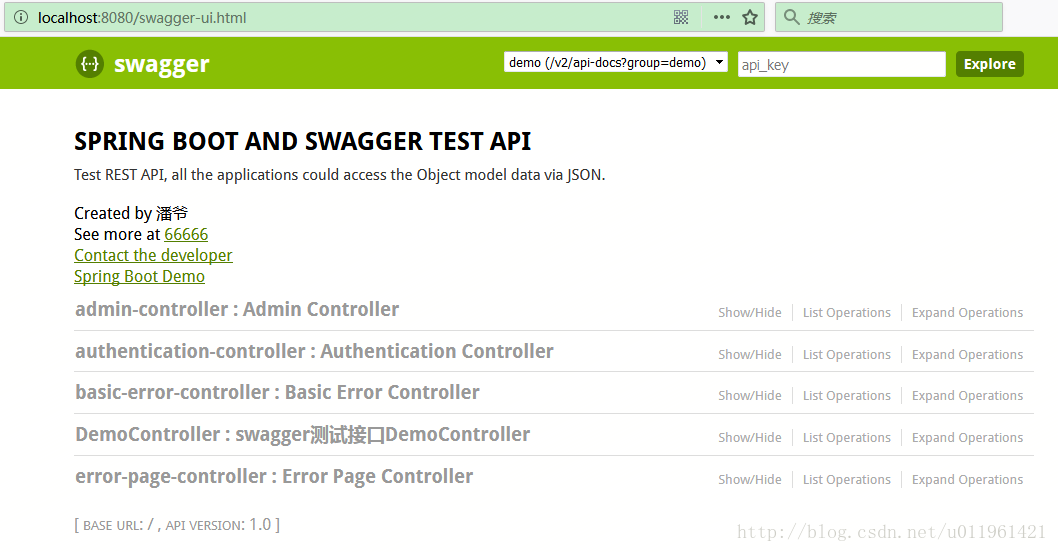
4.启动工程,访问工程路径加/swagger-ui.html,本文例子路径为http://localhost:8080/swagger-ui.html,这里需要注意的是有访问控制的,记得放开swagger的相关访问控制,否则访问不到相关资源。
访问后页面如下,展示根据配置的扫描路径的所有controller,没有添加加任何注解会以默认值显示。
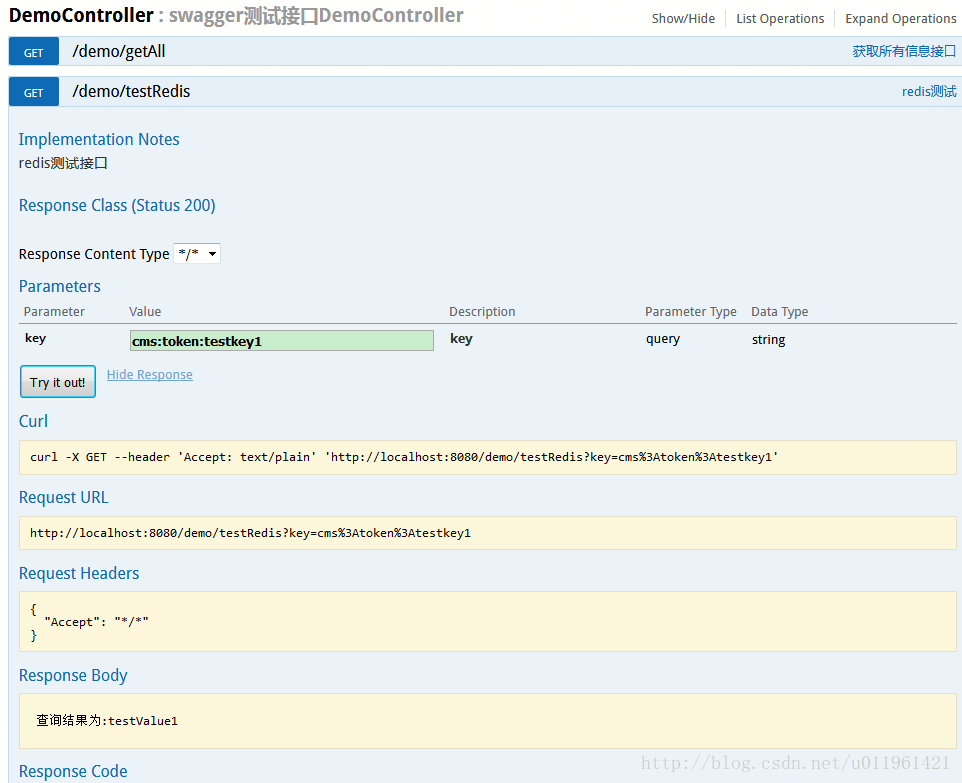
单击controller可显示当前controller下所有方法,单击方法名可以显示所以信息如下,该页面提供了测试功能,是前后端分离的最主要功能。parameters展示了所以入参,在value填入参数值后,点击”Try it out!”便可发起请求,得到并展示请求相关的所有信息。
最后,SpringBoot集成swagger到这已经集成完成,SpringBoot整个学习系列案例、以及本文案例地址为https://github.com/15651037763/cms,关于swagger使用的更多细节并未深入介绍,并且博主也仅停留在一般运用上,如有疑问,欢迎留言评论。