ApacheShiro是Java 的一个安全(权限)框架。
Shiro可以非常容易的开发出足够好的应用,其不仅可以用在JavaSE环境,也可以用在JavaEE环境。
Shiro可以完成:认证、授权、加密、会话管理、与Web 集成、缓存等。
功能介绍
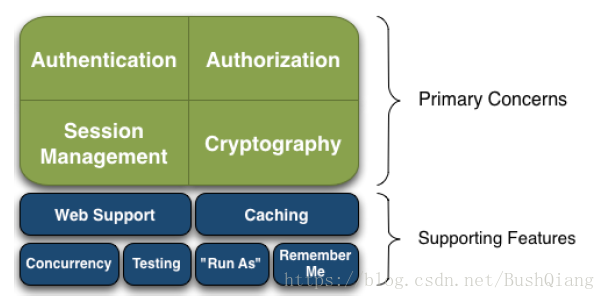
Authentication:身份认证/登录,验证用户是不是拥有相应的身份;
Authorization:授权,即权限验证,验证某个已认证的用户是否拥有某个权限;即判断用户是否能进行什么操作,如:验证某个用户是否拥有某个角色。或者细粒度的验证某个用户对某个资源是否具有某个权限;
Session Manager:会话管理,即用户登录后就是一次会话,在没有退出之前,它的所有信息都在会话中;会话可以是普通JavaSE环境,也可以是Web 环境的;
Cryptography:加密,保护数据的安全性,如密码加密存储到数据库,而不是明文存储;
Web Support:Web 支持,可以非常容易的集成到Web 环境;
Caching:缓存,比如用户登录后,其用户信息、拥有的角色/权限不必每次去查,这样可以提高效率;
Concurrency:Shiro支持多线程应用的并发验证,即如在一个线程中开启另一个线程,能
把权限自动传播过去;
Testing:提供测试支持;
Run As:允许一个用户假装为另一个用户(如果他们允许)的身份进行访问;
Remember
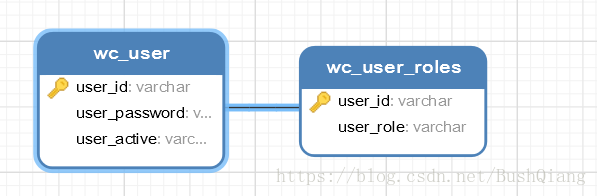
本案例就两个表,一个是用户表,一个是角色表,如下图
首先是pom.xml配置
除了基本的spring,mybats,mysql配置外,还要添加shiro的配置
		<dependency>
			<groupId>org.apache.shiro</groupId>
			<artifactId>shiro-core</artifactId>
			<version>1.3.2</version>
		</dependency>
		<dependency>
			<groupId>org.apache.shiro</groupId>
			<artifactId>shiro-spring</artifactId>
			<version>1.3.2</version>
		</dependency>
		<dependency>
			<groupId>org.apache.shiro</groupId>
			<artifactId>shiro-all</artifactId>
			<version>1.3.2</version>
		</dependency>
由于要使用shiro来管理,所以要在web.xml使用shiro来做过滤器
	<!-- 1. 配置 Shiro 的 shiroFilter. 2. DelegatingFilterProxy 实际上是 Filter 的一个代理对象.
		默认情况下, Spring 会到 IOC 容器中查找和 <filter-name> 对应的 filter bean. 也可以通过 targetBeanName
		的初始化参数来配置 filter bean 的 id. -->
	<filter>
		<filter-name>shiroFilter</filter-name>
		<filter-class>org.springframework.web.filter.DelegatingFilterProxy</filter-class>
		<init-param>
			<param-name>targetFilterLifecycle</param-name>
			<param-value>true</param-value>
		</init-param>
	</filter>

	<filter-mapping>
		<filter-name>shiroFilter</filter-name>
		<url-pattern>/*</url-pattern>
	</filter-mapping>
在src/main/resources/下添加shiro.xml配置
<?xml version="1.0" encoding="UTF-8"?>
<beans xmlns="http://www.springframework.org/schema/beans"
	xmlns:xsi="http://www.w3.org/2001/XMLSchema-instance"
	xsi:schemaLocation="http://www.springframework.org/schema/beans http://www.springframework.org/schema/beans/spring-beans.xsd">
	<!-- 1. 配置 SecurityManager! -->
	<bean id="securityManager" class="org.apache.shiro.web.mgt.DefaultWebSecurityManager">
		<property name="cacheManager" ref="cacheManager" />
		<property name="authenticator" ref="authenticator"></property>
		<!--配置多个Realm  -->
		<property name="realms">
			<list>
				<ref bean="jdbcRealm" />
				<!-- <ref bean="secondRealm" /> -->
			</list>
		</property>
		<!--登陆时,记住我的有限时间  -->
		<property name="rememberMeManager.cookie.maxAge" value="3600"></property>
	</bean>
	<!-- 2. 配置 CacheManager. 2.1 需要加入 ehcache 的 jar 包及配置文件. -->
	<bean id="cacheManager" class="org.apache.shiro.cache.ehcache.EhCacheManager">
		<property name="cacheManagerConfigFile" value="classpath:ehcache.xml" />
	</bean>
	<!--多个Realm时指定授权通过的标准,可以是一个通过就ok,也可以是全部通过才算通过  -->
	<bean id="authenticator" class="org.apache.shiro.authc.pam.ModularRealmAuthenticator">
		<property name="authenticationStrategy">
			<bean class="org.apache.shiro.authc.pam.AtLeastOneSuccessfulStrategy"></bean>
		</property>
	</bean>
	<!-- 3. 配置 Realm 3.1 直接配置实现了 org.apache.shiro.realm.Realm 接口的 bean -->
	<bean id="jdbcRealm" class="com.smxy.wechat.realms.ShiroRealm">
		<property name="credentialsMatcher">
			<bean class="org.apache.shiro.authc.credential.HashedCredentialsMatcher">
			    <!--加密方式和加密次数  -->
				<property name="hashAlgorithmName" value="MD5"></property>
				<property name="hashIterations" value="1024"></property>
			</bean>
		</property>
	</bean>
<!-- 	<bean id="secondRealm" class="com.smxy.wechat.realms.SecondRealm">
		<property name="credentialsMatcher">
			<bean class="org.apache.shiro.authc.credential.HashedCredentialsMatcher">
				<property name="hashAlgorithmName" value="SHA1"></property>
				<property name="hashIterations" value="1024"></property>
			</bean>
		</property>
	</bean> -->
	<!-- 4. 配置 LifecycleBeanPostProcessor. 可以自定的来调用配置在 Spring IOC 容器中 shiro
		bean 的生命周期方法. -->
	<bean id="lifecycleBeanPostProcessor" class="org.apache.shiro.spring.LifecycleBeanPostProcessor" />

	<!-- Enable Shiro Annotations for Spring-configured beans. Only run after
		the lifecycleBeanProcessor has run: -->
	<!-- 5. 启用 IOC 容器中使用 shiro 的注解. 但必须在配置了 LifecycleBeanPostProcessor 之后才可以使用. -->
	<bean
		class="org.springframework.aop.framework.autoproxy.DefaultAdvisorAutoProxyCreator"
		depends-on="lifecycleBeanPostProcessor" />
	<bean
		class="org.apache.shiro.spring.security.interceptor.AuthorizationAttributeSourceAdvisor">
		<property name="securityManager" ref="securityManager" />
	</bean>
	<!-- 6. 配置 ShiroFilter. 6.1 id 必须和 web.xml 文件中配置的 DelegatingFilterProxy
		的 <filter-name> 一致. 若不一致, 则会抛出: NoSuchBeanDefinitionException. 因为 Shiro 会来
		IOC 容器中查找和 <filter-name> 名字对应的 filter bean. -->
	<bean id="shiroFilter" class="org.apache.shiro.spring.web.ShiroFilterFactoryBean">
		<property name="securityManager" ref="securityManager" />
		<property name="loginUrl" value="/login.jsp" />
		<property name="successUrl" value="/list.jsp" />
		<property name="unauthorizedUrl" value="/unauthorized.jsp" />
		<property name="filterChainDefinitionMap" ref="filterChainDefinitionMap"></property>
	</bean>

	<!-- 配置一个 bean, 该 bean 实际上是一个 Map. 通过实例工厂方法的方式 -->
	<bean id="filterChainDefinitionMap" factory-bean="filterChainDefinitionMapBuilder"
		factory-method="buildFilterChainDefinitionMap"></bean>
	<bean id="filterChainDefinitionMapBuilder" class="com.smxy.wechat.factory.FilterChainDefinitionMapBuilder"></bean>
</beans>
添加缓存配置ehcache.xml
<ehcache>
    <diskStore path="java.io.tmpdir"/>
    <!--授权缓存策略  -->
    <cache name="authorizationCache"
           eternal="false"
           timeToIdleSeconds="3600"
           timeToLiveSeconds="0"
           overflowToDisk="false"
           statistics="true">
    </cache>
    <!--认证缓存策略  -->
    <cache name="authenticationCache"
           eternal="false"
           timeToIdleSeconds="3600"
           timeToLiveSeconds="0"
           overflowToDisk="false"
           statistics="true">
    </cache>

    <cache name="shiro-activeSessionCache"
           eternal="false"
           timeToIdleSeconds="3600"
           timeToLiveSeconds="0"
           overflowToDisk="false"
           statistics="true">
    </cache>
    <defaultCache
        maxElementsInMemory="10000"
        eternal="false"
        timeToIdleSeconds="120"
        timeToLiveSeconds="120"
        overflowToDisk="true"
        />

    <!-- Place configuration for your caches following -->
</ehcache>
自定义Realm需要继承AuthorizingRealm,重写它的doGetAuthenticationInfo,和doGetAuthorizationInfo实现认证和授权的方法。这里使用了盐值,可以是随机字符串或者用户名,只要是唯一的就行了。这样两个相同的密码,添加盐值后就不会在数据库显示一样了。
密码的匹配shiro会帮我们完成。
package com.smxy.wechat.realms;

import java.util.HashSet;
import java.util.Set;

import org.apache.shiro.authc.AuthenticationException;
import org.apache.shiro.authc.AuthenticationInfo;
import org.apache.shiro.authc.AuthenticationToken;
import org.apache.shiro.authc.LockedAccountException;
import org.apache.shiro.authc.SimpleAuthenticationInfo;
import org.apache.shiro.authc.UnknownAccountException;
import org.apache.shiro.authc.UsernamePasswordToken;
import org.apache.shiro.authz.AuthorizationInfo;
import org.apache.shiro.authz.SimpleAuthorizationInfo;
import org.apache.shiro.crypto.hash.SimpleHash;
import org.apache.shiro.realm.AuthorizingRealm;
import org.apache.shiro.subject.PrincipalCollection;
import org.apache.shiro.util.ByteSource;
import org.springframework.beans.factory.annotation.Autowired;
import org.springframework.util.StringUtils;

import com.smxy.wechat.pojo.WcUser;
import com.smxy.wechat.pojo.WcUserAll;
import com.smxy.wechat.service.WcUserService;

/**
 *
 * @Description :自定义Realm
 * @author Bush罗
 * @date 2018年7月12日
 *
 */
public class ShiroRealm extends AuthorizingRealm {

	@Autowired
	WcUserService wcUserService;

	@SuppressWarnings("unused")
	@Override
	protected AuthenticationInfo doGetAuthenticationInfo(
			AuthenticationToken token) throws AuthenticationException {

		//1. 把 AuthenticationToken 转换为 UsernamePasswordToken
		UsernamePasswordToken upToken = (UsernamePasswordToken) token;

		//2. 从 UsernamePasswordToken 中来获取 username
		String username = upToken.getUsername();

		//3. 调用数据库的方法, 从数据库中查询 username 对应的用户记录
		WcUser wcUser= wcUserService.selectByPrimaryKey(username);
		System.out.println(wcUser.toString());
		//4. 若用户不存在, 则可以抛出 UnknownAccountException 异常
		if(wcUser!=null){
			//5. 根据用户的情况, 来构建 AuthenticationInfo 对象并返回. 通常使用的实现类为: SimpleAuthenticationInfo
			//以下信息是从数据库中获取的.
			//1). principal: 认证的实体信息. 可以是 username, 也可以是数据表对应的用户的实体类对象.
			Object principal = username;
			//2). credentials: 密码
			Object credentials = wcUser.getUserPassword();
			//3). realmName: 当前 realm 对象的 name. 调用父类的 getName() 方法即可
			String realmName = getName();
			//4). 盐值. 可以使用随机字符串或者用户名,只要是唯一的就行了
			ByteSource credentialsSalt = ByteSource.Util.bytes(username);
			SimpleAuthenticationInfo info = null; //new SimpleAuthenticationInfo(principal, credentials, realmName);
			info = new SimpleAuthenticationInfo(principal, credentials, credentialsSalt, realmName);
			return info;
		}else{
			return null;
		}
	}


	//授权会被 shiro 回调的方法
	@Override
	protected AuthorizationInfo doGetAuthorizationInfo(
			PrincipalCollection principals) {
		//1. 从 PrincipalCollection
		Object principal = principals.getPrimaryPrincipal();
		System.out.println(principal);
		//2. 利用登录的用户的信息来用户当前用户的角色或权限(可能需要查询数据库)
		Set<String> roles = new HashSet<>();
		WcUserAll wcUserAll=wcUserService.selectRoleByPrimaryKey(String.valueOf(principal));
		roles.add(wcUserAll.getWcUserRoles().getUserRole());

		//3. 创建 SimpleAuthorizationInfo, 并设置其 reles 属性.
		SimpleAuthorizationInfo info = new SimpleAuthorizationInfo(roles);

		//4. 返回 SimpleAuthorizationInfo 对象.
		return info;
	}
}
登陆Controller
package com.smxy.wechat.controller;

import org.apache.shiro.SecurityUtils;
import org.apache.shiro.authc.AuthenticationException;
import org.apache.shiro.authc.UsernamePasswordToken;
import org.apache.shiro.subject.Subject;
import org.springframework.beans.factory.annotation.Autowired;
import org.springframework.stereotype.Controller;
import org.springframework.web.bind.annotation.RequestMapping;
import org.springframework.web.bind.annotation.RequestParam;
import org.springframework.web.bind.annotation.ResponseBody;

import com.smxy.wechat.pojo.WcUserAll;
import com.smxy.wechat.service.WcUserService;

/**
 *
 * @Description :shiro权限控制
 * @author Bush罗
 * @date 2018年7月12日
 *
 */
@Controller
@RequestMapping("/shiro")
public class UserController {

	@Autowired
	WcUserService wcUserService;

	@RequestMapping("/login")
	public String login(@RequestParam("username") String username,
			@RequestParam("password") String password){
		Subject currentUser = SecurityUtils.getSubject();
		if (!currentUser.isAuthenticated()) {
        	// 把用户名和密码封装为 UsernamePasswordToken 对象
            UsernamePasswordToken token = new UsernamePasswordToken(username, password);
            //记住我
            token.setRememberMe(true);
            try {
            	// 执行登录.
                currentUser.login(token);
            	System.out.println("登陆成功!");
            }
            // ... catch more exceptions here (maybe custom ones specific to your application?
            // 所有认证时异常的父类.
            catch (AuthenticationException ae) {
                //unexpected condition?  error?
            	System.out.println("登录失败: " + ae.getMessage());
            }
        }
		return "redirect:/list.jsp";
	}
	@RequestMapping("test")
	@ResponseBody
	public WcUserAll test(){
		System.out.println(wcUserService.selectByPrimaryKey("admin1"));
		return wcUserService.selectRoleByPrimaryKey("admin1");
	}

}
认证思路
1. 获取当前的 Subject. 调用 SecurityUtils.getSubject();
2. 测试当前的用户是否已经被认证. 即是否已经登录. 调用 Subject 的 isAuthenticated()
3. 若没有被认证, 则把用户名和密码封装为 UsernamePasswordToken 对象
1). 创建一个表单页面
2). 把请求提交到 SpringMVC 的 Handler
3). 获取用户名和密码.
4. 执行登录: 调用 Subject 的 login(AuthenticationToken) 方法.
5. 自定义 Realm 的方法, 从数据库中获取对应的记录, 返回给 Shiro.
1). 实际上需要继承 org.apache.shiro.realm.AuthenticatingRealm 类.
2). 实现 doGetAuthenticationInfo(AuthenticationToken) 方法.
6. 由 shiro 完成对密码的比对.