环境搭建
三台服务器:
192.168.126.100(master)
192.168.126.110(slaver)
192.168.126.120(slaver)
拷贝192.168.126.100(主)服务器中的Redis到从机,保证Redis版本、环境一致:
scp -r redis-3.2.0/ root@192.168.126.110:/usr/local/ // 安装目录 scp -r redis/ root@192.168.126.110:/usr/local/ // 自定义配置、数据目录 scp -r redis-3.2.0/ root@192.168.126.120:/usr/local/ scp -r redis/ root@192.168.126.120:/usr/local/主从复制 - 读写分离
Redis的复制功能是支持多个数据库之间的数据同步。一类是主数据库(master)一类是从数据库(slave),主数据库可以进行读写操作,当发生写操作的时候自动将数据同步到从数据库,而从数据库一般是只读的,并接收主数据库同步过来的数据,一个主数据库可以有多个从数据库,而一个从数据库只能有一个主数据库。
通过redis的复制功能可以很好的实现数据库的读写分离,提高服务器的负载能力。主数据库主要进行写操作,而从数据库负责读操作。
主从复制过程
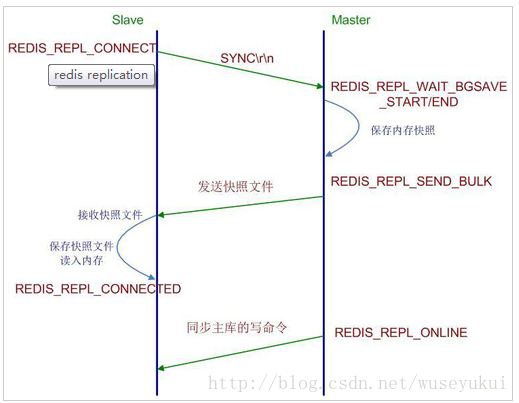
过程:
1:当一个从数据库启动时,会向主数据库发送sync命令,
2:主数据库接收到sync命令后会开始在后台保存快照(执行rdb操作),并将保存期间接收到的命令缓存起来
3:当快照完成后,redis会将快照文件和所有缓存的命令发送给从数据库。
4:从数据库收到后,会载入快照文件并执行收到的缓存的命令。
注意:redis2.8之前的版本:当主从数据库同步的时候从数据库因为网络原因断开重连后会重新执行上述操作,不支持断点续传。redis2.8之后支持断点续传。
配置
只需要修改两台从节点中redis的配置文件:
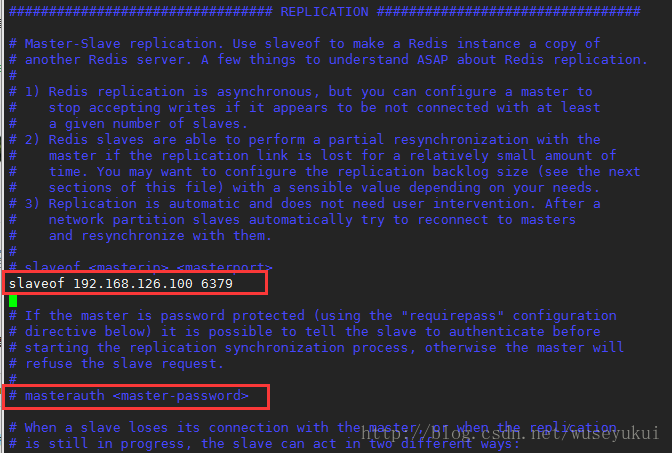
注意:如果主数据库设置了密码,需要在从数据的配置文件中通过masterauth参数设置主数据库的密码
效果
| 节点 | 效果 |
|---|---|
| 192.168.126.100(master) |  |
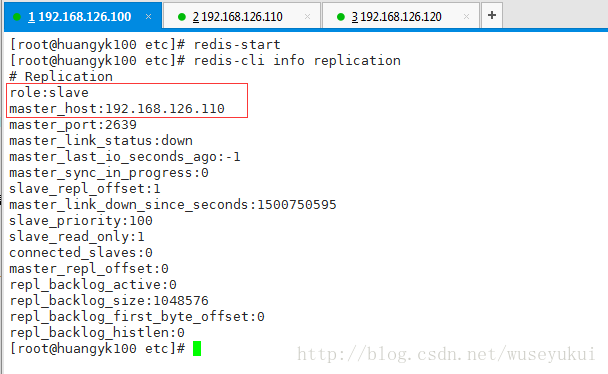
| 192.168.126.110(slaver) | 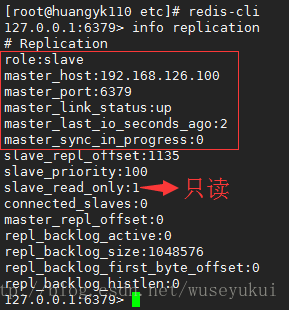 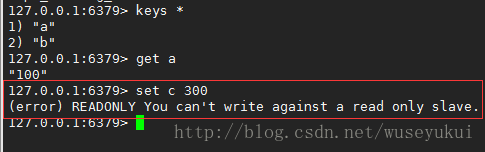 |
| 192.168.126.120(slaver) | 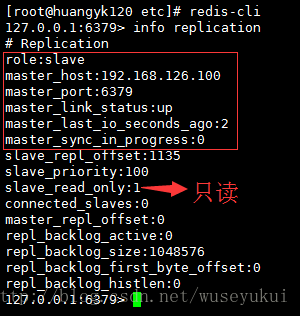  |
常见问题
启动从节点的redis,可能出现以下错误:
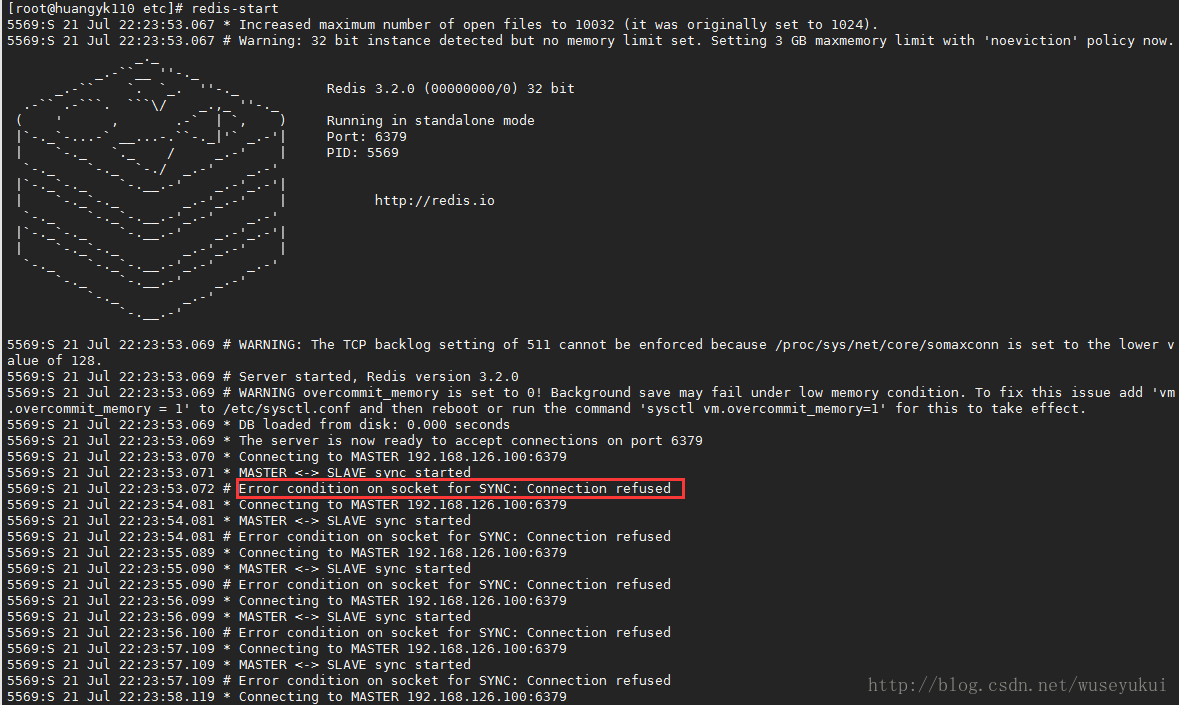
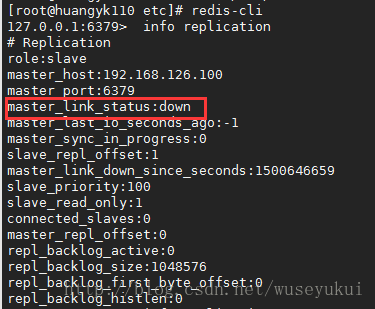
解决办法:
1、修改主节点redis的配置文件:
bind 0.0.0.02、重启服务
哨兵( Sentinel)机制 - 主从高可用方案
简介
Redis-Sentinel是Redis官方推荐的高可用性(HA)解决方案。实际上这意味着你可以使用Sentinel模式创建一个可以不用人为干预而应对各种故障的Redis部署。
主要功能
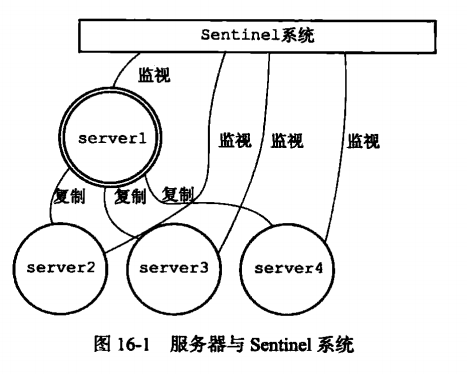
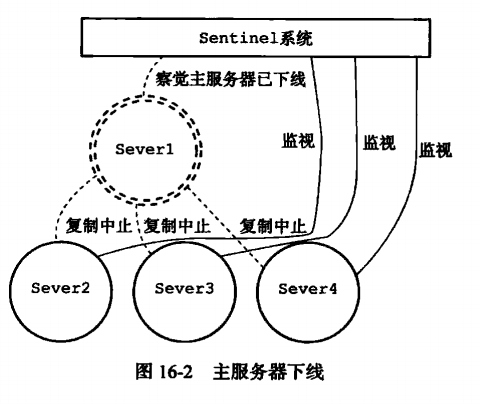
- 监控(Monitoring): Sentinel 会不断地检查你的主服务器和从服务器是否运作正常。
- 提醒(Notification): 当被监控的某个 Redis 服务器出现问题时, Sentinel 可以通过 API 向管理员或者其他应用程序发送通知。
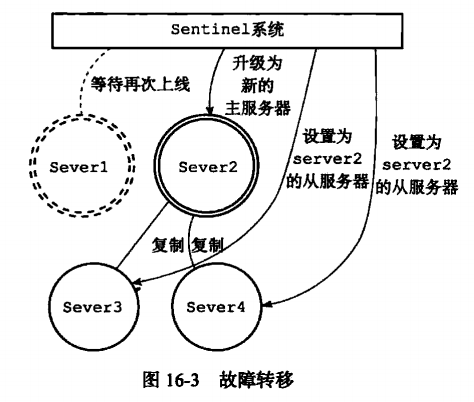
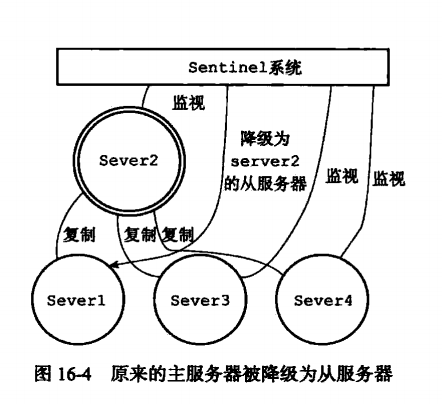
- 自动故障迁移(Automatic failover): 当一个主服务器不能正常工作时, Sentinel 会开始一次自动故障迁移操作, 它会将失效主服务器的其中一个从服务器升级为新的主服务器, 并让失效主服务器的其他从服务器改为复制新的主服务器; 当客户端试图连接失效的主服务器时, 集群也会向客户端返回新主服务器的地址, 使得集群可以使用新主服务器代替失效服务器。
Redis Sentinel 是一个分布式系统, 你可以在一个架构中运行多个 Sentinel 进程(progress), 这些进程使用流言协议(gossip protocols)来接收关于主服务器是否下线的信息, 并使用投票协议(agreement protocols)来决定是否执行自动故障迁移, 以及选择哪个从服务器作为新的主服务器。
Sentinel的主从原理
配置
修改110、120服务器下Sentinel的配置文件sentinel.conf:
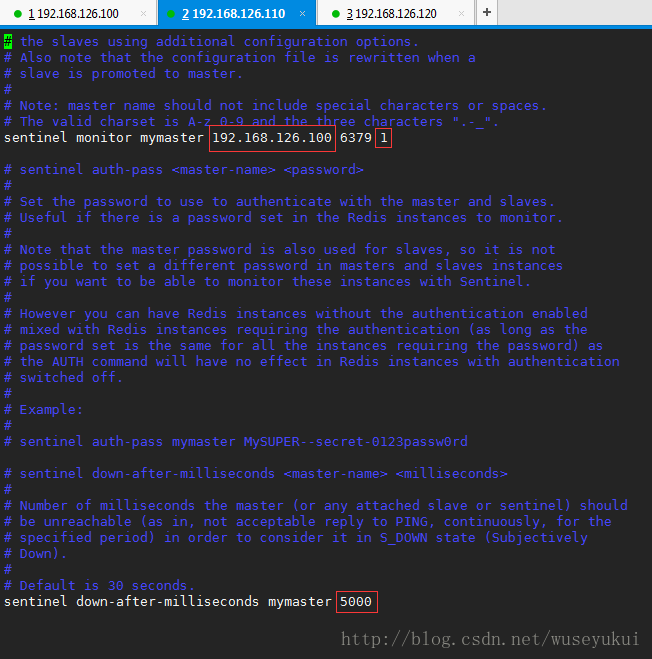
sentinel monitor mymaster 192.168.126.100 6379 1- 该配置指定 Sentinel 去监视一个名为 mymaster 的主服务器, 这个主服务器的 IP 地址为 192.168.126.100 , 端口号为 6379 , 而将这个主服务器判断为失效至少需要 1 个 Sentinel 同意 (只要同意 Sentinel 的数量不达标,自动故障迁移就不会执行)。
需要注意的是: 无论你设置要多少个 Sentinel 同意才能判断一个服务器失效, 一个 Sentinel 都需要获得系统中多数 Sentinel 的支持, 才能发起一次自动故障迁移, 并预留一个给定的配置纪元 (configuration Epoch ,一个配置纪元就是一个新主服务器配置的版本号)。换句话说, 在只有少数 Sentinel 进程正常运作的情况下, Sentinel 是不能执行自动故障迁移的。
sentinel down-after-milliseconds mymaster 5000- 该配置指定了 Sentinel 认为服务器已经断线所需的毫秒数。
如果服务器在给定的毫秒数之内, 没有返回 Sentinel 发送的 PING 命令的回复, 或者返回一个错误, 那么 Sentinel 将这个服务器标记为主观下线(subjectively down,简称 SDOWN )。
不过只有一个 Sentinel 将服务器标记为主观下线并不一定会引起服务器的自动故障迁移: 只有在足够数量的 Sentinel 都将一个服务器标记为主观下线之后, 服务器才会被标记为客观下线(objectively down, 简称 ODOWN ), 这时自动故障迁移才会执行。
将服务器标记为客观下线所需的 Sentinel 数量由对主服务器的配置决定。
sentinel parallel-syncs mymaster 1- 该配置指定了在执行故障转移时, 最多可以有多少个从服务器同时对新的主服务器进行同步, 这个数字越小, 完成故障转移所需的时间就越长。
如果从服务器被设置为允许使用过期数据集(参见对 redis.conf 文件中对 slave-serve-stale-data 选项的说明), 那么你可能不希望所有从服务器都在同一时间向新的主服务器发送同步请求, 因为尽管复制过程的绝大部分步骤都不会阻塞从服务器, 但从服务器在载入主服务器发来的 RDB 文件时, 仍然会造成从服务器在一段时间内不能处理命令请求: 如果全部从服务器一起对新的主服务器进行同步, 那么就可能会造成所有从服务器在短时间内全部不可用的情况出现。
你可以通过将这个值设为 1 来保证每次只有一个从服务器处于不能处理命令请求的状态。
sentinel failover-timeout mymaster 180000- failover(故障转移)过期时间,当failover开始后,在此时间内仍然没有触发任何failover操作, 当前sentinel将会认为此次failoer失败。
启动
方式一:使用redis-sentine命令启动 Sentinel 系统:
redis-sentinel /path/to/sentinel.conf方式二:redis-server命令启动一个运行在 Sentinel 模式下的 Redis 服务器:
redis-server /path/to/sentinel.conf --sentinel效果
启动110、120服务器下的Sentinel 服务:
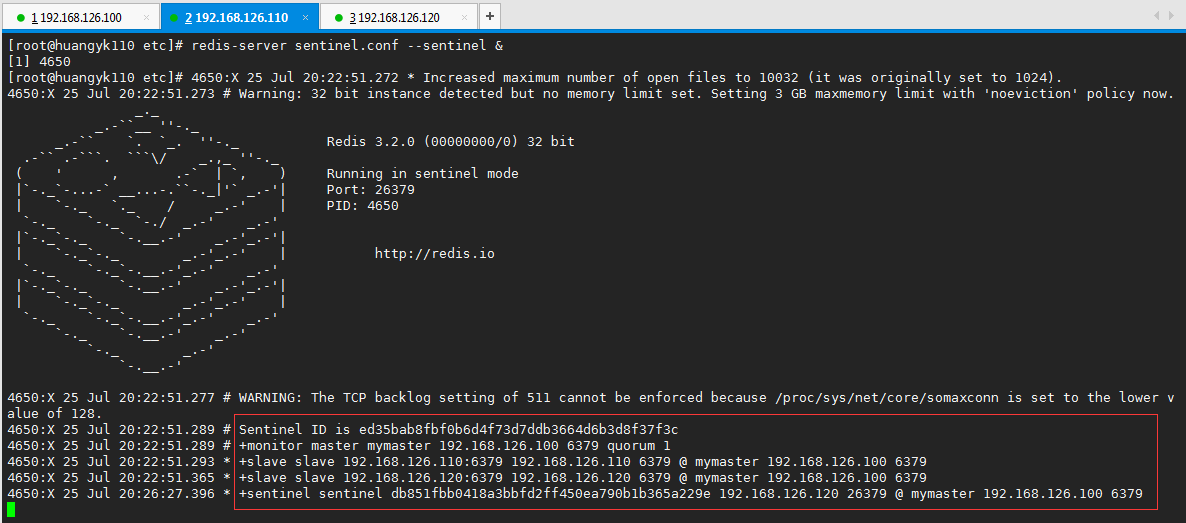
192.168.126.110:

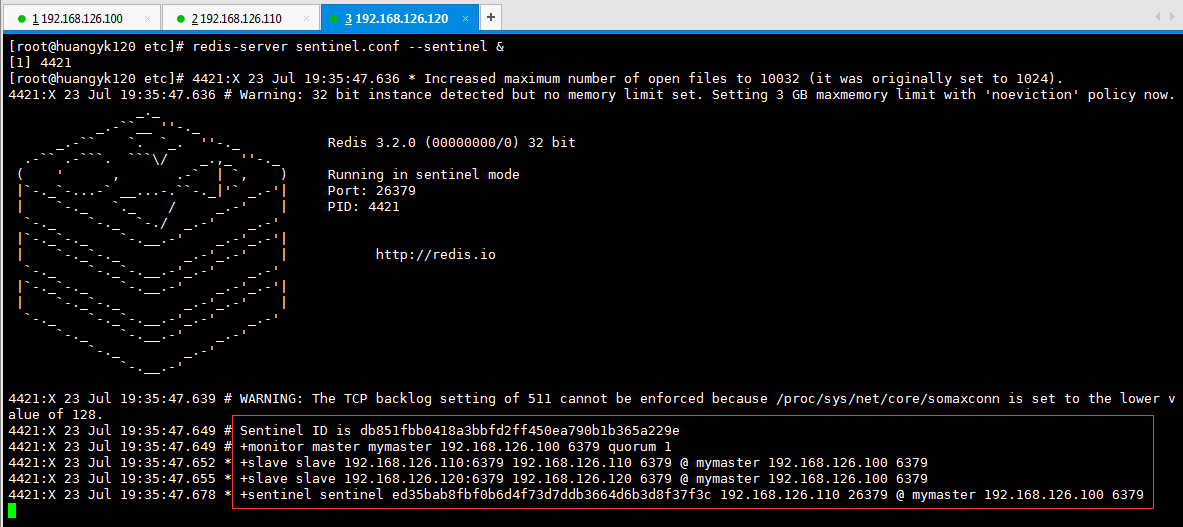
192.168.126.120:

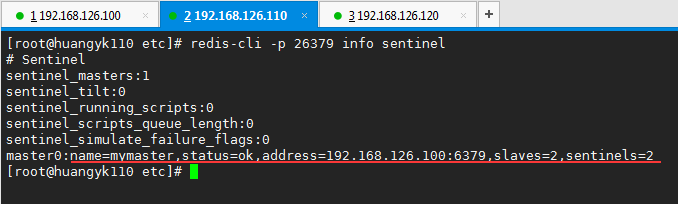
查看sentinel的状态:
常见问题
问题一:
[root@huangyk120 etc]# redis-cli -h 192.168.126.120 -p 26379 info Sentinel

Could not connect to Redis at 192.168.126.120:26379: Connection refused
解决办法:
配置文件redis.conf配置了只在127.0.0.1上绑定监听,取消该配置。
################################## NETWORK #####################################

# By default, if no "bind" configuration directive is specified, Redis listens
# for connections from all the network interfaces available on the server.
# It is possible to listen to just one or multiple selected interfaces using
# the "bind" configuration directive, followed by one or more IP addresses. # # Examples: # # bind 192.168.1.100 10.0.0.1 # bind 127.0.0.1 ::1 # # ~~~ WARNING ~~~ If the computer running Redis is directly exposed to the # internet, binding to all the interfaces is dangerous and will expose the # instance to everybody on the internet. So by default we uncomment the # following bind directive, that will force Redis to listen only into # the IPv4 lookback interface address (this means Redis will be able to # accept connections only from clients running into the same computer it # is running). # # IF YOU ARE SURE YOU WANT YOUR INSTANCE TO LISTEN TO ALL THE INTERFACES # JUST COMMENT THE FOLLOWING LINE. # ~~~~~~~~~~~~~~~~~~~~~~~~~~~~~~~~~~~~~~~~~~~~~~~~~~~~~~~~~~~~~~~~~~~~~~~~ #bind 127.0.0.1
问题二:
DENIED Redis is running in protected mode because protected mode is enabled, no bind address was specified, no authentication password is requested to clients. In this mode connections are only accepted from the loopback interface. If you want to connect from external computers to Redis you may adopt one of the following solutions: 1) Just disable protected mode sending the command 'CONFIG SET protected-mode no' from the loopback interface by connecting to Redis from the same host the server is running, however MAKE SURE Redis is not publicly accessible from internet if you do so. Use CONFIG REWRITE to make this change permanent. 2) Alternatively you can just disable the protected mode by editing the Redis configuration file, and setting the protected mode option to 'no', and then restarting the server. 3) If you started the server manually just for testing, restart it with the '--protected-mode no' option. 4) Setup a bind address or an authentication password. NOTE: You only need to do one of the above things in order for the server to start accepting connections from the outside.登录redis client
[root@huangyk120 etc]# redis-cli -h 192.168.126.120 -p 6379或者查看Sentinel信息
[root@huangyk120 etc]# redis-cli -h 192.168.126.120 -p 26379 info Sentinel都可能以上错误。
原因分析:
默认情况下redis运行在保护模式,这种模式下,如果没有设置访问密码,只允许本地回路访问。如果需要远程访问
1:修改protected-mode为no
2:添加认证,设置密码
#requirepass foobared
requirepass 123456
解决办法:
修改配置文件redis.conf中的protected-mode为no:
# By default protected mode is enabled. You should disable it only if
# you are sure you want clients from other hosts to connect to Redis # even if no authentication is configured, nor a specific set of interfaces # are explicitly listed using the "bind" directive. protected-mode no
巨坑(这个问题坑了我好久):
只修改redis.conf的protected-mode为no,发现查看Sentinel信息还是报错。官方在redis.conf的注释说明中有protected-mode这一配置项,但sentinel.conf的注释中完全没有提到过该配置项,尝试在sentinel.conf中加入
protected-mode no 
保存并重新启动sentinel。
查看sentinel的状态,终于成功了!!! 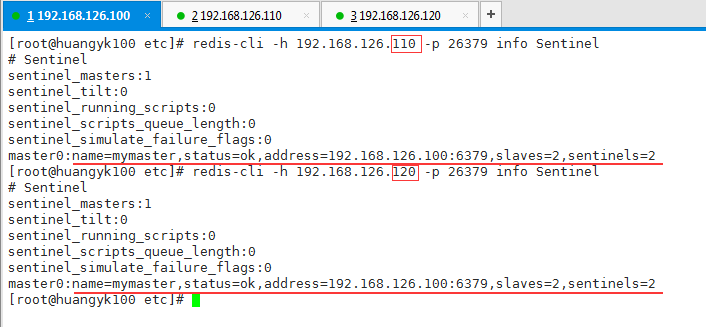
验证redis sentinel的主从切换(故障转移)
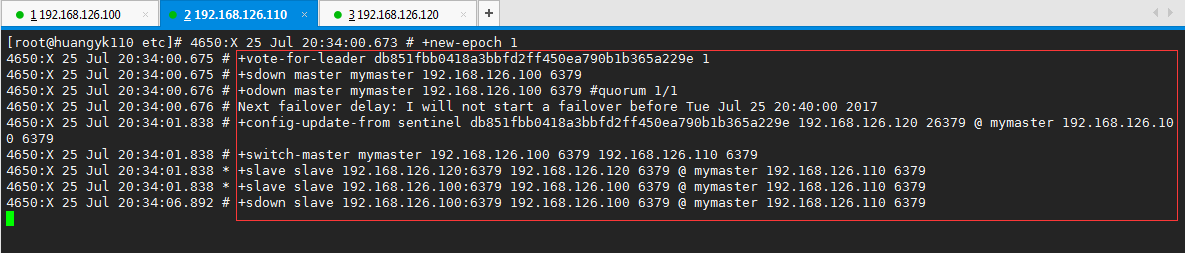
关闭100上的主redis服务(shutdown)。

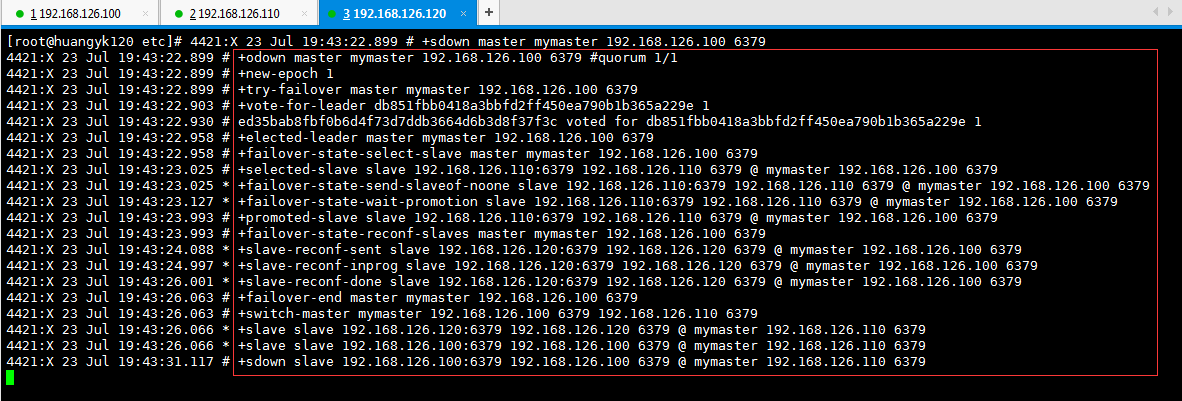
查看sentinel哨兵日志信息,发现110上的redis服务被选举为主服务,sentinel自动完成了故障切换。
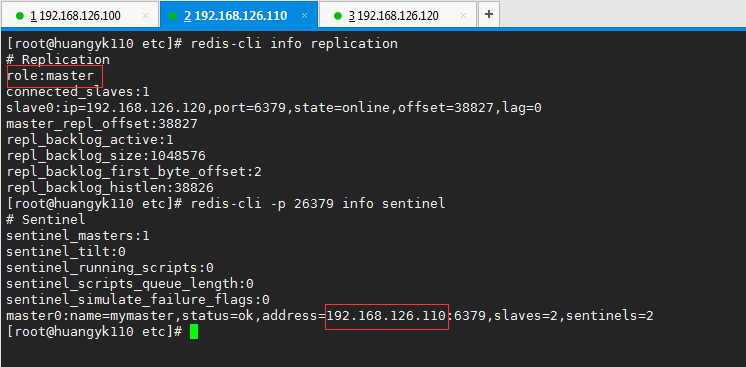
启动刚才被shutdown的110上的redis服务并查看,发现它变成了从服务。
java操作sentinel
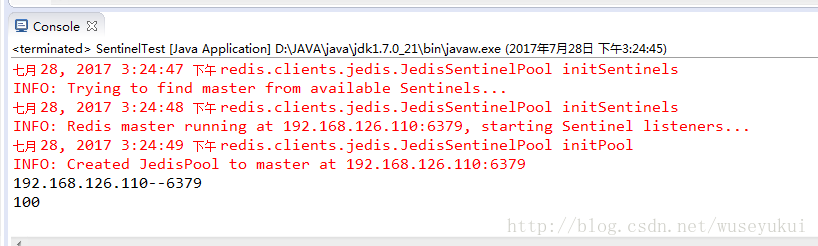
代码示例:
package redistest;

import java.util.HashSet;
//需要在pom.xml文件中引入jedis依赖
import redis.clients.jedis.HostAndPort;
import redis.clients.jedis.Jedis; import redis.clients.jedis.JedisPoolConfig; import redis.clients.jedis.JedisSentinelPool; public class SentinelTest { public static void main(String[] args) { // 使用HashSet添加多个sentinel HashSet<String> sentinels = new HashSet<String>(); // 添加sentinel主机和端口 sentinels.add("192.168.126.110:26379"); sentinels.add("192.168.126.120:26379"); // 创建config JedisPoolConfig poolConfig = new JedisPoolConfig(); // 控制一个pool最多有多少个状态为idle(空闲的)的jedis实例。 poolConfig.setMaxIdle(10); // 控制一个pool最多有多少个jedis实例。 poolConfig.setMaxTotal(100); // 表示当borrow(引入)一个jedis实例时,最大的等待时间,如果超过等待时间,则直接抛出JedisConnectionException; poolConfig.setMaxWaitMillis(2000); // 在borrow一个jedis实例时,是否提前进行validate操作;如果为true,则得到的jedis实例均是可用的; poolConfig.setTestOnBorrow(true); // 通过Jedis连接池创建一个Sentinel连接池 JedisSentinelPool pool = new JedisSentinelPool("mymaster", sentinels, poolConfig); // 获取master的主机和端口 HostAndPort currentHostMaster = pool.getCurrentHostMaster(); System.out.println(currentHostMaster.getHost() + "--" + currentHostMaster.getPort()); // 从Sentinel池中获取资源 Jedis resource = pool.getResource(); // 打印资源中key为name的值 System.out.println(resource.get("a")); // 关闭资源 resource.close(); } }
执行结果: