前言
学IT的人经常要去而操作系统,而装操作系统大部分都是交互式的操作,也就是说安装时需要有人在旁边设置语言,时间,网络,或者点下一步,下一步这样子,装系统变成了一个人机交互的过程。如果装一台操作系统还可以,但是如果给机房装操作系统,有多台的操作系统的话,就会很累,装操作系统就会变成一项机械的体力劳动。
于是乎,有人提出,既然整个机房装系统的配置是一样的,那么能不能使用同样的配置应用于所有机器。也就是说,提前定制好相关配置,写到一个文件里面,在系统启动时会读取这个文件,根据这个文件来设置后续的时间,语言,网络等系统配置。这个文件就是kickstart。
在实际的机房操作中,安装操作系统往往都不是有人在旁边一直点下一步,人机交互式的点相关配置的(机房温度很高,并且线很多,总之一把人都不会愿意呆很久。)。更多情况下我们是先设定好相关配置,然后指出操作系统的安装方式。接下来静静等待就好。
常见的非交互式的安装操作系统的方式主要有以下三种。
- 制作自动化安装的iso镜像(通过u盘来安装),主要是在原有的系统镜像上做一些修改,让我们自定制的配置文件kickstartt与原有的系统镜像融合,形成新的镜像。进而实现自动化安装的步骤。
- pxe安装,是早期机房安装的神器。其原理主要就是在机器a上部署DHCP、TFTP等相关服务,把镜像和配置文件都放在机器a上,而后其他机器通过a的dhcp服务获得ip,通过ip与机器a进行通信,拉取机器a的配置文件以及镜像等到本地运行。然后就可以实现整个机房都自动化安装操作系统了。
- cobbler安装,这是对pxe的二次封装,在pxe当中,我们还需要手动的去部署dhcp和tftp等相关服务。在cobbler中,相关的配置、软件、服务等都被集成在了一起,管理起来能够更简单。
这三种方式,用的比较多的是第一种跟第三种。第一种经常用于使用在安装几台服务器的小场面上,而第三种一般用于几百台、甚至上千台这种规模。尤其是cobbler还可以进行跨网段的安装(网上有相关教程,不作为此篇文章的重点)。本片文章主要讲如何制作自动化的镜像和做cobbler服务器。
kickstart文件详解
在学习制作镜像和做cobbler之前,首先要学习如何把装系统过程中人机交互的那个过程做成一个配置文件。也就是说,我们要学习一下生成kickstart文件。
首先,我们要利用图形化的界面生成一个ks模板文件,当你理解ks文件所有参数和命令的含义后,可以直接在别人的模板上稍加修改,然后就可以直接拿去用了。
1.在一台装有图形化界面的机器上,我用的是centos7.4,安装相关工具并启动。
[ root@ygl ~ ]# yum install system-config-kickstart
#安装图形化管理工具
[ root@ygl ~ ]# system-config-kickstart
#启动图形界面
2.逐步安装,我把安装容易出错的配置说一下,其他的配置不再赘述
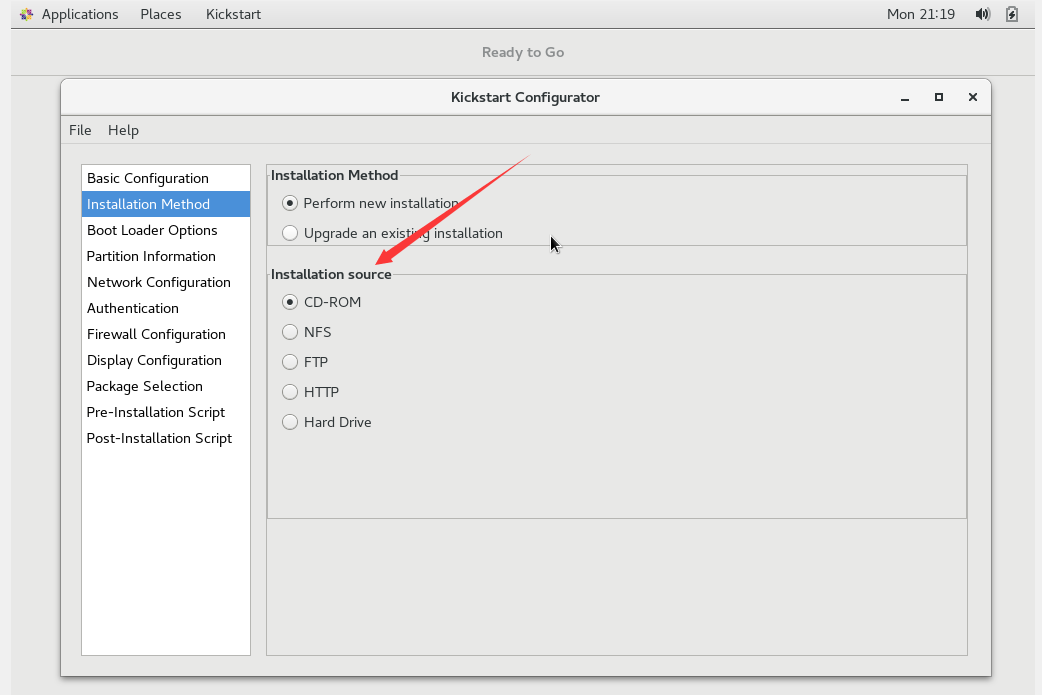
在选择安装源的时候,如果你是使用的u盘安装,就选择cd-rom,如果你是cobbler安装就选择http然后填上相应的ip和目录位置即可,比如
http://10.1.18.29/cobbler/ks_mirror/centos7.4。
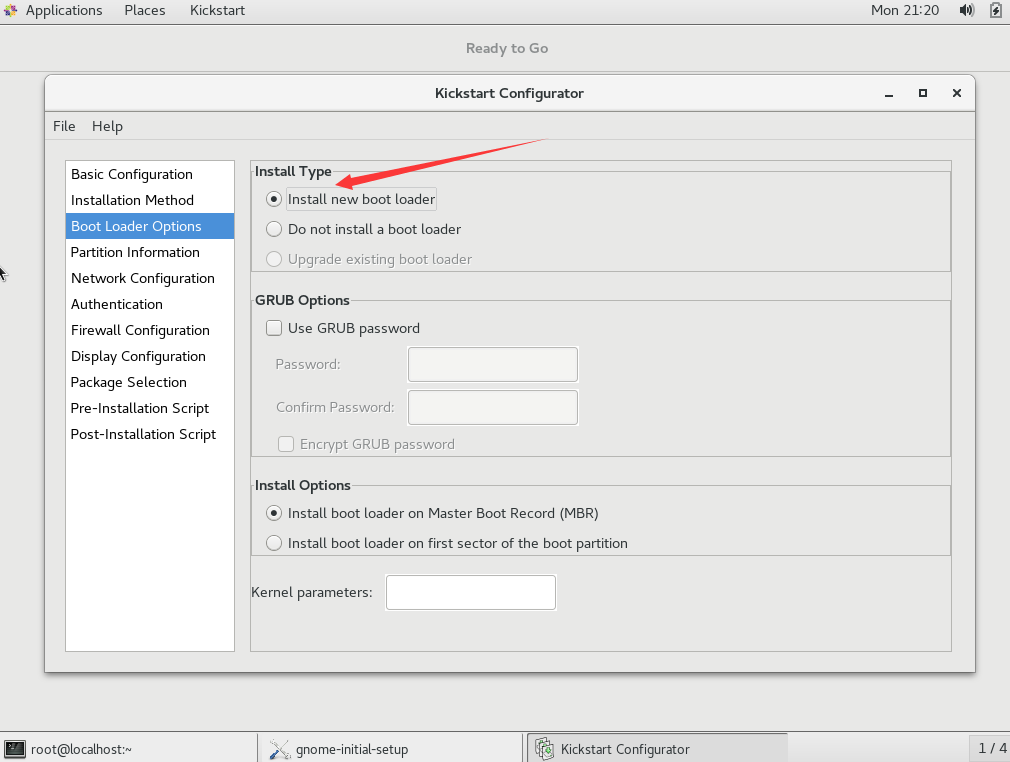
第二张图要勾选这几个位置,是强调重建bootloader。
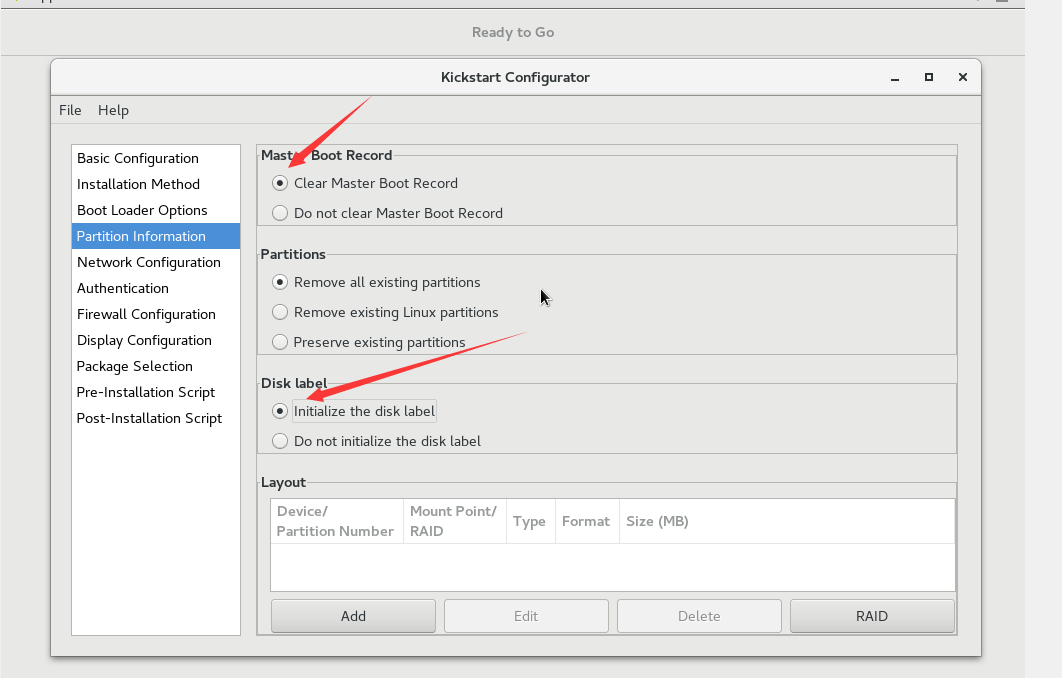
第三张图要注意的位置是,勾选重新初始化mbr和重新初始化卷标这两项内容。
如果只做kickstart文件上还有什么不理解的地方,可以参考此篇博客。图形化界面的话,只要看得懂英语,问题都不大。
u盘自动化安装
1.挂载初始镜像。
以centos7.4为例,你需要把最初的系统镜像挂载到某个目录,比如/mnt/
2.把所挂载的光盘里的所有文件全部复制出来,放到一个你指定的地方,我放在了/var/ftp/pub/fulliso/下面。 (这样放的目的是为了后期通过ftp拉取制作好的镜像,当然我先安装并开启了ftp服务。)
注意哦:有两个是隐藏文件,别忘了复制出来哦。
[root@29 ~]# yum -y install vsftpd
[root@29 ~]# systemctl start vsftpd
[root@29 ~]# cp -r /mnt/* /var/ftp/pub/fulliso/

#复制所有文件到一个新的目录
[root@29 ~]# cd /mnt/
[root@29 /mnt]# cp .discinfo .treeinfo /var/ftp/pub/fulliso/
#把隐藏文件也复制过去
3.删除所有的TRANS.TBL文件
[root@29 ~]# cd /var/ftp/pub/fulliso/
#切换目录
[root@29 /var/ftp/pub/fulliso]# find -name TRANS.TBL -exec rm {} \;
4.删除源文件的repodata文件。(因为你是要重新定制光盘镜像,原有的repodata可能因为你路径的变换或者内容的删减变得不再合适了,你需要删除并根据现有情况重新生成repodata)
[root@29 /var/ftp/pub/fulliso]# rm -rf repodata/
5.根据情况重新生成相关repodata。
[root@29 /var/ftp/pub/fulliso]# mkdir repodata
#新建目录
[root@29 /var/ftp/pub/fulliso]# cp /mnt/repodata/d8***-x86_64-comps.xml repodata/
#把原仓库中repodata目录下的内容复制到新的iso的repodata文件中。
#注意只复制那个xml结尾的文件。尾号为x86_64-comps.xml的文件,就是需要复制的那个。
#每台机器情况不一样,按实际情况去进行考量。
[root@29 /var/ftp/pub/fulliso]# createrepo -g repodata/d87379a47bc2060f833000b9cef7f9670195fe197271d37fce5791e669265e8b-c7-x86_64-comps.xml ./
#生成新的repodata文件。
6.定制kickstart文件
上文中生成的kickstart文件是个基本的模板,真实的安装环境我们还需要进行二次修改。
最小化安装版kickstart文件
#platform=x86, AMD64, or Intel EM64T
#version=DEVEL
# Install OS instead of upgrade
install        #选择安装还是选择更新
# Keyboard layouts
keyboard 'us'
# Root password  #root用户密码的设定,可利用openssl命令设定(用法见百度)
#或者在上文中图形化生成ks模板文件时直接设定好密码。
rootpw --iscrypted $1$GKfMMD9.$Cgag5pWRZcCLO52j1Hw4P1
# Use cdrom  installation
cdrom     #重要的一个选项,如果是u盘装就选cdrom,如果cobbler装就和初始的那
#个ks文件一样就好,声明是网络安装和相关服务的ip地址。
# System language
lang en_US
# Firewall configuration
firewall --disabled
# System authorization information
auth  --useshadow  --passalgo=sha512
# Use text mode install
text
# SELinux configuration
selinux --disabled
# Do not configure the X Window System
skipx

# Network information
network  --bootproto=dhcp --device=ens33
# Reboot after installation
reboot
# System timezone
timezone Asia/Shanghai
# System bootloader configuration
bootloader --location=mbr
# Clear the Master Boot Record
zerombr
# Partition clearing information
clearpart --all --initlabel
# Disk partitioning information
#分区要注意不能分的太大了,要结合自己实际硬盘情况,不然安装的时候会报错。
#可以在分区的时候直接定义lvm卷。
part / --fstype="xfs" --size=20480
part /boot --fstype="xfs" --size=500
part swap --fstype="swap" --size=4096

#接下来是迷你版安装的相关yum包
%packages
@^minimal
@base
-abrt-addon-ccpp
-abrt-addon-python
-abrt-cli
-abrt-console-notification
-bash-completion
-blktrace
-bridge-utils
-bzip2
-chrony
-cryptsetup
-dmraid
-dosfstools
-ethtool
-fprintd-pam
-gnupg2
-hunspell
-hunspell-en
-kmod-kvdo
-kpatch
-ledmon
-libaio
-libreport-plugin-mailx
-libstoragemgmt
-lvm2
-man-pages
-man-pages-overrides
-mdadm
-mlocate
-mtr
-nano
-ntpdate
-pinfo
-plymouth
-pm-utils
-rdate
-rfkill
-rng-tools
-rsync
-scl-utils
-setuptool
-smartmontools
-sos
-sssd-client
-strace
-sysstat
-systemtap-runtime
-tcpdump
-tcsh
-teamd
-time
-unzip
-usbutils
-vdo
-vim-enhanced
-virt-what
-wget
-which
-words
-xfsdump
-xz
-yum-langpacks
-yum-utils
-zip

%end
上述文件除了密码之外的部分都可以拿去借鉴,如果你整个文件都拿去用的话,生成的默认密码是我所设置的密码。建议先自己生成一个模板ks文件,然后根据实际需要进行二次修改。
带桌面的全安装版本
#platform=x86, AMD64, or Intel EM64T
#version=DEVEL
# Install OS instead of upgrade
install
# Keyboard layouts
keyboard 'us'
# Root password
rootpw --iscrypted $1$GKfMMD9.$Cgag5pWRZcCLO52j1Hw4P1
# Use cdrom  installation
cdrom
# System language
lang en_US
# Firewall configuration
firewall --disabled
# System authorization information
auth  --useshadow  --passalgo=sha512
# Use text mode install
text
# SELinux configuration
selinux --disabled
# Do not configure the X Window System
skipx

# Network information
network  --bootproto=dhcp
# Reboot after installation
reboot
# System timezone
timezone Asia/Shanghai
# System bootloader configuration
bootloader --location=mbr
# Clear the Master Boot Record
zerombr
# Partition clearing information
clearpart --all --initlabel
# Disk partitioning information
part / --fstype="xfs" --size=20480
part /boot --fstype="xfs" --size=500
part swap --fstype="swap" --size=4096

%packages
@^graphical-server-environment
@base
@core
@desktop-debugging
@dial-up
@fonts
@gnome-desktop
@guest-agents
@guest-desktop-agents
@ha
@hardware-monitoring
@input-methods
@internet-browser
@java-platform
@kde-desktop
@large-systems
@load-balancer
@multimedia
@performance
@print-client
@virtualization-client
@virtualization-hypervisor
@virtualization-tools
@x11
chrony
kexec-tools


%end
7.生成专门的目录存放kickstart文件
[root@29 /var/ftp/pub/fulliso]# mkdir kickstart

[root@29 /var/ftp/pub/fulliso]# mv ks7-desktop.cfg  ks7-mini.cfg kickstart/
#将编写好的ks文件放入kickstart目录中,ks7-desktop.cfg是桌面完整版的配置
#ks7-mini.cfg是精简mini版本的配置
8.制作启动菜单
[root@29 /var/ftp/pub/fulliso]# cd isolinux/
#进入到启动菜单目录
[root@29 /var/ftp/pub/fulliso/isolinux]# vim isolinux.cfg
#修改启动菜单
原有的内容都不变,在原有基础上增加两个label,这两个label在启动的时候会显示出来。增加desktopl标签和mini标签,并且指明ks文件的存放位置。
...
...
...
label desktop
  menu label Install ^desktop system
  kernel vmlinuz
  append initrd=initrd.img ks=cdrom:/kickstart/ks7-desktop.cfg
label mini
  menu label Install an m^ini system
  kernel vmlinuz
  append initrd=initrd.img ks=cdrom:/kickstart/ks7-mini.cfg
label linux
  menu label ^Install CentOS 7
  kernel vmlinuz
  append initrd=initrd.img inst.stage2=hd:LABEL=CentOS\x207\x20x86_64 quiet

label check
  menu label Test this ^media & install CentOS 7
  menu default
  kernel vmlinuz
  append initrd=initrd.img inst.stage2=hd:LABEL=CentOS\x207\x20x86_64 rd.live.check quiet

menu separator # insert an empty line

# utilities submenu
menu begin ^Troubleshooting
  menu title Troubleshooting

label vesa
  menu indent count 5
  menu label Install CentOS 7 in ^basic graphics mode
  text help
        Try this option out if you're having trouble installing
        CentOS 7.
  endtext
  kernel vmlinuz
  append initrd=initrd.img inst.stage2=hd:LABEL=CentOS\x207\x20x86_64 xdriver=vesa nomodeset quiet

label rescue
  menu indent count 5
  menu label ^Rescue a CentOS system
  text help
        If the system will not boot, this lets you access files
        and edit config files to try to get it booting again.
  endtext
  kernel vmlinuz
  append initrd=initrd.img inst.stage2=hd:LABEL=CentOS\x207\x20x86_64 rescue quiet

label memtest
  menu label Run a ^memory test
  text help
        If your system is having issues, a problem with your
        system's memory may be the cause. Use this utility to
        see if the memory is working correctly.
  endtext
  kernel memtest

menu separator # insert an empty line

label local
  menu label Boot from ^local drive
  localboot 0xffff

menu separator # insert an empty line
menu separator # insert an empty line

label returntomain
  menu label Return to ^main menu
  menu exit
8.制作光盘镜像
[root@29 /var/ftp/pub]# mkisofs -R -J -T -v --no-emul-boot --boot-load-size 4 --boot-info-table -V "CentOS 7.4 autoinstall" -b isolinux/isolinux.bin -c isolinux/boot.cat -o /var/ftp/pub/auto_centos7.4.iso /var/ftp/pub/fulliso/
#这条命令很长,我讲下要注意的几个选项。
#-V "CentOS 7.4 autoinstall" 指的是镜像的详细信息,可以修改为和自己操作系
#统版本一样的名字
#-o /var/ftp/pub/auto_centos7.4.iso 指的是你自己制作的镜像的存放位置。
#建议放在pub的目录下,一会儿好用ftp拉取出来。
#最后一个参数是源文件的位置,就是你要制作为iso镜像的那一坨文件在哪里放。
#举例而言,我一开始就把所有制作镜像所需的文件都放在了/var/ftp/pub/fulliso/目录下
除了上面所说的一些点,其他内容都是没必要进行修改的,直接照抄即可,如果你想知道其他选项含义,建议百度或者使用man
9.利用ftp拉取镜像到windows下,然后拷贝至u盘。在安装的时候选择一下安装桌面版或者最小版,剩下的就完全是自动化的了。
cobbler自动化安装
当有更多的机器的时候,u盘自动化依然很累,我们需要一个更加一劳永逸的办法。那就是给机房内的一台电脑安装上操作系统,然后给它搭建cobbler服务,让其他的机器通过pxe进行自动化安装。
请先看完下面这篇博客会对你帮助很大的。
使用Cobbler批量安装操作系统
文中的操作我是完全实验过的,完全可行,但是有一点文中讲的不是很清楚。就是有关ks文件的设置。
如果你使用u盘安装,这部分配置文件要写成cdrom,如果使用cobbler安装,这部分修改为http的url,确保这个url能够访问到镜像。
下面贴上我使用cobbler自动安装操作系统的ks文件
#platform=x86, AMD64, or Intel EM64T
#version=DEVEL
# Install OS instead of upgrade
install
# Keyboard layouts
keyboard 'us'
# Root password
rootpw --iscrypted $1$GKfMMD9.$Cgag5pWRZcCLO52j1Hw4P1
# Use network installation
url --url="http://10.1.18.29/cobbler/ks_mirror/centos7.4"
# System language
lang en_US
# Firewall configuration
firewall --disabled
# System authorization information
auth  --useshadow  --passalgo=sha512
# Use text mode install
text
# SELinux configuration
selinux --disabled
# Do not configure the X Window System
skipx

# Network information
network  --bootproto=dhcp --device=ens33
# Reboot after installation
reboot
# System timezone
timezone Asia/Shanghai
# System bootloader configuration
bootloader --location=mbr
# Clear the Master Boot Record
zerombr
# Partition clearing information
clearpart --all --initlabel
# Disk partitioning information
part / --fstype="xfs" --size=40960
part /boot --fstype="xfs" --size=500
part /usr --fstype="xfs" --size=51200
part swap --fstype="swap" --size=4096

%packages
@^minimal
@base
-abrt-addon-ccpp
-abrt-addon-python
-abrt-cli
-abrt-console-notification
-bash-completion
-blktrace
-bridge-utils
-bzip2
-chrony
-cryptsetup
-dmraid
-dosfstools
-ethtool
-fprintd-pam
-gnupg2
-hunspell
-hunspell-en
-kmod-kvdo
-kpatch
-ledmon
-libaio
-libreport-plugin-mailx
-libstoragemgmt
-lvm2
-man-pages
-man-pages-overrides
-mdadm
-mlocate
-mtr
-nano
-ntpdate
-pinfo
-plymouth
-pm-utils
-rdate
-rfkill
-rng-tools
-rsync
-scl-utils
-setuptool
-smartmontools
-sos
-sssd-client
-strace
-sysstat
-systemtap-runtime
-tcpdump
-tcsh
-teamd
-time
-unzip
-usbutils
-vdo
-vim-enhanced
-virt-what
-wget
-which
-words
-xfsdump
-xz
-yum-langpacks
-yum-utils
-zip

%end


