前言:无奈研究了一下CodePush,遇到了很多坑~~ 但是原理呢不是很难理解,就是配置有点多,原理可以简单的参考一下我之前的一篇博客React-Native 热更新尝试(Android),下面说一下期间遇到的坑~
大家可以看一下官网:https://github.com/Microsoft/react-native-code-push,
如果觉得自己英文不太好的话可以看一下这哥们的博客:
React Native热更新部署/热更新-CodePush最新集成总结(新)
下面带大家一步一步实现一下传说中的rn热更新:
首先我们创建一个rn项目叫UpdateDemo,然后运行android:
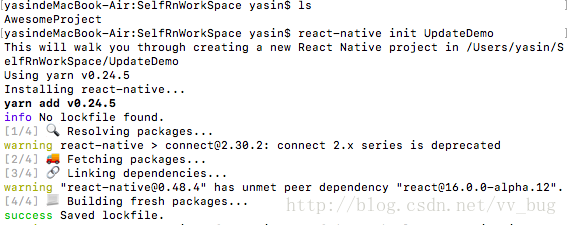
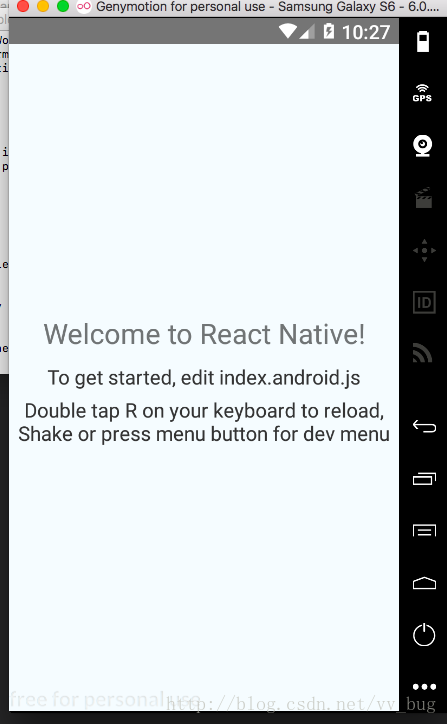
好啦! 很干净的一个app(不要在问我怎么创建和运行rn了)~~
开始之前小伙伴可以自己去看看CodePush做一个简单的了解,然后你需要的是一台mac电脑~
一、安装 CodePush
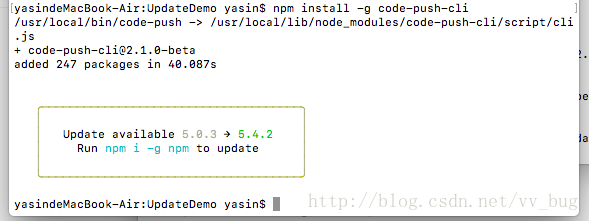
进入命令栏执行:

npm install -g code-push-cli然后短暂等待一会:
二、创建一个CodePush账号, 并登入
执行在命令栏里执行:
code-push register然后会弹出一个注册页面,我们直接github登入,登入成功后会显示你的access-key,我们直接copy一下:
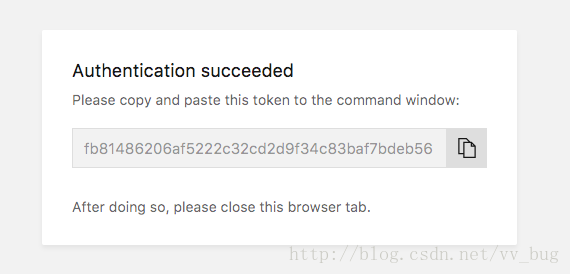
然后复制到命令栏中:

可以看到,我们已经成功的登入了~~
三、在CodePush注册一个我们的app
我们在终端输入:
code-push app add <appname> android react-native
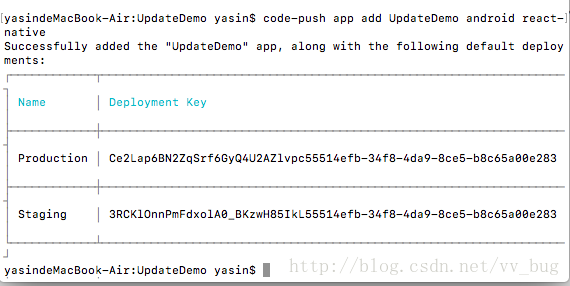
我们这里是以android为例子的~~
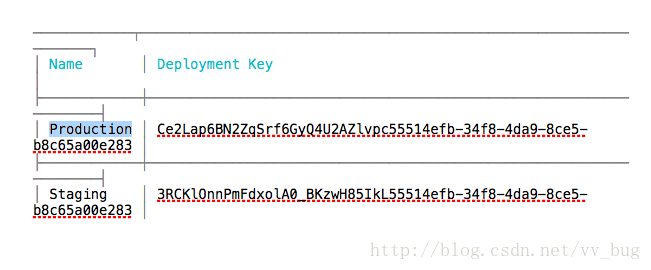
然后我们把Production和Staging对应的可以copy一下,后面需要用到~~
四、集成Android开发环境
1、进入到项目个根目录然后执行:
npm install --save react-native-code-push
然后短暂停留几秒~~~
2、进到android目录,然后执行:
npm i -g rnpm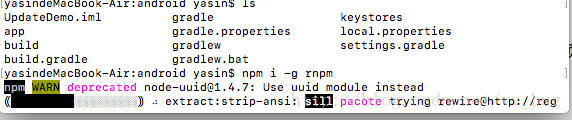
3、回到项目根目录,直接命令集成android环境:
rnpm link react-native-code-push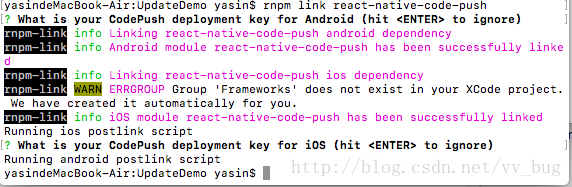
一路回车~~~~
然后用 AndroidStudio 打开android项目,找到/xxxx/UpdateDemo/android/app/build.gradle,你会发现多了几行代码:
compile project(':react-native-code-push')
apply from: "../../node_modules/react-native-code-push/android/codepush.gradle"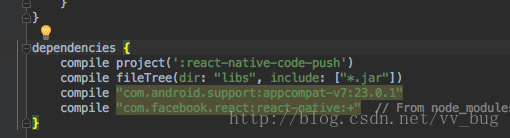
这就是脚本文件为我们自动生成的,然后/xxx/UpdateDemo/android/settings.gradle这个文件也多了几行代码:
include ':react-native-code-push'
project(':react-native-code-push').projectDir = new File(rootProject.projectDir, '../node_modules/react-native-code-push/android/app')
最后我们点击重新编译app:
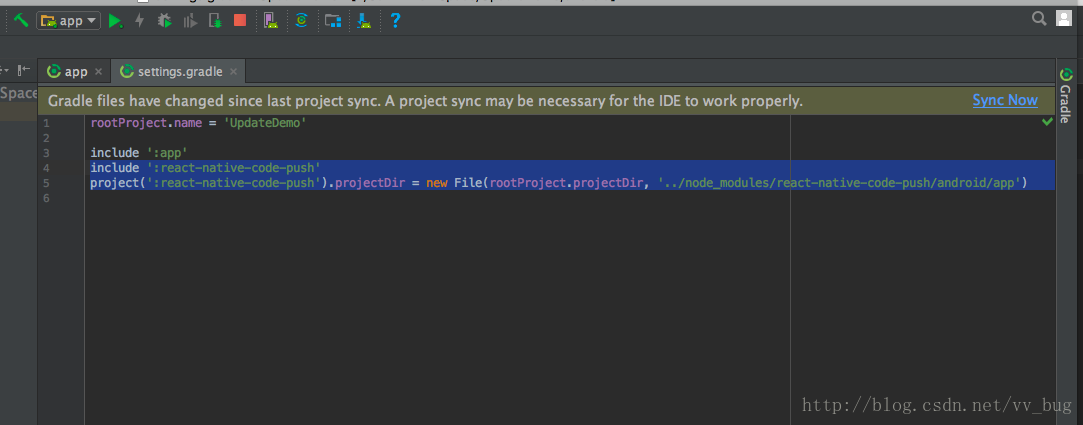
点击”Sync Now”~~
然后我们试着运行app,你会发现报了一个不明的错误,我们继续找到/xxx/UpdateDemo/android/app/src/main/java/com/updatedemo/MainApplication.java文件:
package com.updatedemo;

import android.app.Application;

import com.facebook.react.ReactApplication;
import com.facebook.react.ReactNativeHost;
import com.facebook.react.ReactPackage;
import com.facebook.react.shell.MainReactPackage;
import com.facebook.soloader.SoLoader;
import com.microsoft.codepush.react.CodePush;

import java.util.Arrays;
import java.util.List;

public class MainApplication extends Application implements ReactApplication {

    private final ReactNativeHost mReactNativeHost = new ReactNativeHost(this) {

        @Override
        protected String getJSBundleFile() {
            return CodePush.getJSBundleFile();
        }

        @Override
        public boolean getUseDeveloperSupport() {
            return BuildConfig.DEBUG;
        }

        @Override
        protected List<ReactPackage> getPackages() {
            return Arrays.<ReactPackage>asList(
                    new MainReactPackage(),
                    new CodePush("deployment-key-here", MainApplication.this, BuildConfig.DEBUG)
            );
        }
    };

    @Override
    public ReactNativeHost getReactNativeHost() {
        return mReactNativeHost;
    }

    @Override
    public void onCreate() {
        super.onCreate();
        SoLoader.init(this, /* native exopackage */ false);
    }
}
如果为了偷懒一下的话,直接把“deployment-key-here”用我们之前获取的Production的key替换就可以了
当然,我们是需要切换Production跟Staging的,所以我们得动态的配置我们的key,我们需要变成这样:

你会看到CODEPUSH_KEY变红色了,那么这个变量我们怎么配置呢?
我们找到xxxx/UpdateDemo/android/app/build.gradle文件,
改成:
buildTypes {
        release {
            minifyEnabled enableProguardInReleaseBuilds
            proguardFiles getDefaultProguardFile("proguard-android.txt"), "proguard-rules.pro"
            buildConfigField "String", "CODEPUSH_KEY", '"Ce2Lap6BN2ZqSrf6GyQ4U2AZlvpc55514efb-34f8-4da9-8ce5-b8c65a00e283"'
        }
        debug {
            buildConfigField "String", "CODEPUSH_KEY", '"3RCKlOnnPmFdxolA0_BKzwH85IkL55514efb-34f8-4da9-8ce5-b8c65a00e283"'
        }

        releaseStaging {
            minifyEnabled enableProguardInReleaseBuilds
            buildConfigField "String", "CODEPUSH_KEY", '"3RCKlOnnPmFdxolA0_BKzwH85IkL55514efb-34f8-4da9-8ce5-b8c65a00e283"'
        }
    }
里面的CODEPUSH_KEY即为我们之前获取的Deployment Key ,
release对应的Production
releaseStaging跟debug对应的Staging
然后重新编译一下as,会发现之前的地方不报红色了:
new CodePush(BuildConfig.CODEPUSH_KEY, MainApplication.this, BuildConfig.DEBUG)package com.updatedemo;
import android.app.Application;
import com.facebook.react.ReactApplication;
import com.facebook.react.ReactNativeHost;
import com.facebook.react.ReactPackage;
import com.facebook.react.shell.MainReactPackage;
import com.facebook.soloader.SoLoader;
import com.microsoft.codepush.react.CodePush;
import java.util.Arrays;
import java.util.List;
public class MainApplication extends Application implements ReactApplication {
private final ReactNativeHost mReactNativeHost = new ReactNativeHost(this) {
@Override
protected String getJSBundleFile() {
return CodePush.getJSBundleFile();
}
@Override
public boolean getUseDeveloperSupport() {
return BuildConfig.DEBUG;
}
@Override
protected List<ReactPackage> getPackages() {
return Arrays.<ReactPackage>asList(
new MainReactPackage(),
new CodePush(BuildConfig.CODEPUSH_KEY, MainApplication.this, BuildConfig.DEBUG)
);
}
};
@Override
public ReactNativeHost getReactNativeHost() {
return mReactNativeHost;
}
@Override
public void onCreate() {
super.onCreate();
SoLoader.init(this, /* native exopackage */ false);
}
}
然后我们顺便把我们的keystore打包key配置一下:
不懂的小伙伴可以去看我之前的一篇博客:
然后配置好keystore之后,然后我们的/xxxx/UpdateDemo/android/app/build.gradle文件就变成了这样:
apply plugin: "com.android.application"

import com.android.build.OutputFile

/**
 * The react.gradle file registers a task for each build variant (e.g. bundleDebugJsAndAssets
 * and bundleReleaseJsAndAssets).
 * These basically call `react-native bundle` with the correct arguments during the Android build
 * cycle. By default, bundleDebugJsAndAssets is skipped, as in debug/dev mode we prefer to load the
 * bundle directly from the development server. Below you can see all the possible configurations
 * and their defaults. If you decide to add a configuration block, make sure to add it before the
 * `apply from: "../../node_modules/react-native/react.gradle"` line.
 *
 * project.ext.react = [
 *   // the name of the generated asset file containing your JS bundle
 *   bundleAssetName: "index.android.bundle",
 *
 *   // the entry file for bundle generation
 *   entryFile: "index.android.js",
 *
 *   // whether to bundle JS and assets in debug mode
 *   bundleInDebug: false,
 *
 *   // whether to bundle JS and assets in release mode
 *   bundleInRelease: true,
 *
 *   // whether to bundle JS and assets in another build variant (if configured).
 *   // See http://tools.android.com/tech-docs/new-build-system/user-guide#TOC-Build-Variants
 *   // The configuration property can be in the following formats
 *   //         'bundleIn${productFlavor}${buildType}'
 *   //         'bundleIn${buildType}'
 *   // bundleInFreeDebug: true,
 *   // bundleInPaidRelease: true,
 *   // bundleInBeta: true,
 *
 *   // whether to disable dev mode in custom build variants (by default only disabled in release)
 *   // for example: to disable dev mode in the staging build type (if configured)
 *   devDisabledInStaging: true,
 *   // The configuration property can be in the following formats
 *   //         'devDisabledIn${productFlavor}${buildType}'
 *   //         'devDisabledIn${buildType}'
 *
 *   // the root of your project, i.e. where "package.json" lives
 *   root: "../../",
 *
 *   // where to put the JS bundle asset in debug mode
 *   jsBundleDirDebug: "$buildDir/intermediates/assets/debug",
 *
 *   // where to put the JS bundle asset in release mode
 *   jsBundleDirRelease: "$buildDir/intermediates/assets/release",
 *
 *   // where to put drawable resources / React Native assets, e.g. the ones you use via
 *   // require('./image.png')), in debug mode
 *   resourcesDirDebug: "$buildDir/intermediates/res/merged/debug",
 *
 *   // where to put drawable resources / React Native assets, e.g. the ones you use via
 *   // require('./image.png')), in release mode
 *   resourcesDirRelease: "$buildDir/intermediates/res/merged/release",
 *
 *   // by default the gradle tasks are skipped if none of the JS files or assets change; this means
 *   // that we don't look at files in android/ or ios/ to determine whether the tasks are up to
 *   // date; if you have any other folders that you want to ignore for performance reasons (gradle
 *   // indexes the entire tree), add them here. Alternatively, if you have JS files in android/
 *   // for example, you might want to remove it from here.
 *   inputExcludes: ["android/**", "ios/**"],
 *
 *   // override which node gets called and with what additional arguments
 *   nodeExecutableAndArgs: ["node"],
 *
 *   // supply additional arguments to the packager
 *   extraPackagerArgs: []
 * ]
 */

apply from: "../../node_modules/react-native/react.gradle"
apply from: "../../node_modules/react-native-code-push/android/codepush.gradle"

/**
 * Set this to true to create two separate APKs instead of one:
 *   - An APK that only works on ARM devices
 *   - An APK that only works on x86 devices
 * The advantage is the size of the APK is reduced by about 4MB.
 * Upload all the APKs to the Play Store and people will download
 * the correct one based on the CPU architecture of their device.
 */
def enableSeparateBuildPerCPUArchitecture = false

/**
 * Run Proguard to shrink the Java bytecode in release builds.
 */
def enableProguardInReleaseBuilds = false

android {
    signingConfigs {
        release {
            keyAlias 'update'
            keyPassword '123456'
            storeFile file('/Users/yasin/SelfRnWorkSpace/UpdateDemo/android/update.keystore')
            storePassword '123456'
        }
    }
    compileSdkVersion 23
    buildToolsVersion "23.0.1"
    defaultConfig {
        applicationId "com.updatedemo"
        minSdkVersion 16
        targetSdkVersion 22
        versionCode 1
        versionName "1.0"
        ndk {
            abiFilters "armeabi-v7a", "x86"
        }
    }
    splits {
        abi {
            reset()
            enable enableSeparateBuildPerCPUArchitecture
            universalApk false  // If true, also generate a universal APK
            include "armeabi-v7a", "x86"
        }
    }
    buildTypes {
        release {
            minifyEnabled enableProguardInReleaseBuilds
            proguardFiles getDefaultProguardFile("proguard-android.txt"), "proguard-rules.pro"
            buildConfigField "String", "CODEPUSH_KEY", '"Ce2Lap6BN2ZqSrf6GyQ4U2AZlvpc55514efb-34f8-4da9-8ce5-b8c65a00e283"'
            signingConfig signingConfigs.release
        }
        debug {
            buildConfigField "String", "CODEPUSH_KEY", '"3RCKlOnnPmFdxolA0_BKzwH85IkL55514efb-34f8-4da9-8ce5-b8c65a00e283"'
        }
        releaseStaging {
            minifyEnabled enableProguardInReleaseBuilds
            buildConfigField "String", "CODEPUSH_KEY", '"3RCKlOnnPmFdxolA0_BKzwH85IkL55514efb-34f8-4da9-8ce5-b8c65a00e283"'
            signingConfig signingConfigs.release
        }
    }
    // applicationVariants are e.g. debug, release
    applicationVariants.all { variant ->
        variant.outputs.each { output ->
            // For each separate APK per architecture, set a unique version code as described here:
            // http://tools.android.com/tech-docs/new-build-system/user-guide/apk-splits
            def versionCodes = ["armeabi-v7a": 1, "x86": 2]
            def abi = output.getFilter(OutputFile.ABI)
            if (abi != null) {  // null for the universal-debug, universal-release variants
                output.versionCodeOverride =
                        versionCodes.get(abi) * 1048576 + defaultConfig.versionCode
            }
        }
    }
}

dependencies {
    compile project(':react-native-code-push')
    compile fileTree(include: ['*.jar'], dir: 'libs')
    compile 'com.android.support:appcompat-v7:23.0.1'
    compile 'com.facebook.react:react-native:+'
    // From node_modules
}

// Run this once to be able to run the application with BUCK
// puts all compile dependencies into folder libs for BUCK to use
task copyDownloadableDepsToLibs(type: Copy) {
    from configurations.compile
    into 'libs'
}
好啦~~~ 有点偏题了哈~ 配置完key后,我们的android配置到这就结束了
五、配置React Native环境
我们什么时候更新我们的app呢? 我们为了简单一点就直接在rn的第一个页面中作更新了,我们直接在我们的index.android.js文件的componentDidMount方法:
  componentDidMount() {
        AppState.addEventListener("change", (newState) => {
            newState === "active" && CodePush.sync();
        });
    }
全部内容:
/**
 * Sample React Native App
 * https://github.com/facebook/react-native
 * @flow
 */

import React, {Component} from 'react';
import {
    AppRegistry,
    StyleSheet,
    Text,
    View,
    AppState,
} from 'react-native';
import CodePush from 'react-native-code-push';

const VERSION = '1.0.0';
export default class UpdateDemo extends Component {
    render() {
        return (
            <View style={styles.container}>
                <Text>{'当前版本:' + VERSION}</Text>
                <Text style={styles.welcome}>
                    Welcome to React Native!
                </Text>
                <Text style={styles.instructions}>
                    To get started, edit index.android.js
                </Text>
                <Text style={styles.instructions}>
                    Double tap R on your keyboard to reload,{'\n'}
                    Shake or press menu button for dev menu
                </Text>
            </View>
        );
    }

    componentDidMount() {
        AppState.addEventListener("change", (newState) => {
            newState === "active" && CodePush.sync();
        });
    }
}

const styles = StyleSheet.create({
    container: {
        flex: 1,
        justifyContent: 'center',
        alignItems: 'center',
        backgroundColor: '#F5FCFF',
    },
    welcome: {
        fontSize: 20,
        textAlign: 'center',
        margin: 10,
    },
    instructions: {
        textAlign: 'center',
        color: '#333333',
        marginBottom: 5,
    },
});

AppRegistry.registerComponent('UpdateDemo', () => UpdateDemo);
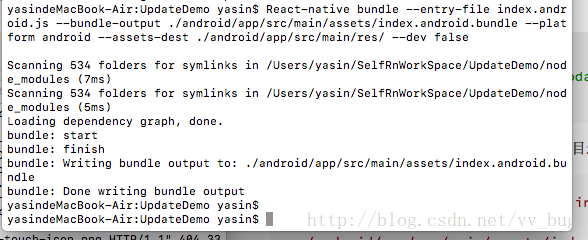
然后我们打个生产包运行一下,我们直接在根目录执行:
React-native bundle --entry-file index.android.js --bundle-output ./android/app/src/main/assets/index.android.bundle --platform android --assets-dest ./android/app/src/main/res/ --dev false
然后到我们android studio中把 buildtype改为release:
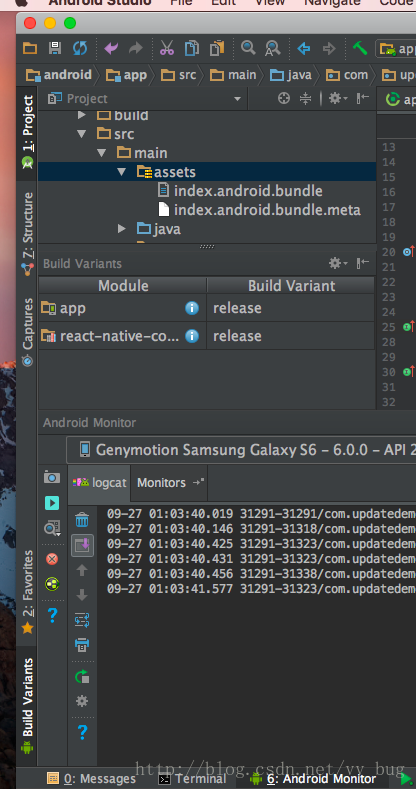
然后直接运行我们的app:
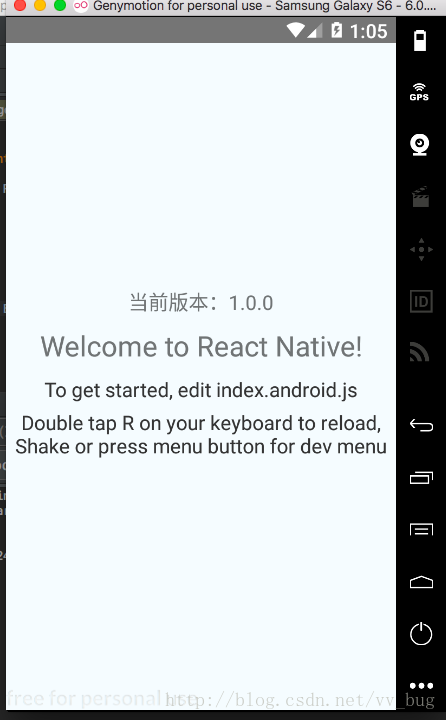
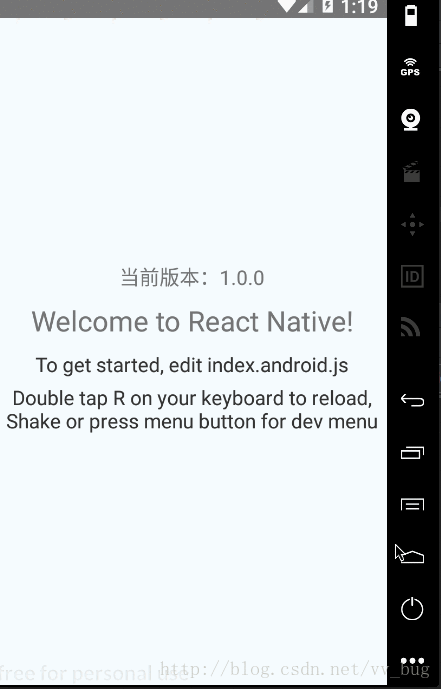
可以看到,我们的app出现了,我们加了一个版本控制为:1.0.0,
然后我们怎么发布我们的jsbundle让它热更新呢?
六、发布jsbundle到codepush
比如我们现在要升级了,我们模拟一下,把rn页面的当前版本1.0.0的提示改为1.0.1:
const VERSION = '1.0.1';
export default class UpdateDemo extends Component {
    render() {
        return (
            <View style={styles.container}>
                <Text>{'当前版本:' + VERSION}</Text>
然后我们在项目根目录创建一个bundles文件夹:

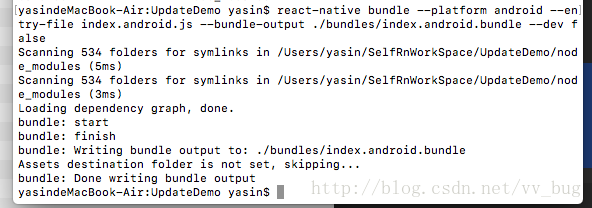
然后打一个jsbundle包到bundles文件夹中:
react-native bundle --platform android --entry-file index.android.js --bundle-output ./bundles/index.android.bundle --dev false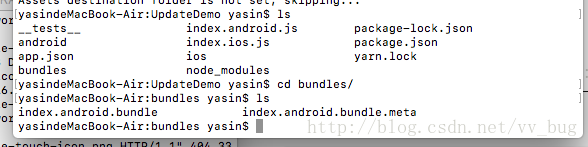
index.android.bundle即为我们需要上传到codepush的文件~~
最后到codepush
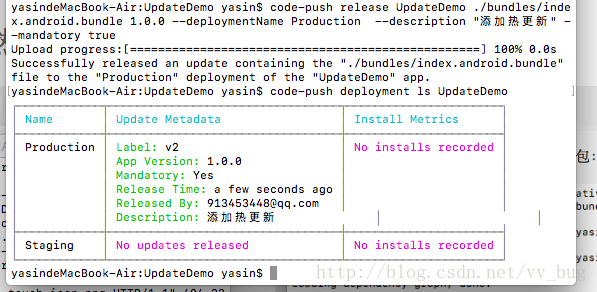
code-push release UpdateDemo ./bundles/index.android.bundle 1.0.0 --deploymentName Production --description "更改版本为1.0.1" --mandatory true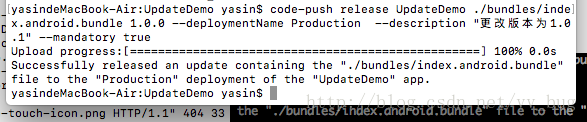
然后查看一下我们的发布情况:
code-push deployment ls UpdateDemo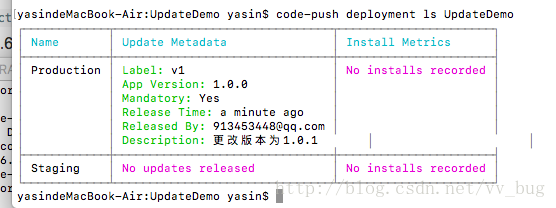
好啦~~~ 我们改变一下我们android中的版本为1.0.0,因为要跟我们codepush上的版本对应起来,所以我们找到andoid的/xxx/UpdateDemo/android/app/build.gradle文件,然后把版本号改为:1.0.0:
 defaultConfig {
        applicationId "com.updatedemo"
        minSdkVersion 16
        targetSdkVersion 22
        versionCode 1
        versionName "1.0.0"
        ndk {
            abiFilters "armeabi-v7a", "x86"
        }
    }
然后重新编译运行一下:
可以看到,我们运行后当前版本先是1.0.0,然后过了一会变成了1.0.1,也就是我们的热更新已经集成好了~~
注意:android中的versionName一定要跟codepush中的version一样,我就是这里卡了很久~~~
那如果我们要针对1.0.0再做一次升级呢?
我们继续操作一下~~
const VERSION = '1.0.1';
export default class UpdateDemo extends Component {
    render() {
        return (
            <View style={styles.container}>
                <Text>{'我添加了热更新:' + VERSION}</Text>
可以看到,我改了几个文字,然后我们重新打包:
然后重新上传codepush:
我们重新打开我们的app,顺便看一下as的log:
好啦~到这里我们的热更新就全部完毕了
小伙伴正在项目的情况可能是这样的:进入app请求后台接口–>根据后台接口判断是否需要更新—>弹出dialog提示用户—>点击更新—>执行CodePush.sync();
具体我就不掩饰了~~~
不懂的童鞋可以进群联系我,欢迎交流~~
qq交流群:

参考:
http://www.jianshu.com/p/9e3b4a133bcc
https://github.com/Microsoft/react-native-code-push,