原文地址:CentOS 7.4下使用yum安装MySQL5.7.20
1.卸载 先停掉mysql进程 没有安装过的可以直接跳过
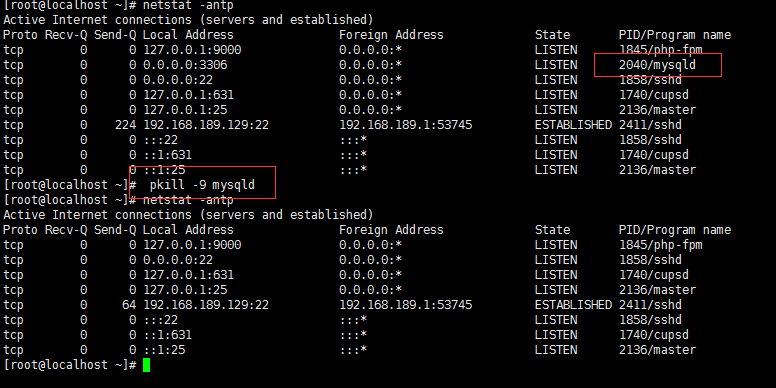
pkill -9 mysqld
rpm -qa|grep -i mysql
用命令 yum -y remove
yum -y remove mysql-community-client-5.6.38-2.el7.x86_64
卸载不掉的用 rpm -ev
依次卸载 直到没有

2.下载mysql的repo源 这个安装的mysql5.7.20 /**纠正一下,这源下载的是最新的版本 ****/
[root@localhost ~]# cd /usr/local/src/
[root@localhost src]# wget http://repo.mysql.com/mysql57-community-release-el7-8.noarch.rpm
[root@localhost src]# rpm -ivh mysql57-community-release-el7-8.noarch.rpm
[root@localhost src]# yum -y install mysql-server
(也可以指定安装目录 yum --installroot=/usr/local/mysql --releasever=/ -y install mysql-server )我没试,这样装环境变量配置都不用你管,装上直接启动就行。安装路径是默认的。

一路 y

根据步骤安装就可以了,
默认配置文件路径:
配置文件:/etc/my.cnf
日志文件:/var/log/var/log/mysqld.log
服务启动脚本:/usr/lib/systemd/system/mysqld.service
socket文件:/var/run/mysqld/mysqld.pid
默认的配置文件/etc/my.cnf如下:
# innodb_buffer_pool_size = 128M
#
# Remove leading # to turn on a very important data integrity option: logging
# changes to the binary log between backups.
# log_bin
#
# Remove leading # to set options mainly useful for reporting servers.
# The server defaults are faster for transactions and fast SELECTs.
# Adjust sizes as needed, experiment to find the optimal values.
# join_buffer_size = 128M
# sort_buffer_size = 2M
# read_rnd_buffer_size = 2M
datadir=/var/lib/mysql
socket=/var/lib/mysql/mysql.sock

# Disabling symbolic-links is recommended to prevent assorted security risks
symbolic-links=0

log-error=/var/log/mysqld.log
pid-file=/var/run/mysqld/mysqld.pid
"/etc/my.cnf" 27L, 960C                                    27,1          Bot
# For advice on how to change settings please see
# http://dev.mysql.com/doc/refman/5.7/en/server-configuration-defaults.html

[mysqld]
#
# Remove leading # and set to the amount of RAM for the most important data
# cache in MySQL. Start at 70% of total RAM for dedicated server, else 10%.
# innodb_buffer_pool_size = 128M
#
# Remove leading # to turn on a very important data integrity option: logging
# changes to the binary log between backups.
# log_bin
#
# Remove leading # to set options mainly useful for reporting servers.
# The server defaults are faster for transactions and fast SELECTs.
# Adjust sizes as needed, experiment to find the optimal values.
# join_buffer_size = 128M
# sort_buffer_size = 2M
# read_rnd_buffer_size = 2M
datadir=/var/lib/mysql
socket=/var/lib/mysql/mysql.sock

# Disabling symbolic-links is recommended to prevent assorted security risks
symbolic-links=0

log-error=/var/log/mysqld.log
pid-file=/var/run/mysqld/mysqld.pid
不过安装完成后,密码为随机密码,需要重置密码。
3. 启动mysql服务
service mysqld restart
重置密码
[root@localhost ~]# grep "password" /var/log/mysqld.log

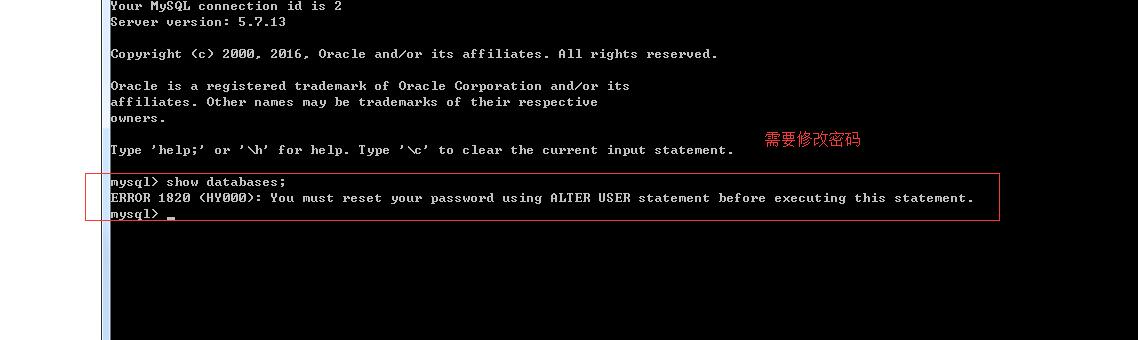
可以看到 输入 mysql -u root -p 密码 进入 第一次登陆 ,需要重置密码 要不什么也不能操作
接下来重置密码:5.7.20 为了安全,密码必须包含 数字字母符号
alter user 'root'@'localhost' identified by 'Root!!2018';
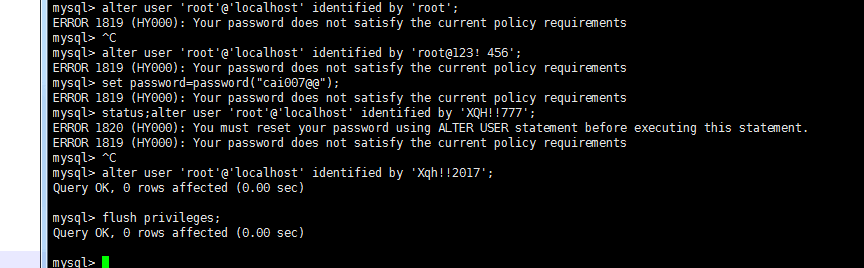
最后记得刷新权限;
flush privileges
也可以 直接再添加新用户
CREATE USER ‘root’@‘%‘ IDENTIFIED BY ‘您的密码‘;
grant all on *.* to 'root001'@'%' identified by 'Root@@' with grant option;
增加root用户指定可以任意IP登录,如果想限制只能让指定IP登录请把%替换成IP地址