这里使用的是安装在VMWare上的CentOS6.8虚拟机,用户是root
①首先安装编译工具和依赖库
yum install gcc gcc-c++
yum install openssl-devel
yum install c-ares-devel
yum install libuuid-devel
yum install cmake
yum install build-essential python quilt devscripts python-setuptools python3
yum install libssl-dev libc-ares-dev uuid-dev daemon openssl-devel
②安装libwebsockets,为mosquitto添加websocket支持
这里没有使用github,不知道是抽风了还是校园网问题,太慢了,我把它添加到自己的码云上后再clone的
yum install git
git clone https://gitee.com/hujianbest/libwebsockets.git
克隆完成后编译安装
cd libwebsockets
mkdir build
cd  build/
cmake .. -DLIB_SUFFIX=64
make install
修正链接库
gedit /etc/ld.so.conf.d/liblocal.conf添加如下信息
/usr/local/lib64
/usr/local/lib
保存后执行ldconfig
ldconfig③安装mosquitto
从github上下载压缩包,比较小抽风也能下
解压缩
tar zxvf mosquitto-1.4.9.tar.gz修改config.mk文件,让其支持websocket
cd mosquitto-1.4.9
gedit config.mk
修改
WITH_WEBSOCKETS:=yes(默认为no)
然后make
make这里我出现了*** [mosquitto.8] 错误,解决办法如下
1.安装docbook-style-xsl
yum -y install docbook-style-xsl2.查看文件docbook.xsl被安装到了哪里
[root@localhost /]# find / -name docbook.xsl
/usr/share/sgml/docbook/xsl-stylesheets-1.75.2/html/docbook.xsl
/usr/share/sgml/docbook/xsl-stylesheets-1.75.2/epub/docbook.xsl
/usr/share/sgml/docbook/xsl-stylesheets-1.75.2/xhtml-1_1/docbook.xsl
/usr/share/sgml/docbook/xsl-stylesheets-1.75.2/fo/docbook.xsl
/usr/share/sgml/docbook/xsl-stylesheets-1.75.2/xhtml/docbook.xsl
/usr/share/sgml/docbook/xsl-stylesheets-1.75.2/manpages/docbook.xsl
[root@localhost /]#
3.将上面红字中的地址修改到文件manpage.xsl里的对应位置
cd /home/xxx/mosquitto-1.4.9/man
gedit manpage.xsl
修改位置如下
<!-- Set parameters for manpage xsl -->
<xsl:stylesheet xmlns:xsl="http://www.w3.org/1999/XSL/Transform" version="1.0">
	<xsl:import href="/usr/share/sgml/docbook/xsl-stylesheets-1.75.2/manpages/docbook.xsl"/>
	<xsl:strip-space elements="member"/>
	<!-- Don't display notes list of link urls. -->
	<xsl:param name="man.endnotes.list.enabled">0</xsl:param>
	<xsl:param name="man.endnotes.are.numbered">0</xsl:param>
	<!-- But if we do, set a base url for the relative links. -->
	<xsl:param name="man.base.url.for.relative.links">http://mosquitto.org/man/</xsl:param>
	<!-- Don't output filename when generating. -->
	<xsl:param name="man.output.quietly" select="1"></xsl:param>
	<!-- Generate ansi style function synopses. -->
	<xsl:param name="man.funcsynopsis.style">ansi</xsl:param>
</xsl:stylesheet>
4.重新编译安装
make
make install
④测试mosquitto
这里为了验证能够开启服务,最简单的配置了下mosquitto
cp mosquitto.conf /etc/mosquitto
gedit /etc/mosquitto/mosquitto.conf
添加如下信息
listener 1883
allow_anonymous true
max_connections -1
保存退出
运行mosquitto服务
mosquitto -c /etc/mosquitto/mosquitto.conf新开两个Terminal
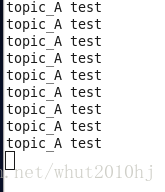
一个订阅topic_A
[XXX@localhost Desktop]$ mosquitto_sub -t topic_A一个在topic_A主题发布消息

可以看到订阅端收到了消息
用MQTT.fx测试
新建连接,不需要用户名和密码,因为开启了匿名登录,这里用ifconfig看一下虚拟机的IP

完了点连接

发现连接上了,右边绿色圆圈就是连接上了,
服务端也会有提示信息

然后我们订阅topic_A,或者在topic_A推送消息,发现几端都是同步的

mosquitto具体的使用可以参阅官方doc进行配置,主要是操作mosquitto.conf文件,如前面所见,这个文件里也提供了具体的注释描述。