网站写了蛮长时间了,一直想具体分析分析Flask的运行机制,但是源码看得断断续续,不过最近状态不错,进度上来了点,这里先新建一个类别,专门来说说Flask和源码有关系的内容, 这篇准备粗略说一下应用Flask框架的时候,从HTTP请求开始到响应的流程
前置技能 --- WSGI
在具体读源码之前,这里先需要说一个概念,什么是WSGI。
WSGI,全称 Web Server Gateway Interface,或者 Python Web Server Gateway Interface ,是为 Python 语言定义的 Web 服务器和 Web 应用程序或框架之间的一种简单而通用的接口。自从 WSGI 被开发出来以后,许多其它语言中也出现了类似接口。
WSGI 的官方定义是,the Python Web Server Gateway Interface。从名字就可以看出来,这东西是一个Gateway,也就是网关。网关的作用就是在协议之间进行转换。
WSGI 是作为 Web 服务器与 Web 应用程序或应用框架之间的一种低级别的接口,以提升可移植 Web 应用开发的共同点。WSGI 是基于现存的 CGI 标准而设计的。
很多框架都自带了 WSGI server ,比如 Flask,webpy,Django、CherryPy等等。当然性能都不好,自带的 web server 更多的是测试用途,发布时则使用生产环境的 WSGI server或者是联合 nginx 做 uwsgi 。
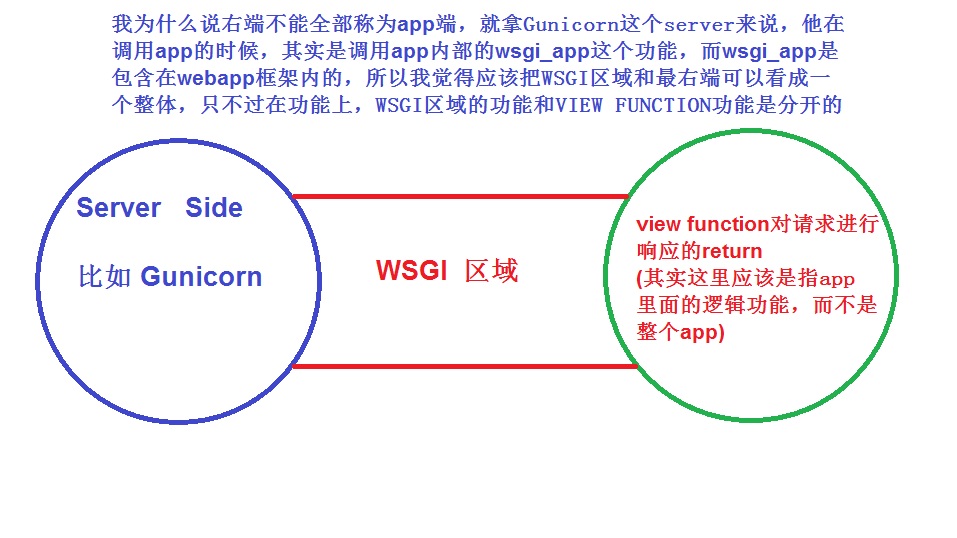
在网上搜过WSGI的人应该会看到一个图,左边是Server,右边是APP,中间有一个连接纽带是WSGI。
不过,我看了源码以后的理解和这个有些不同,我个人觉得,实际上不应该单独写一个APP,因为,这个WSGI的使用方法实际上也是包含在APP里面的,最右端的app实际上应该指的是逻辑功能,包括URL和view function的对应关系。
所以我个人的理解如下自己画的图
WSGI其实是作为一个接口,来接受Server传递过来的信息, 然后通过这个接口调用后台app里的view function进行响应。
WSGI具体的功能
上面讲到了WSGI可以起到一个接口的功能,前面对接服务器,后面对接app的具体功能
我们先来看看最简单的一个wsgi_app的实现
-
def application(environ, start_response): #一个符合wsgi协议的应用程序写法应该接受2个参数 -
start_response('200 OK', [('Content-Type', 'text/html')]) #environ为http的相关信息,如请求头等 start_response则是响应信息 -
return [b'<h1>Hello, web!</h1>'] #return出来是响应内容
但是,作为app本身,你就算启动了程序,你也没办法给application传递参数?
所以,实际上,调用application和传递2个参数的动作,是服务器来进行的,比如Gunicorn.
而这个叫做application的东西,在Flask框架内部的名字,叫做wsgi_app,请看下面章节的源码。
Flask和WSGI
生成Flask实例
我们再来看下生成flask应用的操作写法,用过的人肯定都非常熟悉。
-
from flask import Flask -
app = Flask(__name__) #生成app实例 -
@app.route('/') -
def index(): -
return 'Hello World'
这样,一个flask app就生成了
但是这里有一个概念必须要搞清楚,就是当你的gunicorn收到http请求,去调用app的时候,他实际上是用了Flask 的 __call__方法,这点非常重要!!!
因为__call__方法怎么写,决定了你整个流程从哪里开始。
那我们来看下Flask类的__call__方法的源码
-
class Flask(_PackageBoundObject): #Flask类 -
#中间省略一些代码 -
def __call__(self, environ, start_response): #Flask实例的__call__方法 -
"""Shortcut for :attr:`wsgi_app`.""" -
return self.wsgi_app(environ, start_response) #注意他的return,他返回的时候,实际上是调用了wsgi_app这个功能
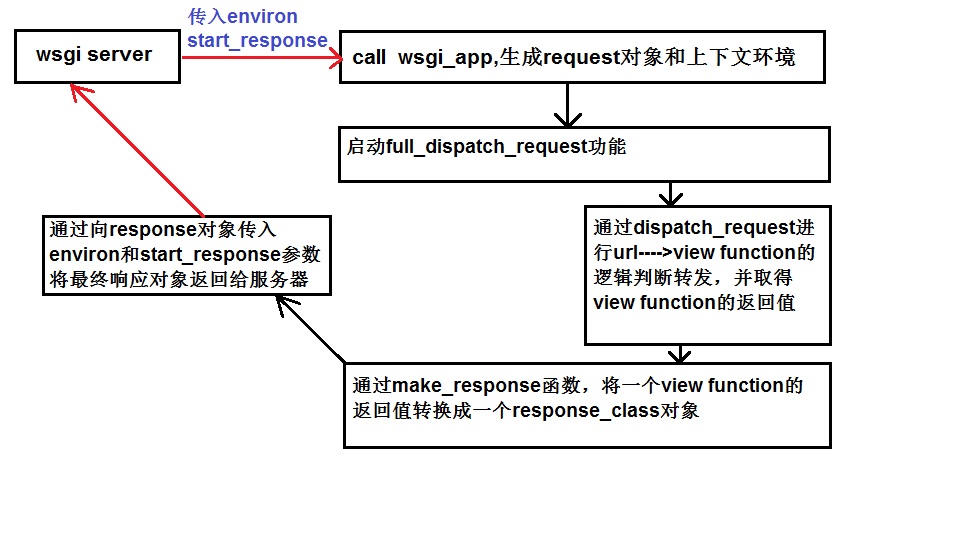
如此一来,我们便知道,当http请求从server发送过来的时候,他会启动__call__功能,最终实际是调用了wsgi_app功能并传入environ和start_response
Flask的wsgi_app定义
-
class Flask(_PackageBoundObject): -
#中间省略一些代码 -
#请注意函数的说明,说得非常准确,这个wsgi_app是一个真正的WSGI应用 -
def wsgi_app(self, environ, start_response): #他扮演的是一个中间角色 -
"""The actual WSGI application. This is not implemented in -
`__call__` so that middlewares can be applied without losing a -
reference to the class. So instead of doing this:: -
app = MyMiddleware(app) -
It's a better idea to do this instead:: -
app.wsgi_app = MyMiddleware(app.wsgi_app) -
Then you still have the original application object around and -
can continue to call methods on it. -
:param environ: a WSGI environment -
:param start_response: a callable accepting a status code, -
a list of headers and an optional -
exception context to start the response -
""" -
ctx = self.request_context(environ) -
ctx.push() -
error = None -
try: -
try: -
response = self.full_dispatch_request() #full_dispatch_request起到了预处理和错误处理以及分发请求的作用 -
except Exception as e: -
error = e -
response = self.make_response(self.handle_exception(e)) #如果有错误发生,则生成错误响应 -
return response(environ, start_response) #如果没有错误发生,则正常响应请求,返回响应内容 -
finally: -
if self.should_ignore_error(error): -
error = None -
ctx.auto_pop(error)
Ok, 这个wsgi_app的函数定义,基本上包含了整个流程的功能
WSGI_APP的内部流程
第一步:生成request请求对象和请求上下文环境
首先,你会看到ctx = self.request_context(environ)的语句,这个涉及到Flask使用了请求上下文和应用上下文的概念,结构为栈结构,这部分比较难,后面第二篇会单独写。
这里只需要理解为,上面语句产生的所用是生成了一个request请求对象以及包含请求信息在内的request context
第二部:请求进入预处理,错误处理及请求转发到响应的过程
进入wsgi_app的函数内部,生成了request对象和上下文环境之后,进入到try
response = self.full_dispatch_request() 我们看到,响应被赋值成了full_dispatch_request()方法的返回内容,所以我们来看一下full_dispatch_request方法
-
class Flask(_PackageBoundObject): -
#此处省略一些代码 -
def full_dispatch_request(self): -
"""Dispatches the request and on top of that performs request -
pre and postprocessing as well as HTTP exception catching and -
error handling. -
.. versionadded:: 0.7 -
""" -
self.try_trigger_before_first_request_functions() #进行发生真实请求前的处理 -
try: -
request_started.send(self) #socket部分的操作 -
rv = self.preprocess_request() #进行请求的预处理 -
if rv is None: -
rv = self.dispatch_request() -
except Exception as e: -
rv = self.handle_user_exception(e) -
response = self.make_response(rv) -
response = self.process_response(response) -
request_finished.send(self, response=response) -
return response
他首先会触发 try_trigger_before_first_request_function()方法
在方法内部 ---------->会触发 _got_first_request 属性,这个属性的返回值是True或者False. True的话就代表了程序开始处理请求了.
来看看 try_trigger_before_first_request_function()的代码,他的目的是,最后将_got_first_request属性置为True.
-
class Flask(_PackageBoundObject): -
#省略一些代码 -
def try_trigger_before_first_request_functions(self): -
"""Called before each request and will ensure that it triggers -
the :attr:`before_first_request_funcs` and only exactly once per -
application instance (which means process usually). -
:internal: -
""" -
if self._got_first_request: -
return -
with self._before_request_lock: -
if self._got_first_request: -
return -
for func in self.before_first_request_funcs: -
func() -
self._got_first_request = True
再来看看_got_first_request 的定义,他的默认值是False
他的定义中可以明显看到, if the application started,this attribute is set to True.
-
class Flask(_PackageBoundObject): -
#省略一些代码 -
@property -
def got_first_request(self): -
"""This attribute is set to ``True`` if the application started -
handling the first request. -
.. versionadded:: 0.8 -
""" -
return self._got_first_request
接着,当_got_first_request 属性被设置完以后,我们就需要再次回到 full_dispatch_request函数内部,继续往下走
下面一段代码是request_started.send(),他是继承自signal模块,大致作用是进行socket部分的功能,暂时不详细追溯。
preprocess_request()方法的话,主要是进行flask的hook钩子, before_request功能的实现,也就是在真正发生请求之前,有些事情需要提前做
Flask一共有4个hook钩子,另外再写吧
随后,继续往下走,来到了一个至 关 重 要的功能 dispatch_request()
-
try: -
request_started.send(self) -
rv = self.preprocess_request() -
if rv is None: -
rv = self.dispatch_request()
为什么说至关重要,因为一个http请求到了这里,实际上已经完成了从wsgi部分的过渡,进入到了寻找响应的阶段了,一个请求通过url进来以后,app怎么知道要如何响应呢?
就是通过dispatch_request方法来进行请求判定和分发。
第三步:请求分发 dispatch_request
来看源码
-
class Flask(_PackageBoundObject): -
#省略一些代码 -
def dispatch_request(self): #看函数定义,matches the URL and returns the value of the view or error. -
"""Does the request dispatching. Matches the URL and returns the -
return value of the view or error handler. This does not have to -
be a response object. In order to convert the return value to a -
proper response object, call :func:`make_response`. -
.. versionchanged:: 0.7 -
This no longer does the exception handling, this code was -
moved to the new :meth:`full_dispatch_request`. -
""" -
req = _request_ctx_stack.top.request -
if req.routing_exception is not None: -
self.raise_routing_exception(req) -
rule = req.url_rule -
# if we provide automatic options for this URL and the -
# request came with the OPTIONS method, reply automatically -
if getattr(rule, 'provide_automatic_options', False) \ -
and req.method == 'OPTIONS': -
return self.make_default_options_response() -
# otherwise dispatch to the handler for that endpoint -
return self.view_functions[rule.endpoint](**req.view_args) #最终进入view_functions,取出url对应的视图函数的返回值
中间不需要过多考虑,req = _request_ctx_stack.top.request 可以暂时理解为,将请求对象赋值给req
这里先简单讲下,每个url进来以后,他都会对应一个view_function
比如下面的一个简单视图函数,路径 '/' 对应的是index函数
但是,实际上当中是分2步走的,第一步是'/'对应的endpoint为'index' ,第二部是endpoint 'index' 对应到index()视图函数
这个也是放在第二篇文章里面具体写flask 路由的实现,这里暂时可以忽略中间步骤,只要知道URL----------->VIEW FUNCTION的逻辑步骤就ok
-
@app.route('/') -
def index(): -
return 'Hello world'
另外说下view_functions 是一个字典形式,他的key和value的关系是endpoint ------> view function
所以每个有效的URL进来,都能找到他对应的视图函数view function,取得返回值并赋值给 rv
比如上面简单的index,他取得的就是 'Hello world' 值
请求分发完成后,已经取得了返回的值,再看下一步是如何做
我们再次回到 full_dispatch_request方法内往下走
-
response = self.make_response(rv) -
response = self.process_response(response) -
request_finished.send(self, response=response) -
return response
这时候,通过make_response函数,将刚才取得的 rv 生成响应,重新赋值response
再通过process_response功能主要是处理一个after_request的功能,比如你在请求后,要把数据库连接关闭等动作,和上面提到的before_request对应和类似。
之后再进行request_finished.send的处理,也是和socket处理有关,暂时不详细深入。
之后返回新的response对象
这里特别需要注意的是,make_response函数是一个非常重要的函数,他的作用是返回一个response_class的实例对象,也就是可以接受environ和start_reponse两个参数的对象
非 常 重 要!!!
Converts the return value from a view function to a real response object that is an instance of :attr:`response_class
-
class Flask(_PackageBoundObject): #注意函数说明,converts the return value from view function to a real response object -
#省略一部分代码 -
def make_response(self, rv): -
"""Converts the return value from a view function to a real -
response object that is an instance of :attr:`response_class`. -
The following types are allowed for `rv`: -
.. tabularcolumns:: |p{3.5cm}|p{9.5cm}| -
======================= =========================================== -
:attr:`response_class` the object is returned unchanged -
:class:`str` a response object is created with the -
string as body -
:class:`unicode` a response object is created with the -
string encoded to utf-8 as body -
a WSGI function the function is called as WSGI application -
and buffered as response object -
:class:`tuple` A tuple in the form ``(response, status, -
headers)`` or ``(response, headers)`` -
where `response` is any of the -
types defined here, `status` is a string -
or an integer and `headers` is a list or -
a dictionary with header values. -
======================= =========================================== -
:param rv: the return value from the view function -
.. versionchanged:: 0.9 -
Previously a tuple was interpreted as the arguments for the -
response object. -
""" -
status_or_headers = headers = None -
if isinstance(rv, tuple): -
rv, status_or_headers, headers = rv + (None,) * (3 - len(rv)) -
if rv is None: -
raise ValueError('View function did not return a response') -
if isinstance(status_or_headers, (dict, list)): -
headers, status_or_headers = status_or_headers, None -
if not isinstance(rv, self.response_class): -
# When we create a response object directly, we let the constructor -
# set the headers and status. We do this because there can be -
# some extra logic involved when creating these objects with -
# specific values (like default content type selection). -
if isinstance(rv, (text_type, bytes, bytearray)): -
rv = self.response_class(rv, headers=headers, -
status=status_or_headers) -
headers = status_or_headers = None -
else: -
rv = self.response_class.force_type(rv, request.environ) -
if status_or_headers is not None: -
if isinstance(status_or_headers, string_types): -
rv.status = status_or_headers -
else: -
rv.status_code = status_or_headers -
if headers: -
rv.headers.extend(headers) -
return rv
第四步:返回到wsgi_app内部
终于快进行到了最后一步,流程走回到了wsgi_app的内部
下面这段是wsgi_app内部的代码
-
try: -
try: -
response = self.full_dispatch_request() -
except Exception as e: -
error = e -
response = self.make_response(self.handle_exception(e)) -
return response(environ, start_response) -
finally: -
if self.should_ignore_error(error): -
error = None -
ctx.auto_pop(error)
当response从刚刚的full_dispatch_request功能返回之后,函数会对这个response加上environ, start_response的参数并返回给Gunicorn
至此,一个HTTP从请求到响应的流程就完毕了.
总的来说,一个流程的关键步骤可以简单归结如下:
后一篇,将会记录一下flask的route实现,里面的url如何和endpoint对应起来,endpoint和view function又是如何对应起来
本篇参考资料:
http://docs.jinkan.org/docs/flask/api.html?highlight=wsgi_app#flask.Flask.wsgi_app
https://segmentfault.com/a/1190000004223296