上一篇----IntelliJ IDEA 搭建springboot
上一篇成功搭建springboot项目之后,我们来实现springboot 整合mybatis ,操作数据库。
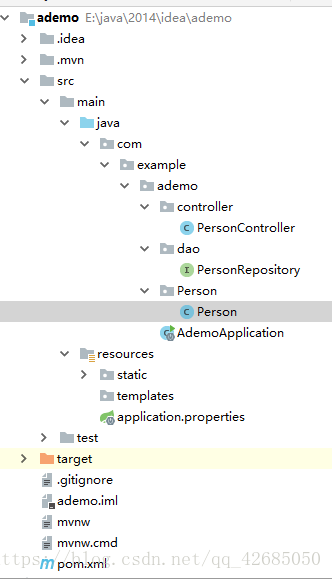
首先创建一个ademo项目,我先把我的项目结构放在这里,进行解释
PersonController 是接受请求并使用对应方法来处理请求操作;
PersonRepository 这里使用了JPA接口,JPA封装了底层的数据库操作,PersonRepository使用JPA声明的方法就可以直接进行数据库操作;
Person 是实体类,这里进行数据类型声明,实现get(),set()方法,类名要与对应的数据库表名一致;
application.properties 是配置数据库连接,相对于spring,springboot会直接读取这里的配置连接数据库,但不适用于多数据源。
pom.xml 在这里添加依赖,导入对应jar包
在建立好项目后,我们先把对应的配置文件做好,这里我们直接在pom.xml文件中添加依赖,调用jar包
下面是要添加的依赖,只需添加没有的依赖就行,其他的不用更改
<dependencies>
        <dependency>
            <groupId>org.springframework.boot</groupId>
            <artifactId>spring-boot-starter-data-jpa</artifactId>
        </dependency>
        <dependency>
            <groupId>org.springframework.boot</groupId>
            <artifactId>spring-boot-starter-jdbc</artifactId>
        </dependency>
        <dependency>
            <groupId>org.springframework.boot</groupId>
            <artifactId>spring-boot-starter-web</artifactId>
        </dependency>

        <dependency>
            <groupId>mysql</groupId>
            <artifactId>mysql-connector-java</artifactId>
            <scope>runtime</scope>
        </dependency>
        <dependency>
            <groupId>org.springframework.boot</groupId>
            <artifactId>spring-boot-starter-test</artifactId>
            <scope>test</scope>
        </dependency>

        <dependency>
        <groupId>org.springframework.boot</groupId>
        <artifactId>spring-boot-configuration-processor</artifactId>
        <optional>true</optional>
        </dependency>
</dependencies>数据库操作,第一步是先连接数据库,可以在application.properties中直接配置
注意:这里的localhost:3306是你的数据库连接,test是数据库名
spring.datasource.driver-class-name=com.mysql.jdbc.Driver

spring.datasource.url=jdbc:mysql://localhost:3306/test

spring.datasource.username=root

spring.datasource.password=root
第二步,建立Person实体类,这个类中的类名要在你的数据库中存在(不存在的话,springboot会逆向生成表),这里的id,name是表中的名称,要注意变量的类型与数据库名称类型一致;
另外,这里使用的@Entity 是声明映射Person这个实体类,@Id标注用于声明一个实体类的属性映射为数据库的主键列。,@GeneratedValue用于标注主键的生成策略 这里了解一下
注意:因为这里使用了@Id标签,所以进行数据添加操作时,不能随意创建记录
package com.example.ademo.Person;

import org.springframework.boot.context.properties.ConfigurationProperties;
import org.springframework.stereotype.Component;

import javax.persistence.Entity;
import javax.persistence.GeneratedValue;
import javax.persistence.Id;

@Entity
public class Person {
    @Id
    @GeneratedValue
    private int id;
    private int name;

    public Person(){

    }
    public Person(int id,int name){
        this.id = id;
        this.name = name;
    }

    public int getId() {
        return id;
    }

    public void setId(int id) {
        this.id = id;
    }

    public int getName() {
        return name;
    }

    public void setName(int name) {
        this.name = name;
    }
}
第三步,我们既然连接到了数据库,又拿到了实体类,接下来我们就要进行数据库操作的声明了,直接继承JpaRepository接口,进行底层数据库操作
package com.example.ademo.dao;

import com.example.ademo.Person.Person;
import org.springframework.data.jpa.repository.JpaRepository;

public interface PersonRepository extends JpaRepository<Person,Integer> {
}
第四步,数据库操作有了,那我们要使用对应的方法操作就不难了,
package com.example.ademo.controller;
import com.example.ademo.Person.Person;
import com.example.ademo.dao.PersonRepository;
import com.fasterxml.jackson.core.JsonProcessingException;
import com.fasterxml.jackson.databind.ObjectMapper;
import org.hibernate.annotations.UpdateTimestamp;
import org.springframework.beans.factory.annotation.Autowired;
import org.springframework.web.bind.annotation.*;
import javax.servlet.http.HttpServletResponse;
import java.io.IOException;
import java.io.PrintWriter;
import java.util.HashMap;
import java.util.List;
import java.util.Map;
@RestController
public class PersonController {
@Autowired
private PersonRepository personRepository;
//查看全部
@RequestMapping(value="/hello",method = RequestMethod.GET)
public void sau(HttpServletResponse response) throws IOException {
List<Person> list = personRepository.findAll();
Map<Integer,Integer> map = new HashMap<Integer,Integer>();
for(Person p:list)
map.put(p.getId(),p.getName());
ObjectMapper json = new ObjectMapper();
String ss = json.writeValueAsString(map);
PrintWriter out = response.getWriter();
out.print(ss);
out.flush();
out.close();
}
//添加一个
@PostMapping(value = "/hello")
public Person addPerson(@RequestParam("id") Integer id,@RequestParam("name") Integer name){
Person person = new Person();
person.setId(id);
person.setName(name);
return personRepository.save(person);
}
@GetMapping(value = "/hello/add")
public Person addPerson1(@RequestParam("id") Integer id,@RequestParam("name") Integer name){
Person person = new Person();
person.setId(id);
person.setName(name);
return personRepository.save(person);
}
//修改一个
@PutMapping(value = "/hello/{id}")
public Person updatePerson(@PathVariable("id") Integer id,@RequestParam("name") Integer name){
Person person = new Person();
person.setId(id);
person.setName(name);
return personRepository.save(person);
}
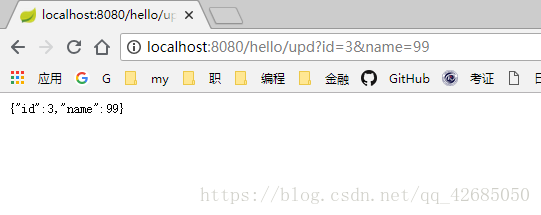
@GetMapping(value = "/hello/upd")
public Person updPerson(@RequestParam("id") Integer id,@RequestParam("name") int name){//@PathVariable("id") Integer id){
Person person = findOne(id);
person.setName(name);
return personRepository.save(person);
}
//查找一个
@GetMapping(value = "/hello/{id}")
public Person findOne(@PathVariable("id") Integer id){
return personRepository.findById(id).orElse(null);
}
//删除
@GetMapping(value = "/hello/del/{id}")
public void deletePerson(@PathVariable("id") Integer id){
Person person = findOne(id);
personRepository.delete(person);
}
}
这样我们的项目就算完成了,看一下效果吧。
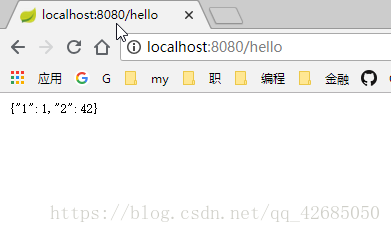
查看全部数据
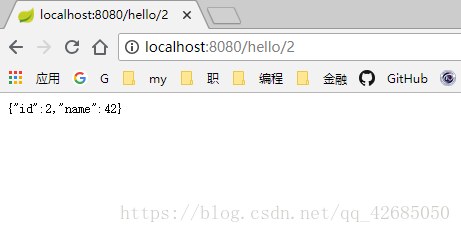
查看ID是2的数据
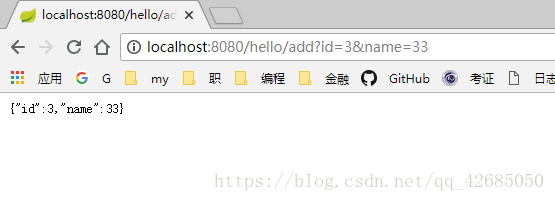
添加一个ID是3,的记录
把name改成99
删除id是2的数据
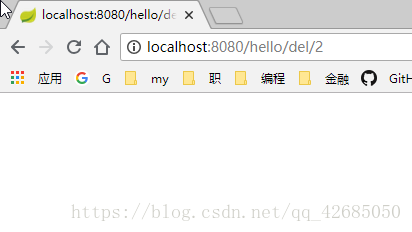
删除成功

输入网址是一个不好的操作,实现界面化才是我们的目标,