一、多表查询
1.1 复制表 (作用: 备份表 、 快速建表)
• 将源表 xxx 复制为新表 yyy
– CREATE TABLE yyy SELECT * FROM xxx;
• 将指定的查询结果复制为新表 zzz
– CREATE TABLE zzz SQL 查询语句 ;• 复制源表 xxx 的结构到新表 vvv
– CREATE TABLE vvv SELECT * FROM xxx WHERE FALSE;
mysql> create table 表名 sql查询;
create table user2 select * from db3.user;
select * from user2;
create table user3 select name,uid,shell from db3.user order by uid desc limit 5;
select * from user3;
create table user4 select * from db3.user where 1=2;
select * from user4;
desc user4;
1.2 多表查询
• 多表查询(又称 连接查询)
– 将 2 个或 2 个以上的表 按某个条件连接起来,从中选
取需要的数据
– 当多个表中 存在相同意义的字段(字段名可以不同)
时,可以通过该字段连接多个表
create table t1 select name,uid,shell from db3.user limit 3;
select * from t1;
create table t2 select name,password,uid,homedir from db3.user limit 5;
select * from t2;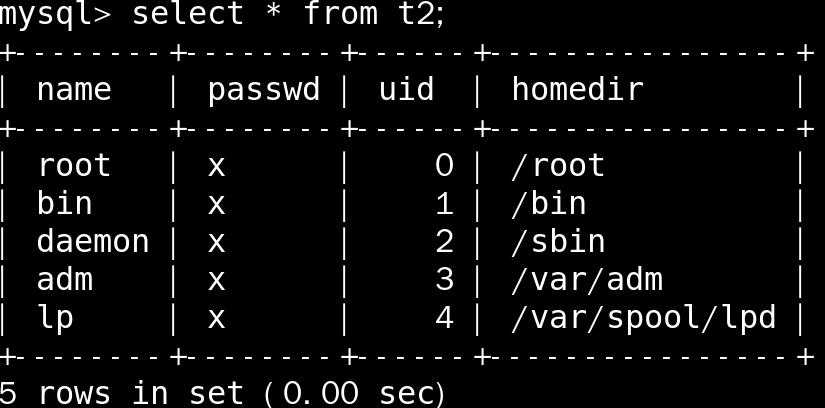
• 格式 1
– select 字段名列表 from 表 a, 表 b ;
select * from t1,t2; //会产生笛卡尔积
笛卡尔集 3 * 5 = 15
• 格式 2
– select 字段名列表 from 表 a, 表 b where 条件;
select t1.* , t2.password , t2.homedir from t1,t2 where t1.uid = t2.uid;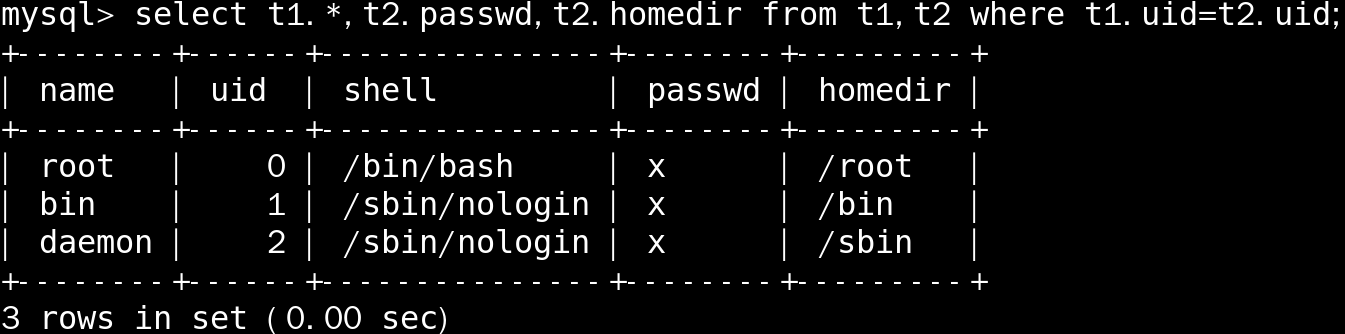
1.3 where 子查询
• 使用 where 子查询
– 把内层查询结果作为外层查询的查询条件
• 格式
– select 字段名列表 from 表 A where 条件 ( select 字段名列表 from 表 A ) ;
– select 字段名列表 from 表 A where 条件 ( select 字段名列表 from 表 A where 条件 ) ;
– 输出年龄小于平均年龄的学生的名字和年龄
select name,age from student where age < (select avg(age) from student);
select 字段名列表 from 表 A where 条件 ( select 字段名列表 from 表 A ) ;
select name from db4.t1;
select name from db3.user where name in (select name from db4.t1);
select 字段名列表 from 表名 where 条件 (select 字段名列表 from 表名 where 条件);
select name from db3.user order by uid desc limit 1;
select avg(uid) from db3.user;
select name,uid from db3.user where uid<( select avg(uid) from db3.user);
1.4 连接查询
1.4.1 左连接查询 : 以左边的表为主显示查询结果,查看两个表中相同的数据
select 字段名列表 from 表名A left join 表名B on 条件;
create table db4.t3 select name,uid,shell from db3.user limit 5;
select * from db4.t3;
create table db4.t4 select name,uid,shell from db3.user limit 7;
select * from db4.t4; //创建两张表
select * from t3 left join t4 on t3.uid = t4.uid;

1.4.2 右连接查询 : 以右边的表为主显示查询结果
select 字段名列表 from 表名A right join 表名B on 条件;
select * from t3 right join t4 on t3.uid = t4.uid;

select t3.name,t4.name from t3 right join t4 on t3.uid = t4.uid;
二、MySQL图形管理工具
2.1 常见的管理工具
| 类 型 | 界 面 | 操作系统 | 说 明 |
|---|---|---|---|
| mysql | 命令行 | 跨平台 | MySQL 官方 bundle 包自带 |
| MySQL-Workbench | 图形 | 跨平台 | MySQL 官方提供 |
| MySQL-Front | 图形 | Windows | 开源,轻量级客户端软件 |
| phpMyAdmin | 浏览器 | 跨平台 | 开源,需 LAMP 平台 |
| Navicat | 图形 | Windows | 专业、功能强大,商业版 |
2.2 PhpMyAdmin
• 基本思路
1. 安装 httpd 、 mysql 、 php-mysql 及相关包
2. 启动 httpd 服务程序
3. 解压 phpMyAdmin 包,部署到网站目录
4. 配置 config.inc.php ,指定 MySQL 主机地址
5. 创建授权用户
6. 浏览器访问、登录使用
步骤1 :部署运行环境lamp 或 lnmp
rpm -q httpd
yum -y install httpd
systemctl start httpd
systemctl enable httpd
rpm -q php;rpm -q php-mysql
yum -y install php php-mysql
systemctl restart httpd
步骤2 :安装软件phpMyAdmin
tar -zxvf phpMyAdmin-2.11.11-all-languages.tar.gz
ls phpMyAdmin-2.11.11-all-languages
mv phpMyAdmin-2.11.11-all-languages /var/www/html/phpadmin
cd /var/www/html/
步骤3 : 创建配置,指定管理数据库服务器。
]#cd phpadmin
]#cp config.sample.inc.php config.inc.php
]#vim config.inc.php
<?php
.....
17 $cfg['blowfish_secret'] = 'pljabc';
31 $cfg['Servers'][$i]['host'] = 'localhost';
......
?>
:wq
步骤4 : 客户端访问
打开浏览器输入URL http://192.168.4.50/phpadmin
用户 root
密码 123456
三、用户授权及权限撤销
3.1 密码恢复及设置
3.1.1 恢复数据库管理员本机登录密码
• 密码忘了怎么办?
1. 停止 MySQL 服务程序
2. 跳过授权表启动 MySQL 服务程序
skip-grant-tables //写入 /etc/my.cnf
3. 重设 root 密码(更新 user 表记录)
4. 以正常方式重启 MySQL 服务程序
]#systemctl stop mysqld
]# vim /etc/my.cnf
[mysqld]
skip-grant-tables
#validate_password_policy=0
#validate_password_length=6
:wq
]# systemctl start mysqld
]#mysql
mysql> select host,user,authentication_string from mysql.user;
mysql> update mysql.user set authentication_string=password("123456") where host="localhost" and user="root";
mysql> flush privileges; //刷新MySQL的系统权限相关表,可以节省一次重启
mysql>quit
]# vim /etc/my.cnf
[mysqld]
#skip-grant-tables
validate_password_policy=0
validate_password_length=6
:wq
]# systemctl restart mysqld
]# mysql -uroot -p123456
mysql>
3.1.2 操作系统管理员 修改数据库管理员root本机登录的密码
• 在 Shell 命令行修改登陆密码
– 需要验证旧密码
– 不适用于跳过授权表启动的情况
[root@mysql51 ~]# mysqladmin -hlocalhost -uroot -p password "654321"
Enter password: 当前登录密码
3.2 用户授权
3.2.1 GRANT 配置授权
在数据库服务器上添加新的连接用户名,默认只有数据库管理员root用户在数据库服务器本机登录有授权权限。
授权命令格式:
]# mysql -uroot -p123456
mysql>grant 权限列表 on 数据库名 to 用户名@" 客户端地址"
identified by "密码" [ with grant option];
授权命令的解释:
1.权限列表 : 新添加的连接用户,对可以操作的库的访问权限,权限的表示方式如下:
all 所有权限
命令,命令 某种权限 (例如 select , insert ,delete)
2.数据库名 : 新添加的连接用户,访问后可以操作的库,表示方式如下:
*.* 所有库 所有表
库名.* 库下的所有表
库名.表明 某张表
3.用户名: 客户端主机连接数据库服务器时使用的名字,授权时自定义既可名字要有标识性。
4.客户端地址 : 网络中的那些主机可以使用新添加的用户连接数据库服务器。有如下表示方式:
所有主机 %
网段 192.168.4.%
指定主机 192.168.4.51
本机 localhost
主机名 pc1.lijun.fun
域名 %.lijun.fun
5.identified by "密码" 新添加的用户连接数据库服务器时,使用的密码
6.with grant option 可选, 让添加的用户连接服务器后,也有授权权限。
授权库 mysql 库记录授权信息,使用不同的表记录不同的授权信息
• 授权库 mysql ,主要的几个表
– user 表,存储授权用户的访问权限
– db 表,存储授权用户对数据库的访问权限
– tables_priv 表,存储授权用户对表的访问权限
– columns_priv 表,存储授权用户对字段的访问权限
desc user\G; ...
select * from user\G; ...
select user,host from mysql.user; ...
3.2.2 查看用户授权
• 用户查看自己的权限
– SHOW GRANTS;• 管理员可查看其他用户的权限
– SHOW GRANTS FOR 用户名 @' 客户端地址 ';
show grants for root@"localhost";
select * from user where user="root" and host="localhost"\G;
授权例子1
在50服务器上添加用户admin
mysql> grant select,insert on db3.* to admin@"192.168.4.%" identified by "123qqq...A";
mysql> select user from mysql.user where user="admin";
在客户端51使用服务新添加的用户连接主机50 验证例子1 授权
]# mysql -h192.168.4.50 -uadmin -p123qqq...A
mysql> select @@hostname; //查看当前主机的主机名
mysql> 执行sql命令验证权限
授权例子2
在50服务器 授权主机52 可以使用root 连接自己,对所有库表有完全权限且有授权权限 登录密码是123qqq...A
grant all on *.* to root@"192.168.4.52" identified by "123qqq...A" with grant option;
在客户端使用服务新添加的用户连接主机50 验证授权例子2
[root@host52 ~]# mysql -h192.168.4.50 -uroot -p123qqq...A
mysql> select @@hostname;
mysql> select user();
mysql> show grants;
mysql> 测试对库表的访问权限
mysql> grant select,update(name,uid) on db3.user to webuser@"%" identified by "123qqq...A"; #测试授权权限
在客户端使用有授权权限用户
]# mysql -h192.168.4.50 -uwebuser -p123qqq...A
mysql> show grants;
mysql> 测试访问权限
在50主机上查看授权信息
select user,host from mysql.user;
select * from mysql.db \G;
select * from mysql.tables_priv \G;
select * from mysql.columns_priv \G;
3.2.3 重设用户密码
• 授权用户修改自己的密码
– SET PASSWORD=PASSWORD(' 新密码 ');
• 管理员可重设其他用户的密码
– SET PASSWORD
FOR 用户名 @' 客户端地址 '=PASSWORD(' 新密码 '); //本质是修改user表中的authentication_string字段
mysql> set password=password("123456");
mysql> set password for webUser@'%'=password("123456");
3.2.4 权限撤销
权限撤销的本质是删除新添加用户的访问权限
• 基本用法
– REVOKE 权限列表 ON 库名 . 表名
– FROM 用户名 @' 客户端地址 ';
select user,host from mysql.user;
show grants for root@"192.168.4.52";
1.通过revoke命令撤销用户权限
revoke grant option on *.* from root@"192.168.4.52"; //本质上还是把user表中的Grant_priv修改为N
show grants for root@"192.168.4.52";
select * from mysql.user where user="root" and host="192.168.4.52"\G;
revoke all on *.* from root@"192.168.4.52";
show grants for root@"192.168.4.52";
2.修改记录的方式 撤销用户的权限
mysql> update mysql.user set Delete_priv="N" where user="root" and host="192.168.4.52";
MySQL>flush privileges;
select * from mysql.user where user="root" and host="192.168.4.52"\G;
3.2.5 删除授权用户
本质上是删除user表中添加的连接用户
mysql> drop user 用户名@"客户端地址";
mysql> drop user root@"192.168.4.52";
SELECT, INSERT, UPDATE, CREATE, DROP, RELOAD, SHUTDOWN, PROCESS, FILE, REFERENCES, INDEX, ALTER, SHOW DATABASES, SUPER, CREATE TEMPORARY TABLES, LOCK TABLES, EXECUTE, REPLICATION SLAVE, REPLICATION CLIENT, CREATE VIEW, SHOW VIEW, CREATE ROUTINE, ALTER ROUTINE, CREATE USER, EVENT, TRIGGER, CREATE TABLESPACE
++++++++++++++++++++++++++++++++++++++++++++++++++++++++++++++++++++++++++++++++++++++++++++++++
1、修改数据库管理员从本机登录的密码为lijun666,数据库管理员使用新密码从本机连接数据库服务器
mysql> update user set authentication_string=password("lijun666") where host="localhost" and user="root";
2、查看当前登陆数据库服务器的用户是谁?
mysql> select user();
3、查看当前登陆数据库服务器用户的权限?
mysql> show grants;
4、查看当前数据库服务器有哪些授权用户?
mysql> select user,host from mysql.user;
5、授权管理员用户可以在网络中的192.168.4.254主机登录,对所有库和表有完全权限且有授权的权限;登陆密码abc123
vim /etc/my.cnf
[mysqld]
..
validate_password_policy=0
validate_password_length=6
mysql> grant all on *.* to lijun@'192.168.4.254' identified by 'abc123' with grant option;
[root@room9pc01 mysql-5.7.17]# mysql -h192.168.4.55 -ulijun -pabc123
6、不允许数据库管理员在数据库服务器本机登录。
mysql> update set account_locked='Y' where user="root" and host="localhost";
7、授权userweb用户可以从网络中的任意主机访问数据库服务器,仅对对db3库下的user表有查看、更新name字段和age字段的权限 , 登录密码userweb888。
mysql> grant select,update(name,age) on db3.user to webuser@'%' identified by 'userweb888' with grant option;
8、验证以上授权是否成功
[root@room9pc01 mysql-5.7.17]# mysql -h192.168.4.55 -uwebuser -p'userweb888'
9、userweb修改自己的登陆密码为123456,并验证能否使用新密码登陆
mysql> set password=password("123456");
10、 数据库管理员修改授权用户userweb的登录密码为654321,让授权用户userweb 使用新密码登陆数据库服务器。
mysql> update user set authentication_string=password("654321") where user="webuser";
11、撤销授权用户userweb 的所有授权并 使其不再能使用此用户连接数据库服务器。
mysql> drop user webUser;
12、授权webadmin用户可以从网络中的所有主机登录,对bbsdb库拥有完全权限,且有授权权限,登录密码为 123456
mysql> grant all on gamedb.* to webadmin@'%' identified by '123456' with grant option;
13、在客户端使用授权用户webadmin登录,把自己的权限授权给userone用户 , 登录密码是 123456
grant select on gamedb.* to userone identified by '123456';
或 create user userone@'%' identified by '123456';
mysql> grant all on gamedb.* to userone@'%' ;
15、撤销webadmin用户的授权权限。
mysql> revoke grant option on gamedb.* from webadmin@"%";