注意:我主要用的包管理工具是yarn(也可以用npm或者cnpm);这里只介绍第三方库的基本集成,属性和方法可以去参考文章和github查找学习。
个人意见:集成第三方库最好不要制定固定的版本,因为可能会和你的react native版本不相符,导致报错!!!
这篇文章主要记录一些React Navigation的基本用法....
前言:在 web 浏览器中, 你可以使用 (<a>) 标签作为锚点,链接到不同的页面。 当用户单击某个链接时, 该 URL 就会被推送到浏览器历史记录堆栈。 当用户点击返回按钮时, 浏览器会从历史堆栈顶部删除正在访问的页面, 因此当前页现在就成了以前访问过的页面。 React Native没有像Web浏览器那样的内置全局历史堆栈的想法 -- 这就是 React Navigation 存在的意义。 ===>>> 这个是React Navigation官方对其本身的描述。
页面跳转对于app是非常重要的,但react-native本身在这上面是没有很好的解决方法的(两端公用),此时React Navigation这个库就非常重要了也非常好用!
安装:yarn add [email protected](npm install --save react-navigation)
==>> 我的react-native版本是 0.55.0;而React Navigation官网使用的版本是2.0.0-beta.6,我用了报错,不知道什么原因!
==>>后来我降了几次版本,到1.0.0-beta.27可以用了(1.0.0-beta.27是以前项目中用过的版本,不过不是我集成的!)
该库只是一个js库,安装后既可以用了!
简单使用:StackNavigator管理路由
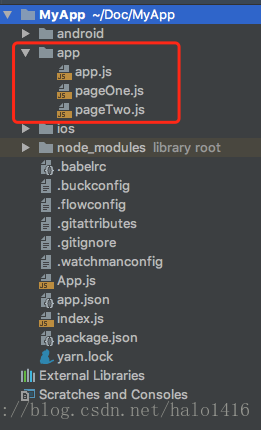
我的代码都是放在app目录下的:
1. pageOne.js
import React, {Component} from "react";
import {
View,
Text,
Button,
} from 'react-native'
export class PageOne extends Component{
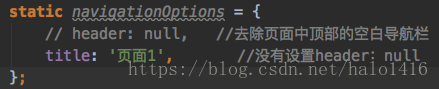
static navigationOptions = {
header: null, //去除页面中顶部的空白导航栏
};
constructor() {
super();
this.state = {
}
}
goTwo(){
console.log(this.props.navigation);
const {dispatch, goBack, navigate, setParams, state} = this.props.navigation;
navigate('two',{page:2})
}
render(){
return(
<View style={{flex:1,justifyContent:'center',alignItems:'center'}}>
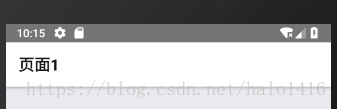
<Text style={{fontSize:24,color:'red'}}>页面one</Text>
<Button
title="去下一页"
onPress={() => this.goTwo()}
/>
</View>
)
}
}
2. pageTwo.js
import React, {Component} from "react";
import {
    View,
    Text,
    Button,
} from 'react-native'

export class PageTwo extends Component{
    static navigationOptions = {
        header: null,            //去除页面中顶部的空白导航栏
    };
    constructor() {
        super();
        this.state = {
        }
    }

    componentDidMount(){
        console.log(this.props.navigation);
        const {dispatch, goBack, navigate, setParams, state} = this.props.navigation;
        console.log('=====>>>>>',state)
    }

    goBack(){
        console.log(this.props.navigation);
        const {dispatch, goBack, navigate, setParams, state} = this.props.navigation;
        goBack();
    }

    render(){
        return(
            <View style={{flex:1,justifyContent:'center',alignItems:'center'}}>
                <Text style={{fontSize:24,color:'green'}}>页面Two</Text>

                <Button
                    title="返回"
                    onPress={() => this.goBack()}
                />
            </View>
        )
    }
}
3. app.js
import React, {Component} from "react";

//导入stack导航组件
import { StackNavigator } from 'react-navigation';

import {PageOne} from './pageOne';      //引入PageOne
import {PageTwo} from './pageTwo';      //引入PageTwo

//导航注册
export default App = StackNavigator(
    {
        two: { screen: PageTwo },
        Home: { screen: PageOne },
    },
    {
        initialRouteName: 'Home',           //initialRouteName设置初始路由为Home
    }
);
最后,说一下导航模块组合:
- 命令结构:

- main、task模块的nav.js(各个模块的导航文件)
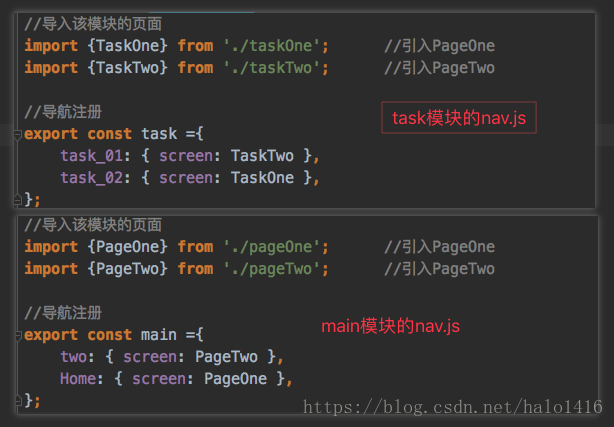
- app.js 主文件导航模块

- 导航模块组合思路:即把各个模块的理由构建成一个个的对象,然后在主导航文件中引入各个模块的理由,并把它们合并成(Object.assign方法)一个对象,放到react-navigation的StackNavigator方法中管理即可。
总结:

详细设置可以去看文档。。
参考博客:https://blog.csdn.net/u010411264/article/details/79915020
https://blog.csdn.net/xiangzhihong8/article/details/71249167?ref=myread
官方文档:https://reactnavigation.org/docs/zh-Hans/hello-react-navigation.html
github:https://github.com/react-navigation/react-navigation
文章仅为本人学习过程的一个记录,仅供参考,如有问题,欢迎指出!