Robot Framework基础知识
RobotFramework特性:
- Enables easy-to-use tabular syntax for creating test cases in a uniform way.
- Provides ability to create reusable higher-level keywords from the existing keywords.
- Provides easy-to-read result reports and logs in HTML format.
- Is platform and application independent.
- Provides a simple library API for creating customized test libraries which can be implemented natively with either Python or Java.
- Provides a command line interface and XML based output files for integration into existing build infrastructure (continuous integration systems).
- Provides support for Selenium for web testing, Java GUI testing, running processes, Telnet, SSH, and so on.
- Supports creating data-driven test cases.
- Has built-in support for variables, practical particularly for testing in different environments.
- Provides tagging to categorize and select test cases to be executed.
- Enables easy integration with source control: test suites are just files and directories that can be versioned with the production code.
- Provides test-case and test-suite -level setup and teardown.
- The modular architecture supports creating tests even for applications with several diverse interfaces.
RobotFramework架构:
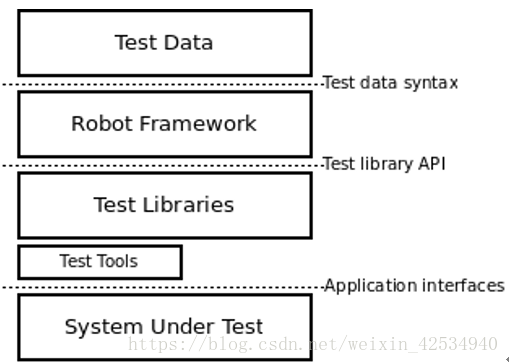
Robot Framework 是一款基于 Python 的功能自动化测试框架。它具备良好的可扩展性,支持关键字驱动,可以同时测试多种类型的客户端或者接口,可以进行分布式测试执行。主要用于轮次很多的验收测试和验收测试驱动开发(ATDD)。对于使用Robot Framework的自动化实现,官方推荐使用Python,原因是基于Python实现的Robot Framework更加成熟,并且基于Python实现的启动速度相对Java和.NET更快。其次推荐使用基于独立JAR包的Robot Framework
Robot Framework安装
在配置过程中需要安装如下包:python 2.7、wxPython、robot framework、robot framework ride、robot framework selenium library。
Installingwith pip:
# Install the latest version (does notupgrade)
pip install robotframework
安装后检查:
$ robot --version
$ rebot --version

详细的安装指导见:http://www.cnblogs.com/yufeihlf/p/5945102.html
https://www.ibm.com/developerworks/cn/opensource/os-cn-robot-framework/
特别说明:RIDE当前发布的版本只支持Python2.X,不支持Python 3及以上的版本。解决办法请参考:https://blog.csdn.net/Jasonliujintao/article/details/79292578
pipinstall -U --pre https://github.com/HelioGuilherme66/RIDE/archive/python3.zip--ignore-installed
解决启动报错:

启动RIDE:C:\ProgramFiles\Python35\Scripts>python ride.py
解决错误: Message: 'geckodriver' executable needs to be in PATH.
解决办法:下载'geckodriver',并加入path环境变量。另外可能需要自行设置浏览器类型
参考链接:https://blog.csdn.net/z_johnny/article/details/74540712
解决错误:"unknown error: call function result missing 'value'"
解决办法:更新chromedriver.exe版本
参考链接:https://github.com/webdriverio/webdriverio/issues/2631
Robot Framework编写测试用例
新建工程–> 新建测试套件 -> 新建测试用例
用例示例:
*** Settings ***
Library Selenium2Library
Library BuiltIn
*** Test Cases ***
TestCase
open browser https://www.baidu.com browser=Chrome
Maximize Browser Window
input text xpath=//input[@id='kw'] helloworld
Click Button id=su
Sleep 2s
Page Should Contain hello world
close browser
用例执行:
l 可以直接在RIDE中执行用例
l 也可以命令行的方式执行:robotTestSuite.txt
封装用户关键字(User Keyword)
可以利用已有的关键字封装用户自己的关键字,例如,可以将输入用户名、密码、点击登录按钮等操作封装为一个登录关键字,这样在编写用例的时候就可以直接使用用户关键字
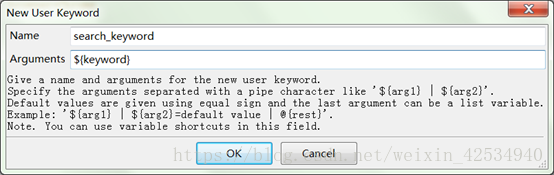
l 在TestSuite目录(或project目录)右键 > 选择“New UserKeyword”
l [可选]输入User Keyword名称和参数列表
l [可选]在Settings中编辑返回参数列表

l 实现用户关键字的具体功能(同用例编写)
代码示例:
*** Keywords ***
search_keyword
[Arguments] ${keyword}
open browser https://www.baidu.com browser=Chrome
Maximize Browser Window
input text id=kw python
Click Button id=su
Sleep 2s
新建和引用资源(Resource)
Resource可以用来组织自己封装的用户关键字和预置数据
l 新建resource:选中project目录,右键单击 > NewResource > 填入Resource名称 > [可选] 选择Resource格式
l 在resource下新建userkeyword:同上一节的封装用户关键字
l 引用resource到test suite:在test suite的settings中,点击resource按钮引入自己新建的resource;或者在testsuite脚本中增加如下的resource代码:
***Settings ***
Library Selenium2Library
Library BuiltIn
Resource MyResource.robot
开发系统关键字
当想要实现一些功能,但是robot framework没有提供现成的关键字时,我们就可以通过Python自己开发系统关键字。所以开发系统关键字的重点是利用Python实现具体的功能。
以实现一个加法功能为例:
l 在Python目录下的\Lib\site-packages新建TestLibrary目录
l 在TestLibrary目录下新建count.py文件,并实现加法功能,示例代码如下:
#coding=utf-8
classCount(object):
def Add(self, a, b):
"""
This method is used to calculate theresult of a plus b
:param a: an integer
:param b: an integer
:return: The result of a plus b
example:
| add | a | b |
"""
return int(a) + int(b)
l 在TestLibrary目录下新建__init__.py文件将上面的Python文件转换成一个标准包,该文件内代码如下:
from.count import Count
__version__= "0.1"
classTestLibrary(Count):
ROBOT_LIBRARY_SCOPE = 'GLOBAL'
l 操作完以上步骤,就可以在RIDE中引入我们自己所创建的库,方式同前面的引用Lib