1)下载
Elasticsearch 6.3.1 地址:https://artifacts.elastic.co/downloads/elasticsearch/elasticsearch-6.3.1.tar.gz
2)拷贝
拷贝到服务器上,解压:tar -xvzf elasticsearch-6.3.1.tar.gz 。解压后路径:/home/elasticsearch-6.3.1
3)创建用户
创建用户,创建esdata目录,并赋予权限
[root@bogon home]# adduser esuser
[root@bogon home]# cd /home
[root@bogon home]# mkdir -p esdata/data
[root@bogon home]# mkdir -p esdata/log
[root@bogon home]# chown -R esuser elasticsearch-6.3.1
[root@bogon home]# chown -R esuser esdata
4)配置es
 View Code
5)配置系统
[root@bogon bin]#  vim /etc/security/limits.conf(在文件最后添加)
esuser hard nofile 65536
esuser soft nofile 65536
esuser soft memlock unlimited
esuser hard memlock unlimited
以上配置解决问题:
max file descriptors [4096] for elasticsearch process is too low, increase to at least [65536]
memory locking requested for elasticsearch process but memory is not locked
[root@bogon bin]# sysctl -w vm.max_map_count=262144
vm.max_map_count = 262144
[root@bogon bin]# more /proc/sys/vm/max_map_count
262144
以上配置解决问题:
max virtual memory areas vm.max_map_count [65530] is too low, increase to at least [262144]
[root@bogon logs]# visudo
。。。。。。。。
## Allow root to run any commands anywhere
root    ALL=(ALL)       ALL
esuser  ALL=(ALL)       ALL
。。。。。。。。
以上配置解决某些情况下无法读写的问题
6)启动

[root@bogon ~]# cd /home/elasticsearch-6.3.1/bin/
[root@bogon bin]# su esuser
[esuser@bogon bin]$ ./elasticsearch
[2018-07-17T10:17:30,139][INFO ][o.e.n.Node               ] [node-1] initializing ...
[2018-07-17T10:17:30,234][INFO ][o.e.e.NodeEnvironment    ] [node-1] using [1] data paths, mounts [[/ (rootfs)]], net usable_space [22.1gb], net total_space [27.6gb], types [rootfs]
[2018-07-17T10:17:30,234][INFO ][o.e.e.NodeEnvironment    ] [node-1] heap size [1007.3mb], compressed ordinary object pointers [true]
[2018-07-17T10:17:30,236][INFO ][o.e.n.Node               ] [node-1] node name [node-1], node ID [cb69e4JjSBKeHJ9y-q-hNA]
[2018-07-17T10:17:30,236][INFO ][o.e.n.Node               ] [node-1] version[6.3.1], pid[26327], build[default/tar/eb782d0/2018-06-29T21:59:26.107521Z], OS[Linux/3.10.0-514.6.1.el7.x86_64/amd64], JVM[Oracle Corporation/Java HotSpot(TM) 64-Bit Server VM/1.8.0_92/25.92-b14]
[2018-07-17T10:17:30,236][INFO ][o.e.n.Node               ] [node-1] JVM arguments [-Xms1g, -Xmx1g, -XX:+UseConcMarkSweepGC, -XX:CMSInitiatingOccupancyFraction=75, -XX:+UseCMSInitiatingOccupancyOnly, -XX:+AlwaysPreTouch, -Xss1m, -Djava.awt.headless=true, -Dfile.encoding=UTF-8, -Djna.nosys=true, -XX:-OmitStackTraceInFastThrow, -Dio.netty.noUnsafe=true, -Dio.netty.noKeySetOptimization=true, -Dio.netty.recycler.maxCapacityPerThread=0, -Dlog4j.shutdownHookEnabled=false, -Dlog4j2.disable.jmx=true, -Djava.io.tmpdir=/tmp/elasticsearch.F1Jh0AOB, -XX:+HeapDumpOnOutOfMemoryError, -XX:HeapDumpPath=data, -XX:ErrorFile=logs/hs_err_pid%p.log, -XX:+PrintGCDetails, -XX:+PrintGCDateStamps, -XX:+PrintTenuringDistribution, -XX:+PrintGCApplicationStoppedTime, -Xloggc:logs/gc.log, -XX:+UseGCLogFileRotation, -XX:NumberOfGCLogFiles=32, -XX:GCLogFileSize=64m, -Des.path.home=/home/elasticsearch-6.3.1, -Des.path.conf=/home/elasticsearch-6.3.1/config, -Des.distribution.flavor=default, -Des.distribution.type=tar]
[2018-07-17T10:17:33,136][INFO ][o.e.p.PluginsService     ] [node-1] loaded module [aggs-matrix-stats]
[2018-07-17T10:17:33,136][INFO ][o.e.p.PluginsService     ] [node-1] loaded module [analysis-common]
[2018-07-17T10:17:33,137][INFO ][o.e.p.PluginsService     ] [node-1] loaded module [ingest-common]
。。。。。。
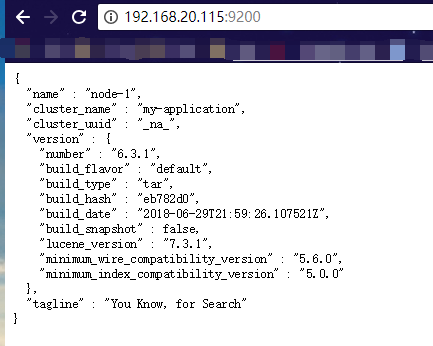
7)验证
浏览器访问:http://192.168.20.115:9200/ (192.168.20.115是es服务器的IP,另外请确保9200端口能够被外部访问),返回:
{
  "name" : "node-1",
  "cluster_name" : "my-application",
  "cluster_uuid" : "_na_",
  "version" : {
    "number" : "6.3.1",
    "build_flavor" : "default",
    "build_type" : "tar",
    "build_hash" : "eb782d0",
    "build_date" : "2018-06-29T21:59:26.107521Z",
    "build_snapshot" : false,
    "lucene_version" : "7.3.1",
    "minimum_wire_compatibility_version" : "5.6.0",
    "minimum_index_compatibility_version" : "5.0.0"
  },
  "tagline" : "You Know, for Search"
}
当然最方便的安装方法还是下载docker镜像,官方安装手册:https://www.elastic.co/guide/en/elasticsearch/reference/current/docker.html 步骤:
1)下载镜像:docker pull docker.elastic.co/elasticsearch/elasticsearch:6.3.1
2)运行容器:docker run -p 9200:9200 -p 9300:9300 -e "discovery.type=single-node" docker.elastic.co/elasticsearch/elasticsearch:6.3.1
ElasticSearch Head安装
官方的模拟工具是控制台的curl,不是很直观,可以在chrome浏览器中安装head插件来作为请求的工具:head插件的地址:https://chrome.google.com/webstore/detail/elasticsearch-head/ffmkiejjmecolpfloofpjologoblkegm/