一,安装环境
1.CentOS6.8+mysql5.6,首先安装好虚拟机,安装好后,设置虚拟机固定ip,通过克隆在创建一台虚拟机,然后修改配置文件,创建固定ip.
二、Master的配置
1.修改MySQL配置文件
| 1 |
[root@localhost ~]# vim /etc/my.cnf
|
文件内容
| 1 2 3 4 5 6 7 8 9 10 11 |
[mysqld]
#开启二进制日志
log-bin=mysql-bin
#标识唯一id(必须),一般使用ip最后位
server-id=131
#不同步的数据库,可设置多个
binlog-ignore-db=information_schema
binlog-ignore-db=cluster
binlog-ignore-db=mysql
#指定需要同步的数据库(和slave是相互匹配的),可以设置多个
binlog-do-db=test
|
添加日志存储方式和规则(选填)
| 1 2 3 4 5 6 7 8 9 10 |
#设置存储模式不设置默认
binlog_format=MIXED
#日志清理时间
expire_logs_days=7
#日志大小
max_binlog_size=100m
#缓存大小
binlog_cache_size=4m
#最大缓存大小
max_binlog_cache_size=521m
|
2.重启MySQL
3.进去mysql设置允许从库获得主库日志 注:这里使用root用户配置,不建议使用,正常使用新创建的用户进行授权
| 1 |
[root@localhost ~]# mysql -u root -p
|
| 1 2 3 4 5 |
#给从库放权限
mysql>GRANT FILE ON *.* TO 'root'@'192.168.137.132' IDENTIFIED BY 'root password'; #创建用户
mysql>GRANT REPLICATION SLAVE ON *.* TO 'root'@'192.168.137.132' IDENTIFIED BY 'root password'; #修改用户权限
mysql>select host ,user ,password from mysql.user; #查看是否修改成功
mysql>FLUSH PRIVILEGES; #刷新
|
注:如果数据库有数据需要进行数据迁移保证数据的一致性 数据迁移
创建数据库: 在从库中创建一个和主库相同的数据库,不然两个数据库不能同步(进行过数据迁移就跳过)
| 1 |
CREATE DATABASE test CHARACTER SET utf8 COLLATE utf8_general_ci;
|
4.重启MySQL,登录MySQL,查看主库信息
| 1 |
mysql> show master status;
|
显示内容

注:如果执行这个步骤始终为Empty set(0.00 sec),那说明前面的my.cnf没配置对
三、Slave的配置
1.从库配置
| 1 2 3 4 5 6 7 8 9 10 |
#开启二进制日志(可以不配置)log-bin=mysql-bin
server-id=132
binlog-ignore-db=information_schema
binlog-ignore-db=cluster
binlog-ignore-db=mysql#与主库配置一直
replicate-do-db=test
replicate-ignore-db=mysql
log-slave-updates
slave-skip-errors=all
slave-net-timeout=60
|
4.重启MySQL,登录MySQL
| 1 2 3 4 5 |
#关闭Slave
mysql> stop slave; #设置连接主库信息
mysql> change master to master_host='192.168.137.131',master_user='root',master_password='root password',master_log_file='mysql-bin.000002', master_log_pos=120;
#开启Slave
mysql> start slave;
|
注:上面的master_log_file是在配置Master的时候的File字段, master_log_pos是在配置Master的Position 字段。一定要一一对应
5.查看信息
| 1 |
mysql> show slave status \G;
|
| 1 2 3 4 5 6 7 8 9 10 11 12 13 14 15 16 17 18 19 20 21 22 23 24 25 26 27 28 29 30 31 32 33 34 35 36 37 38 39 40 41 42 43 44 45 46 47 48 49 50 51 52 53 54 55 56 57 58 59 |
*************************** 1. row ***************************
Slave_IO_State: Waiting for master to send event
Master_Host: 192.168.2.1
Master_User: root
Master_Port: 3306
Connect_Retry: 60
Master_Log_File: mysql-bin.000006
Read_Master_Log_Pos: 120
Relay_Log_File: localhost-relay-bin.000006
Relay_Log_Pos: 520
Relay_Master_Log_File: mysql-bin.000006
Slave_IO_Running: Yes //显示yes为成功
Slave_SQL_Running: Yes //显示yes为成功,如果为no,一般为没有启动master
Replicate_Do_DB: test
Replicate_Ignore_DB: mysql//上面的都是配置文件中的信息
Replicate_Do_Table:
Replicate_Ignore_Table:
Replicate_Wild_Do_Table:
Replicate_Wild_Ignore_Table:
Last_Errno: 0
Last_Error:
Skip_Counter: 0
Exec_Master_Log_Pos: 357
Relay_Log_Space: 697
Until_Condition: None
Until_Log_File:
Until_Log_Pos: 0
Master_SSL_Allowed: No
Master_SSL_CA_File:
Master_SSL_CA_Path:
Master_SSL_Cert:
Master_SSL_Cipher:
Master_SSL_Key:
Seconds_Behind_Master: 0
Master_SSL_Verify_Server_Cert: No
Last_IO_Errno: 0
Last_IO_Error: //如果为no,此处会显示错误信息
Last_SQL_Errno: 0
Last_SQL_Error:
Replicate_Ignore_Server_Ids:
Master_Server_Id: 2
Master_UUID: be0a41c0-2b40-11e8-b791-000c29267b6a
Master_Info_File: /usr/local/mysql/data/master.info
SQL_Delay: 0
SQL_Remaining_Delay: NULL
Slave_SQL_Running_State: Slave has read all relay log; waiting for the slave I/O thread to update it
Master_Retry_Count: 86400
Master_Bind:
Last_IO_Error_Timestamp:
Last_SQL_Error_Timestamp:
Master_SSL_Crl:
Master_SSL_Crlpath:
Retrieved_Gtid_Set:
Executed_Gtid_Set:
Auto_Position: 0
1 row in set (0.00 sec)
ERROR:
No query specified
|
注:如果Slave_IO_Running: No 出现下面的错误
| 1 |
Last_IO_Error: Fatal error: The slave I/O thread stops because master and slave have equal MySQL server UUIDs; these UUIDs must be different for replication to work.
|
说明主服务器的UUID和从服务器的UUID重复,更改方式
| 1 |
[root@localhost ~]# vim /usr/local/mysql/data/auto.cnf #这是我的安装路径修改auto.cnf的server-uuid
|
注:如果Slave_IO_Running: Connecting 并出现下面错误
解决方法,查看主库是否授权,查看change master to... 是否有用户密码ip填写错误
注:如果Slave_IO_Running: No 出现下面错误
Got fatal error 1236 from master when reading data from binary log: 'Could not find first log file name in binary log index file'
解决方法:复位
mysql>stop slave;  //停止
mysql>reset slave;  //清空
mysql>start slave;  //开启
以上主从MySQL已经可以使用了,欢迎各位多提bug
注意事项:
当只针对某些库的某张表进行同步时,如下,只同步huanqiu库的haha表和huanpc库的heihei表:
replicate-do-db = huanqiu
replicate-wild-do-table = huanqiu.haha       //当只同步几个或少数表时,可以这样设置。注意这要跟上面的库指定配合使用;
replicate-do-db = huanpc
replicate-wild-do-table = huanpc.heihei      //如果同步的库的表比较多时,就不能这样一一指定了,就把这个选项配置去掉,直接根据指定的库进行同步。
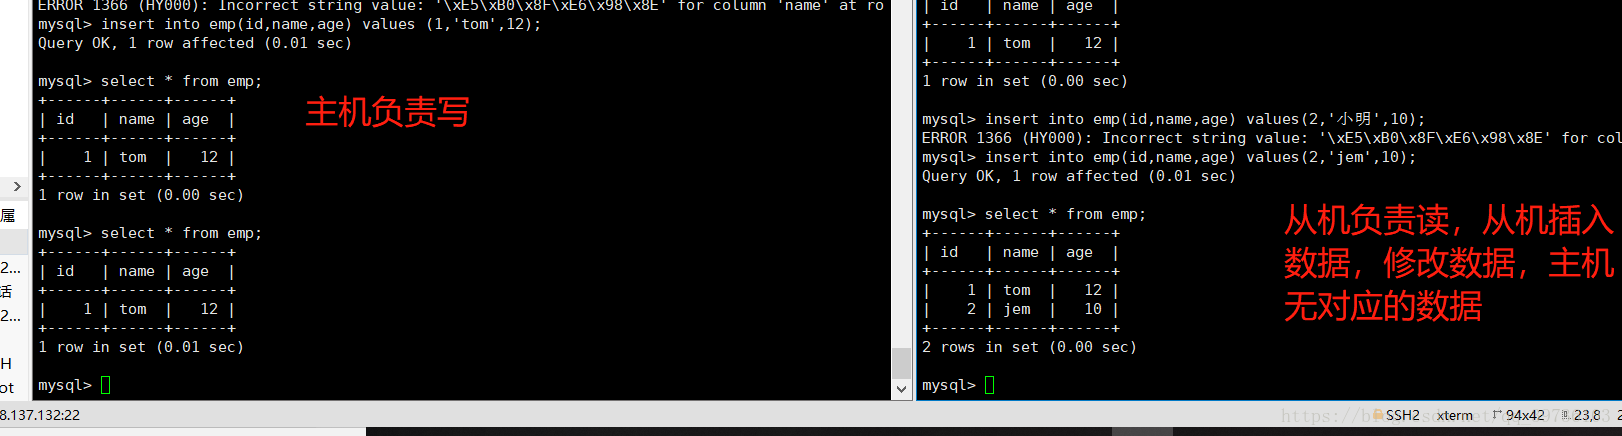
关于增删改查,主从数据不一致问题:
| 1 2 3 4 5 6 7 8 9 |
#select 语句,暂时没有发现问题
#insert 语句,暂时没有发现问题
#update 语句,暂时没有发现问题
#delete 语句,主库删除多条数据,发现数据不一致
原因:在主库的logbin中的确有执行删除语句,但是在从库的logbin中却没有删除语句
解决:使用 use database 选取当前数据库架构中的需要操作的数据库,然后在执行删除,OK同步成功
|
查询binlog主从日志的方法
| 1 2 3 4 5 6 7 8 9 10 11 12 13 14 |
#查看binlog全部文件
mysql>show binary logs;
#查看binlog是否开启NO为开启
mysql> show variables like 'log_bin%';
#详细信息
mysql> show variables like 'binlog%';
#查看binlog日志
mysql> show binlog events in'mysql-bin.000019';
#或者使用mysqlbinlog,如果报错使用--no-defaults(使用全路径)
[root@localhost ~]# /usr/local/mysql/bin/mysqlbinlog --no-defaults /usr/local/mysql/data/mysql-bin.000019
|
手动清理master日志,最好关闭日志,在/etc/my.cnf
| 1 2 3 |
#手动刷新日志
mysql> show master status;
#删除全部mysql> reset slave;或 rest master;#删除MySQL-bin.010mysql> PURGE MASTER LOGS TO 'MySQL-bin.010';
|