一 Zuul的介绍
-
是Netflix的一个子项目
-
提供代理、过滤、路由等功能
二 编写第一个Zuul程序
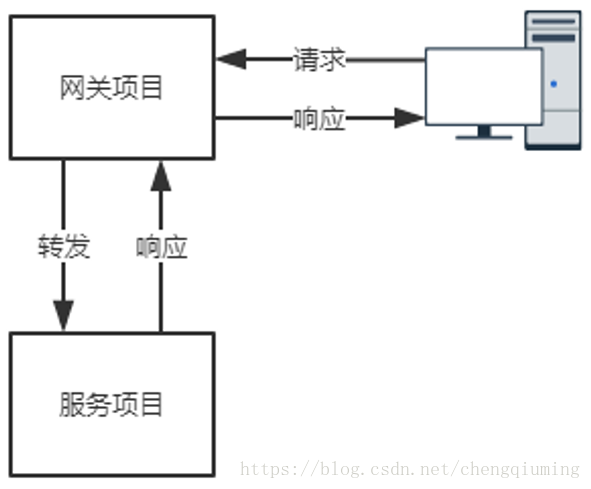
建立服务项目
建立网关项目
三 建立服务项目
1 建立依赖
<project xmlns="http://maven.apache.org/POM/4.0.0" xmlns:xsi="http://www.w3.org/2001/XMLSchema-instance"
      xsi:schemaLocation="http://maven.apache.org/POM/4.0.0http://maven.apache.org/xsd/maven-4.0.0.xsd">
      <modelVersion>4.0.0</modelVersion>
      <groupId>org.crazyit.cloud</groupId>
      <artifactId>zuul-first-source</artifactId>
      <version>0.0.1-SNAPSHOT</version>
      <dependencies>
            <dependency>
                  <groupId>org.springframework.boot</groupId>
                  <artifactId>spring-boot-starter-web</artifactId>
                  <version>1.5.4.RELEASE</version>
            </dependency>
      </dependencies>
</project>
2 建立启动类
package org.crazyit.cloud;

import org.springframework.boot.SpringApplication;
import org.springframework.boot.autoconfigure.SpringBootApplication;
import org.springframework.web.bind.annotation.PathVariable;
import org.springframework.web.bind.annotation.RequestMapping;
import org.springframework.web.bind.annotation.RequestMethod;
import org.springframework.web.bind.annotation.RestController;

@SpringBootApplication
@RestController
public class SourceApp {

    public static void main(String[] args) {
        SpringApplication.run(SourceApp.class, args);
    }

    @RequestMapping(value = "/hello/{name}", method = RequestMethod.GET)
    public String hello(@PathVariable String name) {
        return "hello, " + name;
    }

}
四 建立网关项目
1 新建依赖
      <dependencies>
            <dependency>
                  <groupId>org.springframework.cloud</groupId>
                  <artifactId>spring-cloud-starter-zuul</artifactId>
            </dependency>
            <dependency>
                  <groupId>org.apache.httpcomponents</groupId>
                  <artifactId>httpclient</artifactId>
                  <version>4.5.2</version>
            </dependency>
      </dependencies>
2 新建启动类
package org.crazyit.cloud;
import org.springframework.boot.SpringApplication;
import org.springframework.boot.autoconfigure.SpringBootApplication;
import org.springframework.cloud.netflix.zuul.EnableZuulProxy;
@SpringBootApplication
@EnableZuulProxy
public class RouterApp {
public static void main(String[] args) {
SpringApplication.run(RouterApp.class, args);
}
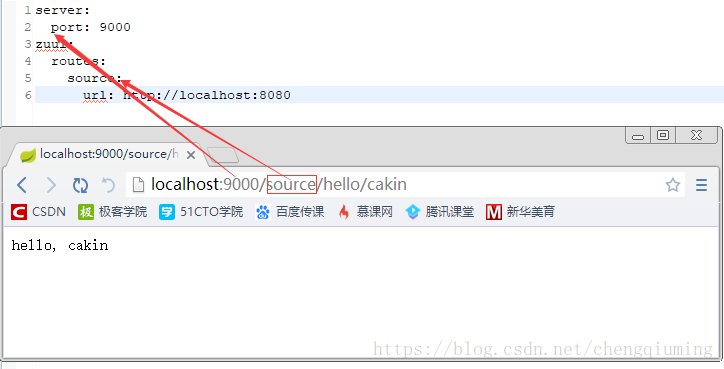
}3 新建配置文件
server:
  port: 9000
zuul:
  routes:
    source:
      url: http://localhost:8080
五 测试
1 启动上面两个项目
2 浏览器输入http://localhost:9000/source/hello/cakin
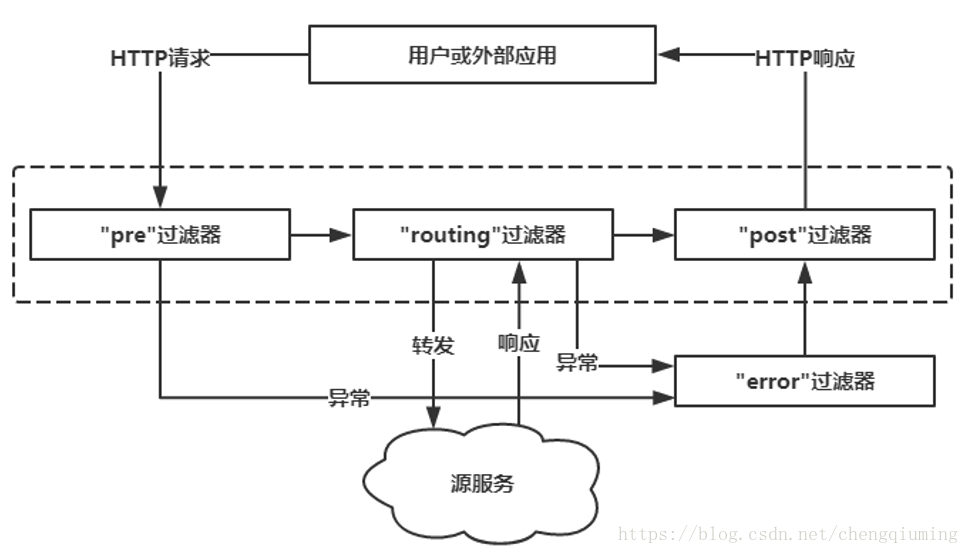
六 Zuul过滤器运行机制