在使用React脚手架之前需要通过 create-react-app 快速构建 React 开发环境 ,
注意 : create-react-app 自动创建的项目是基于 Webpack + ES6 。
执行以下命令创建项目:
$ npm install -g create-react-app
$ create-react-app myapps
$ cd myapps/
$ npm start
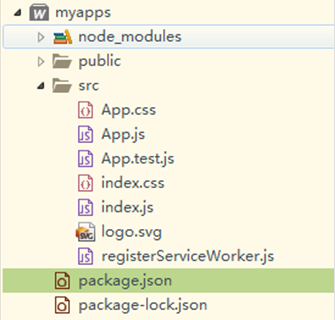
在安装成功后开始使用脚手架
 图为安装成功后的目录
在使用React之前需要注意以下三点:
一 . 关于 class 的问题
在 React 中元素的 class 需要换成 className

二 . 图片路径的问题
1 . 如果要使用相对路径引入图片有两种方法:( 相对路径用于请求 src 下面的图片)
每个组件类中引入图片当使用相对路径的时候,这个图片必须放在src中。
a . 直接在组件类的模板中通过 require("文件的相对路径") 引入
<img src={require("../images/01.jpg")} alt="图片"/>
b . 通过定义图片,在模板中调用
// 引入并定义图片
import pic from './images/01.jpg';

// 在模板中使用
 <div className="App">
          <img src={pic} alt="图片"/>
</div>
2 . 如果在 public 中放了一张图片,我们会发现在地址栏上输 http://localhost:3000/01.jpg 能找到图片,说明 React 把 public 当做该项目的 web 容器。 所以,以后做项目时静态资源放在 public 中。
因此,我们的 ajax 请求和 钩子函数 的路径就相对于 index.html , 下面是 ajax请求本地文件 aa.txt 实例
import React, { Component } from 'react';
//  npm install axios  下载并引入 axios
import axios from "axios";
//   创建类组件 组件类的创建方法
//    第一 React.createClass()  最开始的
//    第二 class Heads extend Component{}
//    第三 构造函数
class Slide extends Component {
    constructor(props){ // 在该组件类的标签中设置 props 值,这里设置的是 title
        super(props);
        this.state={  // 设置state
            url:"http://localhost:3000/images/01.jpg"
        }
    }
    render() {
        return (
            <div className="slide">
                <div>
                    <img src={this.state.url} alt="图片"/>
                </div>
            </div>
        );
    }
    componentDidMount(){
        axios.get(this.props.title)
        .then(function (res) {
            console.log(res.data);
            this.setState({
                "url":res.data
            })
        }.bind(this))
        .catch(function (err) {
            console.log(err);
        })
    }
}
export default Slide;
上面组件中设置 props 值
// title 与上面组件中的值对应
<Slide title="http://localhost:3000/txt/aa.txt"/>
三 . 事件
事件通常和 this 有关,下面是关于事件的例子
import React, { Component } from 'react';

class Heads extends Component {    //创建组建类
    constructor(){
        super()
        this.state={
            title:"welcom to China"
        }
        this.fn=this.fn.bind(this)
    }
  fn(){
//    事件往往和this有关
    this.setState({
        title:"Hello world!"
    })
  }
  render() {
    return (
      <div className="Heads">
           <h3 onClick={this.fn}>
               {this.state.title}
           </h3>
      </div>
    );
  }
}

export default Heads;
在学习 React 时,一定要注意:
ajax请求和钩子函数 路径就要相对index.html,所以资源需要放在public下,因为public是静态资源。