Setup
Setting up an agent
Flume代理配置存储在本地配置文件中。 这是一个遵循Java属性文件格式的文本文件。 可以在同一配置文件中指定一个或多个代理的配置。 配置文件包括代理中每个Source,Sink和Channel的属性以及它们如何连接在一起以形成数据流。
Configuring individual components (配置单个组件)
Each component (source, sink or channel) in the flow has a name, type, and set of properties that are specific to the type and instantiation. For example, an Avro source needs a hostname (or IP address) and a port number to receive data from. A memory channel can have max queue size (“capacity”), and an HDFS sink needs to know the file system URI, path to create files, frequency of file rotation (“hdfs.rollInterval”) etc. All such attributes of a component needs to be set in the properties file of the hosting Flume agent.
流中的每个组件(source, sink or channel)都一个name, type 和 特定于类型和实例化的属性集。 例如,Avro source 需要主机名(hostname或IP地址)和端口号来接收数据。 内存通道是一个具有最大值得队列(“capacity”),HDFS sink 需要知道文件系统URI,创建文件的路径,文件轮换频率(“hdfs.rollInterval”)等。组件的所有此类属性需要在托管Flume代理的属性文件中设置。
Wiring the pieces together
The agent needs to know what individual components to load and how they are connected in order to constitute the flow. This is done by listing the names of each of the sources, sinks and channels in the agent, and then specifying the connecting channel for each sink and source. For example, an agent flows events from an Avro source called avroWeb to HDFS sink hdfs-cluster1 via a file channel called file-channel. The configuration file will contain names of these components and file-channel as a shared channel for both avroWeb source and hdfs-cluster1 sink.
代理需要知道要加载哪些组件以及它们如何连接以构成流。 这是通过列出代理中每个源,接收器和通道的名称,然后为每个接收器和源指定连接通道来完成的。 例如,代理通过名为file-channel的文件通道将事件从名为avroWeb的Avro源流向HDFS sink hdfs-cluster1。 配置文件将包含这些组件的名称和文件通道,作为avroWeb源和hdfs-cluster1接收器的共享通道。
Starting an agent
使用名为flume-ng的shell脚本启动代理程序,该脚本位于Flume发行版的bin目录中。 您需要在命令行上指定代理名称,配置目录和配置文件:
bin/flume-ng agent -n $agent_name -c conf -f conf/flume-conf.properties.template
现在,代理将开始运行配置在属性文件中的source和sinks
A simple example
在这里,我们给出一个示例配置文件,描述单节点Flume部署。 此配置允许用户生成事件,然后将其打印到控制台。
# example.conf: A single-node Flume configuration

# Name the components on this agent
a1.sources = r1
a1.sinks = k1
a1.channels = c1

# Describe/configure the source
a1.sources.r1.type = netcat
a1.sources.r1.bind = localhost
a1.sources.r1.port = 44444

# Describe the sink
a1.sinks.k1.type = logger

# Use a channel which buffers events in memory
a1.channels.c1.type = memory
a1.channels.c1.capacity = 1000
a1.channels.c1.transactionCapacity = 100

# Bind the source and sink to the channel
a1.sources.r1.channels = c1
a1.sinks.k1.channel = c1
这个配置定义了一个名为a1的agent。该agent有一个监听本地44444端口数据的source,一个将数据缓存到内存中的channel,和一个将事件数据打印到控制台的sink。配置文件中命名各种组件,然后描述组件的types 和配置参数。一个给定的配置文件钟可能会定义多个命名代理(named agent), 当一个给定的Flume进程启动时,会传递一个标志,告诉它要显示哪个命名代理。
基于此配置文件,我们可以按如下方式启动Flume:

bin/flume-ng agent --conf conf --conf-file example.conf --name a1 -Dflume.root.logger=INFO,console
请注意,在完整部署中,我们通常会包含一个选项: --conf = <conf-dir>。 <conf-dir>目录将包含一个shell脚本flume-env.sh以及一个log4j属性文件。 在这个例子中,我们传递一个Java选项来强制Flume将日志打印到控制台,我们没有自定义环境脚本。
从一个单独的终端,我们可以telnet端口44444并向Flume发送一个事件:
$ telnet localhost 44444
Trying 127.0.0.1...
Connected to localhost.localdomain (127.0.0.1).
Escape character is '^]'.
Hello world! <ENTER>
OK
原始的Flume终端将在日志中输出事件。
12/06/19 15:32:19 INFO source.NetcatSource: Source starting
12/06/19 15:32:19 INFO source.NetcatSource: Created serverSocket:sun.nio.ch.ServerSocketChannelImpl[/127.0.0.1:44444]
12/06/19 15:32:34 INFO sink.LoggerSink: Event: { headers:{} body: 48 65 6C 6C 6F 20 77 6F 72 6C 64 21 0D          Hello world!. }
恭喜 - 您已成功配置并部署了Flume代理! 后续部分将更详细地介绍代理配置。
Using environment variables in configuration files
Flume能够替换配置中的环境变量。 例如:
a1.sources = r1
a1.sources.r1.type = netcat
a1.sources.r1.bind = 0.0.0.0
a1.sources.r1.port = ${NC_PORT}
a1.sources.r1.channels = c1
注意:它目前仅适用于值,不适用于键。 (即仅在配置行的=标记的“右侧”。)
This can be enabled via Java system properties on agent invocation by setting propertiesImplementation = org.apache.flume.node.EnvVarResolverProperties.
可以通过设置propertiesImplementation = org.apache.flume.node.EnvVarResolverProperties,通过代理程序调用上的Java系统属性启用此功能。
For example::
NC_PORT=44444 bin/flume-ng agent –conf conf –conf-file example.conf –name a1 -Dflume.root.logger=INFO,console -DpropertiesImplementation=org.apache.flume.node.EnvVarResolverProperties请注意,上面只是一个示例,可以通过其他方式配置环境变量,包括在conf/flume-env.sh中设置。
Logging raw data(记录原始数据)
在许多生产环境中记录流经摄取管道的原始数据流不是所希望的行为,因为这可能导致泄漏敏感数据或安全相关配置(例如密钥)泄漏到Flume日志文件。 默认情况下,Flume不会记录此类信息。 另一方面,如果数据管道被破坏,Flume将尝试提供调试问题的线索。
调试事件管道问题的一种方法是设置连接到Logger Sink的附加内存通道,它将所有事件数据输出到Flume日志。 但是,在某些情况下,这种方法是不够的。
为了能够记录事件和配置相关的数据,除了log4j属性之外,还必须设置一些Java系统属性。
要启用与配置相关的日志记录,请设置Java系统属性-Dorg.apache.flume.log.printconfig = true。 这可以在命令行上传递,也可以在flume-env.sh中的JAVA_OPTS变量中设置。
要启用数据记录,请按照上述相同方式设置Java系统属性-Dorg.apache.flume.log.rawdata = true。 对于大多数组件,还必须将log4j日志记录级别设置为DEBUG或TRACE,以使特定于事件的日志记录显示在Flume日志中。
下面是启用配置日志记录和原始数据日志记录的示例,同时还将Log4j日志级别设置为DEBUG以用于控制台输出:
bin/flume-ng agent --conf conf --conf-file example.conf --name a1 -Dflume.root.logger=DEBUG,console -Dorg.apache.flume.log.printconfig=true -Dorg.apache.flume.log.rawdata=trueZookeeper based Configuration
Flume通过Zookeeper支持代理配置。 这是一个实验性功能。 配置文件需要上传到Zookeeper中,在可配置前缀下的。 配置文件存储在Zookeeper节点数据中。 以下是agents a1和a2的Zookeeper节点树的外观
- /flume
 |- /a1 [Agent config file]
 |- /a2 [Agent config file]
上传配置文件后,使用以下选项启动agent
bin/flume-ng agent –conf conf -z zkhost:2181,zkhost1:2181 -p /flume –name a1 -Dflume.root.logger=INFO,console| 参数名称 | 默认值 | 描述 |
|---|---|---|
| z | - | Zookeeper连接字符串。 以逗号分隔 hostname:port |
| p | /flume | Zookeeper中用于存储Agent配置的基本路径 |
Installing third-party plugins
Flume拥有完全基于插件的架构。 虽然Flume附带了许多开箱即用的sources, channels, sinks, serializers等,但许多实现都与Flume分开提供。
虽然通过将自己的jar包添加到flume-env.sh文件中的FLUME_CLASSPATH变量中,始终可以包含自定义Flume组件,但Flume现在支持一个名为plugins.d的特殊目录,该目录会自动获取以特定格式打包的插件。 这样可以更轻松地管理插件打包问题,以及更简单的调试和几类问题的故障排除,尤其是库依赖性冲突。
The plugins.d directory
plugins.d目录位于$FLUME_HOME/plugins.d。 在启动时,flume-ng启动脚本在plugins.d目录中查找符合以下格式的插件,并在启动java时将它们包含在正确的路径中。
- lib - 插件jar
- libext - 插件依赖的jar文件
- native - 任何必需的本机库,例如.so文件
plugins.d目录中的两个插件示例:
plugins.d/
plugins.d/custom-source-1/
plugins.d/custom-source-1/lib/my-source.jar
plugins.d/custom-source-1/libext/spring-core-2.5.6.jar
plugins.d/custom-source-2/
plugins.d/custom-source-2/lib/custom.jar
plugins.d/custom-source-2/native/gettext.so
Data ingestion
Flume支持许多从外部源摄取数据的机制。
RPC
Flume发行版中包含的Avro客户端可以使用avro RPC机制将给定文件发送到Flume Avro源:
bin/flume-ng avro-client -H localhost -p 41414 -F /usr/logs/log.10上面的命令会将/usr/logs/log.10的内容发送到监听该端口的Flume源。
Executing commands
There’s an exec source that executes a given command and consumes the output. A single ‘line’ of output ie. text followed by carriage return (‘\r’) or line feed (‘\n’) or both together.
Network streams
Flume支持以下机制从常用日志流类型中读取数据,例如:
- Avro
- Thrift
- Syslog
- Netcat
Setting multi-agent flow

为了跨多个agent或hops,前一个agent的sink和当前hop 的source需要是avro类型,sink指向source的主机名(或IP地址)和端口。
Consolidation
日志收集中非常常见的场景是大量日志生成客户端将数据发送到连接到存储子系统的少数消费者代理。 例如,从数百个Web服务器收集的日志发送给写入HDFS集群的十几个代理。
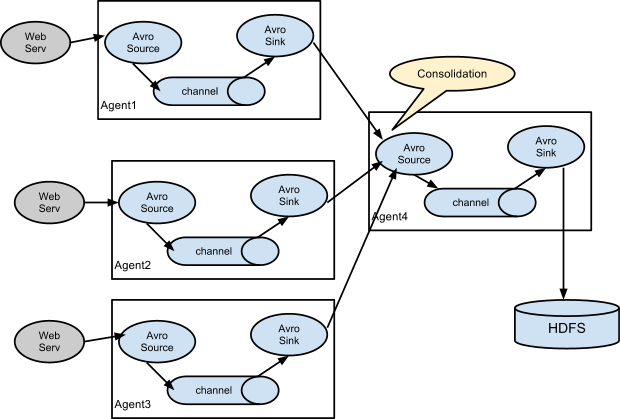
这可以在Flume中实现, 通过使用avro sink配置多个第一层agents,所有这些都指向单个代理的avro源(同样,您可以在这种情况下使用thrift sources/sinks/clients)。 第二层代理上的此源将接收的事件合并到单个信道中,该信道由接收器消耗到其最终目的地。
Multiplexing the flow
Flume支持将事件流多路复用到一个或多个目的地。 这是通过定义可以复制或选择性地将事件路由到一个或多个通道的流复用器来实现的。
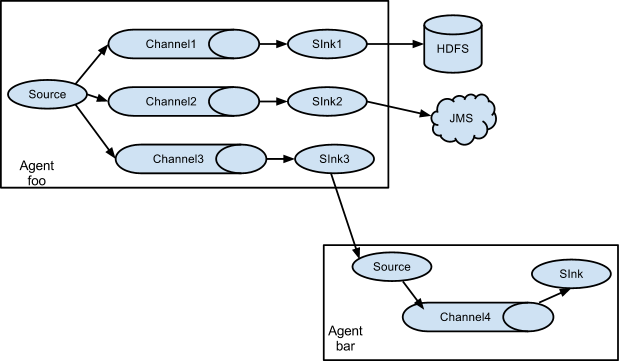
上面的例子显示了来自代理“foo”的source 将流扇出到三个不同的通道。 这个扇出可以是复制(replicating)或多路复用(multiplexing)。 在复制流的情况下,每个事件被发送到所有三个通道。 对于多路复用情况,当事件的属性与预配置的值匹配时,事件将传递到可用通道的子集。 例如,如果一个名为“txnType”的事件属性设置为“customer”,那么它应该转到channel1和channel3,如果它是“vendor”,那么它应该转到channel2,否则转到channel3。 可以在代理的配置文件中设置映射。