Step #1: Expand filesystem
| 1 |
$ sudo raspi-config |
And then select the “Advanced Options” menu item:
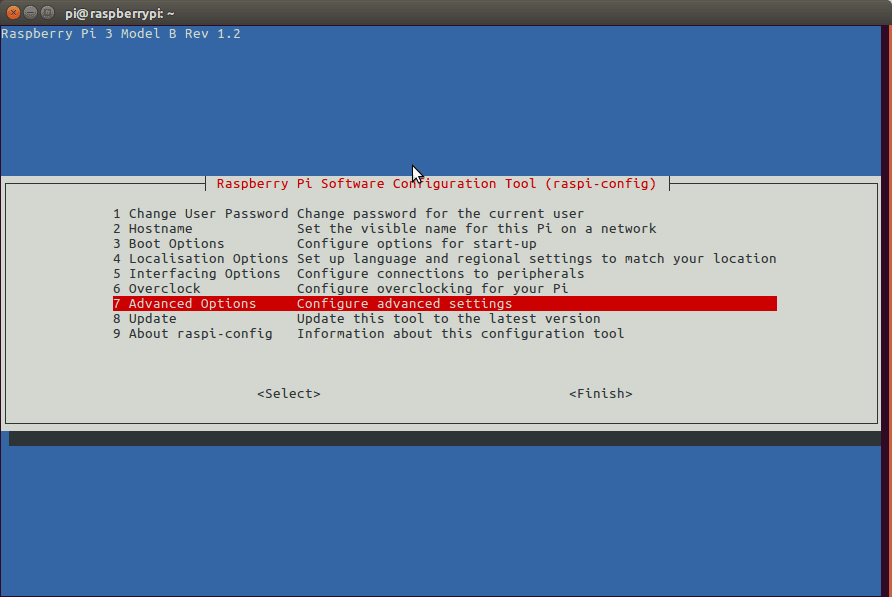
Figure 1: Select the “Advanced Options” item from the “raspi-config” menu.
Followed by selecting “Expand filesystem”:
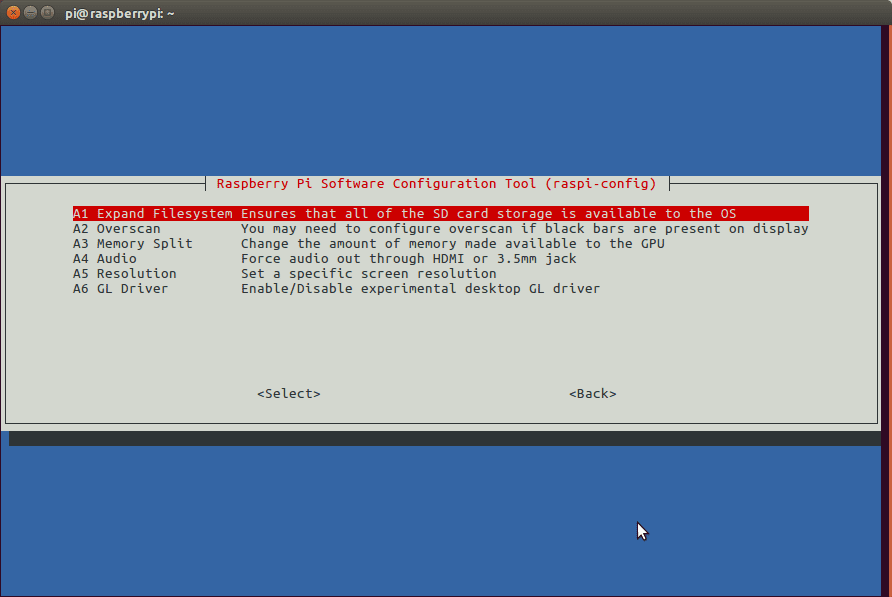
Figure 2: Expanding the filesystem on your Raspberry Pi 3.
| 1 |
$ sudo reboot |
| 1 2 3 4 5 6 7 8 9 10 |
$ df -h Filesystem Size Used Avail Use% Mounted on /dev/root 30G 4.2G 24G 15% / devtmpfs 434M 0 434M 0% /dev tmpfs 438M 0 438M 0% /dev/shm tmpfs 438M 12M 427M 3% /run tmpfs 5.0M 4.0K 5.0M 1% /run/lock tmpfs 438M 0 438M 0% /sys/fs/cgroup /dev/mmcblk0p1 42M 21M 21M 51% /boot tmpfs 88M 0 88M 0% /run/user/1000 |
| 1 2 3 4 |
$ sudo apt-get purge wolfram-engine $ sudo apt-get purge libreoffice* $ sudo apt-get clean $ sudo apt-get autoremove |
After removing the Wolfram Engine and LibreOffice, you can reclaim almost 1GB!
Step #2: Install dependencies
This isn’t the first time I’ve discussed how to install OpenCV on the Raspberry Pi, so I’ll keep these instructions on the brief side, allowing you to work through the installation process: I’ve also included the amount of time it takes to execute each command (some depend on your Internet speed) so you can plan your OpenCV + Raspberry Pi 3 install accordingly (OpenCV itself takes approximately 4 hours to compile — more on this later).
| 1 |
$ sudo apt-get update && sudo apt-get upgrade |
| 1 |
$ sudo apt-get install build-essential cmake pkg-config |
| 1 |
$ sudo apt-get install libjpeg-dev libtiff5-dev libjasper-dev libpng12-dev |
| 1 2 |
$ sudo apt-get install libavcodec-dev libavformat-dev libswscale-dev libv4l-dev $ sudo apt-get install libxvidcore-dev libx264-dev |
| 1 |
$ sudo apt-get install libgtk2.0-dev libgtk-3-dev |
| 1 |
$ sudo apt-get install libatlas-base-dev gfortran |
| 1 |
$ sudo apt-get install python2.7-dev python3-dev |
Required Packages
- GCC 4.4.x or later
- CMake 2.8.7 or higher
- Git
- GTK+2.x or higher, including headers (libgtk2.0-dev)
- pkg-config
- Python 2.6 or later and Numpy 1.5 or later with developer packages (python-dev, python-numpy)
- ffmpeg or libav development packages: libavcodec-dev, libavformat-dev, libswscale-dev
- [optional] libtbb2 libtbb-dev
- [optional] libdc1394 2.x
- [optional] libjpeg-dev, libpng-dev, libtiff-dev, libjasper-dev, libdc1394-22-dev
- [optional] CUDA Toolkit 6.5 or higher
The packages can be installed using a terminal and the following commands or by using Synaptic Manager:
[compiler] sudo apt-get install build-essential
[required] sudo apt-get install cmake git libgtk2.0-dev pkg-config libavcodec-dev libavformat-dev libswscale-dev
[optional] sudo apt-get install python-dev python-numpy libtbb2 libtbb-dev libjpeg-dev libpng-dev libtiff-dev libjasper-dev libdc1394-22-dev
Getting OpenCV Source Code
You can use the latest stable OpenCV version or you can grab the latest snapshot from our Git repository.
Getting the Latest Stable OpenCV Version
- Go to our downloads page.
- Download the source archive and unpack it.
Getting the Cutting-edge OpenCV from the Git Repository
Launch Git client and clone OpenCV repository. If you need modules from OpenCV contrib repository then clone it as well.
For example
cd ~/<my_working_directory>
git clone https://github.com/opencv/opencv.git
git clone https://github.com/opencv/opencv_contrib.git
Step #4: Python 2.7 or Python 3?
Before we can start compiling OpenCV on our Raspberry Pi 3, we first need to install pip , a Python package manager:
Raspbian Stretch: Install OpenCV 3 + Python on your Raspberry Pi
Shell
| 1 2 3 |
$ wget https://bootstrap.pypa.io/get-pip.py $ sudo python get-pip.py $ sudo python3 get-pip.py |
Timing: 33s
You may get a message that pip is already up to date when issuing these commands, but it is best not to skip this step.
If you’re a longtime PyImageSearch reader, then you’ll know that I’m a huge fan of both virtualenv and virtualenvwrapper. Installing these packages is not a requirement and you can absolutely get OpenCV installed without them, but that said, I highly recommend you install them as other existing PyImageSearch tutorials (as well as future tutorials) also leverage Python virtual environments. I’ll also be assuming that you have both virtualenv andvirtualenvwrapper installed throughout the remainder of this guide.
So, given that, what’s the point of using virtualenv and virtualenvwrapper ?
First, it’s important to understand that a virtual environment is a special tool used to keep the dependencies required by different projects in separate places by creating isolated, independent Python environments for each of them.
In short, it solves the “Project X depends on version 1.x, but Project Y needs 4.x” dilemma. It also keeps your global site-packages neat, tidy, and free from clutter.
If you would like a full explanation on why Python virtual environments are good practice, absolutely give this excellent blog post on RealPython a read.
It’s standard practice in the Python community to be using virtual environments of some sort, so I highly recommend that you do the same:
Raspbian Stretch: Install OpenCV 3 + Python on your Raspberry Pi
Shell
| 1 2 |
$ sudo pip install virtualenv virtualenvwrapper $ sudo rm -rf ~/.cache/pip |
Timing: 35s
Now that both virtualenv and virtualenvwrapper have been installed, we need to update our ~/.profile file to include the following lines at the bottom of the file:
Raspbian Stretch: Install OpenCV 3 + Python on your Raspberry Pi
Shell
| 1 2 3 4 |
# virtualenv and virtualenvwrapper export WORKON_HOME=$HOME/.virtualenvs export VIRTUALENVWRAPPER_PYTHON=/usr/bin/python3 source /usr/local/bin/virtualenvwrapper.sh |
In previous tutorials, I’ve recommended using your favorite terminal-based text editor such asvim , emacs , or nano to update the ~/.profile file. If you’re comfortable with these editors, go ahead and update the file to reflect the changes mentioned above.
Otherwise, you should simply use cat and output redirection to handle updating ~/.profile:
Raspbian Stretch: Install OpenCV 3 + Python on your Raspberry Pi
Shell
| 1 2 3 4 |
$ echo -e "\n# virtualenv and virtualenvwrapper" >> ~/.profile $ echo "export WORKON_HOME=$HOME/.virtualenvs" >> ~/.profile $ echo "export VIRTUALENVWRAPPER_PYTHON=/usr/bin/python3" >> ~/.profile $ echo "source /usr/local/bin/virtualenvwrapper.sh" >> ~/.profile |
Now that we have our ~/.profile updated, we need to reload it to make sure the changes take affect. You can force a reload of your ~/.profile file by:
- Logging out and then logging back in.
- Closing a terminal instance and opening up a new one
- Or my personal favorite, just use the source command:
Raspbian Stretch: Install OpenCV 3 + Python on your Raspberry Pi
Shell
| 1 |
$ source ~/.profile |
Note: I recommend running the source ~/.profile file each time you open up a new terminal to ensure your system variables have been setup correctly.
Creating your Python virtual environment
Next, let’s create the Python virtual environment that we’ll use for computer vision development:
Raspbian Stretch: Install OpenCV 3 + Python on your Raspberry Pi
Shell
| 1 |
$ mkvirtualenv cv -p python2 |
This command will create a new Python virtual environment named cv using Python 2.7.
If you instead want to use Python 3, you’ll want to use this command instead:
Raspbian Stretch: Install OpenCV 3 + Python on your Raspberry Pi
Shell
| 1 |
$ mkvirtualenv cv -p python3 |
Timing: 24s
Again, I can’t stress this point enough: the cv Python virtual environment is entirely independent and sequestered from the default Python version included in the download of Raspbian Stretch. Any Python packages in the global site-packages directory will not be available to the cv virtual environment. Similarly, any Python packages installed in site-packages of cv will not be available to the global install of Python. Keep this in mind when you’re working in your Python virtual environment and it will help avoid a lot of confusion and headaches.
How to check if you’re in the “cv” virtual environment
If you ever reboot your Raspberry Pi; log out and log back in; or open up a new terminal, you’ll need to use the workon command to re-access the cv virtual environment. In previous blog posts, I’ve seen readers use the mkvirtualenv command — this is entirely unneeded!The mkvirtualenv command is meant to be executed only once: to actually create the virtual environment.
After that, you can use workon and you’ll be dropped down into your virtual environment:
Raspbian Stretch: Install OpenCV 3 + Python on your Raspberry Pi
Shell
| 1 2 |
$ source ~/.profile $ workon cv |
To validate and ensure you are in the cv virtual environment, examine your command line — if you see the text (cv) preceding your prompt, then you are in the cv virtual environment:
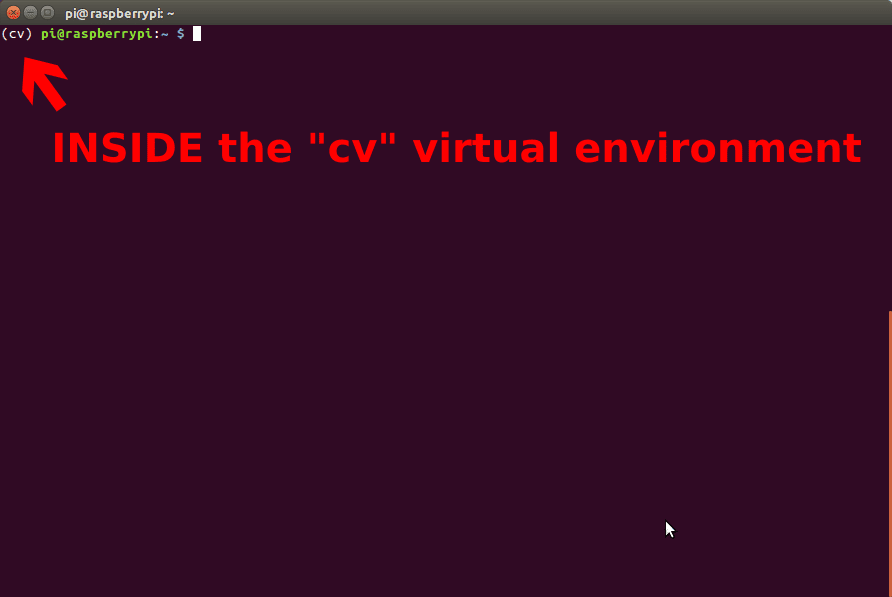
Figure 3: Make sure you see the “(cv)” text on your prompt, indicating that you are in the cv virtual environment.
Otherwise, if you do not see the (cv) text, then you are not in the cv virtual environment:
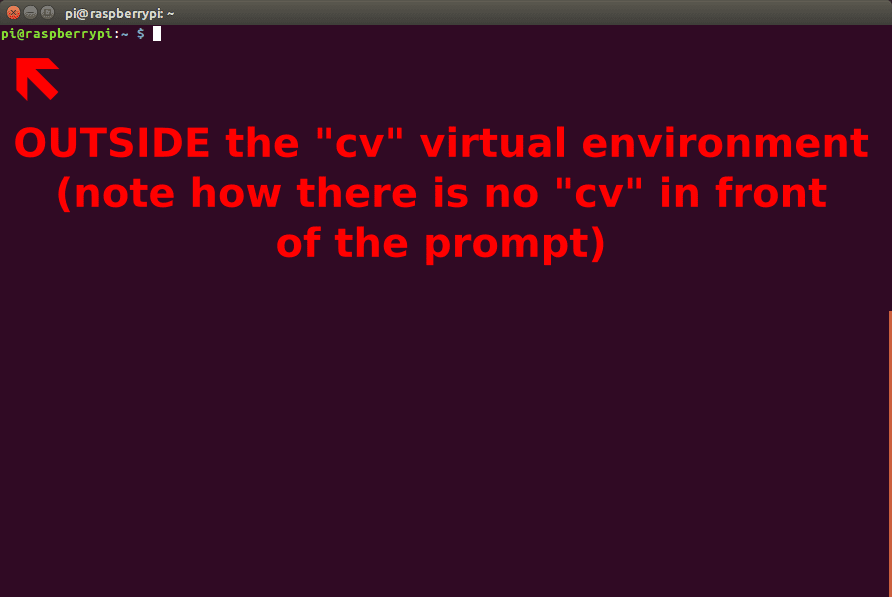
Figure 4: If you do not see the “(cv)” text on your prompt, then you are not in the cv virtual environment and need to run “source” and “workon” to resolve this issue.
To fix this, simply execute the source and workon commands mentioned above.
Installing NumPy on your Raspberry Pi
Assuming you’ve made it this far, you should now be in the cv virtual environment (which you should stay in for the rest of this tutorial). Our only Python dependency is NumPy, a Python package used for numerical processing:
Raspbian Stretch: Install OpenCV 3 + Python on your Raspberry Pi
Shell
| 1 |
$ pip install numpy |
Timing: 11m 12s
Be sure to grab a cup of coffee or go for a nice walk, the NumPy installation can take a bit of time.
Note: A question I’ve often seen is “Help, my NumPy installation has hung and it’s not installing!” Actually, it is installing, it just takes time to pull down the sources and compile. You can verify that NumPy is compiling and installing by running top . Here you’ll see that your CPU cycles are being used compiling NumPy. Be patient. The Raspberry Pi isn’t as fast as your laptop/desktop.
Step #5: Compile and Install OpenCV
We are now ready to compile and install OpenCV! Double-check that you are in the cvvirtual environment by examining your prompt (you should see the (cv) text preceding it), and if not, simply execute workon :
Raspbian Stretch: Install OpenCV 3 + Python on your Raspberry Pi
Shell
| 1 |
$ workon cv |
Building OpenCV from Source Using CMake
-
Create a temporary directory, which we denote as <cmake_build_dir>, where you want to put the generated Makefiles, project files as well the object files and output binaries and enter there.
For example
cd ~/opencv
mkdir build
cd build
-
Configuring. Run cmake [<some optional parameters>] <path to the OpenCV source directory>
For example
cmake -D CMAKE_BUILD_TYPE=Release -D CMAKE_INSTALL_PREFIX=/usr/local ..
or cmake-gui
- set full path to OpenCV source code, e.g. /home/user/opencv
- set full path to <cmake_build_dir>, e.g. /home/user/opencv/build
- set optional parameters
- run: “Configure”
- run: “Generate”
Note
Use
cmake -DCMAKE_BUILD_TYPE=Release -DCMAKE_INSTALL_PREFIX=/usr/local .., without spaces after -D if the above example doesn't work. - Description of some parameters
- build type:
CMAKE_BUILD_TYPE=Release\Debug - to build with modules from opencv_contrib set OPENCV_EXTRA_MODULES_PATH to <path to opencv_contrib/modules/>
- set BUILD_DOCS for building documents
- set BUILD_EXAMPLES to build all examples
- build type:
- [optional] Building python. Set the following python parameters:
- PYTHON2(3)_EXECUTABLE = <path to python>
- PYTHON_INCLUDE_DIR = /usr/include/python<version>
- PYTHON_INCLUDE_DIR2 = /usr/include/x86_64-linux-gnu/python<version>
- PYTHON_LIBRARY = /usr/lib/x86_64-linux-gnu/libpython<version>.so
- PYTHON2(3)_NUMPY_INCLUDE_DIRS = /usr/lib/python<version>/dist-packages/numpy/core/include/
- [optional] Building java.
- Unset parameter: BUILD_SHARED_LIBS
- It is useful also to unset BUILD_EXAMPLES, BUILD_TESTS, BUILD_PERF_TESTS - as they all will be statically linked with OpenCV and can take a lot of memory.
-
Build. From build directory execute make, it is recommended to do this in several threads
For example
make -j7 # runs 7 jobs in parallel
-
[optional] Building documents. Enter <cmake_build_dir/doc/> and run make with target "doxygen"
For example
cd ~/opencv/build/doc/
make -j7 doxygen
- To install libraries, execute the following command from build directory
sudo make install
For Python 3:
After running make install , your OpenCV + Python bindings should be installed in/usr/local/lib/python3.5/site-packages . Again, you can verify this with the ls command:
Raspbian Stretch: Install OpenCV 3 + Python on your Raspberry Pi
Shell
| 1 2 3 |
$ ls -l /usr/local/lib/python3.5/site-packages/ total 1852 -rw-r--r-- 1 root staff 1895932 Mar 20 21:51 cv2.cpython-34m.so |
I honestly don’t know why, perhaps it’s a bug in the CMake script, but when compiling OpenCV 3 bindings for Python 3+, the output .so file is named cv2.cpython-35m-arm-linux-gnueabihf.so (or some variant of) rather than simply cv2.so (like in the Python 2.7 bindings).
Again, I’m not sure exactly why this happens, but it’s an easy fix. All we need to do is rename the file:
Raspbian Stretch: Install OpenCV 3 + Python on your Raspberry Pi
Shell
| 1 2 |
$ cd /usr/local/lib/python3.5/site-packages/ $ sudo mv cv2.cpython-35m-arm-linux-gnueabihf.so cv2.so |
After renaming to cv2.so , we can sym-link our OpenCV bindings into the cv virtual environment for Python 3.5:
Raspbian Stretch: Install OpenCV 3 + Python on your Raspberry Pi
Shell
| 1 2 |
$ cd ~/.virtualenvs/cv/lib/python3.5/site-packages/ $ ln -s /usr/local/lib/python3.5/site-packages/cv2.so cv2.so |
Step #7: Testing your OpenCV 3 install

参考:https://docs.opencv.org/master/d7/d9f/tutorial_linux_install.html