使用 Lint 改进您的代码
除了[In addition to]测试 Android 应用以确保其符合功能要求[meets its functional requirements]外,确保代码不存在结构问题[structural problems]也是非常重要的。结构混乱[poorly structured]的代码会影响 Android 应用的可靠性和效率[impact the reliability and efficiency],增大维护代码的难度[harder to maintain]。
例如,如果 XML 资源文件包含未使用的命名空间,则不仅占用空间[takes up space],还会导致不必要的处理[incurs unnecessary processing]。其他结构问题,例如使用目标 API 版本不支持的已弃用的元素或 API 调用等,可能导致代码无法正常运行[failing to run correctly]。Lint can help you clean up these issues.
To further improve linting performance, you should also add annotations to your code.
概览
Android Studio 提供一个名为 Lint 的代码扫描工具[code scanning tool],可帮助您发现并纠正[identify and correct]代码结构质量[structural quality]的问题,而无需实际执行该应用[without your having to execute the app],也不必编写测试用例[write test cases]。该工具会报告其检测到的每个问题并提供该问题的描述消息和严重级别,以便您可以快速确定需要优先进行哪些关键改进[quickly prioritize the critical improvements]。此外,您可以调低问题的严重级别,忽略与项目无关的问题,也可以调高严重级别,以突出特定问题[highlight specific problems]。
Lint 工具可检查您的 Android 项目源文件是否包含潜在错误[potential bugs],以及在正确性、安全性、性能、易用性、便利性和国际化[correctness, security, performance, usability, accessibility, and internationalization]方面是否需要优化改进。在使用 Android Studio 时,配置的 Lint 和 IDE 检查会在您每次构建应用时运行。不过,您可以手动运行检查或从命令行运行 Lint。
注:当在 Android Studio 中编译代码时,执行额外的IntelliJ代码检查以简化代码审查注:当在 Android Studio 中编译代码时,执行额外的IntelliJ代码检查以简化代码审查
下图显示了 Lint 工具如何处理应用源文件。
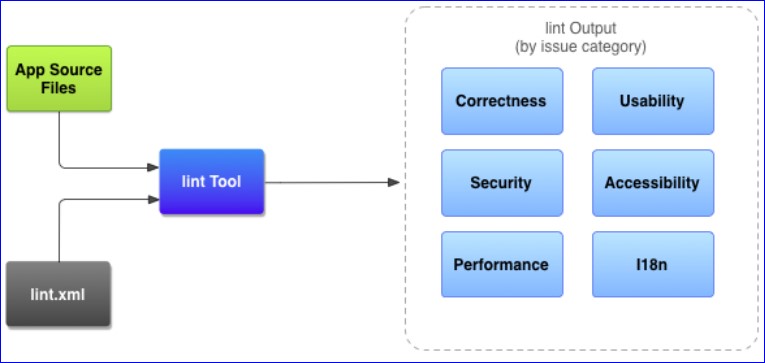
- App source files:包括 Java 和 XML 文件、图标和 ProGuard 配置文件等。
- lint.xml 文件:此配置文件可用于指定您希望排除的任何 Lint 检查以及自定义问题严重级别[customize problem severity levels]。
- Lint 工具:您可以从命令行或在 Android Studio 中对 Android 项目运行此静态代码扫描工具。Lint 工具会检查那些可能影响 Android 应用质量和性能的代码结构问题。强烈建议您先纠正 Lint 检测到的所有错误再发布应用。
- Lint 检查结果:您可以在控制台或 Android Studio 的 Inspection Results 窗口中查看 Lint 检查结果。请参阅手动运行检查。
通过 gradlew 命令运行 Lint
gradlew lint  //On Windows
./gradlew lint //On Linux or Macgradlew lint //On Windows
./gradlew lint //On Linux or Mac
gradlew lint

> Task :app:lint
Ran lint on variant compileOptions: 4 issues found
Ran lint on variant debug: 4 issues found
Ran lint on variant release: 4 issues found
Wrote HTML report to file:///C:/Android/_coder/_workspace_as/_2018.05/JsBridge/app/build/reports/lint-results.html
Wrote XML report to file:///C:/Android/_coder/_workspace_as/_2018.05/JsBridge/app/build/reports/lint-results.xml

> Task :mylibrary:lint
Ran lint on variant release: 2 issues found
Ran lint on variant compileOptions: 2 issues found
Ran lint on variant debug: 2 issues found
Wrote HTML report to file:///C:/Android/_coder/_workspace_as/_2018.05/JsBridge/mylibrary/build/reports/lint-results.html
Wrote XML report to file:///C:/Android/_coder/_workspace_as/_2018.05/JsBridge/mylibrary/build/reports/lint-results.xml

BUILD SUCCESSFUL in 36s
80 actionable tasks: 23 executed, 57 up-to-dategradlew lint
> Task :app:lint
Ran lint on variant compileOptions: 4 issues found
Ran lint on variant debug: 4 issues found
Ran lint on variant release: 4 issues found
Wrote HTML report to file:///C:/Android/_coder/_workspace_as/_2018.05/JsBridge/app/build/reports/lint-results.html
Wrote XML report to file:///C:/Android/_coder/_workspace_as/_2018.05/JsBridge/app/build/reports/lint-results.xml
> Task :mylibrary:lint
Ran lint on variant release: 2 issues found
Ran lint on variant compileOptions: 2 issues found
Ran lint on variant debug: 2 issues found
Wrote HTML report to file:///C:/Android/_coder/_workspace_as/_2018.05/JsBridge/mylibrary/build/reports/lint-results.html
Wrote XML report to file:///C:/Android/_coder/_workspace_as/_2018.05/JsBridge/mylibrary/build/reports/lint-results.xml
BUILD SUCCESSFUL in 36s
80 actionable tasks: 23 executed, 57 up-to-date
<?xml version="1.0" encoding="UTF-8"?>
<issues format="4" by="lint 3.1.3">
<issue
id="GradleDependency"
severity="Warning"
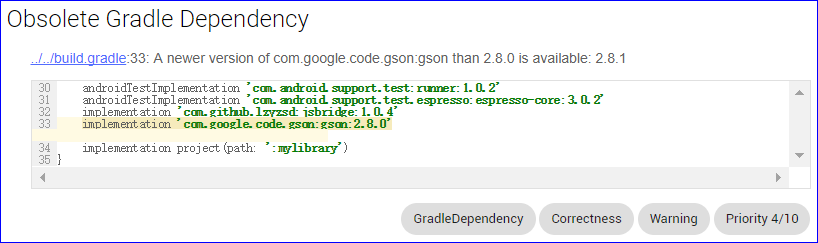
message="A newer version of com.google.code.gson:gson than 2.8.0 is available: 2.8.1"
category="Correctness"
priority="4"
summary="Obsolete Gradle Dependency"
explanation="This detector looks for usages of libraries where the version you are using is not the current stable release. Using older versions is fine, and there are cases where you deliberately want to stick with an older version. However, you may simply not be aware that a more recent version is available, and that is what this lint check helps find."
errorLine1=" implementation 'com.google.code.gson:gson:2.8.0'"
errorLine2=" ~~~~~~~~~~~~~~~~~~~~~~~~~~~~~~~~~~~~~~~~~~~~~~~~"
quickfix="studio">
<location
file="C:\Android\_coder\_workspace_as\_2018.05\JsBridge\app\build.gradle"
line="33"
column="5"/>
</issue>
...
</issues>
<issues format="4" by="lint 3.1.3">
<issue
id="GradleDependency"
severity="Warning"
message="A newer version of com.google.code.gson:gson than 2.8.0 is available: 2.8.1"
category="Correctness"
priority="4"
summary="Obsolete Gradle Dependency"
explanation="This detector looks for usages of libraries where the version you are using is not the current stable release. Using older versions is fine, and there are cases where you deliberately want to stick with an older version. However, you may simply not be aware that a more recent version is available, and that is what this lint check helps find."
errorLine1=" implementation 'com.google.code.gson:gson:2.8.0'"
errorLine2=" ~~~~~~~~~~~~~~~~~~~~~~~~~~~~~~~~~~~~~~~~~~~~~~~~"
quickfix="studio">
<location
file="C:\Android\_coder\_workspace_as\_2018.05\JsBridge\app\build.gradle"
line="33"
column="5"/>
</issue>
...
</issues>
gradlew lintDebuggradlew lintDebug
使用独立的命令行工具运行 lint
为了方便使用命令行工具,你可以将此路径添加到环境变量 Path 里面。
要对项目目录中的文件列表运行 Lint,请使用以下命令:
lint [flags] <project directory>lint [flags] <project directory>
例如,您可以发出以下命令,扫描指定目录及其子目录中的文件。问题 ID AllowBackup 提示 Lint 仅扫描是否具有AllowBackup的问题。
lint --check AllowBackup C:\Android\_coder\_workspace_eclipse\TestAndroid

Scanning TestAndroid: .
AndroidManifest.xml:11: Warning: On SDK version 23 and up, your app data will be automatically backed up and restored on app install. Consider adding the attribute android:fullBackupContent to specify an @xml resource which configures which files to backup. More info: https://developer.android.com/training/backup/autosyncapi.html [AllowBackup]
    <application
    ^
0 errors, 1 warningslint --check AllowBackup C:\Android\_coder\_workspace_eclipse\TestAndroid
Scanning TestAndroid: .
AndroidManifest.xml:11: Warning: On SDK version 23 and up, your app data will be automatically backed up and restored on app install. Consider adding the attribute android:fullBackupContent to specify an @xml resource which configures which files to backup. More info: https://developer.android.com/training/backup/autosyncapi.html [AllowBackup]
<application
^
0 errors, 1 warnings
如果项目是通过Gradle管理的,会提示不能使用独立的工具使用 lint 命令:
lint --check AllowBackup C:\Android\_coder\_workspace_as\_2018.05\JsBridge

JsBridge: Error: "JsBridge" is a Gradle project. To correctly analyze Gradle projects, you should run "gradlew :lint" instead. [LintError]
1 errors, 0 warningslint --check AllowBackup C:\Android\_coder\_workspace_as\_2018.05\JsBridge
JsBridge: Error: "JsBridge" is a Gradle project. To correctly analyze Gradle projects, you should run "gradlew :lint" instead. [LintError]
1 errors, 0 warnings
要查看此工具支持的标志和命令行参数的完整列表,请使用以下命令(详见附件):
lint --helplint --help
配置 lint 以禁止警告
- Globally (entire project)
- Project module
- Production module
- Test module
- Open files
- Class hierarchy类层次结构
- Version Control System (VCS) scopes范围
在 AS 中配置 Lint
在您使用 Android Studio 时,内置的 Lint 工具会检查您的代码。您可以通过以下两种方式查看警告和错误:
- 在代码编辑器中的弹出文本。Lint 发现问题后,会用黄色突出显示有问题的代码,而对于更严重的问题,则会在代码下面添加红色下划线。
- 点击 Analyze > Inspect Code > 设置后点击确定,然后就会在 Lint 的 Inspection Results 窗口中列出检测到的问题。请参阅 手动运行检查。
在 lint.xml 中配置 Lint
PS:此配置文件仅适用于以前用 eclipse 通过 lint.bat 检查的项目,如果项目是用 AndroidStudio 通过 Gradle 管理的,因为不能使用之前的 lint 命令,所以此配置文件也是无效的,没有任何意义。这种情况下,要通过build.gradle 中的 lintOptions 配置才可以。PS:此配置文件仅适用于以前用 eclipse 通过 lint.bat 检查的项目,如果项目是用 AndroidStudio 通过 Gradle 管理的,因为不能使用之前的 lint 命令,所以此配置文件也是无效的,没有任何意义。这种情况下,要通过build.gradle 中的 lintOptions 配置才可以。
<?xml version="1.0" encoding="UTF-8"?>
<lint>
    <!-- Disable the given check in this project -->
    <issue id="IconMissingDensityFolder" severity="ignore" />

    <!-- Ignore the ObsoleteLayoutParam issue in the specified files -->
    <issue id="ObsoleteLayoutParam">
        <ignore path="res/layout/activation.xml" />
        <ignore path="res/layout-xlarge/activation.xml" />
    </issue>

    <!-- Ignore the UselessLeaf issue in the specified file -->
    <issue id="UselessLeaf">
        <ignore path="res/layout/main.xml" />
    </issue>

    <!-- Change the severity of hardcoded strings to "error" -->
    <issue id="HardcodedText" severity="error" />
</lint><?xml version="1.0" encoding="UTF-8"?>
<lint>
<!-- Disable the given check in this project -->
<issue id="IconMissingDensityFolder" severity="ignore" />
<!-- Ignore the ObsoleteLayoutParam issue in the specified files -->
<issue id="ObsoleteLayoutParam">
<ignore path="res/layout/activation.xml" />
<ignore path="res/layout-xlarge/activation.xml" />
</issue>
<!-- Ignore the UselessLeaf issue in the specified file -->
<issue id="UselessLeaf">
<ignore path="res/layout/main.xml" />
</issue>
<!-- Change the severity of hardcoded strings to "error" -->
<issue id="HardcodedText" severity="error" />
</lint>
您可以在 <issue> 标记中设置严重级别属性,以更改某个问题的严重级别或禁止 Lint 检查此问题。
提示:如需查看 Lint 支持的问题及其对应的问题 ID 的完整列表,请运行 lint --list 命令(详见附件)。
配置 Lint 对 Java 代码的检查
要在 Android 项目中特别禁止 Lint 检查某个 Java 类或方法,请向此 Java 代码添加 @SuppressLint 注解。
下例说明了可以如何对 onCreate 方法中的 NewApi 问题关闭 Lint 检查。Lint 工具会继续检查该类的其他方法中的 NewApi 问题。
@SuppressLint("NewApi")
@Override
public void onCreate(Bundle savedInstanceState) { ... }@SuppressLint("NewApi")
@Override
public void onCreate(Bundle savedInstanceState) { }
下例说明了如何对 FeedProvider 类中的 ParserError 问题关闭 Lint 检查:
@SuppressLint("ParserError")
public class FeedProvider extends ContentProvider { ... }@SuppressLint("ParserError")
public class FeedProvider extends ContentProvider { }
要禁止检查 Java 文件中的所有 Lint 问题,请使用如下 all 关键字:
@SuppressLint("all")@SuppressLint("all")
配置 Lint 对 XML 布局的检查
您可以使用 tools:ignore 属性禁止 Lint 检查 XML 文件的特定部分。在 lint.xml 文件中添加以下命名空间值,以便 Lint 工具能识别此属性:
namespace xmlns:tools="http://schemas.android.com/tools"namespace xmlns:tools="http://schemas.android.com/tools"
下例说明了可以如何禁止 Lint 检查 XML 布局文件的 <LinearLayout> 元素中的 UnusedResources 问题。如果某个父元素声明了 ignore 属性,则该元素的子元素会继承此属性。在本例中,也会禁止 Lint 检查 <TextView> 子元素。
<LinearLayout
    xmlns:android="http://schemas.android.com/apk/res/android"
    xmlns:tools="http://schemas.android.com/tools"
    tools:ignore="UnusedResources" >

    <TextView
        android:text="@string/auto_update_prompt"
        ... />
</LinearLayout><LinearLayout
xmlns:android="http://schemas.android.com/apk/res/android"
xmlns:tools="http://schemas.android.com/tools"
tools:ignore="UnusedResources" >
<TextView
android:text="@string/auto_update_prompt"
/>
</LinearLayout>
要禁止检查多个问题,请使用以逗号分隔的字符串列出要禁止检查的问题。例如:
tools:ignore="NewApi,StringFormatInvalid"tools:ignore="NewApi,StringFormatInvalid"
要禁止 Lint 检查 XML 元素中的所有问题,请使用如下 all 关键字:
tools:ignore="all"tools:ignore="all"
通过 Gradle 配置 Lint 选项
注意:以下方式仅在通过 gradlew 命令运行 Lint 时适用,通过 lint 命令行,或通过 Analyze > Inspect Code,或通过 build 生成 APK 均不会产生 lint 报告。注意:以下方式仅在通过 gradlew 命令运行 Lint 时适用,通过 lint 命令行,或通过 Analyze > Inspect Code,或通过 build 生成 APK 均不会产生 lint 报告。
通过适用于 Gradle 的 Android 插件,您可以使用模块级 build.gradle 文件中的 lintOptions {} 块配置某些 Lint 选项,例如要执行或忽略哪些检查。以下代码段显示了您可以配置的部分属性:
android {
  lintOptions {
    disable 'TypographyFractions','TypographyQuotes'  // Turns off checks for the issue IDs you specify.
    enable 'RtlHardcoded', 'RtlCompat', 'RtlEnabled' // These checks are in addition to the default lint checks.
/** To enable checks for only a subset of issue IDs and ignore all others, list the issue IDs with the 'check' property instead. This property overrides any issue IDs you enable or disable using the properties above. */
    check 'NewApi', 'InlinedApi'  //一般不会用
    quiet true  // If set to true, turns off analysis progress reporting by lint.
    abortOnError false // if set to true (default), stops the build if errors are found.
    ignoreWarnings true // if true, only report errors.
  }
}android {
lintOptions {
disable 'TypographyFractions','TypographyQuotes' // Turns off checks for the issue IDs you specify.
enable 'RtlHardcoded', 'RtlCompat', 'RtlEnabled' // These checks are in addition to the default lint checks.
/** To enable checks for only a subset of issue IDs and ignore all others, list the issue IDs with the 'check' property instead. This property overrides any issue IDs you enable or disable using the properties above. */
check 'NewApi', 'InlinedApi' //一般不会用
quiet true // If set to true, turns off analysis progress reporting by lint.
abortOnError false // if set to true (default), stops the build if errors are found.
ignoreWarnings true // if true, only report errors.
}
}
创建警告基线
注意:IDE的 Analyze> Inspect Code 或命令行 gradlew 只会帮你生成一个初始的不含任何问题的 baseline 文件,而不会在以后更新你的 baseline 文件。当然,你可以直接把某次通过 gradlew 命令生成的 \app\build\reports 目录下的 lint-results-debug.xml 等文件当做 baseline 文件,即手动用生成的文件覆盖原先的  baseline 文件。
这其实很好理解,因为 baseline 文件的意思其实相当于自定义让 lint 忽略的问题列表,既然是自定义,当然是你手动控制的,而不是自动生成的。注意:IDE的 Analyze> Inspect Code 或命令行 gradlew 只会帮你生成一个初始的不含任何问题的 baseline 文件,而不会在以后更新你的 baseline 文件。当然,你可以直接把某次通过 gradlew 命令生成的 \app\build\reports 目录下的 lint-results-debug.xml 等文件当做 baseline 文件,即手动用生成的文件覆盖原先的 baseline 文件。
这其实很好理解,因为 baseline 文件的意思其实相当于自定义让 lint 忽略的问题列表,既然是自定义,当然是你手动控制的,而不是自动生成的。
android {
  lintOptions {
    ...
    baseline file("lint-baseline.xml")
  }
}android {
lintOptions {
...
baseline file("lint-baseline.xml")
}
}
C:\Android\_coder\_workspace_as\_2018.05\JsBridge>gradlew lintDebug
...
Created baseline file C:\Android\_coder\_workspace_as\_2018.05\JsBridge\mylibrary\lint-baseline.xmlC:\Android\_coder\_workspace_as\_2018.05\JsBridge>gradlew lintDebug
...
Created baseline file C:\Android\_coder\_workspace_as\_2018.05\JsBridge\mylibrary\lint-baseline.xml
<?xml version="1.0" encoding="UTF-8"?>
<issues format="4" by="lint 3.1.3">
</issues>
<issues format="4" by="lint 3.1.3">
</issues>
自定义基线
android {
  lintOptions {
    check 'NewApi', 'HandlerLeak'
    baseline file("lint-baseline.xml")
  }
}android {
lintOptions {
check 'NewApi', 'HandlerLeak'
baseline file("lint-baseline.xml")
}
}
注意,上面说的这句话是有歧义的:如果要将某些问题类型添加到【基线】,而不是所有问题...
其真实想表达的意思是:如果要将某些问题类型添加到【lint 监测范围】,而不是所有问题...
因为,在 lintOptions 中的配置即使在没有指定 baseline 的情况下也是生效的,也即,这时候执行 gradlew 命令时,lint 会完全按照 lintOptions 中的设置进行检测。注意,上面说的这句话是有歧义的:如果要将某些问题类型添加到【基线】,而不是所有问题...
其真实想表达的意思是:如果要将某些问题类型添加到【lint 监测范围】,而不是所有问题...
因为,在 lintOptions 中的配置即使在没有指定 baseline 的情况下也是生效的,也即,这时候执行 gradlew 命令时,lint 会完全按照 lintOptions 中的设置进行检测。
PS:baseline 文件里面的所有问题都会写入到生成的检测报告中,即使这些问题在 lintOptions 中配置被手动忽略了。
也即:lintOptions 中的配置,仅对除去 baseline 文件里列出的警告之外的"新增"的警告有效。PS:baseline 文件里面的所有问题都会写入到生成的检测报告中,即使这些问题在 lintOptions 中配置被手动忽略了。
也即:lintOptions 中的配置,仅对除去 baseline 文件里列出的警告之外的"新增"的警告有效。
基线警告

注意:在IDE中以批处理模式[batch mode]运行检查时会启用基线,但在编辑文件时,在后台运行的编辑器内检查会忽略它们。 原因是基线适用于代码库[codebase]有大量现有警告的情况,但您确实希望在触摸代码时在本地修复问题。注意:在IDE中以批处理模式[batch mode]运行检查时会启用基线,但在编辑文件时,在后台运行的编辑器内检查会忽略它们。 原因是基线适用于代码库[codebase]有大量现有警告的情况,但您确实希望在触摸代码时在本地修复问题。
手动运行检查
您可以通过选择 Inspect Code > Analyze 手动运行已配置的 configured lint 和其他 IDE inspections。检查结果将显示在 Inspection Results 窗口中。
设置检查范围和配置文件
选择您要分析的文件(inspection scope)和您要运行的检查(inspection profile),具体操作如下:
1、从菜单栏选择 Analyze > Inspect Code, 在 Specify Inspection Scope 对话框中查看设置。- 取决于您所选的是项目、文件夹还是文件,Specify Inspection Scope 对话框中显示的选项组合可能不尽相同。您可以通过选择其他单选按钮之一,更改要检查的内容。
- 您可以在 Specify Inspection Scope 中查看此对话框上可能出现的所有字段的描述。
- 在最左侧的工具栏,可以设置检查结果的展示方式、折叠/展开、重新检测、排序和分组方式、导出检车结果、根据建议快速修改等。
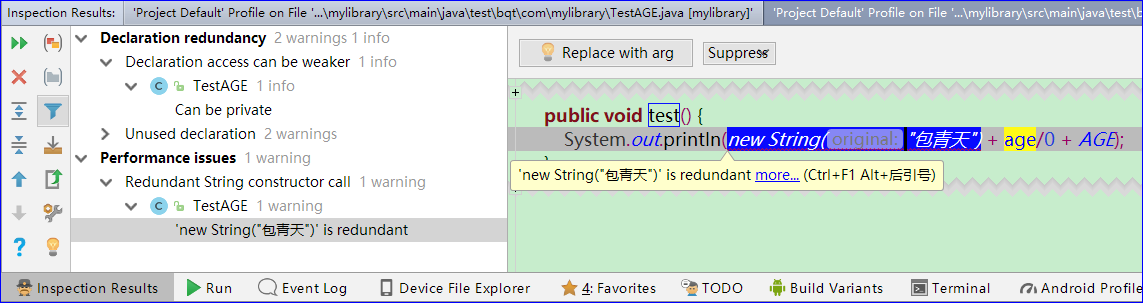
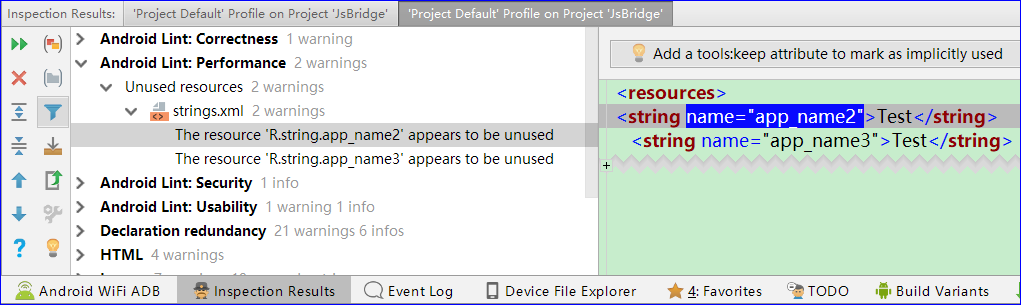
- 在左侧窗格树形视图中,通过展开并选择错误类别、类型和问题[error categories, types, and issues],查看检查结果。
常见的错误类别:
Correctness 正确性
Usability 可用性
Security 安全性
Accessibility 可访问性
Performance 表现,性能
Declaration 声明范围
I18n 国际化
Spelling 拼写
XML
HTML
x
常见的错误类别:
Correctness 正确性
Usability 可用性
Security 安全性
Accessibility 可访问性
Performance 表现,性能
Declaration 声明范围
I18n 国际化
Spelling 拼写
XML
HTML
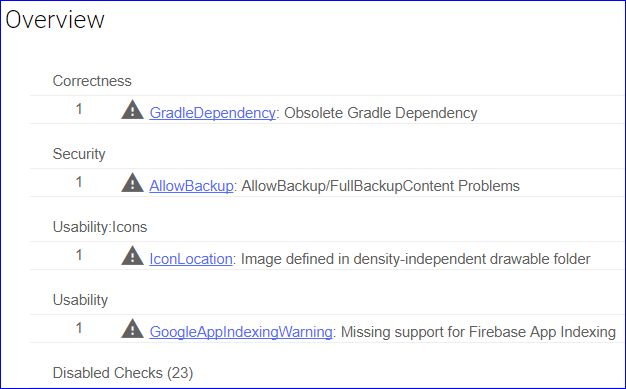
- 右侧窗格显示所选错误类别、类型或问题的检查报告,并提供错误的名称和位置。在适用情况下[Where applicable],检查报告会显示问题摘要[problem synopsis]等其他信息,以帮助您纠正问题。
- 在左侧窗格树形视图中,右键点击某个类别、类型或问题,显示上下文菜单。 取决于上下文,您可以执行以下全部或部分操作:
- jump to source 跳到源文件
- exclude and include selected items 排除和包含选定项
- suppress problems 消除问题
- edit settings 编辑设置
- manage inspection alerts 管理检查警报
- rerun an inspection 重新运行检查
- 如需左侧工具栏按钮、上下文菜单项和检查报告字段的描述,请参阅 Inspection Tool Window。
使用自定义范围
您可以按如下方法使用 Android Studio 中提供的自定义范围之一。
在 Specify Inspection Scope 对话框中,点击 Custom Scope, 点击 Custom Scope 下拉列表,一般有以下可供选择 的自定义范围:- All Places:所有位置
- Project Files:当前项目中的所有文件。
- Project Production Files:仅限当前项目中的生产文件。
- Project Test Files:仅限当前项目中的测试文件。请参阅 测试类型和位置。
- Scratches and Consoles:划痕和控制台
- Open Files:仅限当前项目中已打开的文件。
- Module <your-module>:仅限当前项目中对应模块文件夹中的文件。
- Current File:仅限当前项目中的当前文件。在您已选择文件或文件夹时显示。
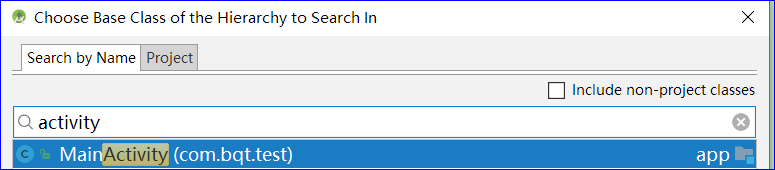
- Class Hierarchy:选择此选项并点击 OK,会出现一个对话框,其中会显示当前项目中的所有类。使用此对话框中的 Search by Name 字段过滤并选择要检查的类。如果未过滤类列表,代码检查将检查所有类。
- VCS Scopes:版本控制范围
- Changed FIles:版本控制范围内改变的文件
- Default:版本控制范围内的文件
创建自定义范围
如果您要检查的部分文件和目录不在当前可用的任何 custom scopes 内,您可以按如下步骤创建自定义范围:
- 在 Specify Inspection Scope 对话框中,选择 Custom Scope,点击 Custom Scope 下拉列表后面的三个点,此时将显示 Scopes 对话框。
- 点击 Add
 以定义一个新的范围。在随之弹出的 Add Scope 下拉列表中,选择 Local。
 - local and shared 范围都可在项目内部用于 Inspect Code 功能。
- shared 范围还可用于其他具有范围字段的[have a scope field]项目功能[other project features]。例如,在您点击 Edit Settings
 更改 Find Usages 的设置时,随之弹出的对话框会显示一个 Scope 字段,您可以在其中选择共享范围。
- 为范围命名并点击 OK。Scopes 对话框的右侧窗格包含可用于定义自定义范围的选项。
- 从下拉列表中选择 Project(选择 packages 也可以)。此时将显示可用的项目列表。通过下拉列表左侧的工具栏可以控制显示方式,显示范围等。
- 展开项目文件夹,选择您要添加到自定义范围中的项,然后点击右侧的按钮之一。
- Include:包含此文件夹及其文件,但不包含其子文件夹中的任何文件。
- Include Recursively:包含此文件夹及其所有文件,以及子文件夹及其中的文件。
- Exclude:排除此文件夹及其文件,但不排除其子文件夹中的任何文件。
- Exclude Recursively:排除此文件夹及其所有文件,以及子文件夹及其中的文件。
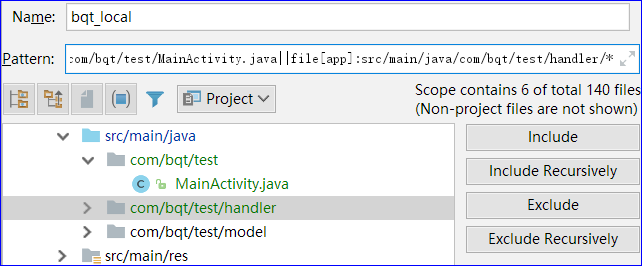
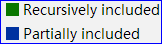
- 蓝色表示部分包含的文件夹,而绿色表示递归包含的文件夹和文件。选中的文件会生成一个正在表达式的结果,并显示在 Pattern 编辑框中。
file[app]:src/main/java/com/bqt/test/MainActivity.java||file[app]:src/main/java/com/bqt/test/handler/*file[app]:src/main/java/com/bqt/test/MainActivity.java||file[app]:src/main/java/com/bqt/test/handler/*
- 点击 OK。自定义范围将会显示在 Custom Scope 下拉列表的底部。

查看和编辑检查配置文件
Android Studio 附带[comes with]多种 Lint 及其他检查配置文件,可通过 Android 更新来更新此类配置文件。您可以原封不动地使用这些配置文件,也可以编辑它们的名称、描述、严重级别和范围。您还可以激活和停用全部配置文件组或一组配置文件中的个别配置文件。
要访问 Inspections 对话框,请:
- 选择 Analyze > Inspect Code,点击 Specify Scope 对话框中的 Inspection Profile 后面的三个点,此时将显示 Inspections 对话框,其中列出了一系列支持的检查及其描述。
- 选择 Profile 下拉列表,在 Default (Android Studio) 和 Project Default(活动项目)检查项目之间切换。如需了解详细信息,请参阅此 IntelliJ Specify Inspection Scope Dialog 页面。
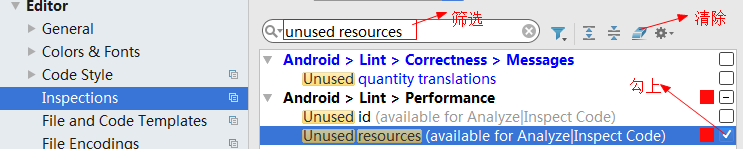
- 在左侧窗格的 Inspections 对话框中,选择最上面的配置文件类别,或展开一个组,选择特定配置文件。选择一种配置文件类别后,您可以将此类别中的所有检查项目当作一个检查项目进行编辑。
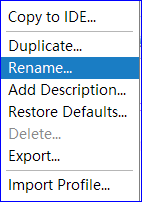
- 选择 Manage 下拉列表,以复制、重命名、将描述添加至、导出和导入检查项目。
- 操作完成后点击 OK。