MFS原理:
MFS是一个具有容错性的网络分布式文件系统,他把数据分散存放在多个物理服务器上,而呈现给用户的则是一个统一的资源
-
MFS文件系统组成:
1、元数据服务器(master)

2、元数据日志服务器(metalogger)

3、数据存储服务器(chunk server)

4、客户端(client)
下面进行MFS分布式文件系统搭建演示
案列环境:

master server:    192.168.100.128
metalogger server:192.168.100.134
chunk server:     192.168.100.132(可以是多台)
client:            192.168.100.131
一、搭建Master Server
(1)下载源码包和安装准备
[root@localhost ~]# systemctl stop firewalld.service
[root@localhost ~]# setenforce 0

[root@localhost ~]# yum install gcc gcc-c++ zlib-devel -y
(2)创建用户
[root@localhost ~]# useradd -s /sbin/nologin mfs(3)安装源码包
[root@localhost ~]# mkdir /abc
[root@localhost ~]# mount.cifs //192.168.100.1/yjs /abc
Password for root@//192.168.100.1/yjs:
[root@localhost ~]# cd /abc
[root@localhost abc]# ls
mfs-1.6.27-5.tar.gz

[root@localhost abc]# tar zxvf mfs-1.6.27-5.tar.gz -C /opt
[root@localhost abc]# cd /opt/mfs-1.6.27/
[root@localhost mfs-1.6.27]# ./config \
> --prefix=/usr/local/mfs \
> --with-default-user=mfs \
> --with-default-group=mfs \
> --disable-mfschunkserver \
> --disable-mfsmount
[root@localhost mfs-1.6.27]# make
[root@localhost mfs-1.6.27]# make install
(4)复制文件
[root@localhost mfs]# ls
mfsexports.cfg.dist  mfsmaster.cfg.dist  mfsmetalogger.cfg.dist  mfstopology.cfg.dist
[root@localhost mfs]# ll
总用量 16
-rw-r--r--. 1 root root 4060 7月  26 16:39 mfsexports.cfg.dist
-rw-r--r--. 1 root root 1020 7月  26 16:39 mfsmaster.cfg.dist
-rw-r--r--. 1 root root  417 7月  26 16:39 mfsmetalogger.cfg.dist
-rw-r--r--. 1 root root 1123 7月  26 16:39 mfstopology.cfg.dist
[root@localhost mfs]# cp mfsexports.cfg.dist mfsexports.cfg
[root@localhost mfs]# cp mfsmaster.cfg.dist mfsmaster.cfg            //挂载权限
[root@localhost mfs]# cp mfstopology.cfg.dist mfstopology.cfg          //架构感知

[root@localhost mfs]# cd /usr/local/mfs/var/mfs/
[root@localhost mfs]# ls
metadata.mfs.empty
[root@localhost mfs]# cp metadata.mfs.empty metadata.mfs    //防异常退出
(5)启动Master Server
[root@localhost mfs]# /usr/local/mfs/sbin/mfsmaster start

[root@localhost mfs]# ps -ef |grep mfs
mfs        6699      1  2 16:46 ?        00:00:01 /usr/local/mfs/sbin/mfsmaster start
root       6715   1493  0 16:47 pts/0    00:00:00 grep --color=auto mfs     //检查是否启动

/usr/local/mfs/sbin/mfsmaster -s     //停止Master Server的命令
二、搭建 Metalogger Server
(1)下载源码包及安装准备
[root@localhost ~]# systemctl stop firewalld.service
[root@localhost ~]# setenforce 0

[root@C-7-4 ~]# yum install gcc gcc-c++ zlib-devel -y
(2)创建用户
[root@C-7-4 ~]# useradd -s /sbin/nologin mfs(3)安装源码包
[root@localhost ~]# mkdir /abc
[root@localhost ~]# mount.cifs //192.168.100.1/yjs /abc
Password for root@//192.168.100.1/yjs:
[root@localhost ~]# cd /abc
[root@localhost abc]# ls
mfs-1.6.27-5.tar.gz

[root@localhost abc]# tar zxvf mfs-1.6.27-5.tar.gz -C /opt
[root@localhost abc]# cd /opt/mfs-1.6.27/
[root@localhost mfs-1.6.27]# ./config \
> --prefix=/usr/local/mfs \
> --with-default-user=mfs \
> --with-default-group=mfs \
> --disable-mfschunkserver \
> --disable-mfsmount

[root@localhost mfs-1.6.27]# make
[root@localhost mfs-1.6.27]# make install
(4)复制文件
[root@C-7-4 mfs-1.6.27]# cd /usr/local/mfs/etc/mfs/
[root@C-7-4 mfs]# ll
总用量 16
-rw-r--r--. 1 root root 4060 7月  26 18:00 mfsexports.cfg.dist
-rw-r--r--. 1 root root 1020 7月  26 18:00 mfsmaster.cfg.dist
-rw-r--r--. 1 root root  417 7月  26 18:00 mfsmetalogger.cfg.dist
-rw-r--r--. 1 root root 1123 7月  26 18:00 mfstopology.cfg.dist
[root@C-7-4 mfs]# cp mfsmetalogger.cfg.dist mfsmetalogger.cfg

[root@C-7-4 mfs]# cd /usr/local/mfs/var/mfs/
[root@C-7-4 mfs]# ls
metadata.mfs.empty
[root@C-7-4 mfs]# cp metadata.mfs.empty metadata.mfs          //同样需要设置防异常退出
(5)修改metalogger server配置文件
[root@C-7-4 mfs]# vim mfsmetalogger.cfg
MASTER_HOST = 192.168.100.128  //改为Master Server的ip地址
(6)开启Metalogger Server服务
[root@C-7-4 mfs]# /usr/local/mfs/sbin/mfsmetalogger start

[root@C-7-4 mfs]# ps -ef |grep mfs
mfs        6465      1  0 18:03 ?        00:00:00 /usr/local/mfs/sbin/mfsmetalogger start
root       6467   1497  0 18:04 pts/0    00:00:00 grep --color=auto mfs    //检测是否开启

/usr/local/mfs/sbin/mfschunkserver -s  //停止Metalogger Server的命令
三、搭建Chunk Server
(1)下载源码包及安装准备
[root@localhost ~]# systemctl stop firewalld.service
[root@localhost ~]# setenforce 0

[root@localhost ~]# yum install gcc gcc-c++ zlib-devel -y
(2)创建用户
[root@C-7-4 ~]# useradd -s /sbin/nologin mfs(3)安装源码包
[root@localhost ~]# mkdir /abc
[root@localhost ~]# mount.cifs //192.168.100.1/yjs /abc
Password for root@//192.168.100.1/yjs:
[root@localhost ~]# cd /abc
[root@localhost abc]# ls
mfs-1.6.27-5.tar.gz

[root@localhost abc]# tar zxvf mfs-1.6.27-5.tar.gz -C /opt
[root@localhost abc]# cd /opt/mfs-1.6.27/
[root@localhost mfs-1.6.27]# ./config \
> --prefix=/usr/local/mfs \
> --with-default-user=mfs \
> --with-default-group=mfs \
> --disable-mfsmaster \
> --disable-mfsmount

[root@localhost mfs-1.6.27]# make
[root@localhost mfs-1.6.27]# make install
(4)复制文件
[root@localhost mfs-1.6.27]# cd /usr/local/mfs/etc/mfs/
[root@localhost mfs]# ls
mfschunkserver.cfg.dist  mfshdd.cfg.dist
[root@localhost mfs]# cp mfschunkserver.cfg.dist mfschunkserver.cfg
[root@localhost mfs]# cp mfshdd.cfg.dist mfshdd.cfg
(5)修改配置文件
[root@localhost mfs]# vim mfschunkserver.cfg
MASTER_HOST = 192.168.100.128  //改为Master Server的ip地址

[root@localhost mfs]# vim mfshdd.cfg
/data                //在这里/data是一个给mfs的分区,最好使用独立的分区或磁盘挂载到此目录
(6)创建挂载目录并赋予权限
[root@localhost mfs]# mkdir /data
[root@localhost mfs]# chown -R mfs.mfs /data
(7)启动 Chunk Server
[root@localhost mfs]# /usr/local/mfs/sbin/mfschunkserver start

[root@localhost mfs]# ps -ef | grep mfs
mfs        7366      1  3 18:12 ?        00:00:00 /usr/local/mfs/sbin/mfschunkserver start
root       7392   1455  0 18:12 pts/0    00:00:00 grep --color=auto mfs
四、配置客户端
(1)下载源码包和安装准备
[root@localhost ~]# systemctl stop firewalld.service
[root@localhost ~]# setenforce 0

[root@localhost ~]# yum install gcc gcc-c++ zlib-devel -y
(2)安装FUSE源码包
[root@localhost ~]# tar xzvf fuse-2.9.2.tar.gz -C  /opt
[root@localhost ~]# cd /opt/fuse-2.9.7/
[root@localhost fuse-2.9.2]# ./configure
[root@localhost fuse-2.9.2]# make
[root@localhost fuse-2.9.2]# make install

设置环境变量:

[root@localhost fuse-2.9.2]#vi /etc/profile
export PKG_CONFIG_PATH=/usr/local/lib/pkgconfig:$PKG_CONFIG_PATH
[root@localhost fuse-2.9.2]#source /etc/profile  //刷新文件使生效
(3)安装MFS客户端
[root@localhost fuse-2.9.2]# useradd -s /sbin/nologin mfs
[root@localhost abc]# tar zxvf mfs-1.6.27-5.tar.gz -C /opt
[root@localhost abc]# cd /opt/mfs-1.6.27/
[root@localhost mfs-1.6.27]# ./configure \
> --prefix=/usr/local/mfs \
> --with-default-user=mfs \
> --with-default-group=mfs \
> --disable-mfsmaster \
> --disable-mfschunkserver \
> --enable-mfsmount

[root@localhost mfs-1.6.27]# make
[root@localhost mfs-1.6.27]# make install
(4)挂载MFS文件系统
[root@localhost mfs-1.6.27]# mkdir /opt/mfs
[root@localhost mfs-1.6.27]# modprobe fuse
[root@localhost mfs-1.6.27]# /usr/local/mfs/bin/mfsmount /opt/mfs -H 192.168.100.128

[root@localhost mfs-1.6.27]# df -TH
文件系统             类型      容量  已用  可用 已用% 挂载点
192.168.100.128:9421 fuse.mfs  6.4G     0  6.4G    0% /opt/mfs
(5)优化客户端
[root@localhost mfs-1.6.27]#vi /etc/profile
export PATH=/usr/local/mfs/bin:$PATH
[root@localhost mfs-1.6.27]#source /etc/profile

[root@localhost mfs-1.6.27]# mfsgetgoal -r /opt/mfs/
/opt/mfs/:
 directories with goal  1 :          1  //mfsgetgoal命令用来查询文件被复制的份数,-r表示递归,goal指文件被复制的份数
五、MFS监控
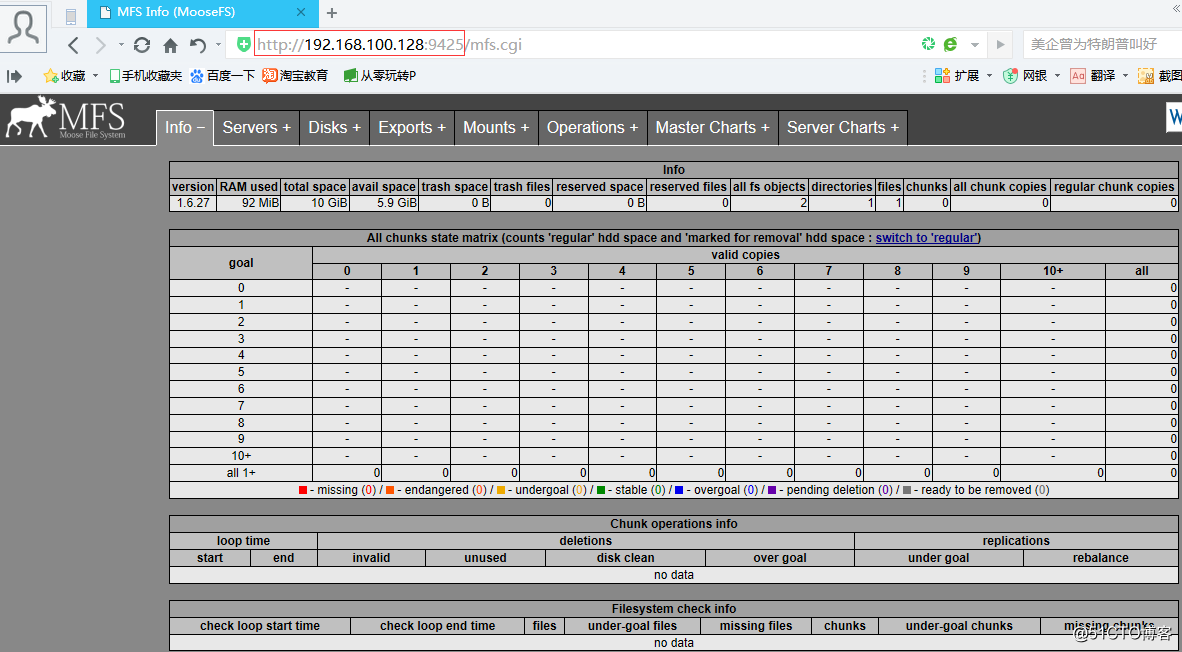
Mfscgiserv是用python语言编写的一个web服务器,监听端口为9425,可以在Master Server上通过命令 /usr/local/mfs/sbin/mfscgiserv来启动。
在客户端上通过浏览器访问http:Master Server_ip:9425查看