TabHost的实现
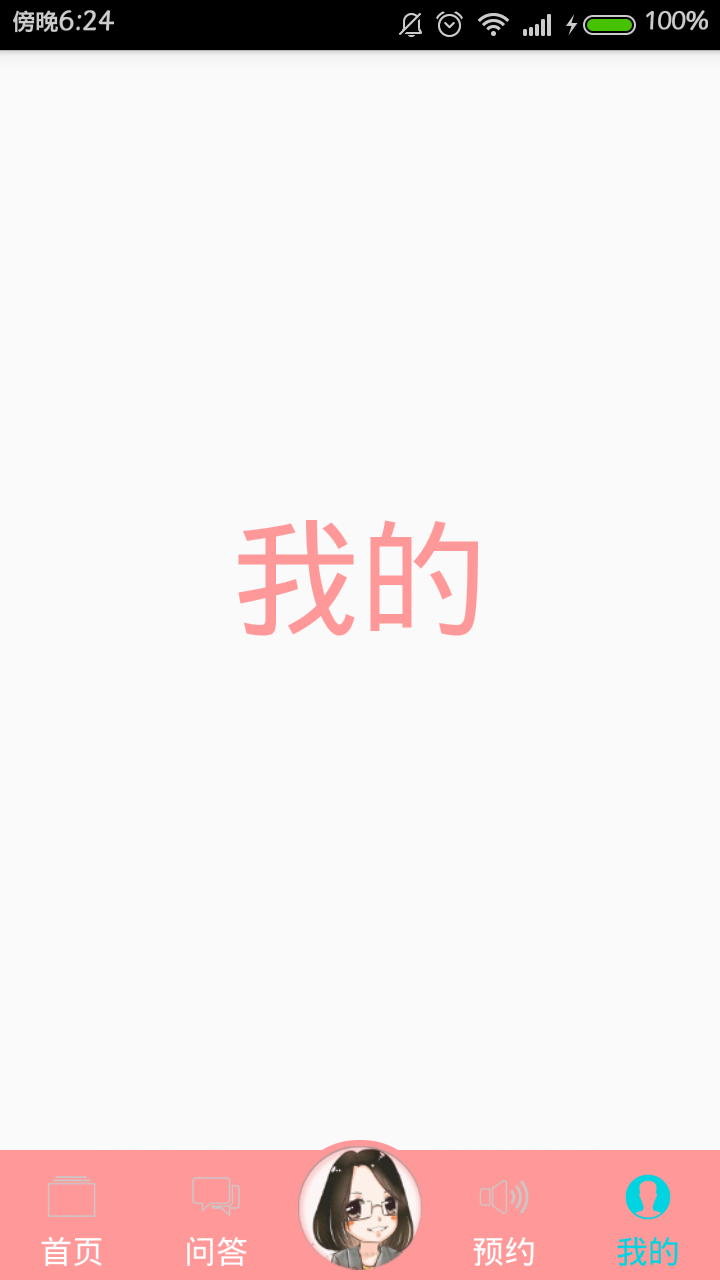
tabHost一般用于实现与QQ下面的“消息”“联系人”“动态”类似的选项卡
-xml文件
根布局标签为TabHost,子布局为FrameLayout和TabWidget
其中FrameLayout用来定义每个选项卡对应上面显示的布局,TabWidget用来定义项卡的共同属性
<?xml version="1.0" encoding="utf-8"?>
<TabHost
    android:id="@android:id/tabhost"
    xmlns:android="http://schemas.android.com/apk/res/android"
    android:layout_width="match_parent"
    android:layout_height="match_parent">

    <LinearLayout
        android:layout_width="match_parent"
        android:layout_height="match_parent"
        android:orientation="vertical">


        <FrameLayout
            android:id="@android:id/tabcontent"
            android:layout_width="match_parent"
            android:layout_height="wrap_content"
            android:layout_weight="1">

            <LinearLayout
                android:id="@+id/shouye"
                android:layout_width="match_parent"
                android:layout_height="match_parent"
                android:orientation="vertical">
                <TextView
                    android:layout_width="match_parent"
                    android:layout_height="match_parent"
                    android:text="首页"
                    android:textSize="64sp"
                    android:gravity="center"
                    android:textColor="@color/baseColor"/>
            </LinearLayout>

            <LinearLayout
                android:id="@+id/wenda"
                android:layout_width="match_parent"
                android:layout_height="match_parent"
                android:orientation="vertical">
                <TextView
                    android:layout_width="match_parent"
                    android:layout_height="match_parent"
                    android:text="问答"
                    android:textSize="64sp"
                    android:gravity="center"
                    android:textColor="@color/baseColor"/>
            </LinearLayout>

            <LinearLayout
                android:id="@+id/roundbutton"
                android:layout_width="match_parent"
                android:layout_height="match_parent"
                android:orientation="vertical">
                <TextView
                    android:layout_width="match_parent"
                    android:layout_height="match_parent"
                    android:text="圆形按钮"
                    android:textSize="64sp"
                    android:gravity="center"
                    android:textColor="@color/baseColor"/>
            </LinearLayout>

            <LinearLayout
                android:id="@+id/yuyue"
                android:layout_width="match_parent"
                android:layout_height="match_parent"
                android:orientation="vertical">
                <TextView
                    android:layout_width="match_parent"
                    android:layout_height="match_parent"
                    android:text="预约"
                    android:textSize="64sp"
                    android:gravity="center"
                    android:textColor="@color/baseColor"/>
            </LinearLayout>


            <LinearLayout
                android:id="@+id/my"
                android:layout_width="match_parent"
                android:layout_height="match_parent"
                android:orientation="vertical">
                <TextView
                    android:layout_width="match_parent"
                    android:layout_height="match_parent"
                    android:text="我的"
                    android:textSize="64sp"
                    android:gravity="center"
                    android:textColor="@color/baseColor"/>
            </LinearLayout>
        </FrameLayout>

        <TabWidget
            android:id="@android:id/tabs"
            android:layout_width="match_parent"
            android:layout_height="70dp"
            android:orientation="horizontal"
            id:tabStripEnabled="false"
            android:showDividers="none"
        </TabWidget>
 </LinearLayout>
</TabHost>
需要注意的是TabHost和FrameLayout和TabWidget的id
是系统规定的id,要写成android:id=”@android:id/tabhost”,android:id=”@android:id/tabcontent”,android:id=”@android:id/tabs”,
跟一般情况下定义id的写法有所不同
在MainActivity中需要得到tabhost并创建每一个选项卡,在创建选项卡的同时设置选项卡的属性和显示的子view。通过当前activity的context得到tabHost,然后通过tabhost的newTabSpec方法创建选项卡,setIndicator(View view)方法是设置选项卡的布局,setContent(int id)方法是设置点击选项卡时显示的具体内容,代码如下:
package com.fengjianghui.personal.test;

import android.app.TabActivity;
import android.content.res.ColorStateList;
import android.content.res.Resources;
import android.os.Bundle;
import android.view.Gravity;
import android.view.View;
import android.widget.FrameLayout;
import android.widget.ImageView;
import android.widget.LinearLayout;
import android.widget.TabHost;
import android.widget.TextView;

public class MainActivity extends TabActivity{

    private TabHost tabHost;

    @Override
    protected void onCreate(Bundle savedInstanceState) {
        super.onCreate(savedInstanceState);
        setContentView(R.layout.main);

        //自定义方法,创建选项卡并将其添加到tabHost中
        getTabSpecs ();
    }

    private void getTabSpecs() {
        tabHost = MainActivity.this.getTabHost();
        //“首页”按钮
        TabHost.TabSpec tabSpec1 = tabHost.newTabSpec("tab1").setIndicator(composedLayout("首页", R.drawable.selectedornot)).setContent(R.id.shouye);
        tabHost.addTab (tabSpec1);
        //“问答”按钮
        TabHost.TabSpec tabSpec2 = tabHost.newTabSpec("tab2").setIndicator(composedLayout("问答",R.drawable.selectedornot1)).setContent(R.id.wenda);
        tabHost.addTab(tabSpec2);
        //中间的圆形按钮,调用的是imagelayout方法
        TabHost.TabSpec tabSpec5 = tabHost.newTabSpec("tab5").setIndicator(imageLayout("123", R.mipmap.login20)).setContent(R.id.roundbutton);
        tabHost.addTab(tabSpec5);
        //“预约”按钮
        TabHost.TabSpec tabSpec3 = tabHost.newTabSpec("tab3").setIndicator(composedLayout("预约", R.drawable.selectedornot2)).setContent(R.id.yuyue);
        tabHost.addTab(tabSpec3);
        //“我的”按钮
        TabHost.TabSpec tabSpec4 = tabHost.newTabSpec("tab4").setIndicator(composedLayout("我的",  R.drawable.selectedornot3)).setContent(R.id.my);
        tabHost.addTab(tabSpec4);
    }


    private View composedLayout(String s, int i) {

        //每个选项卡中最大的那个布局
        LinearLayout layout0 = new LinearLayout(this);
        layout0.setOrientation(LinearLayout.VERTICAL);
        layout0.setGravity(Gravity.CENTER_VERTICAL);

        //用来填充下方的粉色背景的布局,布局中放图案和文字
        LinearLayout layout1 = new LinearLayout(this);
        layout1.setOrientation(LinearLayout.VERTICAL);
        layout1.setGravity(Gravity.CENTER_HORIZONTAL);
        //layout1的参数设置
        LinearLayout.LayoutParams lplayout1 = new LinearLayout.LayoutParams(LinearLayout.LayoutParams.MATCH_PARENT, LinearLayout.LayoutParams.MATCH_PARENT);
        layout1.setBackgroundColor(getResources().getColor(R.color.baseColor));
        lplayout1.setMargins(0, 10, 0, 0);
        //将layout1添加到layout0中
        layout0.addView(layout1, lplayout1);
        //图片
        ImageView imageView = new ImageView(this);
        imageView.setImageResource(i);
        imageView.setPadding(0, 14, 0, 0);
        LinearLayout.LayoutParams lp = new LinearLayout.LayoutParams(LinearLayout.LayoutParams.WRAP_CONTENT, LinearLayout.LayoutParams.WRAP_CONTENT);
        lp.setMargins(0, 10, 0, 0);
        //将图片添加到layout1中
        layout1.addView(imageView, lp);
        //文字
        TextView textView = new TextView(this);
        textView.setText(s);
        textView.setTextSize(16);
        Resources resource = (Resources) getBaseContext().getResources();
        ColorStateList csl=(ColorStateList) resource.getColorStateList(R.color.text_color);
        textView.setTextColor(csl);
        textView.setSingleLine(true);
        textView.setGravity(Gravity.CENTER_HORIZONTAL);
        LinearLayout.LayoutParams lp1 = new LinearLayout.LayoutParams(LinearLayout.LayoutParams.WRAP_CONTENT, LinearLayout.LayoutParams.WRAP_CONTENT);
        textView.setPadding(0, 10, 0, 10);
        layout1.addView(textView, lp1);
        return layout0;
    }

    //中间圆形按钮的实现
    private View imageLayout(String s, int i) {
        //最外层布局
        LinearLayout linearLayout0 = new LinearLayout(this);
        linearLayout0.setOrientation(LinearLayout.VERTICAL);
        linearLayout0.setGravity(Gravity.CENTER_VERTICAL);
        //跟最外层布局一样大的帧布局
        FrameLayout frameLayout0 = new FrameLayout(this);
        frameLayout0.setBackground(getResources().getDrawable(R.drawable.round_background));
        linearLayout0.addView(frameLayout0);
        //帧布局中的linearlayout,用来设置下方的背景块
        LinearLayout linearlayout1 = new LinearLayout(this);
        linearlayout1.setOrientation(LinearLayout.VERTICAL);
        LinearLayout.LayoutParams lplinearlayout1 = new LinearLayout.LayoutParams(LinearLayout.LayoutParams.MATCH_PARENT, LinearLayout.LayoutParams.MATCH_PARENT);
        TextView textView1 = new TextView(this);
        textView1.setBackgroundColor(getResources().getColor(R.color.baseColor));
        LinearLayout.LayoutParams lptextview1 = new LinearLayout.LayoutParams(LinearLayout.LayoutParams.MATCH_PARENT, LinearLayout.LayoutParams.MATCH_PARENT);
        lptextview1.setMargins(0, 10, 0, 0);
        linearlayout1.addView(textView1, lptextview1);
        frameLayout0.addView(linearlayout1, lplinearlayout1);
        //帧布局中的linearlayout,用来设置圆形的图片
        LinearLayout linearLayout11 = new LinearLayout(this);
        linearLayout11.setOrientation(LinearLayout.VERTICAL);
        LinearLayout.LayoutParams lplinearlayout11 = new LinearLayout.LayoutParams(LinearLayout.LayoutParams.MATCH_PARENT, LinearLayout.LayoutParams.MATCH_PARENT);
        frameLayout0.addView(linearLayout11, lplinearlayout11);
        ImageView imageView = new ImageView(this);
        imageView.setImageResource(i);
        LinearLayout.LayoutParams lpimageview = new LinearLayout.LayoutParams(LinearLayout.LayoutParams.MATCH_PARENT, LinearLayout.LayoutParams.MATCH_PARENT);
        imageView.setPadding(10, -5, 10, 0);
        linearLayout11.addView(imageView, lpimageview);
        return linearLayout0;
    }

}