引言
MySQL是一个关系型数据库管理系统,由瑞典MySQL AB 公司开发,目前属于 Oracle 旗下产品。MySQL分为社区版和商业版,具有体积小、速度快、成本低、开源的优点。MySQL备受互联网公司青睐,如腾讯、阿里选择MySQL作为其数据库管理软件。之前学习使用SQL Server作为DBMS,由于体量过大现在将注意力转移到体积较小的MySQL上来。
下载与安装
MySQL官网:https://www.mysql.com/
MySQL官网提供Installer(安装)版和Archive(文档)版,两种类型的安装包。Installer安装包支持分别安装X86和X64两种系统位数的安装,而Archive版X86和X64需要分别下载安装。鉴于开发的应用会安装在X86和X64系统上,因此推荐使用Installer版MySQL。当然实际使用时安装Installer和Archive二者之一即可。
MySQL软件下载
MySQL Installer 下载
mysql-installer-community-5.7.19.0.msi:https://dev.mysql.com/downloads/file/?id=471661
MySQL Archive 下载
mysql-5.7.19-win32.zip:https://dev.mysql.com/downloads/file/?id=471341
mysql-5.7.19-winx64.zip:https://dev.mysql.com/downloads/file/?id=471342
MySQL 安装
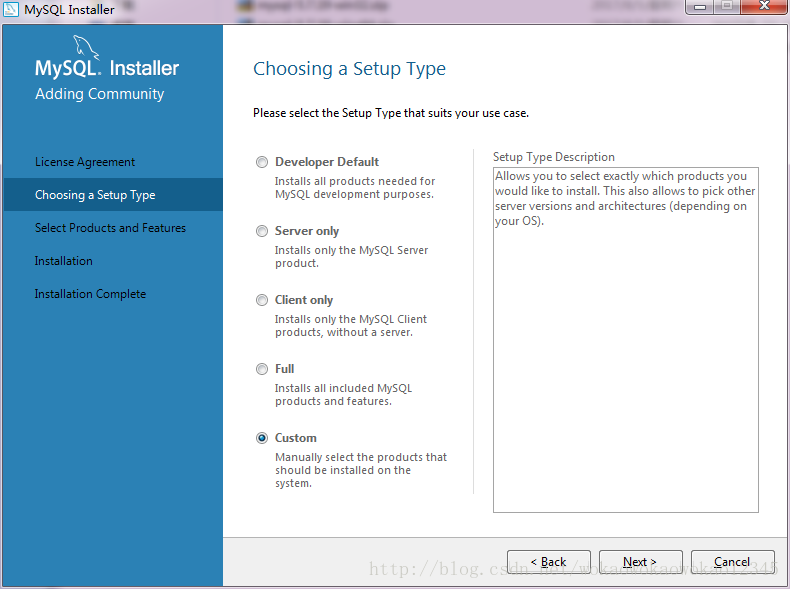
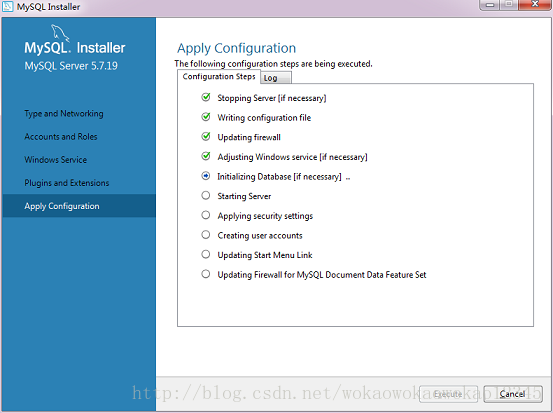
Installer版安装过程
- 双击打开mysql-installer-community-5.7.19.0.msi
- 根据自己需要选择安装模式,这里选择只安装服务器,并设置路径,没有特别需要默认路径即可
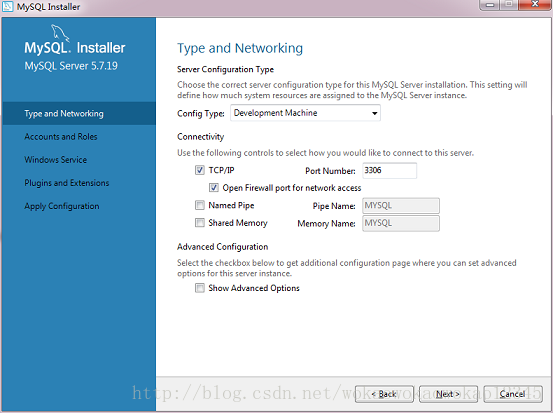
- 设置类型和网络,默认设置
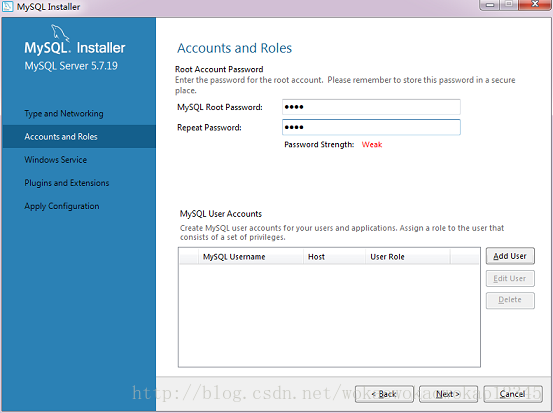
- 设置账户和密码,需要牢记
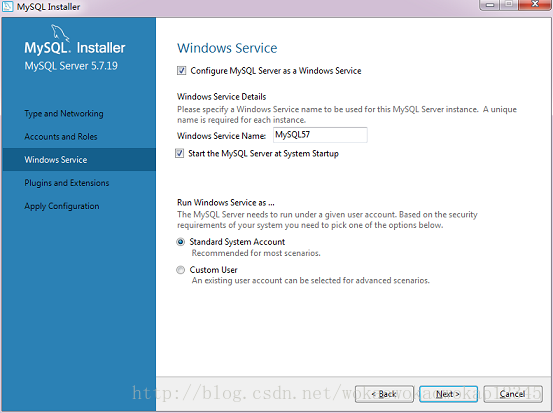
- 设置Windows服务,默认设置
- 应用调试,执行
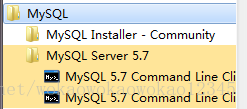
- 安装成功,进行验证,开始菜单中打开MySQL命令行工具
打开命令行工具
输入设置的Root密码,输入show datases查看当前存在的数据库


Archive版安装过程
- 解压mysql-5.7.19-winx64.zip,并复制粘贴到想要安装的位置,比如放在C:\Program Files下面
MySQL Server 5.7是前面安装的Installer版,mysql-5.7.19-winx64是经过解压后的文件 - 将ysql-5.7.19-winx64文件名,修改为MySQL Server 5.7 X64,不改也可以
- 添加环境变量,C:\Program Files\MySQL\MySQL Server 5.7 X64\bin
- 在MySQL目录中新建文件夹datax64,修改MySQL默认的配置文件,最新版的MySQL中并没有配置文件,我们自己在路径C:\Program Files\MySQL\MySQL Server 5.7 X64下新建my.ini文件,并修改内容如下后保存。


# Other default tuning values
# MySQL Server Instance Configuration File
# ----------------------------------------------------------------------
# Generated by the MySQL Server Instance Configuration Wizard
#
#
# Installation Instructions
# ----------------------------------------------------------------------
#
# On Linux you can copy this file to /etc/my.cnf to set global options, # mysql-data-dir/my.cnf to set server-specific options # (@localstatedir@ for this installation) or to # ~/.my.cnf to set user-specific options. # # On Windows you should keep this file in the installation directory # of your server (e.g. C:\Program Files\MySQL\MySQL Server X.Y). To # make sure the server reads the config file use the startup option # "--defaults-file". # # To run run the server from the command line, execute this in a # command line shell, e.g. # mysqld --defaults-file="C:\Program Files\MySQL\MySQL Server X.Y\my.ini" # # To install the server as a Windows service manually, execute this in a # command line shell, e.g. # mysqld --install MySQLXY --defaults-file="C:\Program Files\MySQL\MySQL Server X.Y\my.ini" # # And then execute this in a command line shell to start the server, e.g. # net start MySQLXY # # # Guildlines for editing this file # ---------------------------------------------------------------------- # # In this file, you can use all long options that the program supports. # If you want to know the options a program supports, start the program # with the "--help" option. # # More detailed information about the individual options can also be # found in the manual. # # For advice on how to change settings please see # http://dev.mysql.com/doc/refman/5.7/en/server-configuration-defaults.html # # # CLIENT SECTION # ---------------------------------------------------------------------- # # The following options will be read by MySQL client applications. # Note that only client applications shipped by MySQL are guaranteed # to read this section. If you want your own MySQL client program to # honor these values, you need to specify it as an option during the # MySQL client library initialization. # [client] # pipe # socket=0.0 port=3306 [mysql] no-beep default-character-set=utf8 # SERVER SECTION # ---------------------------------------------------------------------- # # The following options will be read by the MySQL Server. Make sure that # you have installed the server correctly (see above) so it reads this # file. # # server_type=3 [mysqld] # The next three options are mutually exclusive to SERVER_PORT below. # skip-networking # enable-named-pipe # shared-memory # shared-memory-base-name=MYSQL # The Pipe the MySQL Server will use # socket=MYSQL # The TCP/IP Port the MySQL Server will listen on port=3306 # Path to installation directory. All paths are usually resolved relative to this. # basedir="C:/Program Files/MySQL/MySQL Server 5.7/" # Path to the database root datadir=C:/ProgramData/MySQL/MySQL Server 5.7/Data # The default character set that will be used when a new schema or table is # created and no character set is defined character-set-server=utf8 # The default storage engine that will be used when create new tables when default-storage-engine=INNODB # Set the SQL mode to strict sql-mode="STRICT_TRANS_TABLES,NO_AUTO_CREATE_USER,NO_ENGINE_SUBSTITUTION" # Enable Windows Authentication # plugin-load=authentication_windows.dll # General and Slow logging. log-output=FILE general-log=0 general_log_file="LILY-PC.log" slow-query-log=1 slow_query_log_file="LILY-PC-slow.log" long_query_time=10 # Binary Logging. # log-bin # Error Logging. log-error="LILY-PC.err" # Server Id. server-id=1 # Secure File Priv. secure-file-priv="C:/ProgramData/MySQL/MySQL Server 5.7/Uploads" # The maximum amount of concurrent sessions the MySQL server will # allow. One of these connections will be reserved for a user with # SUPER privileges to allow the administrator to login even if the # connection limit has been reached. max_connections=151 # Query cache is used to cache SELECT results and later return them # without actual executing the same query once again. Having the query # cache enabled may result in significant speed improvements, if your # have a lot of identical queries and rarely changing tables. See the # "Qcache_lowmem_prunes" status variable to check if the current value # is high enough for your load. # Note: In case your tables change very often or if your queries are # textually different every time, the query cache may result in a # slowdown instead of a performance improvement. query_cache_size=0 # The number of open tables for all threads. Increasing this value # increases the number of file descriptors that mysqld requires. # Therefore you have to make sure to set the amount of open files # allowed to at least 4096 in the variable "open-files-limit" in # section [mysqld_safe] table_open_cache=2000 # Maximum size for internal (in-memory) temporary tables. If a table # grows larger than this value, it is automatically converted to disk # based table This limitation is for a single table. There can be many # of them. tmp_table_size=11M # How many threads we should keep in a cache for reuse. When a client # disconnects, the client's threads are put in the cache if there aren't # more than thread_cache_size threads from before. This greatly reduces # the amount of thread creations needed if you have a lot of new # connections. (Normally this doesn't give a notable performance # improvement if you have a good thread implementation.) thread_cache_size=10 #*** MyISAM Specific options # The maximum size of the temporary file MySQL is allowed to use while # recreating the index (during REPAIR, ALTER TABLE or LOAD DATA INFILE. # If the file-size would be bigger than this, the index will be created # through the key cache (which is slower). myisam_max_sort_file_size=100G # If the temporary file used for fast index creation would be bigger # than using the key cache by the amount specified here, then prefer the # key cache method. This is mainly used to force long character keys in # large tables to use the slower key cache method to create the index. myisam_sort_buffer_size=13M # Size of the Key Buffer, used to cache index blocks for MyISAM tables. # Do not set it larger than 30% of your available memory, as some memory # is also required by the OS to cache rows. Even if you're not using # MyISAM tables, you should still set it to 8-64M as it will also be # used for internal temporary disk tables. key_buffer_size=8M # Size of the buffer used for doing full table scans of MyISAM tables. # Allocated per thread, if a full scan is needed. read_buffer_size=25K read_rnd_buffer_size=256K #*** INNODB Specific options *** # innodb_data_home_dir=0.0 # Use this option if you have a MySQL server with InnoDB support enabled # but you do not plan to use it. This will save memory and disk space # and speed up some things. # skip-innodb # If set to 1, InnoDB will flush (fsync) the