一,介绍SVN
SVN是Subversion的简称,是一个开放源代码的版本控制系统,相较于RCS、CVS,它采用了分支管理系统,它的设计目标就是取代CVS。互联网上很多版本控制服务已从CVS迁移到Subversion。说得简单一点SVN就是用于多个人共同开发同一个项目,共用资源的目的。 ----百度百科
二,安装SV
官网下载: http://subversion.apache.org/packages.html
SVN客户端TortoiseSVN :https://tortoisesvn.net/downloads.html
1,yum install subversion安装
| 1 |
|
2,新建一个目录用于存储SVN目录
| 1 |
|
3,新建一个测试仓库
| 1 2 3 4 5 6 7 8 9 |
|
以下关于目录的说明:
hooks目录:放置hook脚步文件的目录
locks目录:用来放置subversion的db锁文件和db_logs锁文件的目录,用来追踪存取文件库的客户端
format目录:是一个文本文件,里边只放了一个整数,表示当前文件库配置的版本号
conf目录:是这个仓库配置文件(仓库用户访问账户,权限)
4,配置SVN服务的配置文件svnserver.conf:
| 1 2 3 4 5 6 7 8 9 10 11 12 13 14 15 16 17 18 19 20 21 22 23 24 25 26 27 28 29 30 31 32 33 34 35 36 37 38 39 40 41 42 43 44 45 |
|
5,配置访问用户及密码
| 1 2 3 4 5 6 7 8 9 10 11 |
|
6,配置新用户的授权文件
| 1 2 3 4 5 6 7 8 9 10 11 12 13 14 15 16 17 18 19 20 21 22 23 24 25 26 27 28 29 30 31 32 33 34 |
|
备注:
admin = lqb,test2 创建admin组,组成员为:lqb,test2
user = test1 创建用户组,用户成员:test1
[test:/] 赋予根权限,为了便于管理和权限的控制,可以把权限细化到版本库中相应的目录
@admin = rw admin组有读写的权限
@user = r user组只有读的权限
*= 表示除了上面设置的权限用户组以外,其他所有用户都设置空权限,空权限表示禁止访问本目录,这很重要一定要加上。
备注:版本库的目录格式如下:
[<版本库>:/项目/目录]
@<用户组名> = 权限
<用户名> = 权限
其中[]內容有許多写法:
[/],表示根目录及其一下的路径,根目录是svnserver启动时指定好的,上述实例中我们指定为:/svn/svndata([/]=/svn/svndata).[/]就是表示对全部版本设置的权限
[test:/],表示对版本库test设置权限;
[test:/svnadmin],表示对版本库test中的svnadmin项目设置权限;
[test:/svnadmin/second],表示对版本库test中的svnadmin项目的目录设置权限;
权限的主体可以是用户组,用户或者*,用户组在前面要以@开头,*表示全部用户
权限分为:r ,w, rw和null ,null空表示没有任何权限。
auhtz配置文件中的每个参数,开头不能有空格,对于组要以@开头,用户不需要。
7,启动svn服务
| 1 |
|
注意:更改svnserver.conf时需要重启SVN服务,更改authz,passwd文件时则不需要重启服务
二,通过客户端进行连接:
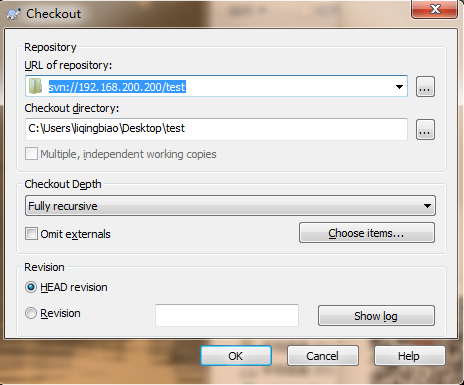
<一>,Windos客户端连接操作
1,使用windows的客户端来进行连接
2,在Linux使用如下命令行:
| 1 2 3 4 |
|
如果失败的话,基本上可以断定authz文件的配置有问题,可以修改下:
| 1 2 3 4 5 6 |
|
3,check out后会在桌面创建一个文件夹,说明操作成功,接下来向该文件夹放文件,然后右键SVN commit,会看到文件在同步,如图一,二,三,四,五
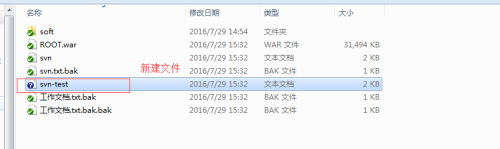
图一
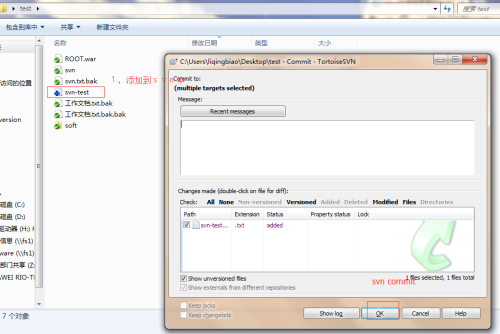
图二
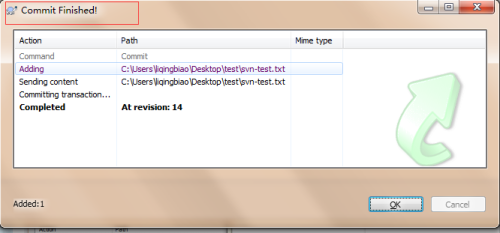
图三
图四
4,同步完成之后,我们可以在本地查看是否同步到服务器中,右击桌面--->TortoiseSVN→Repo Browser即可查看,也可以先SVN Update更新一下,确保内容是最新的。
5,如果要删除文件,直接本地删除然后commit即可。
如果查看历史版本TortoiseSVN,右击文件夹-->TortoiseSVN-->Show log.而且可以查看文档发生了什么变化。
如果版本库地址发生了变化更换的步骤如下:右击文件夹-->TortoiseSVN-->Relocate修改地址确认commit即可
<二>,Linux客户端同步过程:
把linux做为SVN客户端,所以你操作的并不一定是SVN的服务器那台,以后如果说我要定时自动发布代码等等,这时候就要用到脚本了,所以接下来的也是很重要的首先安装SVN,步骤同上,在此就不在赘述。
1,同步文件,check out: svn co svn://192.168.1.202/sadoc /data/svndata/ --username=我的用户名 --password=我的密码
| 1 2 3 4 5 6 7 8 9 10 |
|
注意! 你的密码,对于认证域: <svn://23.110.85.249:3690> 68cfb7eb-c123-4643-8825-8a067020e3f4只能明文保存在磁盘上!
如果可能的话,请考虑配置你的系统,让 Subversion可以保存加密后的密码。请参阅文档以获得详细信息。
你可以通过在“/root/.subversion/servers”中设置选项“store-plaintext-passwords”为“yes”或“no”,来避免再次出现此警告。
2,版本库内容更新
| 1 2 3 4 5 6 |
|
3,查看svn中的数据
| 1 2 3 4 5 6 7 8 9 |
|
4,本地数据commit数据到SVN中
| 1 2 3 4 5 6 7 8 9 |
|
-m [--message] ARG: 指定日志信息ARG 不添加-m参数会报错。
<三>,SVN目录树
一般比较规范的SVN它会有三个目录,分别为:
/svn/trunk: 主干
/svn/branch: 个人或团队开发的分支
/svn/tag: 标记版本,比如某个版本开发好了。
现在我要创建三个这样的目录,然后我要导入到版本库中去,这里会用到的是import命令
import:将未纳入版本控制的文件或目录树提交到版本库。要分清楚它和commit的区别,commit指的是把工作副本的修改提交到版本库。
| 1 2 3 4 5 6 7 |
|
把主干的东西拷到一个分支
| 1 2 |
|
ATTENTION! Your password for authentication realm:
<http://nigel.zeng.me:80> Subversion repository
can only be stored to disk unencrypted! You are advised to configure
your system so that Subversion can store passwords encrypted, if
possible. See the documentation for details.
You can avoid future appearances of this warning by setting the value
of the 'store-plaintext-passwords' option to either 'yes' or 'no' in
'/home/nigelzeng/.subversion/servers'.
这段文字是svn提示需要做svn 认证的cache,提示你只能把密码不加密(也许是明文)保存,问你是yes or no,
其实输入yes就OK了。
单机操作的话没问题,但是在使用脚本批量操作的时候,脚本会卡在这里。(OK,你可以用expect解决,但那是特殊情况)
一般情况下如何跳过这个提示进行操作?
请教了我师兄之后得出了答案:
使用这个命令就OK: “ svn update --no-auth-cache”