Jmeter+Ant集成

这里只写了Jmeter+Ant的集成,后面会加上Jenkins。

一.简介

1.什么是ant?   

   ant是构建工具
2.什么是构建
   概念到处可查到,形象来说,你要把代码从某个地方拿来,编译,再拷贝到某个地方去等等操作,当然不仅于此,但是主要用来干这个
3.ant的好处
   跨平台   --因为ant是使用java实现的,所以它跨平台
   使用简单--与ant的兄弟make比起来
   语法清晰--同样是和make相比
   功能强大--ant能做的事情很多,可能你用了很久,你仍然不知道它能有多少功能。当你自己开发一些ant插件的时候,你会发现它更多的功能。
4.ant的兄弟make
   ant做的很多事情,大部分是曾经有一个叫make的所做的,不过对象不同,make更多应用于c/c++ ,ant更多应用于Java。

二.构建ant环境

1.去Apache官网上下载ant,我下载的是apach-ant-1.10.5   【官网上显示1.10.X的版本需要Java8,但是我用的java8,配置结果是失败的,升级为Java10后成功】

2.下完之后解压,放到一个目录下面。我把它和jmeter都放在了D盘下-----D:\apache-ant-1.10.5

3.配置环境变量,与jmeter类似。   下面这些和你ant存放的路径有关。

   新建系统变量ANT_HOME,值D:\apache-ant-1.10.5

   系统变量CLASSPATH,值后面添加D:\apache-ant-1.10.5\lib    

   系统变量Path,值后面添加D:\apache-ant-1.10.5\bin  

4.进入命令提示符,输入ant,结果如下图所示,"build.xml does not exist "说明ant配置成功


扫描二维码关注公众号,回复: 2368698 查看本文章

三.Jmeter与Ant集成

准备工作,Java10安装,环境变量的配置;jmeter4.0安装,环境变量的配置;ant1.10.5的安装,环境变量的配置。

1.将D:\apache-jmeter-4.0\extras文件夹下的ant-jmeter-1.1.1.jar这个jar包复制到D:\apache-ant-1.10.5\lib文件夹下

2.打开jmeter\bin\properties,将

jmeter.save.saveservice.output_format=csv  改成   jmeter.save.saveservice.output_format=xml,记得去掉前面的“#”

3.进入D:\apache-jmeter-4.0\extras,打开build.xml文件,进行配置。网上关于build.xml文件的配置、写法特别多,但大多数是jmeter3.0甚至jmeter2.0的版本。但是我用的是jmeter4.0,对比之后发现不同版本的jmeter的build.xml文件有一些区别,下面关于对build.xml文件的配置,是个人的理解。错误的地方望指出!

第一处要修改的地方

<!-- Name of test (without .jmx) -->
<property name="test1" value="insight2.0-180720"/>

此处填写你要测试的脚本,后面不用写.jmx,只用写文件名。这里的意思为test1的值为insight2.0-180720,你将要测试的脚本就是insight2.0-180720.jmx

当然property name的也可以取其他的,test、a、b.....等等都可以,简单理解为一个变量名,value就是变量值。

第二处要修改的地方

在<target name = "run"> 下面修改子标签jmeter

<jmeter
jmeterhome="${jmeter.home}"
testplan ="${testpath}/${test1}.jmx"
resultlog="${testpath}/${test1}.jtl">

........

</jmeter>

这里就开始运行jmx脚本了,测试计划testplan的值就是上一处你定义的test1;

resultlog就是执行jmx之后生成的日志文件,它会默认保存在extras文件夹下。

第三处要修改的地方

在<target name="xslt-report" depends="_message_xalan">下面修改子标签xslt

<xslt
classpathref="xslt.classpath"
force="true"
in="${testpath}/${test1}.jtl"
out="${testpath}/${test1}.html"
........
</xslt>

这里做的工作是,将jmeter执行之后生成的jtl文件,编译构建成HTML文件,默认保存在extras文件夹下。

仔细看,in等于的就是上一处的rasultlog,

out的后缀为html

4.修改完build.xml文件之后,就可以试一下jmeter+ant的集成有没有成功,打开命令提示符,进入到D:\apache-jmeter-4.0\extras,在这里输入ant。

最后面显示build successful说明执行成功了!可以进入到extras文件夹下面查看结果

结果如下,生成了一个HTML文件和一个jtl文件。点击进去就可以查看结果了。

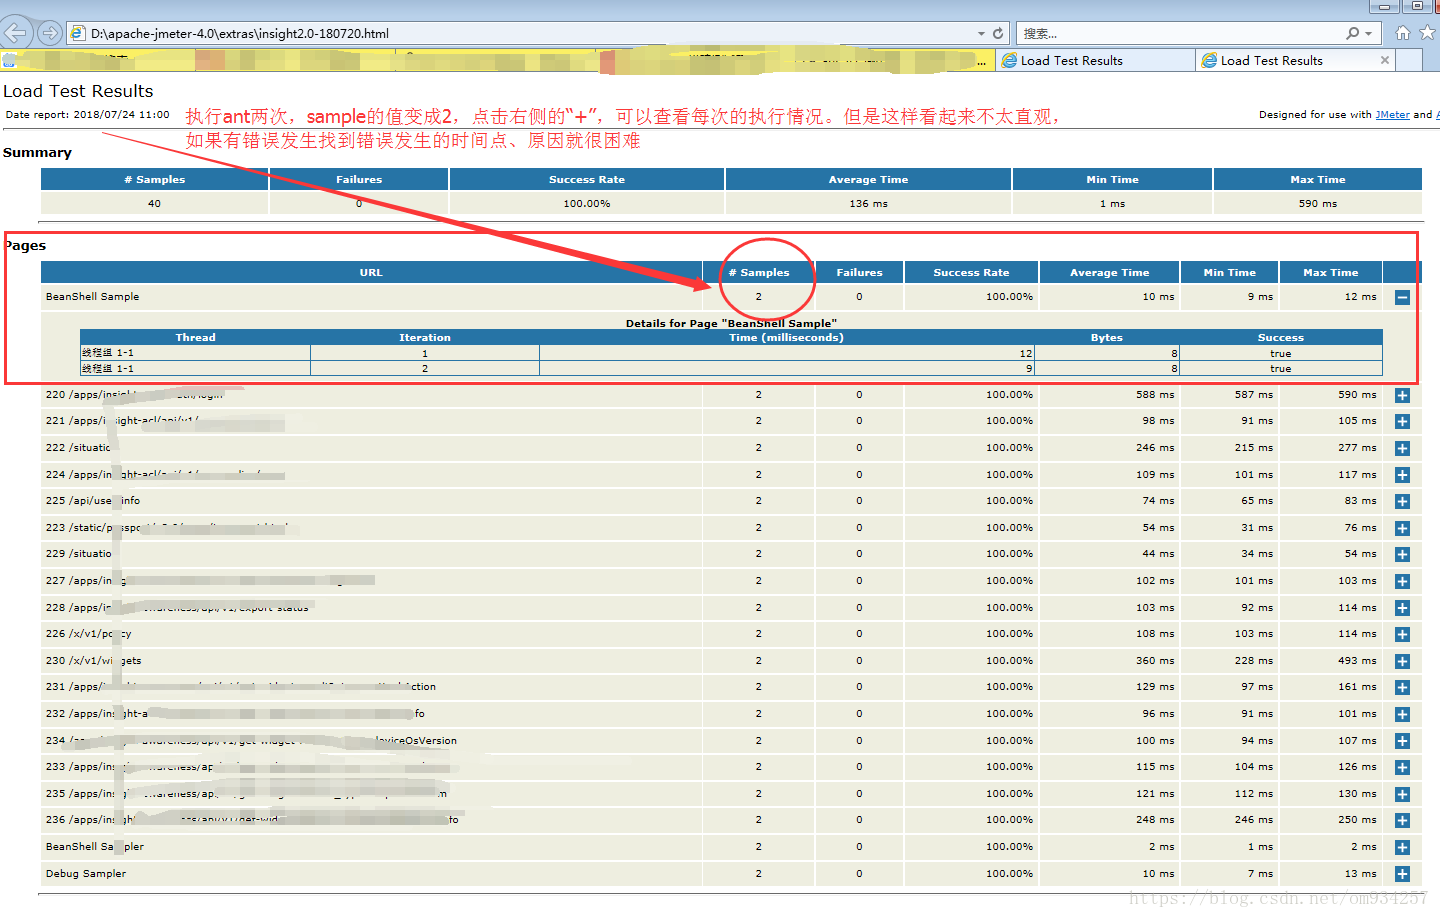
5.问题-----------------上述步骤可以实现jmeter+ant执行脚本,但是后面发现了一个问题。当你重新再执行这个脚本时,生成的HTML、jtl文件里面的结果是累计的,就是把这一次执行的结果与上一次的结果综合起来了,结果全部在一个HTML、jtl文件里面。这样其实不利于查看每一次的执行结果。比如这里我执行了两次,打开相应的HTML结果报告,如下:

6.我的目的是希望每执行一次脚本,就生成一个HTML、一个jtl文件,并且文件名能显示每次执行的时间。这里可以联想到时间戳,每次运行结果都生成不一样的文件。

在上述基础上,要做的修改如下:

1.定义指定格式的时间变量。

可以直接在target name =run下定义

<tstamp>
<format property="time" pattern="yyyy-MM-dd-HH-mm-ss"/>
</tstamp>

2.在jmeter标签下,修改jtl文件的存储路径

<jmeter
jmeterhome="${jmeter.home}"
testplan ="${testpath}/${test1}.jmx"
resultlog="${testpath}/${test1}/${time}.jtl">

...</jmeter>
3.在xslt标签下,修改in、out的路径

<xslt
classpathref="xslt.classpath"
force="true"
in="${testpath}/${test1}/${time}.jtl"
out="${testpath}/${test1}/${time}.html"

.....</xslt>

再打开命令提示符,进入到D:\apache-jmeter-4.0\extras,输入ant运行。进入与运行脚本同名的文件夹里面查看结果,就能看到每一次运行都有对应的HTML和jtl文件了。

7.build.xml文件无法使用*.jmx执行extras目录下所有的jmx文件,那么如果想每一次想执行多个脚本怎么办呢??目前想到了一个解决办法。大概思路就是,定义多个变量,分别执行。

例如:

脚本定义 <target name="run">标签下编写 xslt标签下编写

<!-- Name of test (without .jmx) -->
<property name="test1" value="要执行的脚本1"/>

<property name="test2" value="要执行的脚本2"/>

<property name="test3" value="要执行的脚本3"/>

.........

<jmeter
jmeterhome="${jmeter.home}"
testplan ="${testpath}/${test1}.jmx"
resultlog="${testpath}/${test1}/${time}.jtl">
.....
</jmeter>

<jmeter
jmeterhome="${jmeter.home}"
testplan ="${testpath}/${test2}.jmx"
resultlog="${testpath}/${test2}/${time}.jtl">
.....
</jmeter>

<jmeter
jmeterhome="${jmeter.home}"
testplan ="${testpath}/${test3}.jmx"
resultlog="${testpath}/${test3}/${time}.jtl">
.....
</jmeter>

<xslt
.....
in="${testpath}/${test1}/${time}.jtl"
out="${testpath}/${test1}/${time}.html"
...
</xslt>

<xslt

.....

in="${testpath}/${test2}/${time}.jtl"
out="${testpath}/${test2}/${time}.html"
...
</xslt>

<xslt

.....
in="${testpath}/${test3}/${time}.jtl"
out="${testpath}/${test3}/${time}.html"
...
</xslt>

下面是完整的build.xml文件。

<?xml version="1.0" encoding="utf-8"?>
<!--
Licensed to the Apache Software Foundation (ASF) under one or more
contributor license agreements. See the NOTICE file distributed with
this work for additional information regarding copyright ownership.
The ASF licenses this file to You under the Apache License, Version 2.0
(the "License"); you may not use this file except in compliance with
the License. You may obtain a copy of the License at

http://www.apache.org/licenses/LICENSE-2.0

Unless required by applicable law or agreed to in writing, software
distributed under the License is distributed on an "AS IS" BASIS,
WITHOUT WARRANTIES OR CONDITIONS OF ANY KIND, either express or implied.
See the License for the specific language governing permissions and
limitations under the License.
-->
<project name="ant-jmeter" default="all">
<description>

Sample build file for use with ant-jmeter.jar
See http://www.programmerplanet.org/pages/projects/jmeter-ant-task.php

To run a test and create the output report:
ant -Dtest=script

To run a test only:
ant -Dtest=script run

To run report on existing test output
ant -Dtest=script report

The "script" parameter is the name of the script without the .jmx suffix.

Additional options:
-Dshow-data=y - include response data in Failure Details
-Dtestpath=xyz - path to test file(s) (default user.dir).
N.B. Ant interprets relative paths against the build file
-Djmeter.home=.. - path to JMeter home directory (defaults to parent of this build file)
-Dreport.title="My Report" - title for html report (default is 'Load Test Results')
</description>

<property name="testpath" value="${user.dir}"/>
<property name="jmeter.home" value="${basedir}/.."/>
<property name="report.title" value="Load Test Results"/>

<!-- Name of test (without .jmx) -->
<property name="test1" value="insight2.0-180720"/>

<!-- Should report include response data for failures? -->
<property name="show-data" value="n"/>

<property name="format" value="2.1"/>

<condition property="style_version" value="_21">
<equals arg1="${format}" arg2="2.1"/>
</condition>

<condition property="funcMode">
<equals arg1="${show-data}" arg2="y"/>
</condition>

<condition property="funcMode" value="false">
<not>
<equals arg1="${show-data}" arg2="y"/>
</not>
</condition>

<!-- Allow jar to be picked up locally -->
<path id="jmeter.classpath">
<fileset dir="${basedir}">
<include name="ant-jmeter*.jar"/>
</fileset>
</path>

<taskdef
name="jmeter"
classpathref="jmeter.classpath"
classname="org.programmerplanet.ant.taskdefs.jmeter.JMeterTask"/>

<target name="all" depends="run,report"/>

<target name="run">
<echo>funcMode = ${funcMode}</echo>

<tstamp>
<format property="time" pattern="yyyy-MM-dd-HH-mm-ss"/>
</tstamp> 
<delete file="${testpath}/${test1}.html"/>
<jmeter
jmeterhome="${jmeter.home}"
testplan ="${testpath}/${test1}.jmx"
resultlog="${testpath}/${test1}/${time}.jtl">

<!--
<jvmarg value="-Xincgc"/>
<jvmarg value="-Xmx128m"/>
<jvmarg value="-Dproperty=value"/>
<jmeterarg value="-qextra.properties"/>
-->
<!-- Force suitable defaults -->
<property name="jmeter.save.saveservice.output_format" value="xml"/>
<property name="jmeter.save.saveservice.assertion_results" value="all"/>
<property name="jmeter.save.saveservice.bytes" value="true"/>
<property name="file_format.testlog" value="${format}"/>
<property name="jmeter.save.saveservice.response_data.on_error" value="${funcMode}"/>
</jmeter>
</target>

<property name="lib.dir" value="${jmeter.home}/lib"/>

<!-- Use xalan copy from JMeter lib directory to ensure consistent processing with Java 1.4+ -->
<path id="xslt.classpath">
<fileset dir="${lib.dir}" includes="xalan*.jar"/>
<fileset dir="${lib.dir}" includes="serializer*.jar"/>
</path>

<target name="report" depends="xslt-report,copy-images">
<echo>Report generated at ${report.datestamp}</echo>
</target>

<target name="xslt-report" depends="_message_xalan">
<tstamp><format property="report.datestamp" pattern="yyyy/MM/dd HH:mm"/></tstamp> 
<xslt
classpathref="xslt.classpath"
force="true"
in="${testpath}/${test1}/${time}.jtl"
out="${testpath}/${test1}/${time}.html"
style="${basedir}/jmeter-results-detail-report${style_version}.xsl">
<param name="showData" expression="${show-data}"/>
<param name="titleReport" expression="${report.title}"/>
<param name="dateReport" expression="${report.datestamp}"/>
</xslt>
</target>


<!-- Copy report images if needed -->
<target name="copy-images" depends="verify-images" unless="samepath">
<copy file="${basedir}/expand.png" tofile="${testpath}/expand.png"/>
<copy file="${basedir}/collapse.png" tofile="${testpath}/collapse.png"/>
</target>

<target name="verify-images">
<condition property="samepath">
<equals arg1="${testpath}" arg2="${basedir}" />
</condition>
</target>

<!-- Check that the xalan libraries are present -->
<condition property="xalan.present">
<and>
<!-- No need to check all jars; just check a few -->
<available classpathref="xslt.classpath" classname="org.apache.xalan.processor.TransformerFactoryImpl"/>
<available classpathref="xslt.classpath" classname="org.apache.xml.serializer.ExtendedContentHandler"/>
</and>
</condition>

<target name="_message_xalan" unless="xalan.present">
<echo>Cannot find all xalan and/or serialiser jars</echo>
<echo>The XSLT formatting may not work correctly.</echo>
<echo>Check you have xalan and serializer jars in ${lib.dir}</echo>
</target>


</project>

猜你喜欢

转载自blog.csdn.net/om934257/article/details/81183180