引言:
我写博客的习惯基本上都是:
使用
Typora或者haroopad这样支持 Markdown 语法的实时可视化编辑器先编写好,然后再发布到 CSDN 或者我自己的hexo博客地址上。
不在在线编辑器上编写的原因是可以博客本地备份而且内容不容易丢失。所以,此时假设我们写完了一篇博客,即有一个 .md 的文件,要如何将其自动录入到数据库中?多个 .md 文件如何一次录入?
设计思路:
用过 hexo 静态博客框架的应该都知道,假如我们想要发布一篇博客,我们需要在 source/_posts 目录下放入编写的好的 .md 文件,然后通过 hexo generate 指令来为个 .md 格式的博客文件 生成对应的 .html 静态页面文件,参考这个思路,数据源同样是 .md 文件,区别只在于生成静态页面或者是录入数据库而已。
1.文件批处理:
之前我写过一篇关于使用 Python 如何编写一个自动批量处理文件的工具 【Python 编写自动化工具】,那个工具完成了批量获取文件属性和内容的操作,唯一需要做的就是如何将获取的数据插入数据库中,这里我使用的数据库是 MongoDB 。
2.操作数据库:
使用 Python 语言操作数据库,碰巧我之前也写过一篇爬虫数据存入 MongoDB 数据库的博客 【Python 爬虫7——自定义Item Pipeline将数据存入MongoDB】,原理其实很简单,就是借助 pymongo 这个插件工具来操作 MongoDB 数据库。
假如已经安装了 mongoengine 则无需再安装 pymongo ,因为已经默认一起安装了,否则需要单独安装 pymongo 。
3.数据结构:
关于最后数据已什么样的数据结构体存入数据库中,这取决于应用环境的需求,这里我的存入结构大致如下:
- 将
.md文件的名称坐标博客标题; - 文件创建时间作为发布时间;
- 文件所在目录为文件分类;
- 文件内容直接写入博客内容字段,例如
content。
源码实现:
1.遍历文件:
首先,编写需要用到的批量遍历文件和获取属性的方法:
#!/usr/bin/env python
# -*- coding: utf-8 -*-

import os.path,time
from pymongo import MongoClient

# 获取指定目录指定后缀名的文件列表
def getFileList(path,endStr):
    '''获取指定目录下,指定后缀的文件列表'''
    r_list = []
    f_list = os.listdir(path)   #获取目录列表
    for i in f_list:
        # 分离文件名和后缀名,过滤掉工具脚本
        file_endStr = os.path.splitext(i)[1]
        # 判断是否是目录
        if file_endStr == '':
            #=================〉这一行很必要(补全完整目录)
            i = os.path.join(path, i)
        if os.path.isdir(i):
            f_list1 = os.listdir(path+'/'+i)
            for j in f_list1:
                # 过滤出指定后缀 endStr 后缀的文件
                if os.path.splitext(j)[1] == endStr:
                    # 为了清晰目录把文件所在目录也标识出来
                    r_list.append(i+'/'+j)
                    # print j.decode("string_escape")
        elif file_endStr == endStr:
            r_list.append(i)
    return r_list

# 获取文件创建时间
def get_FileCreateTime(filePath):
    t = os.path.getctime(filePath)
    return TimeStampToTime(t)


# 把时间戳转化为时间: 1479264792 to 2016-11-16 10:53:12'''
def TimeStampToTime(timestamp):
    timeStruct = time.localtime(timestamp)
    return time.strftime('%Y-%m-%d %H:%M:%S',timeStruct)

# 获取目录中去掉前面路径和后缀的文件名字
def getFileSimpleName(filePath):
    name = ''
    # 先去掉后缀
    name = os.path.splitext(filePath)[0]
    # 获取最后一个斜杠位置
    index = name.rfind('/')
    # 找不到则返回 -1
    if index != -1:
        name = name[index+1:] # 截取斜杠后面到结尾内容
    # print name
    return name

# 获得分类文件目录名称

def getTypeNameByPath(filePath):
    fileTag = ''
    # 获取最后一个斜杠位置
    index = filePath.rfind('/')
    # 找不到则返回 -1
    if index != -1:
        # 截取斜杠后面到结尾内容
        fileTag = filePath[:index]
        # 截掉前面部分
        index = fileTag.rfind('/')
        if index != -1:
            fileTag = fileTag[index+1:]
    # print fileTag
    return fileTag

# 获取文件内容
def getArticleContent(filePath):
    file = open(filePath,"r")
    content = file.read()
    file.close()
    return content
然后调用这些方法获取需要的属性:
# 指定目录
path = './blogs/'
print(u'文件目录:'+path)
# 得到文件列表
files = getFileList(path,'.md')
print files
for i in files:
    print 'title: '+getFileSimpleName((i.decode("string_escape")))
    print 'date: '+get_FileCreateTime((i.decode("string_escape")))
    print 'tags: ['+getTypeNameByPath((i.decode("string_escape")))+']'
2.数据库操作方法:
创建一个数据库的操作类,写完初始化函数后,先写一个数据库初始化函数来连接数据保存的数据库,然后编写一个插入数据的方法,这里需要通过 collection.find 接口判断数据库中是否已存在相同的数据:
- 假如存在,则通过
collection.update方法更新部分项的数据; - 假如不存在,直接用
collection.insert方法将数据插入数据库中。
最终数据库操作类的内容如下:
class MongoDBHelper(object):
    def __init__(self):
        self.InitMongoDBConnect()
    # 初始化 MongoDB 的连接
    def InitMongoDBConnect(self):
        # 数据库 ip 地址和端口号
        connection = MongoClient('localhost',27017)
        # db_name
        db = connection['local']
        # document_name
        self.collection = db['articles']
    def CheckData(self,title):
        # 查询是否存在相同的数据
        datas = self.collection.find({'title':title})
        # print datas.count()
        if datas.count() > 0:
            return True,datas[0]
        else:
            return False,0
    def SaveData(self,data):
        if data != {}:
            exits,dat = self.CheckData(data['title'])
            if exits == True:
                # 更新文本内容
                self.collection.update({'_id':dat['_id']},{'$set':{'content':data['content']}})
                print data['title'].decode("utf8",'ignore')+u'-->数据已更新!!'
            else:
                self.collection.insert(data)
                print data['title'].decode("utf8",'ignore')+u'-->数据已存入'
3.数据写入:
通过调用文件操作方法,遍历获取文件目录列表,然后使用循环体去分别获取每个文件的属性,循环之前先创建一个数据库操作对象,每个文件数据都通过数据库操作对象写入到数据库中:
# 指定目录
path = './blogs/'
helper = MongoDBHelper()
print(u'文件目录:'+path)
# 得到文件列表
files = getFileList(path,'.md')
data = {}
for i in files:
    # 平台判断
    if sys.platform == 'win32':
        title = getFileSimpleName(i.decode("gbk",'ignore'))
        date = get_FileCreateTime(i.decode("gbk",'ignore'))
        tags = getTypeNameByPath(i.decode("gbk",'ignore'))
        content = getArticleContent(i.decode("gbk",'ignore'))
        title = title.encode('utf-8')
        date = date.encode('utf-8')
        tags = tags.encode('utf-8')
        content = content.encode('utf-8')
        #print title.decode("utf8",'ignore')
    else:
        title = getFileSimpleName(i)
        date = get_FileCreateTime(i)
        tags = getTypeNameByPath(i)
        content = getArticleContent(i)
        #print title
    data = {'title':title,'date':date,'tags':tags,'content':content}
    # 文件数据写入数据库
    helper.SaveData(data)
4.执行结果:
在命令行中运行编写好的工具脚本(记得需要提前让 MongoDB 处于运行状态),输入如下:
E:\Python Projects\Django\hBlog\source>python SaveToMongoDB.py
文件目录:./blogs/
CentOS 7.0最小安装及配置-->数据已存入
CentOS 7常用工具安装-->数据已存入
Lua 5.3 元表和元方法-->数据已存入
lua 5.3 核心源码解读-->数据已存入
Lua 5.3 源码解读(一) VS 2015 编译源码-->数据已存入
Lua 5.3 源码解读(二) 断点调试-->数据已存入
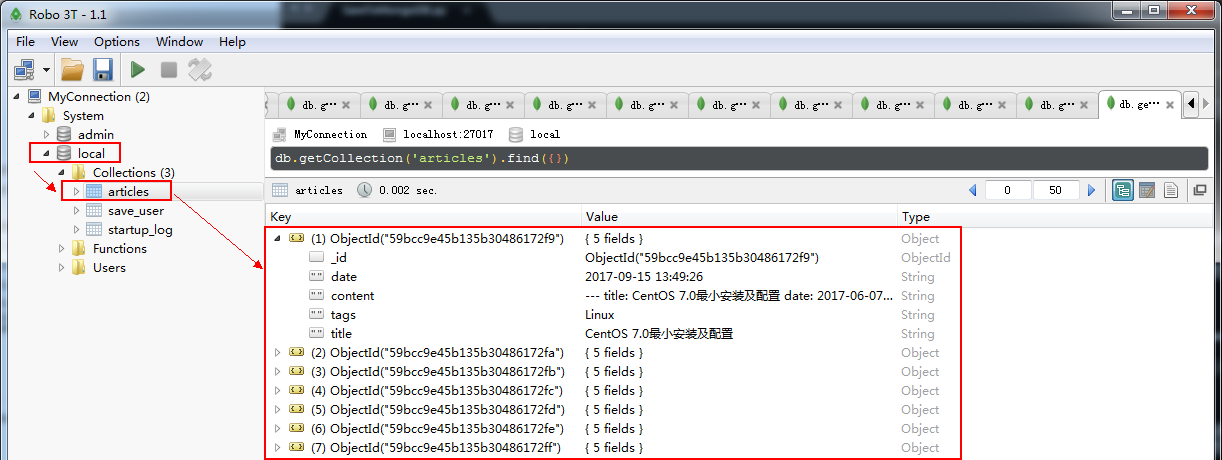
lua 常用操作-->数据已存入通过可视化工具查看数据库内容,可以看到数据已经成功写入到数据库中:
为了避免未启动 MongoDB 的服务就执行对数据库的操作,可以在工具中写入一个启动数据库服务的功能:
# 指定目录
path = './blogs/'

# windows 平台启动数据库服务
if sys.platform == 'win32':
    os.system("net start MongoService")

helper = MongoDBHelper()
执行结果如下:
E:\Python Projects\Django\hBlog\source>python SaveToMongoDB.py
MongoDB3.4.7 服务正在启动 ..
MongoDB3.4.7 服务已经启动成功。

文件目录:./blogs/
CentOS 7.0最小安装及配置-->数据已更新!!
CentOS 7常用工具安装-->数据已更新!!
Lua 5.3 元表和元方法-->数据已更新!!
lua 5.3 核心源码解读-->数据已更新!!
Lua 5.3 源码解读(一) VS 2015 编译源码-->数据已更新!!
Lua 5.3 源码解读(二) 断点调试-->数据已更新!!
lua 常用操作-->数据已更新!!
常见问题:
由于文章标题是中文的,因为在 Python 中字符串默认使用 ascii 编码,而数据库中字符串需要使用 utf-8 ,两者产生了冲突, 所以在将数据插入 MongoDB 数据库的时候出现了如下错误:
bson.errors.InvalidStringData: strings in documents must be valid UTF-8: 'CentOS
 7.0\xd7\xee\xd0\xa1\xb0\xb2\xd7\xb0\xbc\xb0\xc5\xe4\xd6\xc3'
当然对使用非 'utf8' 方式编码的字符串直接使用 datastring.decode('utf8') 还会触发如下报错:
UnicodeDecodeError: 'utf8' codec can't decode byte 0xd7 in position 10: invalid
continuation byte
解决上述问题其实很简单,但是 Linux 平台下和 Windows 平台下略有差别,所以处理也需要通过 sys.platform 接口进行平台判断:
import sys
if sys.platform == 'win32':
    ...
else:
    ...
Linux 平台:
在脚本的开头位置设置默认的编码方式即可,有两种方式:
方式一:
# -- coding: utf-8 --
方式二:
import sys


# 设置字符串使用 utf8 编码方式

reload(sys)
sys.setdefaultencoding('utf8')
Linux 下无需对字符进行额外的操作就能顺利存入数据库中。
Windows 平台:
Windows 平台即便设置了
# -*- coding: utf-8 -*-好像也还是无法解决字符串编码的问题,所以需要在代码中对字符串做修改:title = getFileSimpleName((i.decode("gbk",'ignore'))) print title title = title.encode('utf-8') print title即先通过
decode("gbk",'ignore')解码原本的字符串数据,再通过encode('utf-8')将数据编码为可以存入数据库中的'utf8'编码格式,然后再存入数据库就没问题了。
更多跟编码相关的知识可以查看这篇博客:Python编码UNICODE GBK UTF-8字符集转换的正确姿势 ,里面提供了一个函数库:
# win下命令行参数为gbk编码:star.gbk2unicode(sys.argv[1]) + u'也有'
def gbk2unicode(s):
    return s.decode('gbk', 'ignore')

# 脚本文件#coding:utf-8时默认不带u的字符串为utf8字符串:star.utf82unicode('我')
def utf82unicode(s):
    return s.decode('utf-8', 'ignore')

# 带u的字符串为unicode
# star.unicode2gbk(u'\u4e5f\u6709')
# star.unicode2gbk(u'也有')
def unicode2gbk(s):
    return s.encode('gbk')

# 带u的字符串为unicode
# star.unicode2utf8(u'\u4e5f\u6709')
# star.unicode2utf8(u'也有')
def unicode2utf8(s):
    return s.encode('utf-8')

# win下命令行参数为gbk编码:star.gbk2utf8(sys.argv[1]) + '也有'
def gbk2utf8(s):
    return s.decode('gbk', 'ignore').encode('utf-8')

def utf82gbk(s):
    return s.decode('utf-8', 'ignore').encode('gbk')