一、实现功能
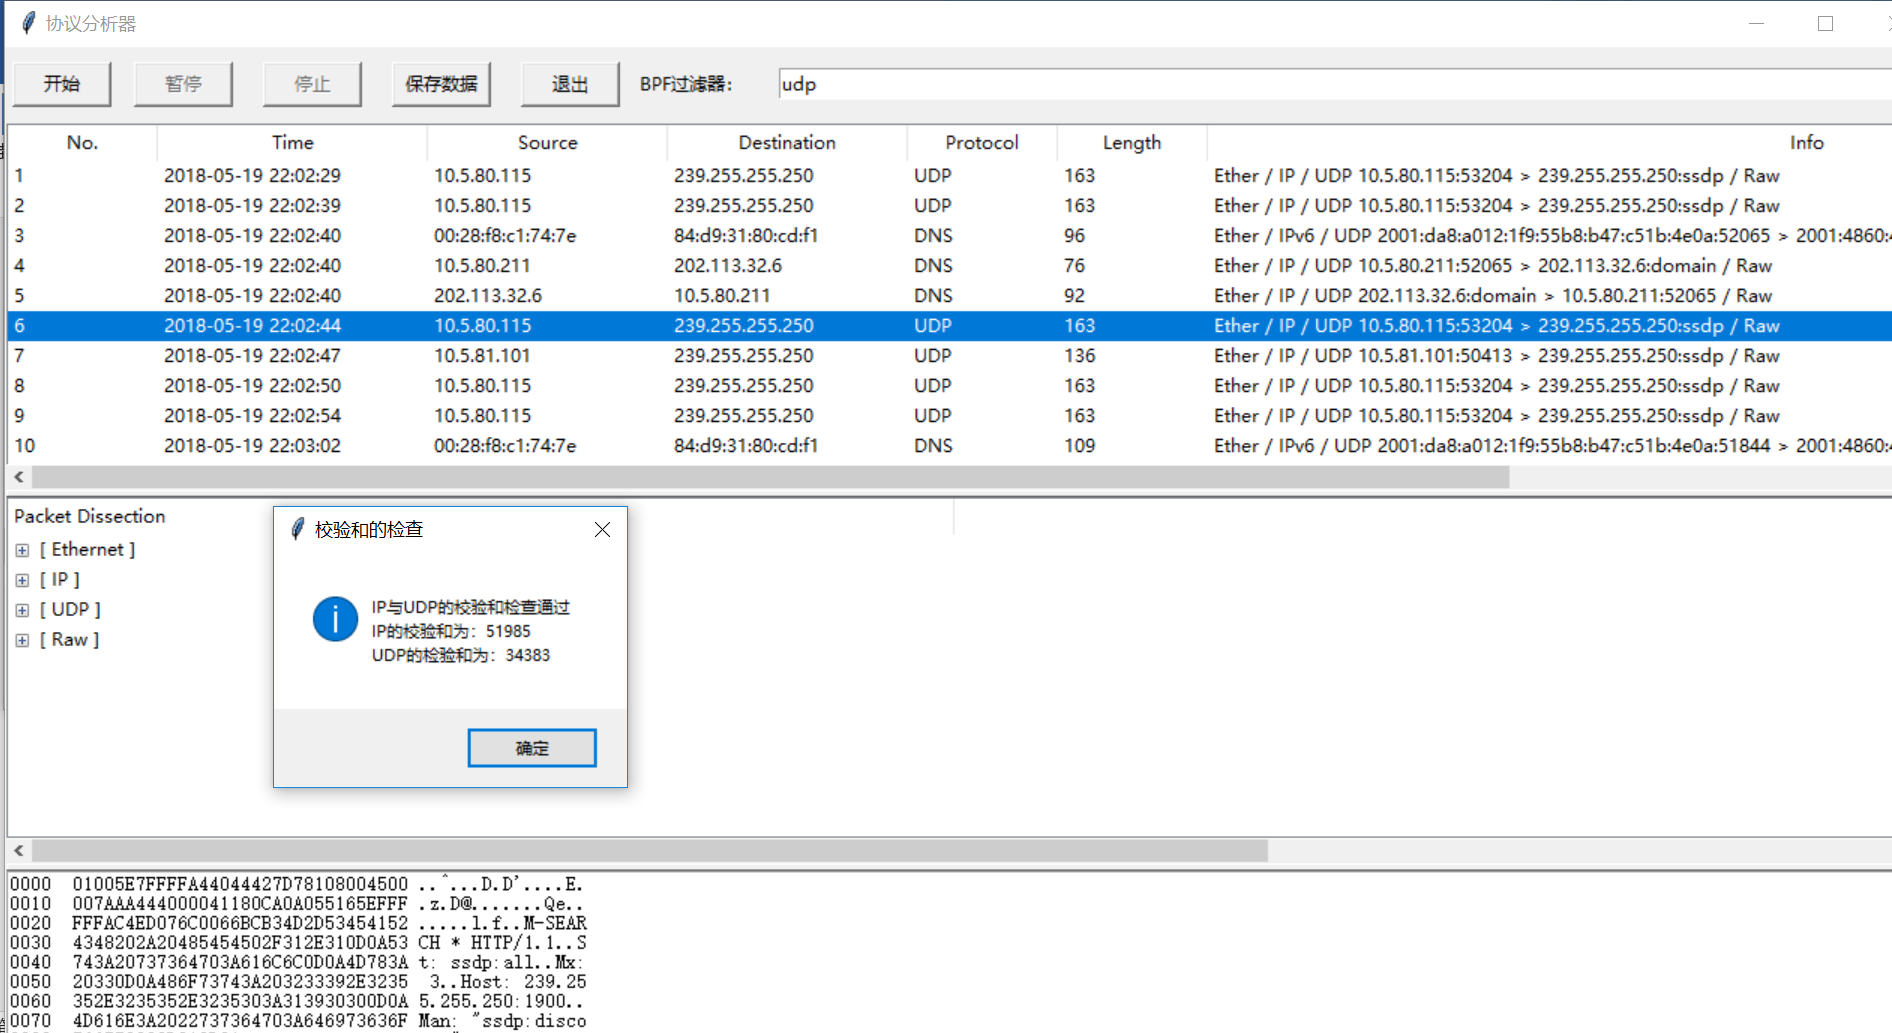
基于Tkinter的Python GUI界面设计,能分条展示数据包的概要信息(summary()),分层解析数据包,可显示数据包的十六进制编码值(hexdump());在抓包的同时解析数据包(不能等抓包停止后才解析),可判断IP、TCP或UDP数据包的校验和是否正确;支持BPF过滤器,抓包过程可以暂停和停止;可将数据包存储在pcap文件中,以供wireshark或其它数据包解析工具分析;可以在退出时提示用户进行保存未保存的数据包,进行保存工作;可以在再次开始新的抓包前提示用户保存未保存的数据包。
注:
源代码:https://download.csdn.net/download/wmrem/10439913
运行前需要先安装第三方库scapy,安装方法:https://blog.csdn.net/wmrem/article/details/80004819
二、主要函数说明
1.抓取数据包并对抓到的数据包进行相应处理
def capture_packet():
    1. 获取并设置过滤条件
    filters = fitler_entry.get()
    2.设置停止抓包的条件stop_filter
    stop_sending.clear()
    3.清空抓到的数据包列表
    packet_list.clear()
    4.用sniff(prn=处理抓到的数据包,filter=过滤条件,stop_filter=停止抓包的条件)进行抓包
    sniff(prn=处理抓到的数据包, filter=过滤条件filters, stop_filter=停止抓包的条件)
2.对抓到的数据包进行处理的函数
def process_packet(packet):
    if 没有点击暂停按钮:
        1.将抓到的包存在列表中
        packet_list.append(packet)
        2.获取抓包的时间
        packet_time= timestamp2time(packet.time)
3.设置默认源地址和目的地址
src = packet[Ether].src
dst = packet[Ether].dst
		4.建立协议查询字典判断Ether帧中封装的数据包的类型,设置proto字段的值,如果是IP数据包则进行第二次判断,如果IP数据包中封装的是TCP或UDP数据包则进行第三次判断
        type = packet[Ether].type
        types = {0x0800:'IPv4',0x0806:'ARP',0x86dd:'IPv6',0x88cc:'LLDP',0x891D:'TTE'}
        5.判断Ether帧中封装的数据包类型
        6.判断是否为IP包
        if proto == 'IPv4':
            7.建立协议查询字典,更改源地址和目的地址为源IP和目的IP地址,判断更改proto字段的值
            protos = {1: 'ICMP', 2: 'IGMP', 4: 'IP', 6: 'TCP',……17: 'UDP'}
            src = packet[IP].src
            dst = packet[IP].dst
        8. 判断是否包含TCP或UDP包
        if TCP包:
            protos_tcp = {80: 'Http', 443: 'Https',……, 25: 'SMTP'}
            9.建立字典,根据端口号判断协议类型并修改proto字段的值
        elif UDP包:
            10.根据端口号判断协议类型并修改proto字段的值
        11.行列表中插入捕获的数据包的信息并显示
        packet_list_tree.insert("", 'end', packet_id, text=packet_id,
                            values=(packet_id, packet_time, src, dst, proto, length, info))
3.开始按钮的单击响应函数,如果是停止后再次开始捕获,要提示用户保存已经捕获的数据
def start_capture():
    if 已经停止捕获发,但是没进行保存操作:
        1.弹出选择窗口,选择是否进行保存数据包。如果选择是则弹出保存文件窗口进行文件保存操作再开始新的一次抓包操作,选择否则直接开始一次新的抓包,选择取消则直接返回,不进行新的抓包操作
    2. 设置开始、保存按钮为不可用,暂停、停止按钮可操作,并设置停止标识stop_flag = False
    start_button['state'] = DISABLED  # 不可操作
    ……
    stop_button['state'] = NORMAL
    stop_flag = False
    if 没进行暂停操作:
        3.清空已经抓到的数据包列表并设置数据包编号为1
        4. 开启新线程进行抓包,设置保存标识save_flag = False
        t = threading.Thread(target=capture_packet)
        t.setDaemon(True)
        t.start()
        save_flag = False
    else:
        5.设置暂停标识pause_flag = False
4.暂停按钮的单击响应函数,这时仍然在抓包,只是不对抓到的包进行处理
def pause_capture():
    1.设置开始按钮为可用,暂停按钮为不可用,并修改暂停标识pause_flag = True
    start_button['state'] = NORMAL  # 可操作
    pause_button['state'] = DISABLED  # 不可操作
    global pause_flag
    pause_flag = True
5.停止按钮单击响应函数,终止线程,退出sniff()函数停止抓包
def stop_capture():
    1. 终止线程,停止抓包
    stop_sending.set()
    2. 设置开始按钮为可用,暂停按钮为不可用,保存为可用,修改暂停标识pause_flag = False,停止标识stop_flag = True
    start_button['state'] = NORMAL # 可操作
    …
    stop_button['state'] = DISABLED
    pause_flag = False
    stop_flag = True
6.保存按钮的单击响应函数,将抓到的数据包保存为pcap格式的文件
def save_captured_data_to_file():
1.弹出保存文件窗口,获取文件保存的位置及名字,并修改保存标识save_flag = True    filename=tkinter.filedialog.asksaveasfilename(title=窗口名, filetypes=保存文件类型, initialfile=默认命名)
    if 文件命名不包含.pcap:
        2.设置默认文件格式为 pcap
        filename = filename+'.pcap'
    3.使用wrpcap()函数进行保存文件操作
    wrpcap(filename, packet_list)
7.退出按钮的单击响应函数,终止线程,停止抓包,退出程序前要提示用户保存已经捕获的数据
def quit_program():
    1.终止线程,设置停止抓包标识,停止抓包
    stop_sending.set()
    if 已经暂停或停止:
        # 没进行保存操作
        if 没进行保存:
            2.弹出保存提醒窗口,如果选择保存则先弹出保存窗口进行保存操作再关闭窗口,如果选择否,则直接退出,选择取消则取消退出操作
    	   else已经保存:
       	 3.直接关闭窗口
          tk.destroy()
8. 数据包列表单击事件响应函数,在数据包列表单击某数据包时,在协议解析区解析此数据包,并在hexdump区显示此数据包的十六进制内容
def on_click_packet_list_tree(event):
    1.从数据包列表中取出要分析的数据包
    packet = packet_list[packet_id]
    2.将选取的数据包分层显示,遇到#,则新建一个分层
    3.如果抓到的数据包包含IP包则检查IP、TCP、UDP的校验和
    if IP包存在:
        4.重新计算选取的数据包的校验和并与接收到的IP包的原校验和进行比较
        if TCP包分装在IP包中:
            1.取出TCP包的校验和的值
            2.重新计算TCP的校验和的值与原校验和进行比较
            3.如果IP与TCP的校验和值都正确则弹出校验和检查通过提示框,如果有一项不正确则弹出错误警告窗口。
        elif UDP包封装在IP包中:
            1.取出UDP包的校验和的值
            2.重新计算UDP数据包的校验和
            3.如果IP与UDP的校验和值都正确则弹出校验和检查通过提示框,如果有一项不正确则弹出错误警告窗口。
三、基础知识准备
1.sniff()函数用于抓包,运行scapy后,使用help(sniff)查看sniff命令的用法。
sniff(count=0(抓包数量), store=True(是否存储), offline=None, prn=None(如何处理抓到的包), lfilter=None(过滤条件), L2socket=None, timeout=None(运行时间), opened_socket=None, stop_filter=None(是否停止抓包), iface=None, *arg, **karg)
count选项
>>> sniff(count=10)
<Sniffed: TCP:0 UDP:6 ICMP:0 Other:4>
>>> a=sniff(count=10)
>>> a.summary()
Ether / ARP who has 10.8.0.91 says 10.8.180.129 / Padding
Ether / IP / UDP 10.8.250.223:55985 > 224.0.0.252:llmnr / LLMNRQuery
Ether / ARP who has 10.8.0.130 says 10.8.180.129 / Padding
Ether / IP / UDP 10.8.164.101:netbios_ns > 10.8.255.255:netbios_ns / NBNSQueryRequest
Ether / ARP who has 10.8.143.141 says 10.8.39.64 / Padding
Ether / ARP who has 10.8.9.147 says 10.8.9.179 / Padding
Ether / ARP who has 10.8.9.154 says 10.8.9.179 / Padding
Ether / ARP who has 10.8.9.175 says 10.8.9.179 / Padding
Ether / ARP who has 10.8.39.3 says 10.8.39.64 / Padding
Ether / IP / UDP 10.8.146.215:netbios_ns > 10.8.255.255:netbios_ns / NBNSQueryRequest
Prn选项(可以是自定义函数,lambda表达式)——lambda x : x.summary()----lambda 对象 : 执行的操作
>>> sniff(count=10,prn=(lambda x : x.summary()))
Ether / ARP who has 10.8.205.116 says 10.8.4.238 / Padding
Ether / ARP who has 10.8.234.117 says 10.8.66.32 / Padding
Ether / IP / UDP / DNS Ans "b'Fate._companion-link._tcp.local.'"
Ether / ARP who has 10.8.0.64 says 10.8.11.181 / Padding
Ether / ARP who has 10.8.87.211 says 10.8.87.217 / Padding
Ether / IP / UDP 10.8.223.215:netbios_ns > 10.8.255.255:netbios_ns / NBNSQueryRequest
Ether / ARP who has 10.8.87.212 says 10.8.87.217 / Padding
Ether / IPv6 / UDP / DNS Ans "b'Fate._companion-link._tcp.local.'"
Ether / IP / UDP / DNS Ans "b'si=BCD53060-A820-4DFC-B776-071FEDDAA131'"
Ether / ARP who has 10.8.87.214 says 10.8.87.217 / Padding
<Sniffed: TCP:0 UDP:4 ICMP:0 Other:6>
lfilter选项----添加过滤器,python语言写的
>>> sniff(count=10,lfilter=(lambda x : x.haslayer(TCP)))
<Sniffed: TCP:10 UDP:0 ICMP:0 Other:0>
>>> sniff(count=10,lfilter=(lambda x : x.haslayer(Padding)))
<Sniffed: TCP:0 UDP:0 ICMP:0 Other:10>
Filter选项-BPF过滤——filter: BPF filter to apply
>>> sniff(count=10,filter='tcp dst port 80')
<Sniffed: TCP:10 UDP:0 ICMP:0 Other:0>
>>>
2.使用wrpcap()函数进行保存文件操作,wrpcap(文件保存的绝对路径, 要保存的数据包)
3.filename=tkinter.filedialog.asksaveasfilename(title=窗口名, filetypes=保存文件类型, initialfile=默认命名),弹出保存文件窗口,获取文件保存的位置及名字。
4. resault = tkinter.messagebox.askyesnocancel("保存提醒", "是否保存抓到的数据包"),弹出提示文本框,如果选择保存(resault=True)则先弹出保存窗口进行保存操作再关闭窗口,如果选择否(resault=False),则直接退出,选择取消则取消退出操作。
四、主要功能实现代码
1.抓取数据包并对抓到的数据包进行相应处理
# 抓取数据包并处理
def capture_packet():
    # 设置过滤条件
    filters = fitler_entry.get()
    print("抓包条件:"+filters)
    # 设置停止抓包的条件stop_filter
    stop_sending.clear()
    global packet_list
    # 清空列表
    packet_list.clear()
    # 抓取数据包并将抓到的包存在列表中
    sniff(prn=(lambda x: process_packet(x)), filter=filters, stop_filter=(lambda x: stop_sending.is_set()))
2.对抓到的数据包进行处理的函数
# 处理抓到的数据包
def process_packet(packet):
    if pause_flag == False:
        global packet_list
        # 将抓到的包存在列表中
        packet_list.append(packet)
        # 抓包的时间
        packet_time= timestamp2time(packet.time)
        src = packet[Ether].src
        dst = packet[Ether].dst
        type = packet[Ether].type
        types = {0x0800:'IPv4',0x0806:'ARP',0x86dd:'IPv6',0x88cc:'LLDP',0x891D:'TTE'}
        if type in types:
           proto = types[type]
        else:
             proto = 'LOOP'  # 协议
        # IP
        if proto == 'IPv4':
            # 建立协议查询字典
            protos = {1: 'ICMP', 2: 'IGMP', 4: 'IP', 6: 'TCP', 8: 'EGP', 9: 'IGP', 17: 'UDP', 41: 'IPv6', 50: 'ESP', 89:'OSPF'}
            src = packet[IP].src
            dst = packet[IP].dst
            proto=packet[IP].proto
            if proto in protos:
                proto=protos[proto]
        # tcp
        if TCP in packet:
            protos_tcp = {80: 'Http', 443: 'Https', 23: 'Telnet', 21: 'Ftp', 20: 'ftp_data', 22: 'SSH', 25: 'SMTP'}
            sport = packet[TCP].sport
            dport = packet[TCP].dport
            if sport in protos_tcp:
                proto = protos_tcp[sport]
            elif dport in protos_tcp:
                proto = protos_tcp[dport]
        elif UDP in packet:
            if packet[UDP].sport == 53 or packet[UDP].dport == 53:
                proto = 'DNS'
        length = len(packet)  # 长度
        info = packet.summary()  # 信息
        global packet_id  # 数据包的编号
        packet_list_tree.insert("", 'end', packet_id, text=packet_id,
                            values=(packet_id, packet_time, src, dst, proto, length, info))
        packet_list_tree.update_idletasks()  # 更新列表,不需要修改
        packet_id = packet_id + 1
3.开始按钮的单击响应函数,如果是停止后再次开始捕获,要提示用户保存已经捕获的数据
# 开始按钮单击响应函数,如果是停止后再次开始捕获,要提示用户保存已经捕获的数据
def start_capture():
    """
    开新线程,进行抓包,sniff的prn 选项设置为包处理函数,仿照just_a_test()写,过滤器为filter选项
    :return:
    """
    # 暂停,停止,保存的标志位
    global pause_flag,stop_flag,save_flag
    # 已经停止,重新开始抓包但没进行保存操作
    if stop_flag is True and save_flag is False:
        resault = tkinter.messagebox.askyesnocancel("保存提醒", "是否保存抓到的数据包")
        if resault is False:
            print("直接开始不保存")
        elif resault is True:
            print("先保存数据包,在进行抓包")
            # 默认打开位置initialdir='d:\\',默认命名initialfile='.pcap'
            filename = tkinter.filedialog.asksaveasfilename(title='保存文件', filetypes=[('所有文件', '.*'),
                                                                                     ('数据包', '.pcap')], initialfile='.pcap')
            if filename.find('.pcap') == -1:
                # 默认文件格式为 pcap
                filename = filename + '.pcap'
            wrpcap(filename, packet_list)
        else:
            print("取消抓包操作")
            stop_flag = False
            return
    # 设置开始按钮为不可用,暂停按钮可操作
    start_button['state'] = DISABLED  # 不可操作
    save_button['state'] = DISABLED
    pause_button['state'] = NORMAL  # 可操作
    stop_button['state'] = NORMAL
    stop_flag = False
    if pause_flag is False:
        # 清空已经抓到的数据包列表--------------
        items = packet_list_tree.get_children()
        for item in items:
            packet_list_tree.delete(item)
        packet_list_tree.clipboard_clear()
        global packet_id
        packet_id = 1
        # 开启新线程进行抓包
        t = threading.Thread(target=capture_packet)
        t.setDaemon(True)
        t.start()
        save_flag = False
    else:
        pause_flag = False
4.暂停按钮的单击响应函数,这时仍然在抓包,只是不对抓到的包进行处理
# 暂停按钮单击响应函数
def pause_capture():
    """
    抓包处理函数停止运行,仍然在抓包
    :return:
    """
    # 设置开始按钮为可用,暂停按钮为不可用
    start_button['state'] = NORMAL  # 可操作
    pause_button['state'] = DISABLED  # 不可操作
    global pause_flag
    pause_flag = True
5.停止按钮单击响应函数,终止线程,退出sniff()函数停止抓包
# 停止按钮单击响应函数
def stop_capture():
    """
    终止线程,停止抓包
    :return:
    """
    # 终止线程,停止抓包
    stop_sending.set()
    # 设置开始按钮为可用,暂停按钮为不可用,保存为可用
    start_button['state'] = NORMAL # 可操作
    pause_button['state'] = DISABLED  # 不可操作
    stop_button['state'] = DISABLED
    save_button['state'] = NORMAL
    global pause_flag, stop_flag
    pause_flag = False
    stop_flag = True
    # 不能用加号+,连接不同格式字符
    print("停止抓包,共抓到", packet_id, "个数据包")
6.保存按钮的单击响应函数,将抓到的数据包保存为pcap格式的文件
# 将抓到的数据包保存为pcap格式的文件
def save_captured_data_to_file():
    global save_flag
    save_flag = True
    # 默认打开位置initialdir='d:\\',默认命名initialfile='.pcap'
    filename=tkinter.filedialog.asksaveasfilename(title='保存文件', filetypes=[('所有文件', '.*'),
                                                                           ('数据包', '.pcap')], initialfile='.pcap')
    if filename.find('.pcap') == -1:
        # 默认文件格式为 pcap
        filename = filename+'.pcap'

    wrpcap(filename, packet_list)
7.退出按钮的单击响应函数,终止线程,停止抓包,退出程序前要提示用户保存已经捕获的数据
# 退出按钮单击响应函数,退出程序前要提示用户保存已经捕获的数据
def quit_program():
    """
    保存数据的函数,wrpcap   : Write a list of packets to a pcap file
    :return:
    """
    #终止线程,停止抓包
    stop_sending.set()
    # 已经暂停,或停止,需要提示保存在退出
    if stop_flag is True or pause_flag is True:
        # 没进行保存操作
        if save_flag is False:

            resault = tkinter.messagebox.askyesnocancel("保存提醒", "是否保存抓到的数据包")
            if resault is False:
                print("直接退出不保存")
                tk.destroy()
            elif resault is True:
                print("先保存数据包,再退出")
                # 默认打开位置initialdir='d:\\',默认命名initialfile='.pcap'
                filename = tkinter.filedialog.asksaveasfilename(title='保存文件',
                                                                filetypes=[('所有文件', '.*'), ('数据包', '.pcap')],initialfile='.pcap')
                if filename.find('.pcap') == -1:
                    # 默认文件格式为 pcap
                    filename = filename + '.pcap'
                wrpcap(filename, packet_list)
                tk.destroy()
            else:
                print("取消退出")
        else:
            print("已经保存,直接退出")
            tk.destroy()
    else:
        print("直接关闭窗口")
        tk.destroy()
8. 数据包列表单击事件响应函数,在数据包列表单击某数据包时,在协议解析区解析此数据包,并在hexdump区显示此数据包的十六进制内容
def on_click_packet_list_tree(event):
    # event.widget获取Treeview对象,调用selection获取选择对象名称,返回结果为字符型元祖
    selected_item = event.widget.selection()
    # 清空packet_dissect_tree上现有的内容------------------------
    packet_dissect_tree.delete(*packet_dissect_tree.get_children())
    # 设置协议解析区的宽度
    packet_dissect_tree.column('Dissect', width=packet_list_frame.winfo_width())
    # 转换为整型
    packet_id = int(selected_item[0])-1
    # 取出要分析的数据包
    packet = packet_list[packet_id]
    #packet.show()
    lines = (packet.show(dump=True)).split('\n')  # dump=True返回字符串,不打出,\n换行符
    last_tree_entry = None
    for line in lines:
        if line.startswith('#'):
            line = line.strip('# ')  # 删除#
            last_tree_entry = packet_dissect_tree.insert('', 'end', text=line)  # 第一个参数为空表示根节点
        else:
            packet_dissect_tree.insert(last_tree_entry, 'end', text=line)
        col_width = font.Font().measure(line)
        # 根据新插入数据项的长度动态调整协议解析区的宽度
        if packet_dissect_tree.column('Dissect', width=None) < col_width:
            packet_dissect_tree.column('Dissect', width=col_width)
    if IP in packet:
        ip = packet[IP]
        ip_chksum = ip.chksum
        # ip.show()#抓到的IP报文
        ip.chksum = None
        # ip.show()
        ip_check = IP(raw(ip)).chksum
        ip.chksum = ip_chksum
        print(ip_chksum, "计算出的IP首部校验和:", ip_check)
        if TCP in packet:
            tcp = packet[TCP]
            tcp_chksum = tcp.chksum
            tcp.chksum = None
            tcp_check = TCP(raw(tcp)).chksum
            tcp.chksum = tcp_chksum
            print(tcp_chksum, "计算出的TCP检验和:", tcp_check)
            information = "IP与TCP的校验和检查通过\r\nIP的校验和为:{chksum_ip}\r\nTCP的检验和为:" \
                          "{chksum_tcp}".format(chksum_ip=ip_chksum, chksum_tcp=tcp_chksum)
            print(information)
            if ip_check == ip_chksum and tcp_check == tcp_chksum:
                tkinter.messagebox.showinfo("校验和的检查", information)
            else:
                tkinter.messagebox.showerror("校验和错误警告", "IP或TCP的校验和出错")
        elif UDP in packet:
            udp = packet[UDP]
            udp_chksum = udp.chksum
            udp.chksum = None
            # 重新计算数据包的校验和
            udp_check = UDP(raw(udp)).chksum
            udp.chksum = udp_chksum
            print(udp_chksum, "计算出的UDP检验和:", udp_check)
            information = "IP与UDP的校验和检查通过\r\nIP的校验和为:" \
                          "{chksum_ip}\r\nUDP的检验和为:{chksum_udp}".format(chksum_ip=ip_chksum, chksum_udp=udp_chksum)
            print(information)
            # 弹出提示窗口
            if ip_check == ip_chksum and udp_check == udp_chksum:
                tkinter.messagebox.showinfo("校验和的检查", information)
            else:
                tkinter.messagebox.showerror("校验和错误警告", "IP或UDP的校验和出错")
    # 在hexdump区显示此数据包的十六进制内容,不用修改
    hexdump_scrolledtext['state'] = 'normal'
    hexdump_scrolledtext.delete(1.0, END)
    hexdump_scrolledtext.insert(END, hexdump(packet, dump=True))
    hexdump_scrolledtext['state'] = 'disabled'