学习目标:
for 语句
while 语句
if 语句
case 语句
expect 语句
exit break continue退出命令的区别:
exit直接退出当前脚本
break仅仅退出本次循环
continue 退出本次循环进行下一次循环
效果演示:
[root@localhost mnt]# vim file.sh 编写脚本
[root@localhost mnt]# sh file.sh   直接调用脚本
1
2
3
4
5
hello westos!!!
[root@localhost mnt]# sh file.sh  exit   exit直接退出当前脚本
1
2
[root@localhost mnt]# sh file.sh  break   break仅仅退出本次循环
1
2
hello westos!!!
[root@localhost mnt]# sh file.sh  continue  continue 退出本次循环进行下一次循环
1
2
4
5
hello westos!!!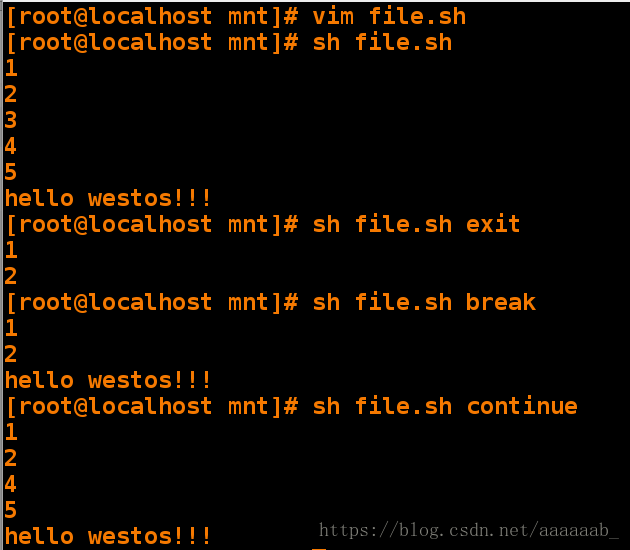
for语句:
`seq 1 5`可以设置步长,可以有变量{1..5}不可以设置步长。
for语句参数可以传到循环以外,是嵌套关系,总共执行m*n次
for语句的变量仅仅最后变量被使用,循环定义变量依次执行,进行批处理。
简单的for语句:
[root@localhost mnt]# vim xfl.sh 编写脚本
[root@localhost mnt]# sh xfl.sh 调用脚本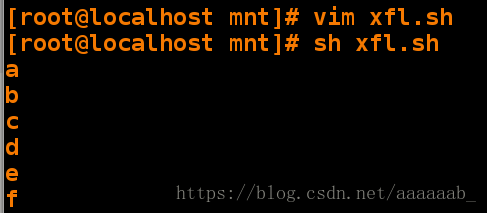
[root@localhost mnt]# vim xfl.sh 编写脚本加入步长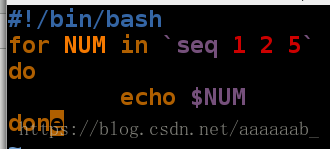
[root@localhost mnt]# sh xfl.sh 调用脚本查看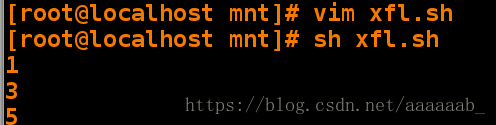
[root@localhost mnt]# vim dd.sh 编辑脚本实现for嵌套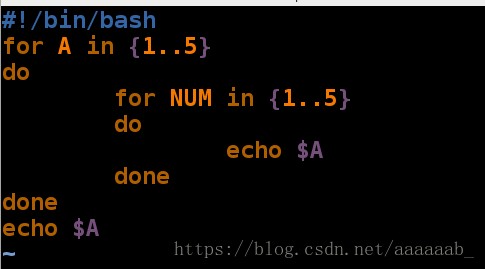
[root@localhost mnt]# sh dd.sh 调用脚本输出25个数字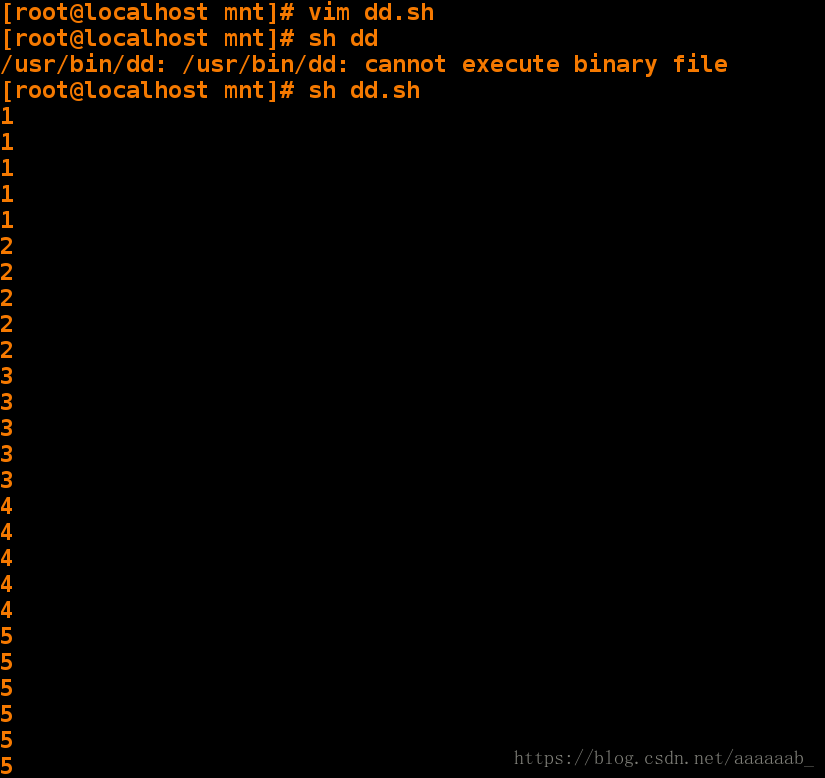
检测教室能上网的机子:
[root@localhost mnt]# vim check_host.sh 编辑脚本
[root@localhost mnt]# sh check_host.sh   调用没有效果呈现因为我的真机IP是172.25.254.84,我检测的是0到50所以就出不来结果
[root@localhost mnt]# cat check_host.sh
#!/bin/bash
for A in {0..50}或者用for((A=0;A<50;A++))  必须是双层括号
do
    ping -c1 -w1 172.25.254.$A &> /dev/null && echo 172.25.254.$A
done
建立两个数据库两个数据表插入字段进行备份操作:
[root@foundation84 ~]# yum install mariadb-server.x86_64 -y 安装数据库
[root@foundation84 ~]# systemctl start mariadb   开启数据库服务
[root@foundation84 ~]# mysql -uroot  登陆数据库
MariaDB [(none)]> create database westos  创建数据库westos
    -> ;
Query OK, 1 row affected (0.00 sec)

MariaDB [(none)]> create database linux;  创建数据库linux
Query OK, 1 row affected (0.00 sec)

MariaDB [(none)]> show databases;  显示所有数据库
+--------------------+
| Database           |
+--------------------+
| information_schema |
| linux              |
| mysql              |
| performance_schema |
| test               |
| westos             |
+--------------------+
6 rows in set (0.00 sec)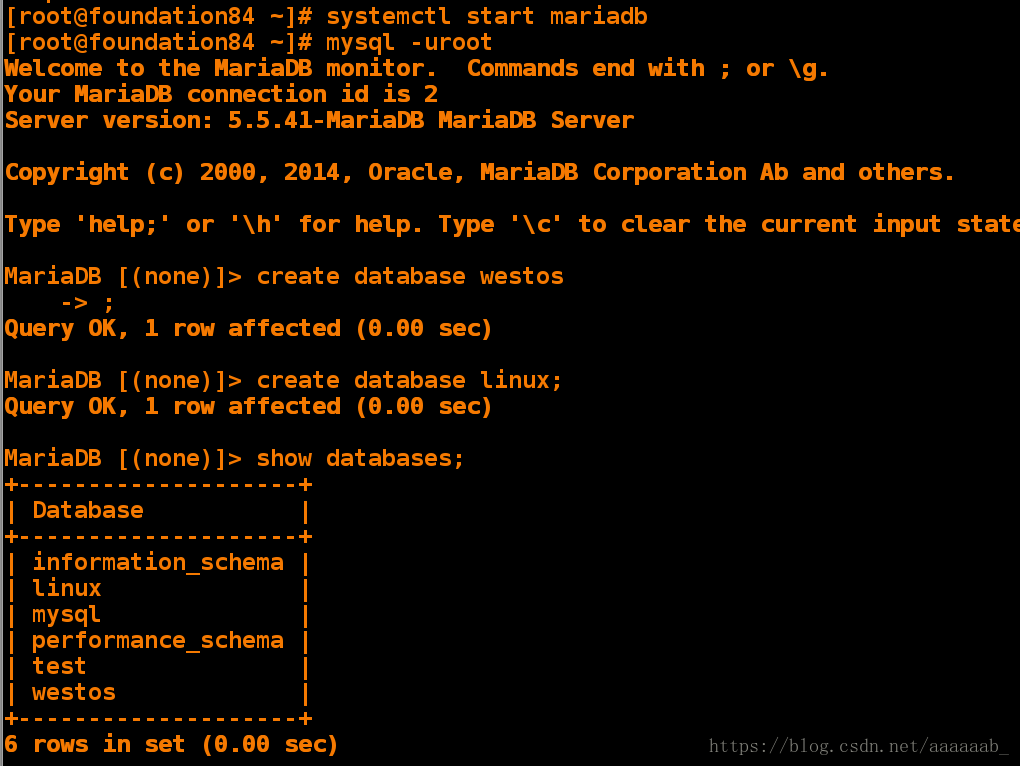
MariaDB [(none)]> use westos;   进入westos数据库
Database changed
MariaDB [westos]> create table westos_user (  创建数据表
    -> username varchar(50) not null,
    -> password varchar(50) not null);
Query OK, 0 rows affected (0.11 sec)
MariaDB [westos]> insert into westos_user values("hello","123");  插入字段
Query OK, 1 row affected (0.33 sec)

MariaDB [westos]> insert into westos_user values("hi","1234");  插入字段
Query OK, 1 row affected (0.08 sec)

MariaDB [westos]> select * from westos_user;  显示数据表信息
+----------+----------+
| username | password |
+----------+----------+
| hello    | 123      |
| hi       | 1234     |
+----------+----------+
2 rows in set (0.00 sec)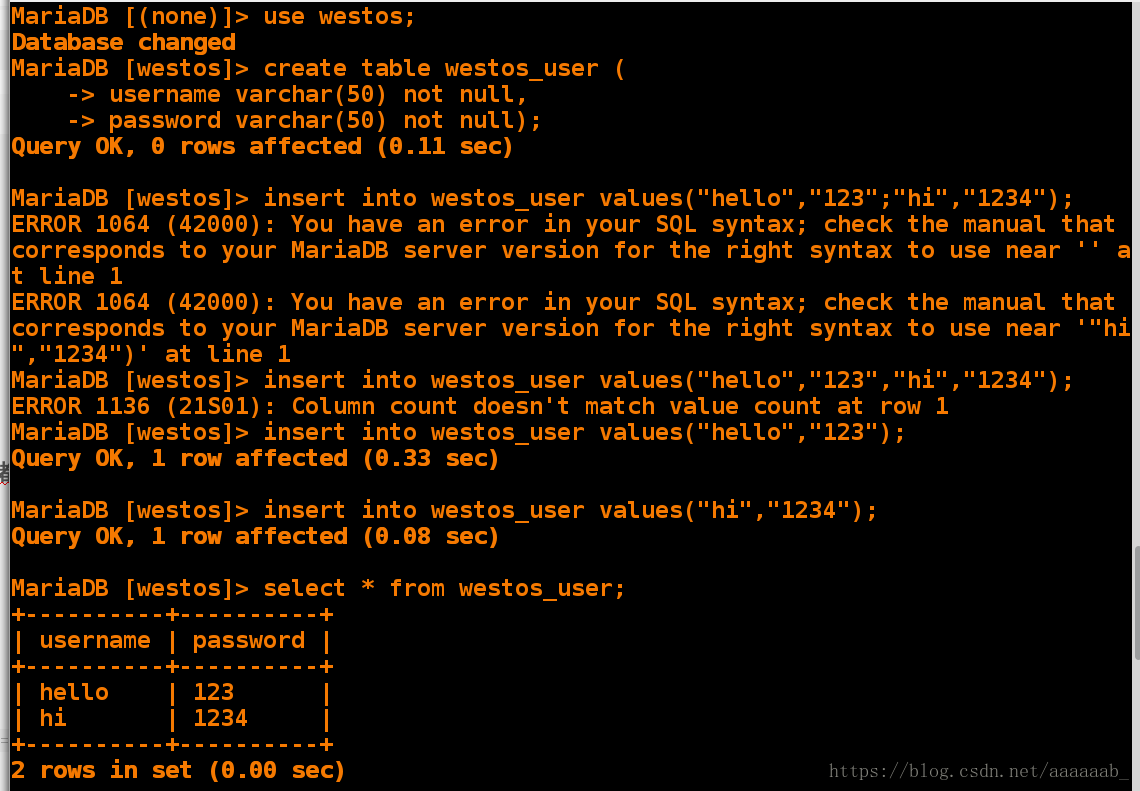
MariaDB [westos]> use linux;  进入linux数据库
Database changed
MariaDB [linux]> create table linux_user(  创建数据表
    -> username varchar(50) not null, password varchar(50) not null);Query OK, 0 rows affected (0.11 sec)

MariaDB [linux]> insert into linux_user values("haha","123");   插入字段
Query OK, 1 row affected (0.34 sec)

MariaDB [linux]> insert into linux_user values("hehe","1234");  插入字段
Query OK, 1 row affected (0.07 sec)

MariaDB [linux]> select * from linux_user;  显示linux_user数据表信息
+----------+----------+
| username | password |
+----------+----------+
| haha     | 123      |
| hehe     | 1234     |
+----------+----------+
2 rows in set (0.00 sec)

MariaDB [linux]> quit
Bye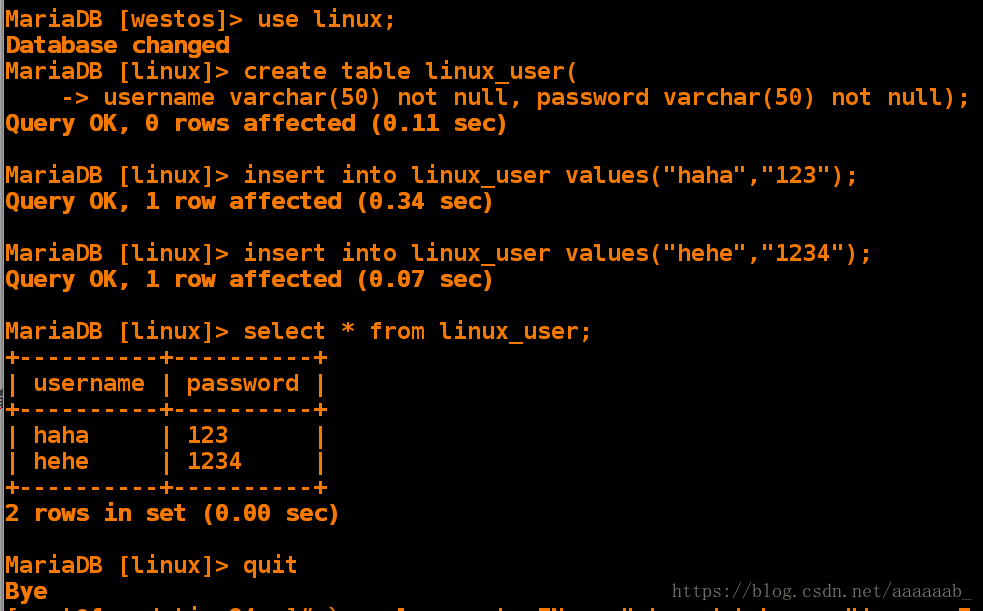
对数据库做备份,每个数据库备份一个文件,例如mysql.sql将文件存储到/mnt/mysql_dump:(for 语句)
[root@foundation84 ~]# cd /mnt/
[root@foundation84 mnt]# ls
install_apache.sh  westos.sh
[root@foundation84 mnt]# vim dump_mysql.sh   建立脚本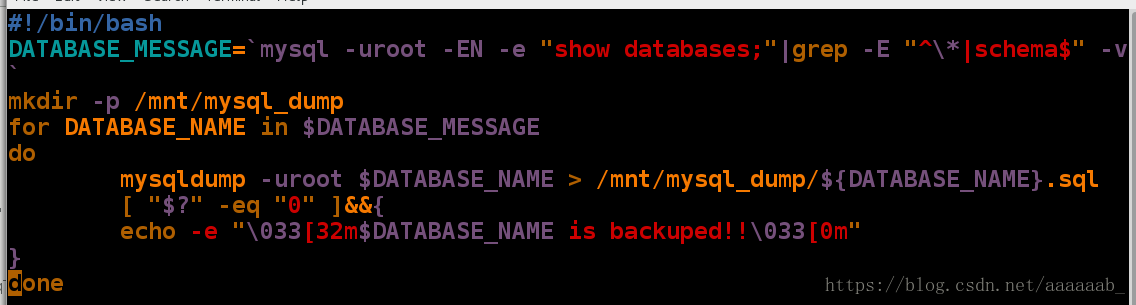
[root@foundation84 mnt]# sh dump_mysql.sh    调用脚本显示已经备份
linux is backuped!!
mysql is backuped!!
test is backuped!!
westos is backuped!!
[root@foundation84 mnt]# ls
dump_mysql.sh  install_apache.sh  mysql_dump  westos.sh
[root@foundation84 mnt]# cd mysql_dump/  进入目录
[root@foundation84 mysql_dump]# ls  查看备份是以.sql后缀结尾
linux.sql  mysql.sql  test.sql  westos.sql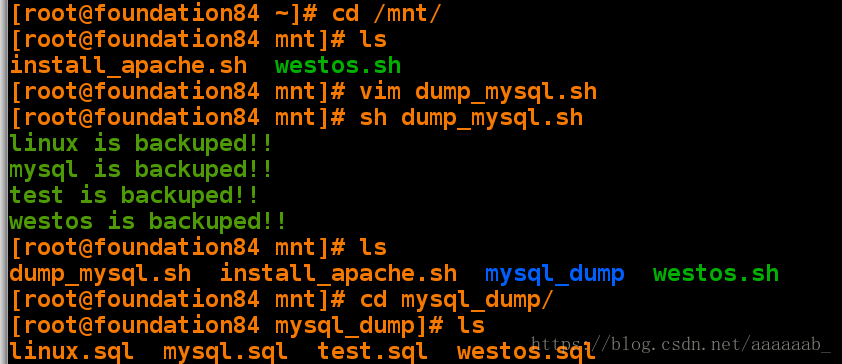
简单的while语句:
while true  条件为真就执行
do
done[root@localhost mysql_dump]# vim cc.sh 简单的每隔一秒打印占用负载以及时间while语句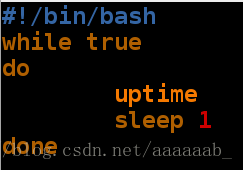
[root@localhost mysql_dump]# sh cc.sh    调用脚本
 04:44:38 up  7:42,  2 users,  load average: 0.00, 0.01, 0.05
 04:44:39 up  7:42,  2 users,  load average: 0.00, 0.01, 0.05
 04:44:40 up  7:42,  2 users,  load average: 0.00, 0.01, 0.05
[root@localhost mysql_dump]# df  查看负载
Filesystem         1K-blocks    Used Available Use% Mounted on
/dev/vda1           10473900 3329740   7144160  32% /
devtmpfs              469344       0    469344   0% /dev
tmpfs                 484932      80    484852   1% /dev/shm
tmpfs                 484932   12768    472164   3% /run
tmpfs                 484932       0    484932   0% /sys/fs/cgroup
/dev/mapper/vg0-vo    483670    2384    451795   1% /home
[root@localhost mysql_dump]# mail   查看没有邮件
No mail for root
[root@localhost mysql_dump]# echo hello world | mail -s warning root发送邮件
[root@localhost ~]# mail   查看邮件
No mail for root
[root@localhost ~]# echo hello world | mail -s warning root
[root@localhost ~]# mail
Heirloom Mail version 12.5 7/5/10.  Type ? for help.
"/var/spool/mail/root": 1 message 1 new
>N  1 root                  Tue Jun 19 22:25  18/611   "warni"
& q       q退出
Held 1 message in /var/spool/mail/root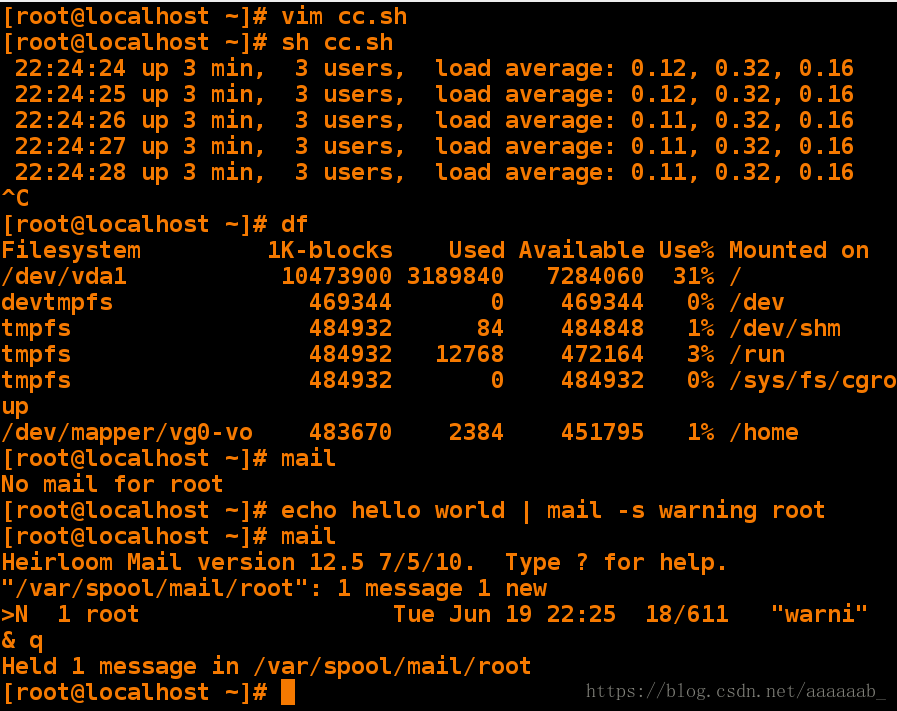
编写脚本利用while语句检测当负载超过80%时发送邮件给超级用户:
[root@localhost mnt]# df   查看负载情况
Filesystem     1K-blocks    Used Available Use% Mounted on
/dev/vda1       10473900 3124404   7349496  30% /
devtmpfs          469344       0    469344   0% /dev
tmpfs             484932      84    484848   1% /dev/shm
tmpfs             484932   12760    472172   3% /run
tmpfs             484932       0    484932   0% /sys/fs/cgroup
[root@localhost mnt]# vim checkload.sh   编写检测脚本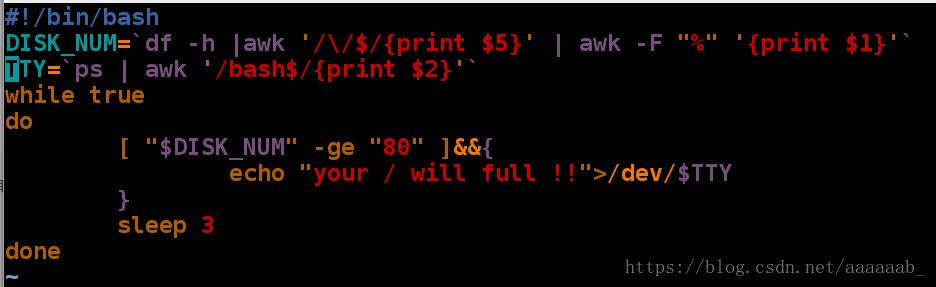
[root@localhost mnt]# dd if=/dev/zero of=/bigfile bs=1M count=6000  截取命令保证负载超过80%来进行实验查看
6000+0 records in
6000+0 records out
6291456000 bytes (6.3 GB) copied, 90.6928 s, 69.4 MB/s
[root@localhost mnt]# df   查看负载已经超过80%
Filesystem     1K-blocks    Used Available Use% Mounted on
/dev/vda1       10473900 9268624   1205276  89% /
devtmpfs          469344       0    469344   0% /dev
tmpfs             484932      84    484848   1% /dev/shm
tmpfs             484932   12760    472172   3% /run
tmpfs             484932       0    484932   0% /sys/fs/cgroup
[root@localhost mnt]# sh checkload.sh  调用脚本每隔3秒会提示你的负载将要满了信息
your / will full !!
your / will full !!
your / will full !!
your / will full !!
your / will full !!
^C
[root@localhost mnt]# sh checkload.sh &  当把脚本打入后台之后
[1] 2553
[root@localhost mnt]# your / will full !!   依旧会每隔三秒进行提示
your / will full !!
your / will full !!
your / will full !!
^C
[root@localhost mnt]# fg  调回进程
sh checkload.sh
your / will full !!
^C    结束进程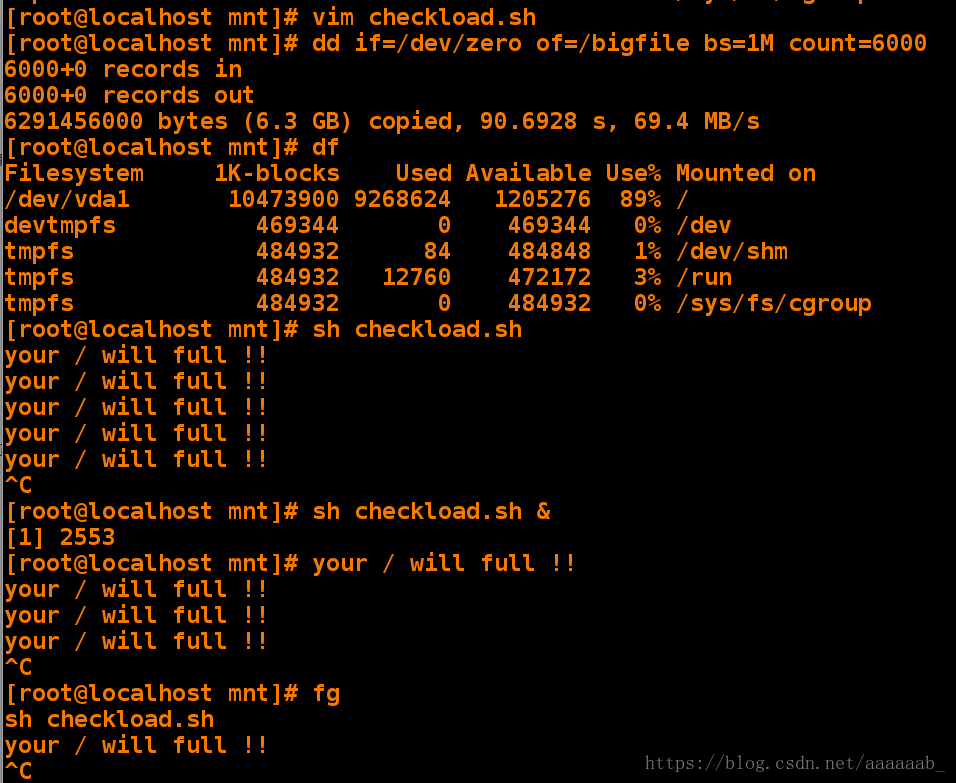
用发送邮件方式检测负载超过80%提示警告(while 语句)
[root@localhost mnt]# dd if=/dev/zero of=/bigfile bs=1M count=6000  截取命令保证负载超过80%来进行实验查看
6000+0 records in
6000+0 records out
6291456000 bytes (6.3 GB) copied, 90.6928 s, 69.4 MB/s
[root@localhost mnt]# df   查看负载已经超过80%
Filesystem     1K-blocks    Used Available Use% Mounted on
/dev/vda1       10473900 9268624   1205276  89% /
devtmpfs          469344       0    469344   0% /dev
tmpfs             484932      84    484848   1% /dev/shm
tmpfs             484932   12760    472172   3% /run
tmpfs             484932       0    484932   0% /sys/fs/cgroup
[root@localhost mnt]# vim checkload.sh   编写脚本
[root@localhost mnt]# sh checkload.sh &   在后台运行脚本
[1] 2769
[root@localhost mnt]# mail  查看邮件
Heirloom Mail version 12.5 7/5/10.  Type ? for help.
"/var/spool/mail/root": 2 messages 2 new
>N  1 root                  Tue Jun 19 23:29  18/619   "warning"
 N  2 root                  Tue Jun 19 23:29  18/619   "warning"
& q   退出
New mail has arrived.
Held 2 messages in /var/spool/mail/root
[root@localhost mnt]# mail  查看邮件每隔3秒就会以root用户身份发送一份邮件
Heirloom Mail version 12.5 7/5/10.  Type ? for help.
"/var/spool/mail/root": 9 messages 7 new 9 unread
 U  1 root                  Tue Jun 19 23:29  19/629   "warning"
 U  2 root                  Tue Jun 19 23:29  19/629   "warning"
>N  3 root                  Tue Jun 19 23:29  18/619   "warning"
 N  4 root                  Tue Jun 19 23:29  18/619   "warning"
 N  5 root                  Tue Jun 19 23:29  18/619   "warning"
 N  6 root                  Tue Jun 19 23:29  18/619   "warning"
 N  7 root                  Tue Jun 19 23:29  18/619   "warning"
 N  8 root                  Tue Jun 19 23:29  18/619   "warning"
 N  9 root                  Tue Jun 19 23:29  18/619   "warning"
& q
New mail has arrived.
Held 9 messages in /var/spool/mail/root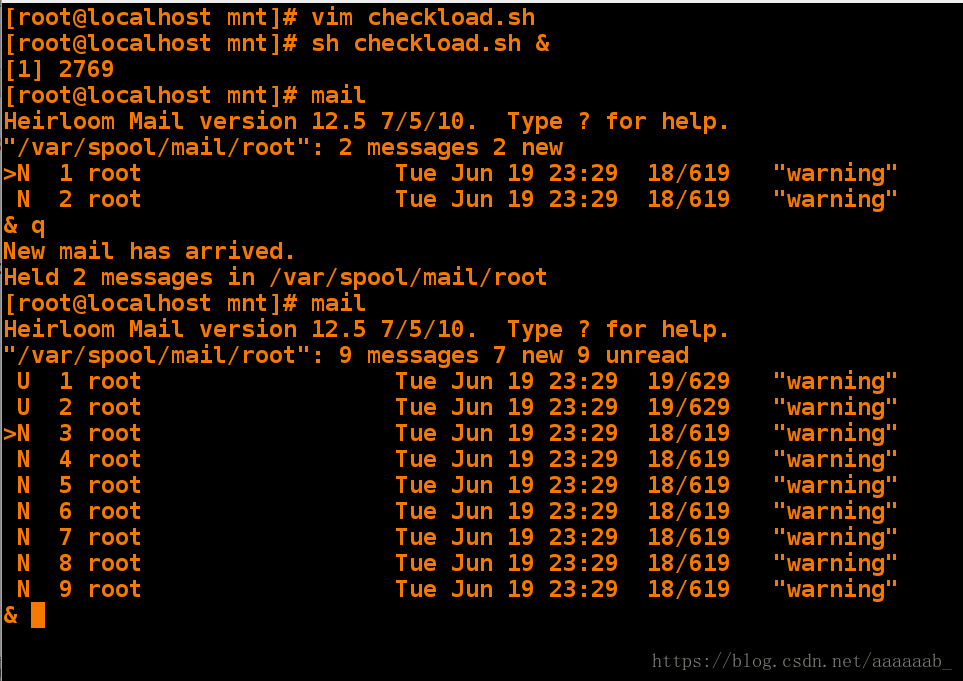
if语句:
简单的if脚本:
[root@localhost mnt]# vim if.sh 简单的if脚本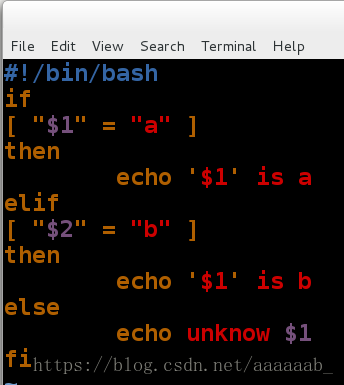
[root@localhost mnt]# sh if.sh   调用if脚本
unknow
[root@localhost mnt]# sh if.sh a
$1 is a
[root@localhost mnt]# sh if.sh b
$1 is b
[root@localhost mnt]# sh if.sh c
unknow c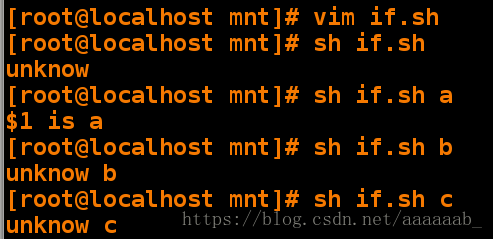
编写脚本用if判断文件是否存在并判断文件类型:
[root@localhost mnt]# vim check_file.sh 编写脚本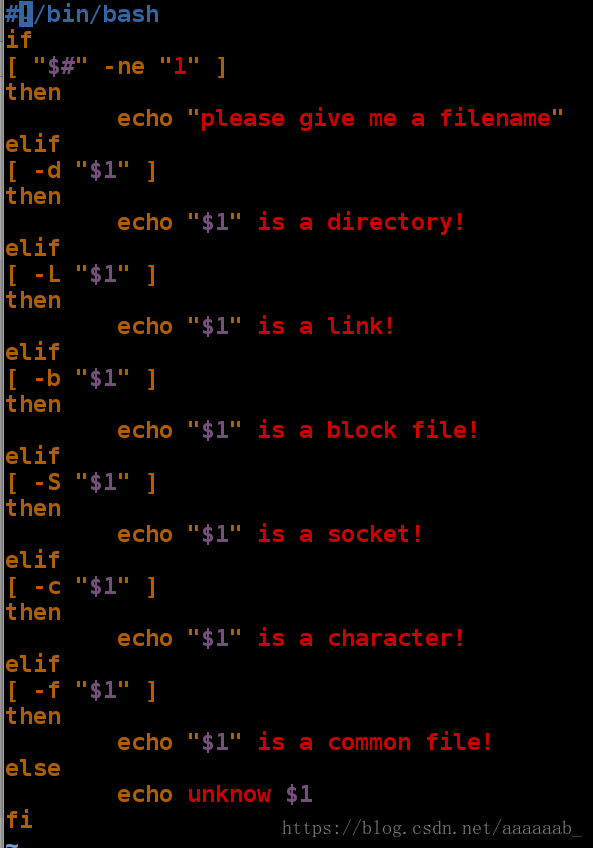
[root@localhost mnt]# sh check_file.sh /dev/vdb/   调用文件检测脚本功能
unknow /dev/vdb/
[root@localhost mnt]# sh check_file.sh /mnt/
/mnt/ is a directory!
[root@localhost mnt]# sh check_file.sh /dev/pts/1
unknow /dev/pts/1
[root@localhost mnt]# sh check_file.sh /dev/pts/
0     ptmx
[root@localhost mnt]# sh check_file.sh /dev/pts/0
/dev/pts/0 is a character!
编写脚本用if判断文件是否存在并判断文件类型:(用函数形式)
用函数可以将一些重复的代码进行简便,同时增加代码的可读性。
[root@localhost mnt]# vim check_file.sh 用函数编写检测文件类型脚本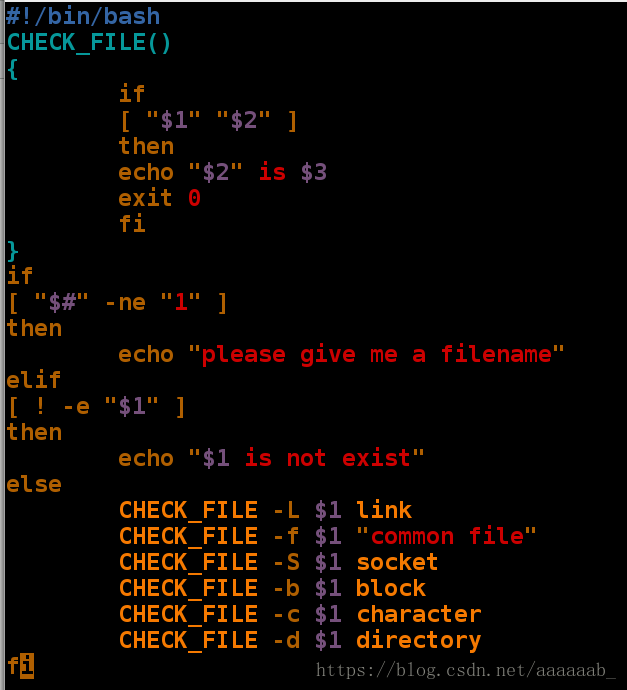
[root@localhost mnt]# sh check_file.sh    检测不给$1的功能
please give me a filename
[root@localhost mnt]# sh check_file.sh /mnt/gj   检测文件不存在的报错
/mnt/gj is not exist
[root@localhost mnt]# sh check_file.sh /etc/system-release  依次调用检测已有文件类型
/etc/system-release is link
[root@localhost mnt]# sh check_file.sh /dev/vdb1
/dev/vdb1 is block
[root@localhost mnt]# ls
check_file.sh  if.sh
[root@localhost mnt]# mkdir hello   建立目录
[root@localhost mnt]# sh check_file.sh /mnt/hello/   查看类型是否匹配
/mnt/hello/ is directory
[root@localhost mnt]# rm -fr hello/
[root@localhost mnt]# touch hello  建立文件
[root@localhost mnt]# sh check_file.sh /mnt/hello   查看类型是否匹配
/mnt/hello is common file
[root@localhost mnt]# sh check_file.sh /mnt/hello/
/mnt/hello/ is not exist
用if,then进行字符匹配:
[root@localhost mnt]# vim if.sh 编写脚本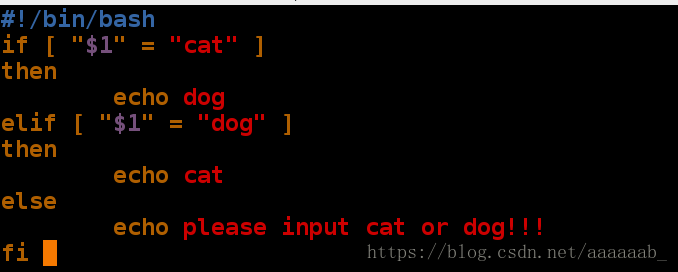
[root@localhost mnt]# sh if.sh    直接调用
please input cat or dog!!!
[root@localhost mnt]# sh if.sh may  错用调用
please input cat or dog!!!
[root@localhost mnt]# sh if.sh dog
cat
[root@localhost mnt]# sh if.sh cat
dog
[root@localhost mnt]# sh -x if.sh dog  检测运行效率,进行两次比较浪费cpu
+ '[' dog = cat ']'
+ '[' dog = dog ']'
+ echo cat
cat
[root@localhost mnt]# sh -x if.sh cat   检测运行效率,进行一次比较
+ '[' cat = cat ']'
+ echo dog
dog
[root@localhost mnt]# sh -x if.sh     空输入检测
+ '[' '' = cat ']'
+ '[' '' = dog ']'
+ echo please input cat or 'dog!!!'
please input cat or dog!!!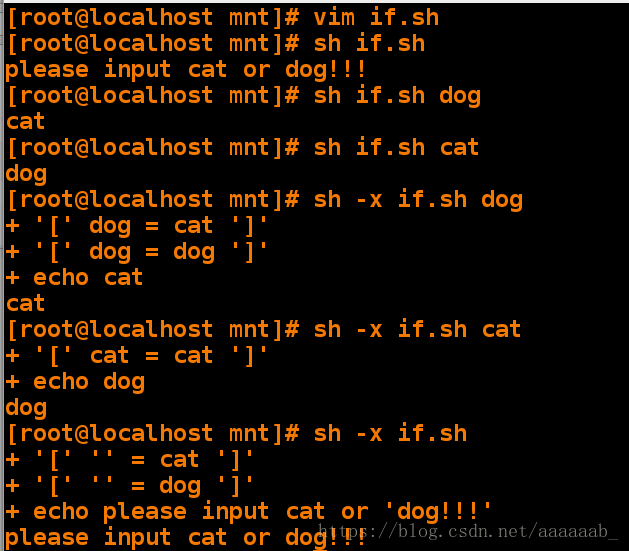
编写脚本智能建立用户,有如下要求:
1,文件数量不对报错。
2,文件不存在报错。
3,文件行数差异报错。
4,用户存在显示用户存在,但是不改变用户密码。
5,当用户不存在建立用户并设定相应密码。[root@localhost mnt]# vim user_create.sh 编写脚本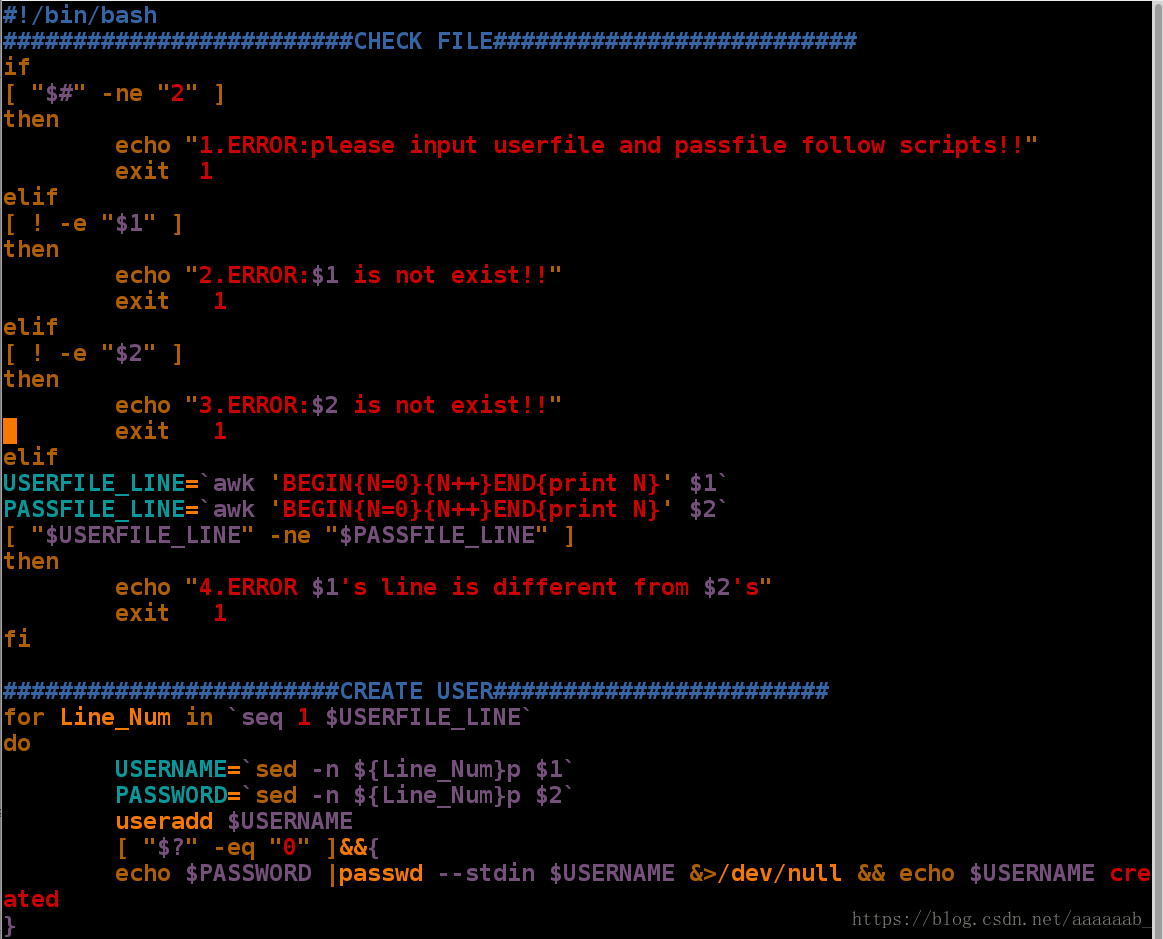
[root@localhost mnt]# sh user_create.sh   空调用脚本
1.ERROR:please input userfile and passfile follow scripts!!
[root@localhost mnt]# vim userfile   编辑用户文件
[root@localhost mnt]# cat userfile
xfl
[root@localhost mnt]# vim passfile  编辑密码文件
[root@localhost mnt]# cat passfile
123
[root@localhost mnt]# sh user_create.sh userfile
1.ERROR:please input userfile and passfile follow scripts!!
[root@localhost mnt]# sh user_create.sh userfile pass  错误调用
3.ERROR:pass is not exist!!
[root@localhost mnt]# sh user_create.sh userfile passfile    调用成功建立用户
xfl created
[root@localhost mnt]# sh user_create.sh userfile passfile   重复建立
useradd: user 'xfl' already exists
[root@localhost mnt]# userdel -r xfl   删除用户
[root@localhost mnt]# sh user_create.sh userfile passfile   重新建立
xfl created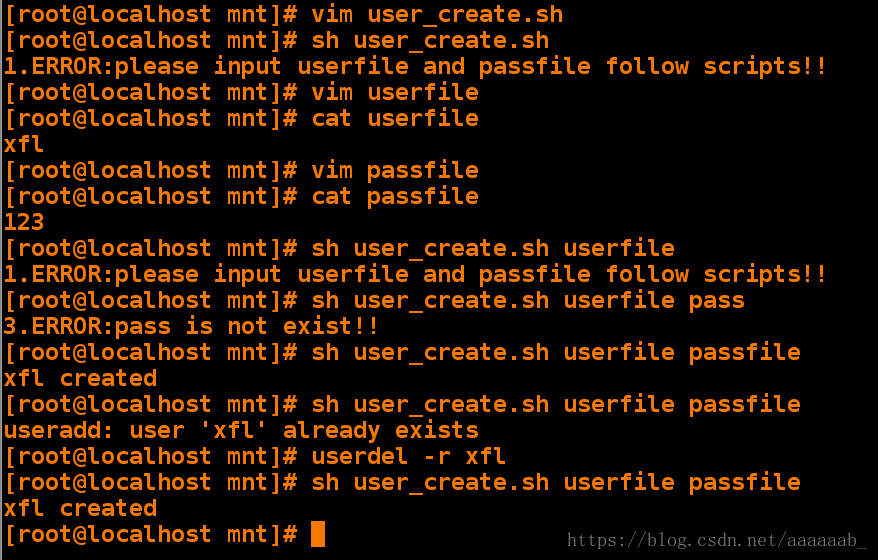
case语句:
用case语句进行字符匹配:
case语句好处就是能缩短输出所进行的比较,if语句是从上到下浪费cpu。
[root@localhost mnt]# vim case.sh 编写case脚本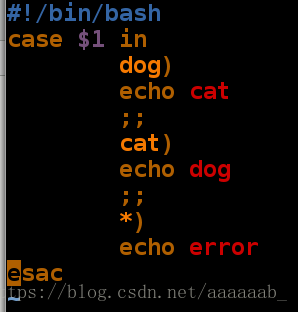
[root@localhost mnt]# sh case.sh   空输入调用
error
[root@localhost mnt]# sh case.sh dog  调用脚本检测
cat
[root@localhost mnt]# sh case.sh cat
dog
[root@localhost mnt]# sh case.sh pig  输入错误检测
error
[root@localhost mnt]# sh -x case.sh cat  每次只需要一次比较就可以得出输出结果
+ case $1 in
+ echo dog
dog
[root@localhost mnt]# sh -x case.sh dog
+ case $1 in
+ echo cat
cat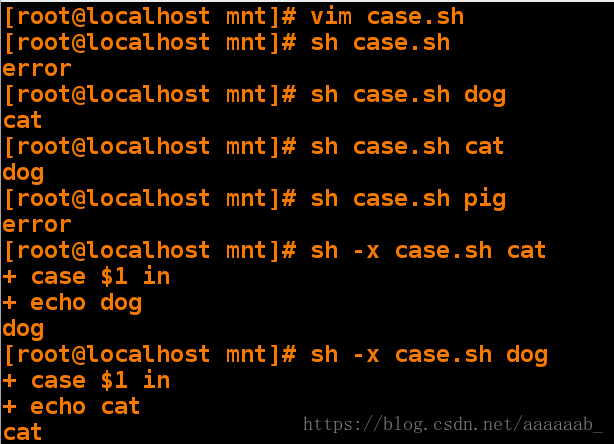
用case语句控制建立删除用户:
[root@localhost mnt]# vim user_create.sh 编写case脚本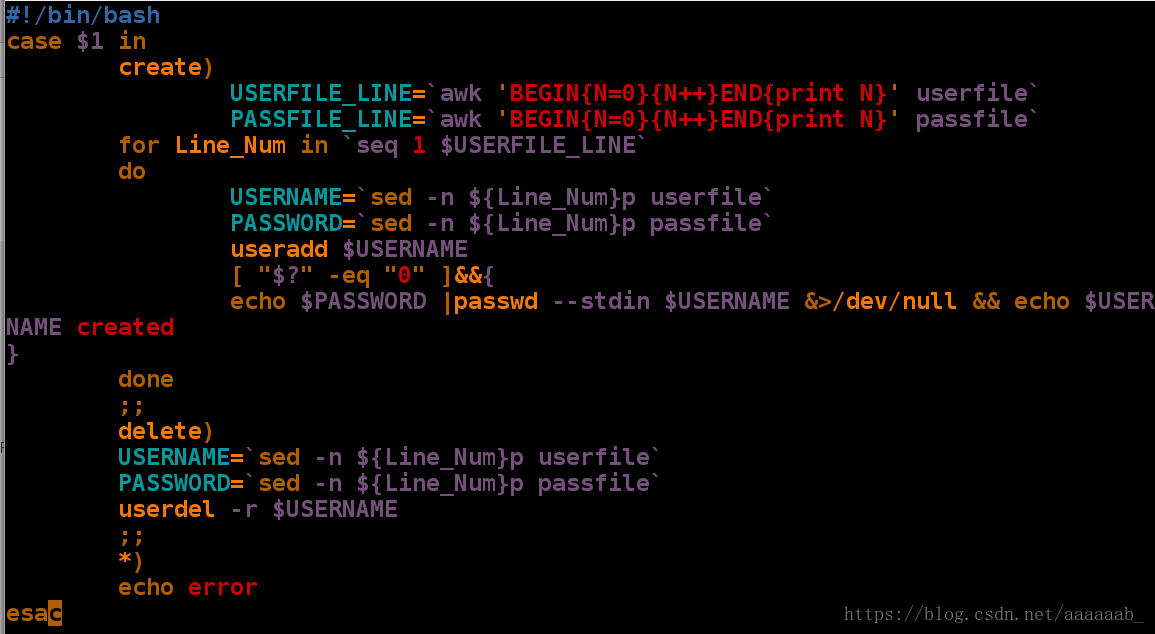
[root@localhost mnt]# sh user_create.sh create  调用创建用户功能
useradd: user 'xfl' already exists
[root@localhost mnt]# sh user_create.sh delete  调用删除用户功能
[root@localhost mnt]# sh user_create.sh create  再次调用创建用户
xfl created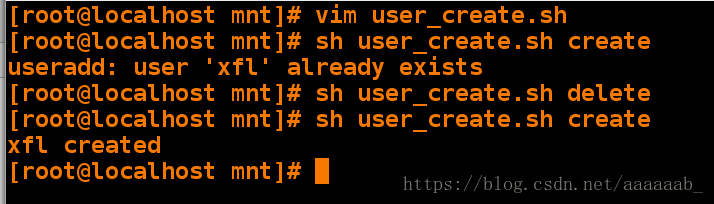
用脚本自动建立分区删除分区:
建立分区:
[root@localhost mnt]# fdisk /dev/vdb 首先查看分区
[root@localhost mnt]# vim if.sh 编辑脚本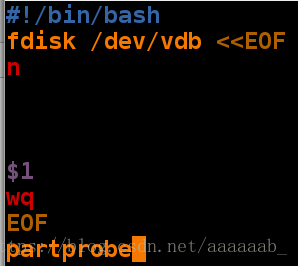
[root@localhost mnt]# sh if.sh +500M   调用脚本
[root@localhost mnt]# fdisk /dev/vdb  再次查看分区

   Device Boot      Start         End      Blocks   Id  System
/dev/vdb1            2048     1026047      512000   8e  Linux LVM
/dev/vdb2         1026048     2050047      512000   83  Linux
删除分区:
[root@localhost mnt]# vim if.sh 编辑脚本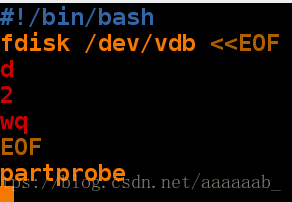
[root@localhost mnt]# sh if.sh 调用脚本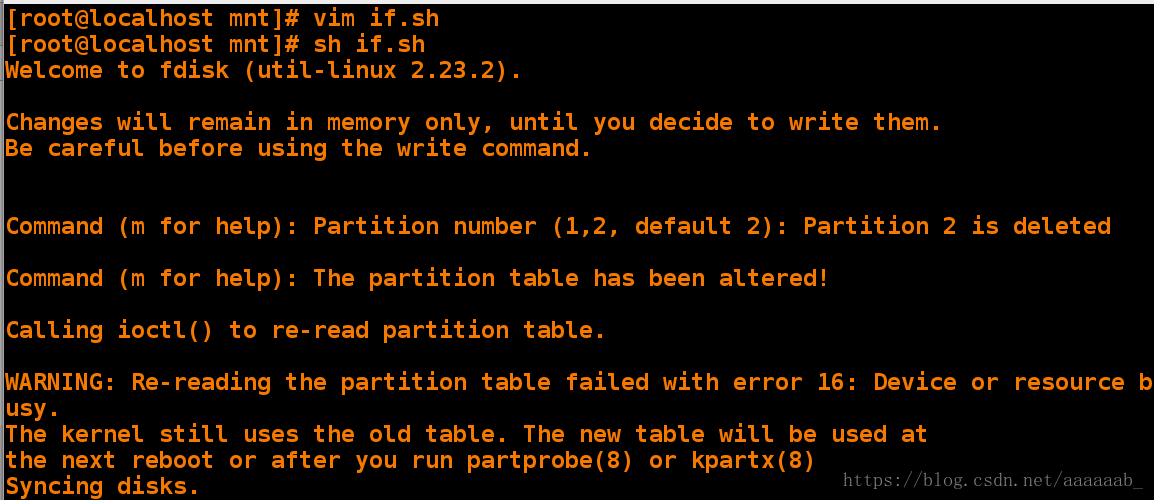
[root@localhost mnt]# fdisk /dev/vdb  查看分区


   Device Boot      Start         End      Blocks   Id  System
/dev/vdb1            2048     1026047      512000   8e  Linux LVM
expext是自动应答脚本:(解释器)
expect 是自动应答命令用于交互式命令的自动执行。
spawn是expect中的监控程序,其运行后会监控命令提出的交互问题。
send  发送问题答案给交互命令
"\r"  表示回车
exp_continue  标示当问题不存在时继续回答下面的问题
expect eof    标示问题回答完毕退出 expect 环境
interact      标示问题回答完毕留在交互界面
set NAME [ lindex $argv n ]     定义变量
简单的expect应答脚本:
read交互式脚本:
[root@localhost mnt]# vim ask.sh 编写脚本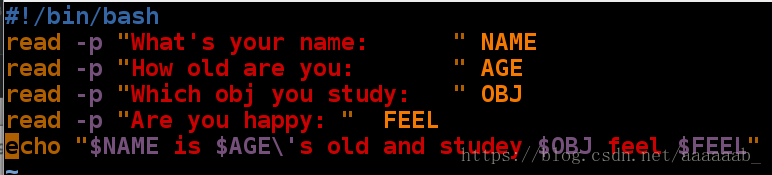
[root@localhost mnt]# chmod +x ask.sh   赋予执行权限
[root@localhost mnt]# /mnt/ask.sh  绝对路径调用
What's your name:   xuefeilong
How old are you:    20
Which obj you study:    yunwei
Are you happy:  happy
xuefeilong is 20\'s old and studey yunwei feel happy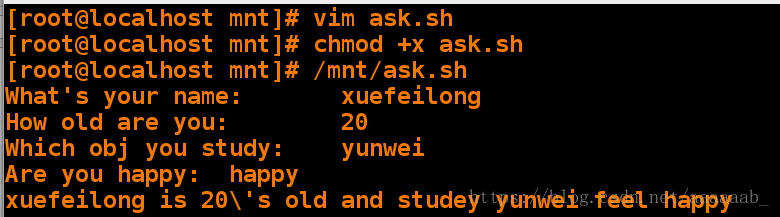
expect 是自动应答命令:
[root@localhost mnt]# vim answer.exp 编写expect脚本设置延时2s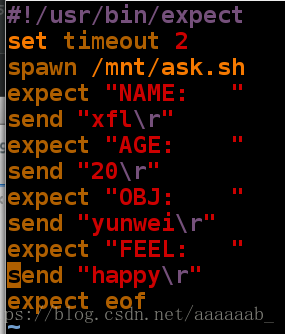
[root@localhost mnt]# expect answer.exp 调用脚本2s自动给出答案
spawn /mnt/ask.sh
What's your name:   xfl
How old are you:    20
Which obj you study:    yunwei
Are you happy:  happy
xfl is 20\'s old and studey yunwei feel happy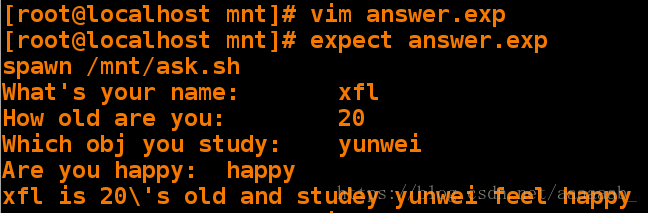
当问题不存在时继续使用answer.exp监控就会出错:
[root@localhost mnt]# vim ask.sh 编辑问题脚本注释一行 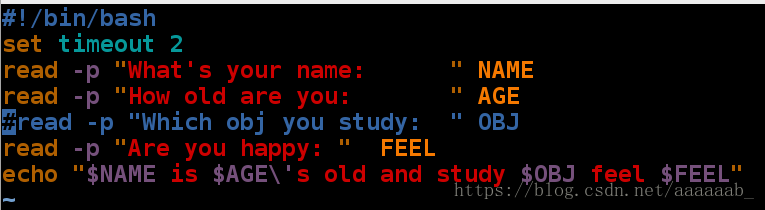
[root@localhost mnt]# sh ask.sh  调用问题脚本不会报错
What's your name:   xfl
How old are you:    20
Are you happy:  happy
xfl is 20\'s old and study  feel happy
[root@localhost mnt]# expect answer.exp  调用expect脚本会报错
spawn /mnt/ask.sh
What's your name:   xfl
How old are you:    20
Are you happy:  yunwei
xfl is 20\'s old and study  feel yunwei
send: spawn id exp4 not open
    while executing
"send "happy\r""
    (file "answer.exp" line 11)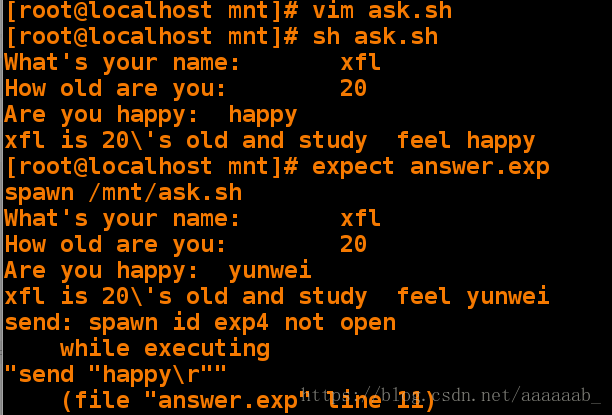
使用exp_continue命令当问题不存在时继续回答下面的问题:
[root@localhost mnt]# vim ask.sh 将问题脚本问题注释掉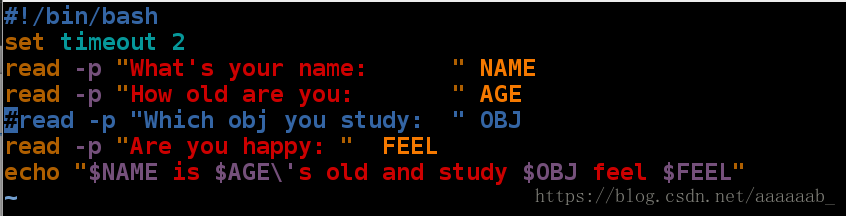
[root@localhost mnt]# vim answer.exp expect脚本里面必须写入问题脚本的关键字
[root@localhost mnt]# expect answer.exp  调用就不会出现问题
spawn /mnt/ask.sh
What's your name:   xfl
How old are you:    20
Are you happy:  happy
xfl is 20\'s old and study  feel happy  自动跳过study问题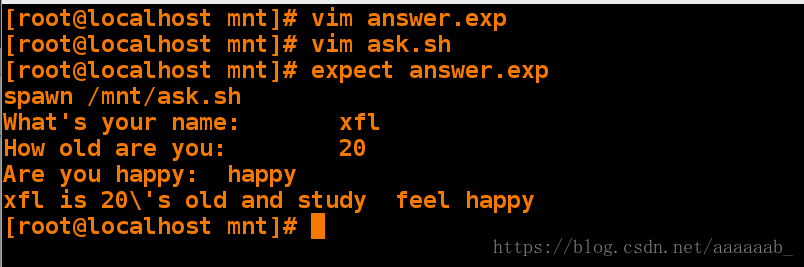
自主调用问题答案:
[root@localhost mnt]# vim ask.sh 编辑问题脚本
[root@localhost mnt]# vim answer.sh 编辑expect脚本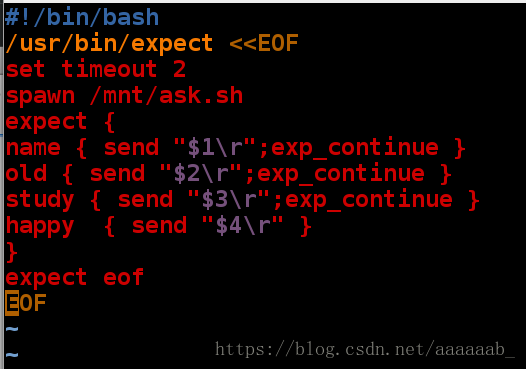
[root@localhost mnt]# sh answer.sh xfl 20 westos happy  根据调用自动配置答案
spawn /mnt/ask.sh
What's your name:   xfl
How old are you:    20
Which obj you study:    westos
Are you happy:  happy
xfl is 20\'s old and study westos feel happy
[root@localhost mnt]# sh answer.sh xyy 21 linux sad
spawn /mnt/ask.sh
What's your name:   xyy
How old are you:    21
Which obj you study:    linux
Are you happy:  sad
xyy is 21\'s old and study linux feel sad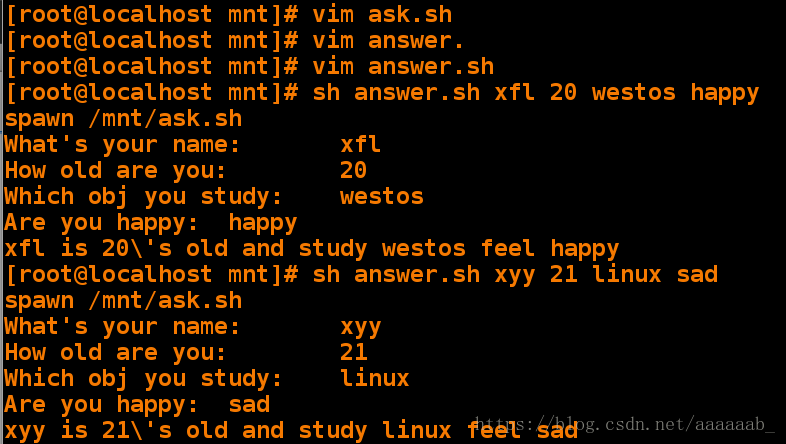
编写脚本1,直接登录设备:
[root@localhost mnt]# yum install expect -y  安装expect解释器
Loaded plugins: langpacks
Package expect-5.45-12.el7.x86_64 already installed and latest version
Nothing to do
[root@localhost mnt]# vim ssh.exp 编写脚本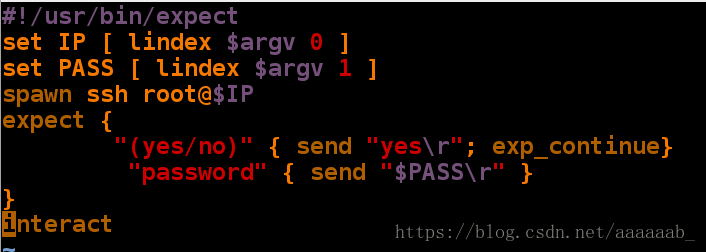
[root@localhost mnt]# expect ssh.exp 172.25.254.84 westos  调用脚本加入ip,密码
spawn ssh root@172.25.254.84
root@172.25.254.84's password:
Last login: Tue Jun 26 14:39:05 2018
ABRT has detected 1 problem(s). For more info run: abrt-cli list --since 1529995145
[root@foundation84 ~]# exit   退出
logout
Connection to 172.25.254.84 closed.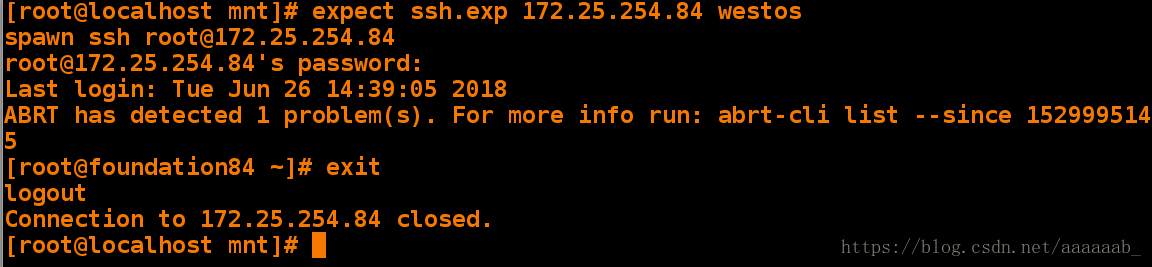
编写脚本2,直接登录设备:
[root@localhost mnt]# vim autoconnection.sh 编写脚本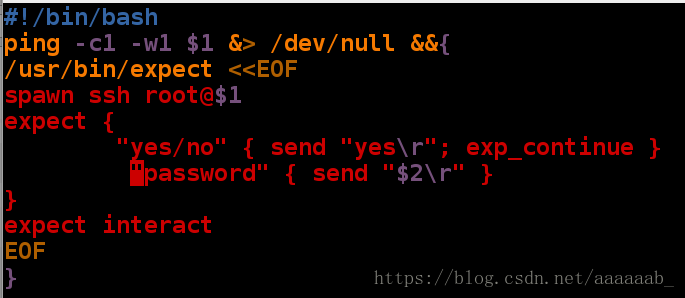
[root@localhost mnt]# sh autoconnection.sh 172.25.254.84 westos  用IP和密码调用
spawn ssh root@172.25.254.84
root@172.25.254.84's password:
Last login: Wed Jun 27 13:40:57 2018 from 172.25.254.121
[root@foundation84 ~]# exit  自动登陆设备
[root@localhost mnt]# exit
logout
Connection to 172.25.254.121 closed.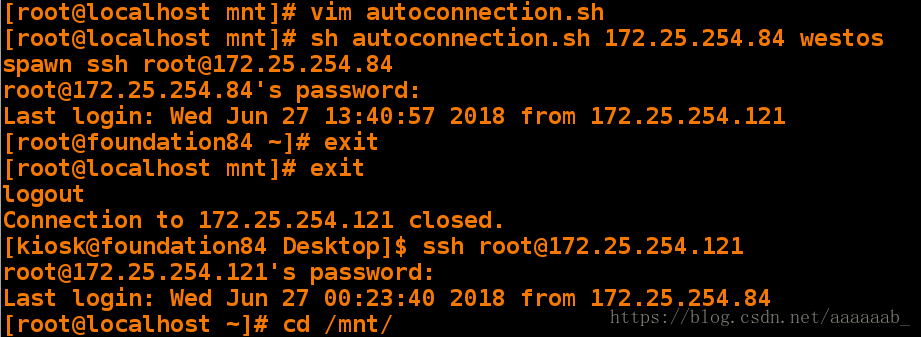
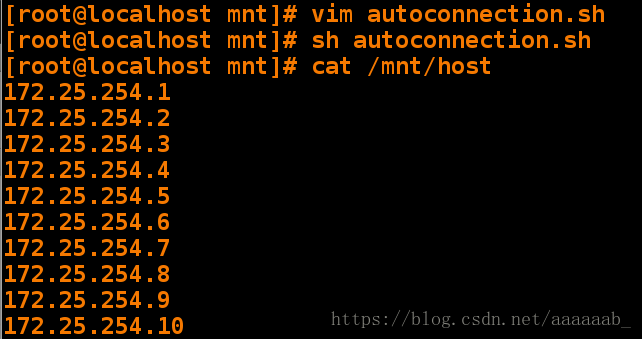
查看可以登陆的IP:
[root@localhost mnt]# vim autoconnection.sh 编写脚本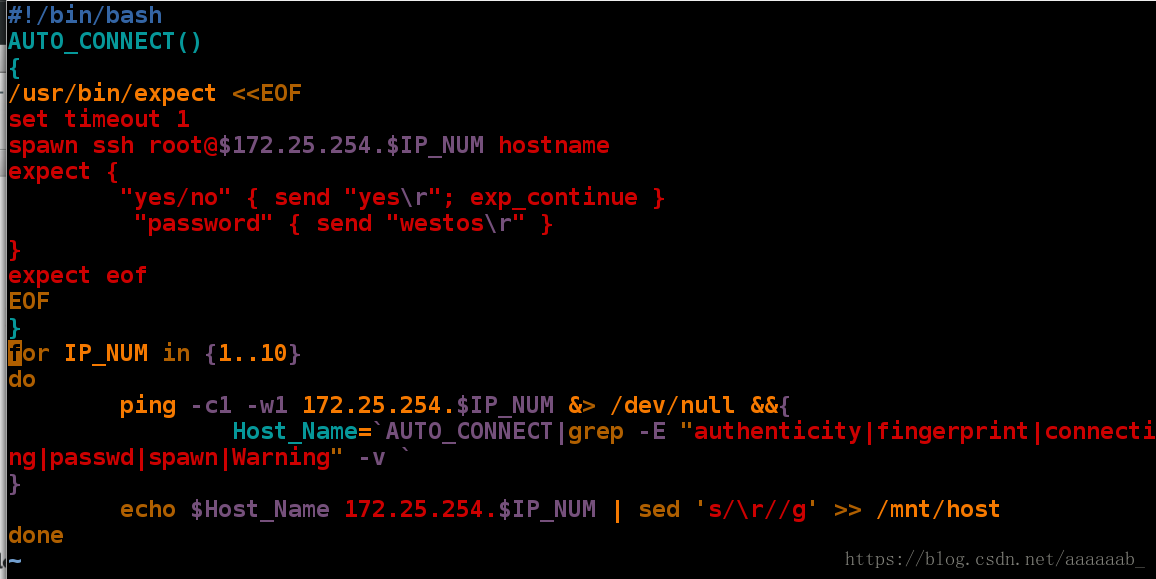
[root@localhost mnt]# sh autoconnection.sh  调用脚本
[root@localhost mnt]# cat /mnt/host  查看
172.25.254.1
172.25.254.2
172.25.254.3
172.25.254.4
172.25.254.5
172.25.254.6
172.25.254.7
172.25.254.8
172.25.254.9
172.25.254.10