此篇博客篇幅较长,请耐心阅读,可能我文笔不太好,但是请仔细看博客中的代码的注释和说明,这样能帮助你理解。有什么问题可以回复。
直接进入正题,在使用Spring时,我们经常要进行大量的配置来告诉Spring,我们需要什么样的功能。但是配置文件又是怎么被Spring解析变成Spring所需要的东西呢。
Spring中有一个接口类,名叫BeanDefinition,配置文件中的<bean>标签中有着class,scope,而BeanDefinition提供了相应的beanClass,scope属性,BeanDefinition中的属性和<bean>中的属性是一一对应的。
抠张图来看看BeanDefinition的种类以及他们之间的关系
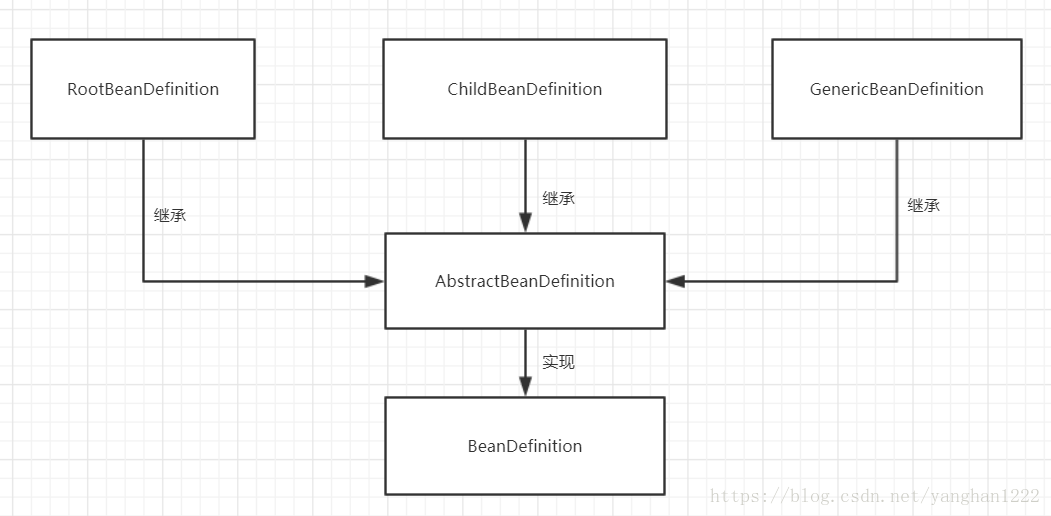
图1
在Spring解析配置文件时,配置文件中的信息会转换为BeanDefinition存在于内存中。
接下来我们用一个小例子来逐步的进行阅读源码
@Test
public void run(){
ApplicationContext context =
new ClassPathXmlApplicationContext("classpath:applicationContext.xml");
UserService bean = (UserService) context.getBean("userServiceImpl");
bean.sayHello();
}
配置文件如下
<!--加载配置文件-->
    <context:property-placeholder location="classpath:db.properties" />
    <!--配置数据库连接池-->
    <bean id="dataSource" class="com.alibaba.druid.pool.DruidDataSource"
          destroy-method="close">
        <property name="driverClassName" value="${jdbc.driver}" />
        <property name="url" value="${jdbc.url}" />
        <property name="username" value="${jdbc.username}" />
        <property name="password" value="${jdbc.password}" />
        <property name="maxActive" value="10" />
    </bean>
    <!--SqlSessionFactory-->
    <bean id="sqlSessionFactory" class="org.mybatis.spring.SqlSessionFactoryBean">
        <property name="dataSource" ref="dataSource"/>
        <property name="configLocation" value="classpath:SqlMapConfig.xml"/>
        <property name="typeAliasesPackage" value="demo"/>
        <property name="mapperLocations" value="UserMapper.xml"/>
    </bean>
    <!--Mapper文件扫描-->
    <bean class="org.mybatis.spring.mapper.MapperScannerConfigurer">
        <property name="basePackage" value="mapper"/>
    </bean>
    <context:component-scan base-package="service"/>
配置文件图2
接下来让我们Debug来逐步去看Spring是如何解析配置文件的。
public ClassPathXmlApplicationContext(String[] configLocations, boolean refresh, ApplicationContext parent) throws BeansException {
        super(parent);
        //将传入的配置文件名作为属性赋值给成员变量
        this.setConfigLocations(configLocations);
        if (refresh) {
            //Spring一切的开始
            this.refresh();
        }
}
进入到refresh方法中一探究竟
public void refresh() throws BeansException, IllegalStateException {
        Object var1 = this.startupShutdownMonitor;
        synchronized(this.startupShutdownMonitor) {
            //准备刷新的上下文环境,如你只是使用Spring,你可以不用理会这个方法
            this.prepareRefresh();
            //OK,这个方法就是解析XML文件的方法,当这个方法执行完时,XML文件已经解析完了
            ConfigurableListableBeanFactory beanFactory = this.obtainFreshBeanFactory();
            this.prepareBeanFactory(beanFactory);

            try {
                this.postProcessBeanFactory(beanFactory);
                this.invokeBeanFactoryPostProcessors(beanFactory);
                this.registerBeanPostProcessors(beanFactory);
                this.initMessageSource();
                this.initApplicationEventMulticaster();
                this.onRefresh();
                this.registerListeners();
                //初始化剩下实例,也就是我们自己写的那些代码,Service,Controller等等
                this.finishBeanFactoryInitialization(beanFactory);
                this.finishRefresh();
            } catch (BeansException var9) {
                if (this.logger.isWarnEnabled()) {
                    this.logger.warn("Exception encountered during context initialization - cancelling refresh attempt: " + var9);
                }
                this.destroyBeans();
                this.cancelRefresh(var9);
                throw var9;
            } finally {
                this.resetCommonCaches();
            }
        }
    }
如果你要想看Spring解析配置文件的步骤,只需要看
ConfigurableListableBeanFactory beanFactory = this.obtainFreshBeanFactory();这一行代码就足够了。让我们一起来挑一些重要的方法来看吧。protected ConfigurableListableBeanFactory obtainFreshBeanFactory() {
//初始化BeanFactory,并进行读取XML文件,并将XML内容转换为BeanDefintion对象存储
this.refreshBeanFactory();
//返回当前实体的beanFactory属性
ConfigurableListableBeanFactory beanFactory = this.getBeanFactory();
if (this.logger.isDebugEnabled()) {
this.logger.debug("Bean factory for " + this.getDisplayName() + ": " + beanFactory);
}
return beanFactory;
}在这个方法中,我们只能看到又调用了refreshBeanFactory方法,所以我们继续往下看
protected final void refreshBeanFactory() throws BeansException {
        if (this.hasBeanFactory()) {
            this.destroyBeans();
            this.closeBeanFactory();
        }
        try {
            //创建DefaultListableBeanFactory对象
            DefaultListableBeanFactory beanFactory = this.createBeanFactory();
            beanFactory.setSerializationId(this.getId());
            this.customizeBeanFactory(beanFactory);
            //初始化DocumentReader,准备解析XML文件
            this.loadBeanDefinitions(beanFactory);
            Object var2 = this.beanFactoryMonitor;
            synchronized(this.beanFactoryMonitor) {
                this.beanFactory = beanFactory;
            }
        } catch (IOException var5) {
            throw new ApplicationContextException("I/O error parsing bean definition source for " + this.getDisplayName(), var5);
        }
    }
可以看到,我们还是没有找到解析XML文件的地方,但是在这里注意两点,DefaultListableBeanFactory对象是整个bean加载的核心部分,是Spring注册及加载Bean的默认实现,也就是说,我们从XML读取到的信息转换为BeanDefintion之后都注册到这个对象之中。
接下来进入loadBeanDefinitions方法之后继续追寻
    protected void loadBeanDefinitions(DefaultListableBeanFactory beanFactory) throws BeansException, IOException {
        //以beanFactory为参数创建XmlBeanDefinitionReader对象
        XmlBeanDefinitionReader beanDefinitionReader = new XmlBeanDefinitionReader(beanFactory);
        beanDefinitionReader.setEnvironment(this.getEnvironment());
        //设置环境变量
        beanDefinitionReader.setResourceLoader(this);
        beanDefinitionReader.setEntityResolver(new ResourceEntityResolver(this));
        this.initBeanDefinitionReader(beanDefinitionReader);
        //解析XML文件(怎么还没到解析XML,好烦啊)
        this.loadBeanDefinitions(beanDefinitionReader);
    }
进入loadBeanDefinitions(XmlBeanDefinitionReader reader)方法继续寻找
protected void loadBeanDefinitions(XmlBeanDefinitionReader reader) throws BeansException, IOException {
        Resource[] configResources = this.getConfigResources();
        if (configResources != null) {
            reader.loadBeanDefinitions(configResources);
        }
        //获取配置文件名
        String[] configLocations = this.getConfigLocations();
        if (configLocations != null) {

            //好,离真正解析XML的方法又近了一步
            reader.loadBeanDefinitions(configLocations);
        }

    }
还是没有看到XML的解析,不过我们又近了一步,不急嘛,肯定会到的。继续深入查看reader.loadBeanDefinitions(configLocations);
    public int loadBeanDefinitions(String... locations) throws BeanDefinitionStoreException {
        Assert.notNull(locations, "Location array must not be null");
        int counter = 0;
        String[] var3 = locations;
        int var4 = locations.length;
        for(int var5 = 0; var5 < var4; ++var5) {
            String location = var3[var5];
            //哎,又近了一步
            counter += this.loadBeanDefinitions(location);
        }
        return counter;
    }
对,没错,我们又近了一步
public int loadBeanDefinitions(String location, Set<Resource> actualResources) throws BeanDefinitionStoreException {
        //加载XML文件用的
        ResourceLoader resourceLoader = this.getResourceLoader();
        if (resourceLoader == null) {
            throw new BeanDefinitionStoreException("Cannot import bean definitions from location [" + location + "]: no ResourceLoader available");
        } else {
            int loadCount;
            if (!(resourceLoader instanceof ResourcePatternResolver)) {
                Resource resource = resourceLoader.getResource(location);
                loadCount = this.loadBeanDefinitions((Resource)resource);
                if (actualResources != null) {
                    actualResources.add(resource);
                }
                if (this.logger.isDebugEnabled()) {
                    this.logger.debug("Loaded " + loadCount + " bean definitions from location [" + location + "]");
                }
                return loadCount;
            } else {
                try {
                    //获取配置文件的Resource数组
                    Resource[] resources = ((ResourcePatternResolver)resourceLoader).getResources(location);
                    //感觉有戏了,应该快到了
                    loadCount = this.loadBeanDefinitions(resources);
                    if (actualResources != null) {
                        Resource[] var6 = resources;
                        int var7 = resources.length;

                        for(int var8 = 0; var8 < var7; ++var8) {
                            Resource resource = var6[var8];
                            actualResources.add(resource);
                        }
                    }
                    if (this.logger.isDebugEnabled()) {
                        this.logger.debug("Loaded " + loadCount + " bean definitions from location pattern [" + location + "]");
                    }
                    return loadCount;
                } catch (IOException var10) {
                    throw new BeanDefinitionStoreException("Could not resolve bean definition resource pattern [" + location + "]", var10);
                }
            }
        }
    }
OK,好像有点看头了,现在得到了一个Reource数组,然后加载这个数组,我们再继续往下看
 public int loadBeanDefinitions(Resource... resources) throws BeanDefinitionStoreException {
        Assert.notNull(resources, "Resource array must not be null");
        int counter = 0;
        Resource[] var3 = resources;
        int var4 = resources.length;
        for(int var5 = 0; var5 < var4; ++var5) {
            Resource resource = var3[var5];
            //OK,我们又近了一步
            counter += this.loadBeanDefinitions((Resource)resource);
        }
        return counter;
    }
可以看到,将传入的Resource数组进行遍历,其实我们就传入了一个文件名,所以在这里,循环是没有什么多余的作用。好吧,又近了一步,继续往下看
public int loadBeanDefinitions(EncodedResource encodedResource) throws BeanDefinitionStoreException {
        if (this.logger.isInfoEnabled()) {
            this.logger.info("Loading XML bean definitions from " + encodedResource.getResource());
        }
        Set<EncodedResource> currentResources = (Set)this.resourcesCurrentlyBeingLoaded.get();
        if (currentResources == null) {
            currentResources = new HashSet(4);
            this.resourcesCurrentlyBeingLoaded.set(currentResources);
        }
        if (!((Set)currentResources).add(encodedResource)) {
            throw new BeanDefinitionStoreException("Detected cyclic loading of " + encodedResource + " - check your import definitions!");
        } else {
            int var5;
            try {
                InputStream inputStream = encodedResource.getResource().getInputStream();
                try {
                    InputSource inputSource = new InputSource(inputStream);
                    if (encodedResource.getEncoding() != null) {
                        inputSource.setEncoding(encodedResource.getEncoding());
                    }
                    //哇塞,以do开头了哎,好像真的要解析XML了哎
                    var5 = this.doLoadBeanDefinitions(inputSource, encodedResource.getResource());
                } finally {
                    inputStream.close();
                }
            } catch (IOException var15) {
                throw new BeanDefinitionStoreException("IOException parsing XML document from " + encodedResource.getResource(), var15);
            } finally {
                ((Set)currentResources).remove(encodedResource);
                if (((Set)currentResources).isEmpty()) {
                    this.resourcesCurrentlyBeingLoaded.remove();
                }
            }
            return var5;
        }
    }
OK,我们好像找到了解析XML的入口,让我们在继续往下看
protected int doLoadBeanDefinitions(InputSource inputSource, Resource resource) throws BeanDefinitionStoreException {
        try {
            Document doc = this.doLoadDocument(inputSource, resource);
            return this.registerBeanDefinitions(doc, resource);
        }
真是令人兴奋,看到Docment了,这不就是要看是进行解析XML了嘛,恢复平静,继续往下看。

OK,XML的第一行被读出来了
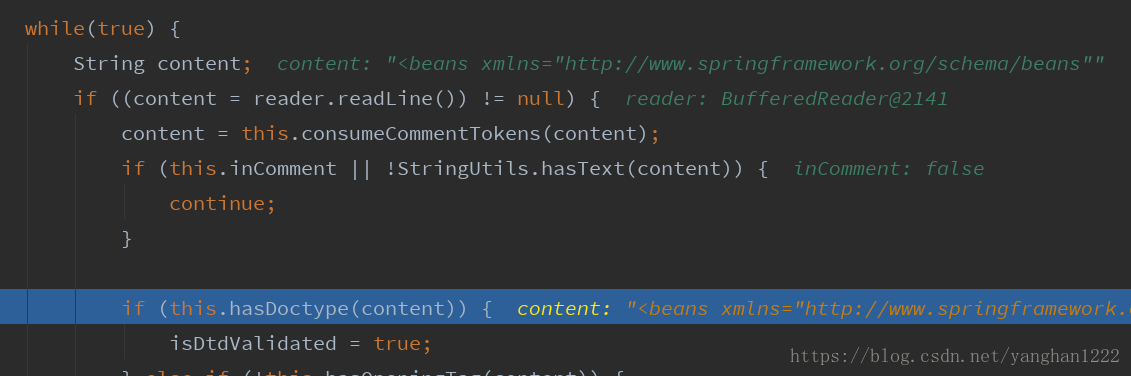
OK,第二行也被读出来了,获取XML的验证模式,是DTD还是XSD,获取完之后,继续往下看,这里间隔稍微有点大,因为中间都是方法的调用,我就直接跳过了,直接来到类DefaultDocumentLoader的loadDocument方法
public Document loadDocument(InputSource inputSource, EntityResolver entityResolver, ErrorHandler errorHandler, int validationMode, boolean namespaceAware) throws Exception {
        DocumentBuilderFactory factory = this.createDocumentBuilderFactory(validationMode, namespaceAware);
        if (logger.isDebugEnabled()) {
            logger.debug("Using JAXP provider [" + factory.getClass().getName() + "]");
        }
        //创建DocumentBuilder对象,来进行XML的解析
        DocumentBuilder builder = this.createDocumentBuilder(factory, entityResolver, errorHandler);
        return builder.parse(inputSource);
    }
刚才并不是真正的解析XML,而是在获取XML文件的验证模式(DTD还是XSD)
protected int doLoadBeanDefinitions(InputSource inputSource, Resource resource) throws BeanDefinitionStoreException {
        try {
            Document doc = this.doLoadDocument(inputSource, resource);
            //又近了一步
            return this.registerBeanDefinitions(doc, resource);
        }
不要灰心,肯定会到的
public int registerBeanDefinitions(Document doc, Resource resource) throws BeanDefinitionStoreException {
        BeanDefinitionDocumentReader documentReader = this.createBeanDefinitionDocumentReader();
        int countBefore = this.getRegistry().getBeanDefinitionCount();
        //看到这里,终于松了一口气
        documentReader.registerBeanDefinitions(doc, this.createReaderContext(resource));
        return this.getRegistry().getBeanDefinitionCount() - countBefore;
    }
这个看到,这个方法是注册BeanDfinition,说明XML真的要解析了
public void registerBeanDefinitions(Document doc, XmlReaderContext readerContext) {
        this.readerContext = readerContext;
        this.logger.debug("Loading bean definitions");
        //根节点,也就是beans节点
        Element root = doc.getDocumentElement();
        //以do开头,说明有动作了
        this.doRegisterBeanDefinitions(root);
    }
终于有点成果了,进入doRegisterBeanDefinitions方法详细看
protected void doRegisterBeanDefinitions(Element root) {
        BeanDefinitionParserDelegate parent = this.delegate;
        this.delegate = this.createDelegate(this.getReaderContext(), root, parent);
        if (this.delegate.isDefaultNamespace(root)) {
            //首先检测配置文件有没有profile标签
            String profileSpec = root.getAttribute("profile");
            if (StringUtils.hasText(profileSpec)) {
                String[] specifiedProfiles = StringUtils.tokenizeToStringArray(profileSpec, ",; ");
                if (!this.getReaderContext().getEnvironment().acceptsProfiles(specifiedProfiles)) {
                    if (this.logger.isInfoEnabled()) {
                        this.logger.info("Skipped XML bean definition file due to specified profiles [" + profileSpec + "] not matching: " + this.getReaderContext().getResource());
                    }

                    return;
                }
            }
        }
        //解析XML啦
        this.preProcessXml(root);
        this.parseBeanDefinitions(root, this.delegate);
        this.postProcessXml(root);
        this.delegate = parent;
    }
在上述代码可以看到,解析首先查看XML有没有profile标签,没有则继续解析下面的内容
protected void parseBeanDefinitions(Element root, BeanDefinitionParserDelegate delegate) {
        if (delegate.isDefaultNamespace(root)) {
            NodeList nl = root.getChildNodes();
            //遍历根标签的子标签
            for(int i = 0; i < nl.getLength(); ++i) {
                Node node = nl.item(i);
                if (node instanceof Element) {
                    Element ele = (Element)node;
                    //默认标签解析的方法
                    if (delegate.isDefaultNamespace(ele)) {
                        this.parseDefaultElement(ele, delegate);
                    } else {
                        //自定义标签的解析方法
                        delegate.parseCustomElement(ele);
                    }
                }
            }
        } else {
            delegate.parseCustomElement(root);
        }

    }
什么是默认标签呢,什么又是自定义标签呢
默认标签就是形如<bean>标签这一类的标签,而自定义标签就是<context:property-placeholder location="classpath:db.properties" />这种的标签,两种标签的解析有差异
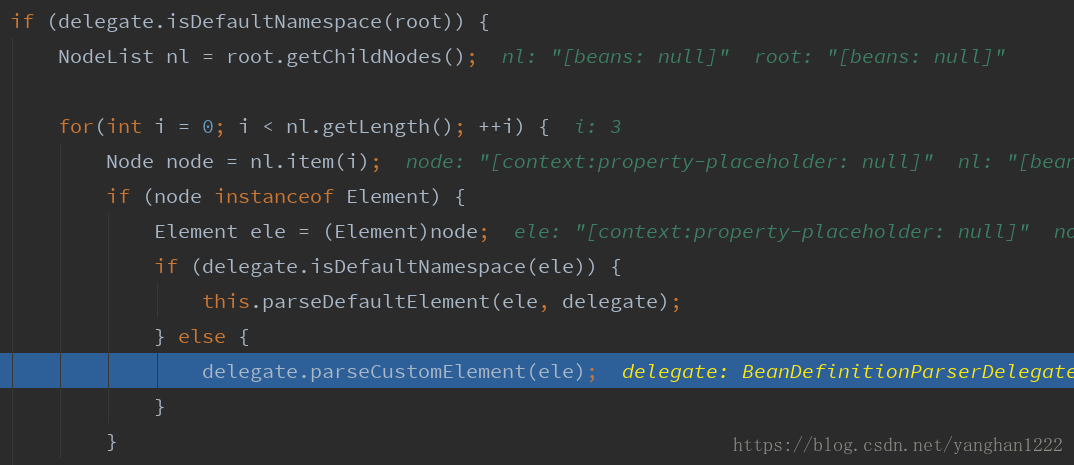
遇到的第一行为<context:property-placeholder location="classpath:db.properties" />,可以看到,这明显不是默认标签,而是自定义标签,所以走else的分支,继续看parseCustomElement方法

这个方法首先获取解析这个标签的uri,也就是

就是这个uri,然后获取这个标签的处理器

这个处理包含这个标签所有的属性,接下来就会去寻找这些属性,并完成这个标签的解析
private BeanDefinitionParser findParserForElement(Element element, ParserContext parserContext) {
        //获取标签的属性
        String localName = parserContext.getDelegate().getLocalName(element);
        //这个是这个标签的所有属性的集合
        BeanDefinitionParser parser = (BeanDefinitionParser)this.parsers.get(localName);
        if (parser == null) {
            parserContext.getReaderContext().fatal("Cannot locate BeanDefinitionParser for element [" + localName + "]", element);
        }

        return parser;
    }
贴上上面两个属性的具体表示

可以看到,localName就是context:后面的字符串
public BeanDefinition parse(Element element, ParserContext parserContext) {
        //进入到parse方法
        return this.findParserForElement(element, parserContext).parse(element, parserContext);
    }
调用了parse方法,我们继续往下看
protected final AbstractBeanDefinition parseInternal(Element element, ParserContext parserContext) {
        BeanDefinitionBuilder builder = BeanDefinitionBuilder.genericBeanDefinition();
        String parentName = this.getParentName(element);
        if (parentName != null) {
            builder.getRawBeanDefinition().setParentName(parentName);
        }
        //设置属性,也就是类
        //org.springframework.context.support.PropertySourcesPlaceholderConfigurer
        Class<?> beanClass = this.getBeanClass(element);
        if (beanClass != null) {
            builder.getRawBeanDefinition().setBeanClass(beanClass);
        } else {
            String beanClassName = this.getBeanClassName(element);
            if (beanClassName != null) {
                builder.getRawBeanDefinition().setBeanClassName(beanClassName);
            }
        }
        //设置属性
        builder.getRawBeanDefinition().setSource(parserContext.extractSource(element));
        if (parserContext.isNested()) {
            builder.setScope(parserContext.getContainingBeanDefinition().getScope());
        }
        if (parserContext.isDefaultLazyInit()) {
            builder.setLazyInit(true);
        }
        //继续进行解析
        this.doParse(element, parserContext, builder);
        return builder.getBeanDefinition();
    }
可以看到,在这个方法中,首先获取了BeanDefinitionBuilder对象,从名称都可以看出来,这个对象是用来构建BeanDefinition对象的,然后为这个BeanDefinition设置属性,beanClass和source,然后调用doParse继续解析
protected void doParse(Element element, ParserContext parserContext, BeanDefinitionBuilder builder) {
        //首先调用父类的doParse方法
        super.doParse(element, parserContext, builder);
        builder.addPropertyValue("ignoreUnresolvablePlaceholders", Boolean.valueOf(element.getAttribute("ignore-unresolvable")));
        //这行代码之下,可以看到,都是去寻找这个标签是否有这些属性,从我们的配置可以看到,其实我
       们并没有配置这么多的属性
        String systemPropertiesModeName = element.getAttribute("system-properties-mode");
        if (StringUtils.hasLength(systemPropertiesModeName) && !systemPropertiesModeName.equals("ENVIRONMENT")) {
            builder.addPropertyValue("systemPropertiesModeName", "SYSTEM_PROPERTIES_MODE_" + systemPropertiesModeName);
        }
        if (element.hasAttribute("value-separator")) {
            builder.addPropertyValue("valueSeparator", element.getAttribute("value-separator"));
        }
        if (element.hasAttribute("trim-values")) {
            builder.addPropertyValue("trimValues", element.getAttribute("trim-values"));
        }
        if (element.hasAttribute("null-value")) {
            builder.addPropertyValue("nullValue", element.getAttribute("null-value"));
        }
    }
在这个方法中,我们现在只需要关注父类的doParse方法,这是为什么呢,因为我们再配置文件中只设置了location属性,并没有设置什么value-separator以及null-value等属性,我们继续进入super.doParse方法
protected void doParse(Element element, ParserContext parserContext, BeanDefinitionBuilder builder) {
        //OK,我们看到了我们配置的location属性
        String location = element.getAttribute("location");
        if (StringUtils.hasLength(location)) {
            location = parserContext.getReaderContext().getEnvironment().resolvePlaceholders(location);
            String[] locations = StringUtils.commaDelimitedListToStringArray(location);
            builder.addPropertyValue("locations", locations);
        }
        //这下面的属性我们都没有配置,所以可以不用看,
        String propertiesRef = element.getAttribute("properties-ref");
        if (StringUtils.hasLength(propertiesRef)) {
            builder.addPropertyReference("properties", propertiesRef);
        }
        String fileEncoding = element.getAttribute("file-encoding");
        if (StringUtils.hasLength(fileEncoding)) {
            builder.addPropertyValue("fileEncoding", fileEncoding);
        }
        String order = element.getAttribute("order");
        if (StringUtils.hasLength(order)) {
            builder.addPropertyValue("order", Integer.valueOf(order));
        }
        builder.addPropertyValue("ignoreResourceNotFound", Boolean.valueOf(element.getAttribute("ignore-resource-not-found")));
        builder.addPropertyValue("localOverride", Boolean.valueOf(element.getAttribute("local-override")));
        builder.setRole(2);
    }
在父类的doParse方法中,我们拿到了location属性的值,也就是db.properties这个字符串,然后添加到BeanDefinitionBuilder中去,继续往下看。其实在这个方法中,这个标签已经解析完了,然后方法会返回到之前调用的地方,也即是我们创建BeanDefinitionBuilder对象的方法中。

可以看到,BeanDefinitionBuilder对象调用getBeanDefinition返回标签的容器表示对象BeanDefinition。此时这个标签已经解析完毕,之后便是将这个BeanDefinition注册到BeanFactory中去,在注册之前在做一些简单的信息设置
public final BeanDefinition parse(Element element, ParserContext parserContext) {
        AbstractBeanDefinition definition = this.parseInternal(element, parserContext);
        if (definition != null && !parserContext.isNested()) {
            try {
                //获取标签的id
                String id = this.resolveId(element, definition, parserContext);
                if (!StringUtils.hasText(id)) {
                    parserContext.getReaderContext().error("Id is required for element '" + parserContext.getDelegate().getLocalName(element) + "' when used as a top-level tag", element);
                }
                //是否存在别名
                String[] aliases = null;
                if (this.shouldParseNameAsAliases()) {
                    String name = element.getAttribute("name");
                    if (StringUtils.hasLength(name)) {
                        aliases = StringUtils.trimArrayElements(StringUtils.commaDelimitedListToStringArray(name));
                    }
                }
                //获取BeanDefinitionHolder对象,这个对象用来封装BeanFinition对象
                BeanDefinitionHolder holder = new BeanDefinitionHolder(definition, id, aliases);        //注册BeanHolder对象
                this.registerBeanDefinition(holder, parserContext.getRegistry());
                if (this.shouldFireEvents()) {
                    BeanComponentDefinition componentDefinition = new BeanComponentDefinition(holder);
                    this.postProcessComponentDefinition(componentDefinition);
                    parserContext.registerComponent(componentDefinition);
                }
            } catch (BeanDefinitionStoreException var8) {
                parserContext.getReaderContext().error(var8.getMessage(), element);
                return null;
            }
        }

        return definition;
    }
在这个方法中,获取标签的id,获取标签的别名,将解析后的Beanfinition,id和别名数组一起封装为BeanFinitionHolder对象,我们先看看这个对象的组成

可以看到,这个类包含三个成员变量,Beanfinition,beanName,别名数组,至此,继续往下走,来到registerBeanDefinition方法之中
public static void registerBeanDefinition(BeanDefinitionHolder definitionHolder, BeanDefinitionRegistry registry) throws BeanDefinitionStoreException {
        //获取bean名称,也就是标签的id属性,如果没有id属性,就是这个类的全路径名再加上一个#0
        String beanName = definitionHolder.getBeanName();
        //注册Beanfinition到BeanFactory中
        registry.registerBeanDefinition(beanName, definitionHolder.getBeanDefinition());
        String[] aliases = definitionHolder.getAliases();
        if (aliases != null) {
            String[] var4 = aliases;
            int var5 = aliases.length;
            for(int var6 = 0; var6 < var5; ++var6) {
                String alias = var4[var6];
                registry.registerAlias(beanName, alias);
            }
        }
    }
在上述方法中,是将解析完得到的Beanfinition注册到DefaultListableBeanFactory,如果别名,将别名也注册到BeanFactory中,继续往下看,进入到registerBeanDefinition方法中
    public void registerBeanDefinition(String beanName, BeanDefinition beanDefinition) throws BeanDefinitionStoreException {
        Assert.hasText(beanName, "Bean name must not be empty");
        Assert.notNull(beanDefinition, "BeanDefinition must not be null");
        //这里对beandefinition做了一些判断,比如是否还有beanClass属性等等
        if (beanDefinition instanceof AbstractBeanDefinition) {
            try {
                ((AbstractBeanDefinition)beanDefinition).validate();
            } catch (BeanDefinitionValidationException var9) {
                throw new BeanDefinitionStoreException(beanDefinition.getResourceDescription(), beanName, "Validation of bean definition failed", var9);
            }
        }
        //因为是第一次解析配置文件,所以oldBeanDefintion一定为null
        BeanDefinition oldBeanDefinition = (BeanDefinition)this.beanDefinitionMap.get(beanName);
        if (oldBeanDefinition != null) {
            if (!this.isAllowBeanDefinitionOverriding()) {
                throw new BeanDefinitionStoreException(beanDefinition.getResourceDescription(), beanName, "Cannot register bean definition [" + beanDefinition + "] for bean '" + beanName + "': There is already [" + oldBeanDefinition + "] bound.");
            }

            if (oldBeanDefinition.getRole() < beanDefinition.getRole()) {
                if (this.logger.isWarnEnabled()) {
                    this.logger.warn("Overriding user-defined bean definition for bean '" + beanName + "' with a framework-generated bean definition: replacing [" + oldBeanDefinition + "] with [" + beanDefinition + "]");
                }
            } else if (!beanDefinition.equals(oldBeanDefinition)) {
                if (this.logger.isInfoEnabled()) {
                    this.logger.info("Overriding bean definition for bean '" + beanName + "' with a different definition: replacing [" + oldBeanDefinition + "] with [" + beanDefinition + "]");
                }
            } else if (this.logger.isDebugEnabled()) {
                this.logger.debug("Overriding bean definition for bean '" + beanName + "' with an equivalent definition: replacing [" + oldBeanDefinition + "] with [" + beanDefinition + "]");
            }

            this.beanDefinitionMap.put(beanName, beanDefinition);
        } else {
            //这里也是,因为是第一解析XML,所以之前"正在创建"标志假
            if (this.hasBeanCreationStarted()) {
                Map var4 = this.beanDefinitionMap;
                synchronized(this.beanDefinitionMap) {
                    this.beanDefinitionMap.put(beanName, beanDefinition);
                    List<String> updatedDefinitions = new ArrayList(this.beanDefinitionNames.size() + 1);
                    updatedDefinitions.addAll(this.beanDefinitionNames);
                    updatedDefinitions.add(beanName);
                    this.beanDefinitionNames = updatedDefinitions;
                    if (this.manualSingletonNames.contains(beanName)) {
                        Set<String> updatedSingletons = new LinkedHashSet(this.manualSingletonNames);
                        updatedSingletons.remove(beanName);
                        this.manualSingletonNames = updatedSingletons;
                    }
                }
            } else {
                //重头戏,将beanName作为键,beanDefinition作为value,注册到BeanDefinitionMap中
                this.beanDefinitionMap.put(beanName, beanDefinition);
                //将beanName添加到beanDefinitionNames中
                this.beanDefinitionNames.add(beanName);
                //
                this.manualSingletonNames.remove(beanName);
            }

            this.frozenBeanDefinitionNames = null;
        }

        if (oldBeanDefinition != null || this.containsSingleton(beanName)) {
            this.resetBeanDefinition(beanName);
        }

    }
在这个方法中,真正的将BeanDefinition注册到DefaultListableBeanFactory中,DefaultListableBeanFactory类最重要的两个变量就是private final Map<String, BeanDefinition> beanDefinitionMap = new ConcurrentHashMap(256);
private volatile List<String> beanDefinitionNames = new ArrayList(256);
private final Map<String, Object> singletonObjects = new ConcurrentHashMap(256);
beanDefinitionMap 中存储着解析后的BeanDefinition,而beanDefinitionNames 存储着BeanName
第三个Map是继承父类的,里面存储着单例的实例,当我们使用getBean获取对象时,就是从这里获取的。
OK,在此,第一个标签已经解析完毕,后面的标签也是类似,我就贴出几张有重点的代码,这次是解析默认标签。
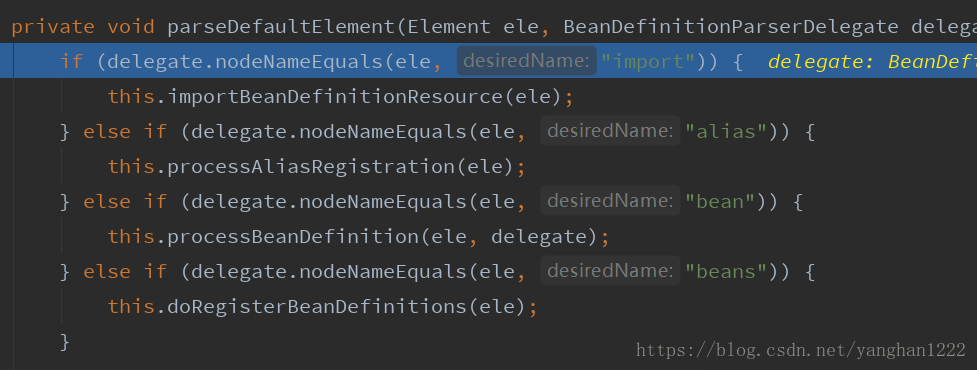
首先可以看到,默认标签有四种,分别是beans,alias,bean和import,第二个标签是alibaba的DataSource,所以是bean标签,继续走。
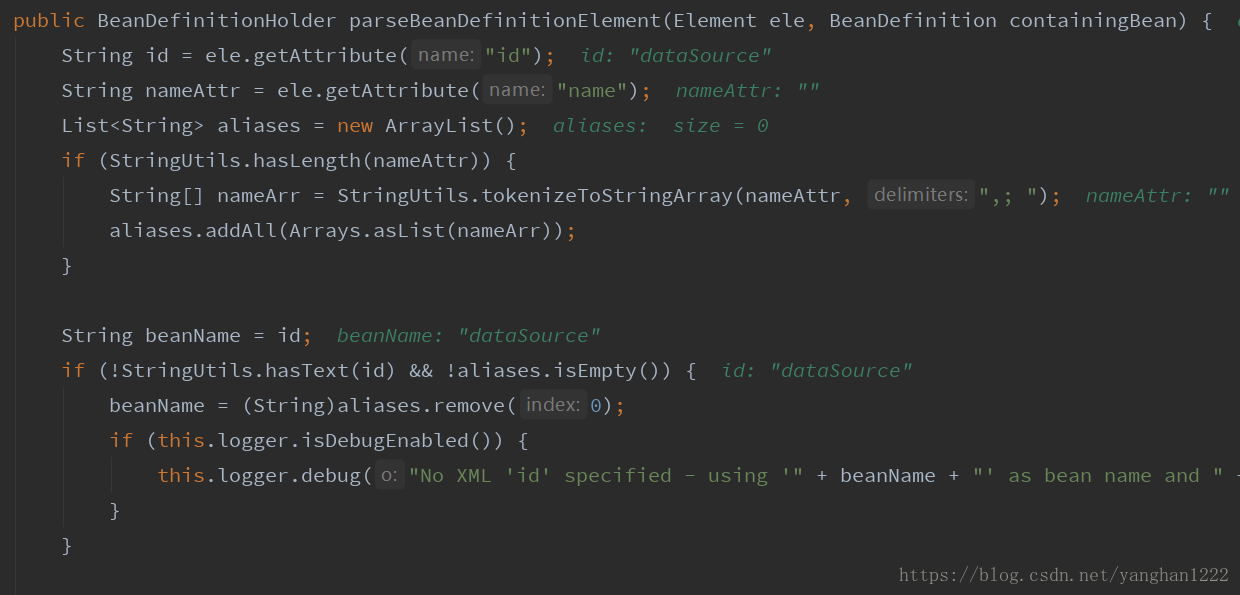
解析bean标签,拿到id属性dataSource,判断是否有别名(然而并没有),beanName就是id,如果你设置了id,那就是id,不然就是解析这个标签的全路径名加#0,看这个方法下半部分
//获取bean标签获取BeanDefinition
AbstractBeanDefinition beanDefinition = this.parseBeanDefinitionElement(ele, beanName, containingBean);
        if (beanDefinition != null) {
            if (!StringUtils.hasText(beanName)) {
                try {
                    if (containingBean != null) {
                        beanName = BeanDefinitionReaderUtils.generateBeanName(beanDefinition, this.readerContext.getRegistry(), true);
                    } else {
                        beanName = this.readerContext.generateBeanName(beanDefinition);
                        String beanClassName = beanDefinition.getBeanClassName();
                        if (beanClassName != null && beanName.startsWith(beanClassName) && beanName.length() > beanClassName.length() && !this.readerContext.getRegistry().isBeanNameInUse(beanClassName)) {
                            aliases.add(beanClassName);
                        }
                    }
                    if (this.logger.isDebugEnabled()) {
                        this.logger.debug("Neither XML 'id' nor 'name' specified - using generated bean name [" + beanName + "]");
                    }
                } catch (Exception var9) {
                    this.error(var9.getMessage(), ele);
                    return null;
                }
            }
            String[] aliasesArray = StringUtils.toStringArray(aliases);
            return new BeanDefinitionHolder(beanDefinition, beanName, aliasesArray);
        } else {
            return null;
        }
进入parseBeanDefinitionElement方法查看解析的结果
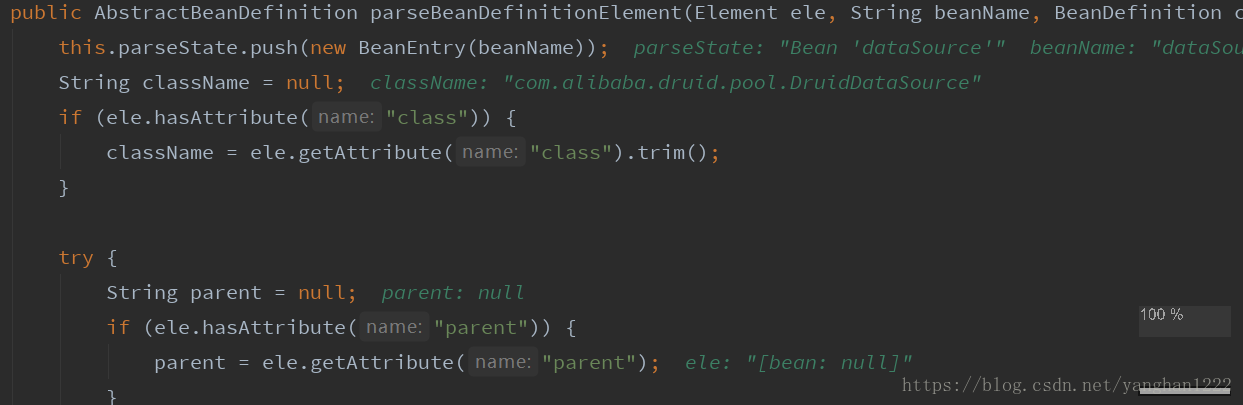
先得到class属性的值,获取parent属性的值(并没有进行配置),继续往下看

可以看到,先创建AbstractBeanDefinition对象,然后继续解析,先来说说下面这些方法的作用吧
parseBeanDefinitionAttributes是用来解析bean标签中的初始化信息,先看一眼
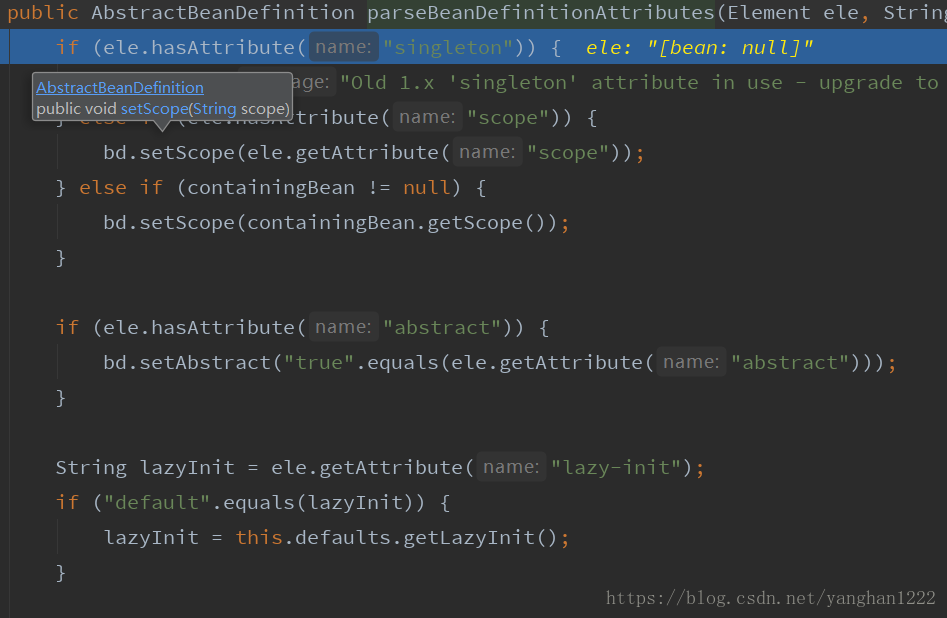
就是解析类的各种信息,比如scope,是否是abstract,init-method,destory-method信息等等
parseMetaElements(ele, bd);这个方法是用来解析meta标签(然而我们也没有)
parseConstructorArgElements(ele, bd);解析构造参数的,也就是constructor-arg这个标签
parsePropertyElements(Element beanEle, BeanDefinition bd)这个方法很重要,世界西property属性的,也就是我们配置的url,username,password等等的信息
parseQualifierElements(ele, bd);这个方法是解析qualifier标签的
至此,这个bean标签已经解析完了,比如id属性,class属性,property属性
继续往下看

最后将解析的beanDefinition,beanName,以及别名封装到BeanDefinitionHolder中去
接下来就是注册BeanDefinition了,继续跟踪方法
public void registerBeanDefinition(String beanName, BeanDefinition beanDefinition) throws BeanDefinitionStoreException {
        Assert.hasText(beanName, "Bean name must not be empty");
        Assert.notNull(beanDefinition, "BeanDefinition must not be null");
        if (beanDefinition instanceof AbstractBeanDefinition) {
            try {
                ((AbstractBeanDefinition)beanDefinition).validate();
            } catch (BeanDefinitionValidationException var9) {
                throw new BeanDefinitionStoreException(beanDefinition.getResourceDescription(), beanName, "Validation of bean definition failed", var9);
            }
        }
        //因为是第一次解析此标签,所以oldBeanDefinition 是null
        BeanDefinition oldBeanDefinition = (BeanDefinition)this.beanDefinitionMap.get(beanName);
        if (oldBeanDefinition != null) {
            if (!this.isAllowBeanDefinitionOverriding()) {
                throw new BeanDefinitionStoreException(beanDefinition.getResourceDescription(), beanName, "Cannot register bean definition [" + beanDefinition + "] for bean '" + beanName + "': There is already [" + oldBeanDefinition + "] bound.");
            }

            if (oldBeanDefinition.getRole() < beanDefinition.getRole()) {
                if (this.logger.isWarnEnabled()) {
                    this.logger.warn("Overriding user-defined bean definition for bean '" + beanName + "' with a framework-generated bean definition: replacing [" + oldBeanDefinition + "] with [" + beanDefinition + "]");
                }
            } else if (!beanDefinition.equals(oldBeanDefinition)) {
                if (this.logger.isInfoEnabled()) {
                    this.logger.info("Overriding bean definition for bean '" + beanName + "' with a different definition: replacing [" + oldBeanDefinition + "] with [" + beanDefinition + "]");
                }
            } else if (this.logger.isDebugEnabled()) {
                this.logger.debug("Overriding bean definition for bean '" + beanName + "' with an equivalent definition: replacing [" + oldBeanDefinition + "] with [" + beanDefinition + "]");
            }

            this.beanDefinitionMap.put(beanName, beanDefinition);
        } else {
            //同样是第一次解析该bean,所以这个表达式为false
            if (this.hasBeanCreationStarted()) {
                Map var4 = this.beanDefinitionMap;
                synchronized(this.beanDefinitionMap) {
                    this.beanDefinitionMap.put(beanName, beanDefinition);
                    List<String> updatedDefinitions = new ArrayList(this.beanDefinitionNames.size() + 1);
                    updatedDefinitions.addAll(this.beanDefinitionNames);
                    updatedDefinitions.add(beanName);
                    this.beanDefinitionNames = updatedDefinitions;
                    if (this.manualSingletonNames.contains(beanName)) {
                        Set<String> updatedSingletons = new LinkedHashSet(this.manualSingletonNames);
                        updatedSingletons.remove(beanName);
                        this.manualSingletonNames = updatedSingletons;
                    }
                }
            } else {
                //又到了熟悉的地方,注册BeanDefinition
                this.beanDefinitionMap.put(beanName, beanDefinition);
                this.beanDefinitionNames.add(beanName);
                this.manualSingletonNames.remove(beanName);
            }

            this.frozenBeanDefinitionNames = null;
        }

        if (oldBeanDefinition != null || this.containsSingleton(beanName)) {
            this.resetBeanDefinition(beanName);
        }

    }
可以看到,我们又来到了这个方法了,这个方法就是讲解析得到的BeanDefinition注册到DefaultListableBeanFactory的beanDefinitionMap中去。后续的sqlSessionFactory,Service注解扫描就不多说了,都是如此。
让我们看一看,XML解析完之后的DefaultListableBeanFactory的属性吧
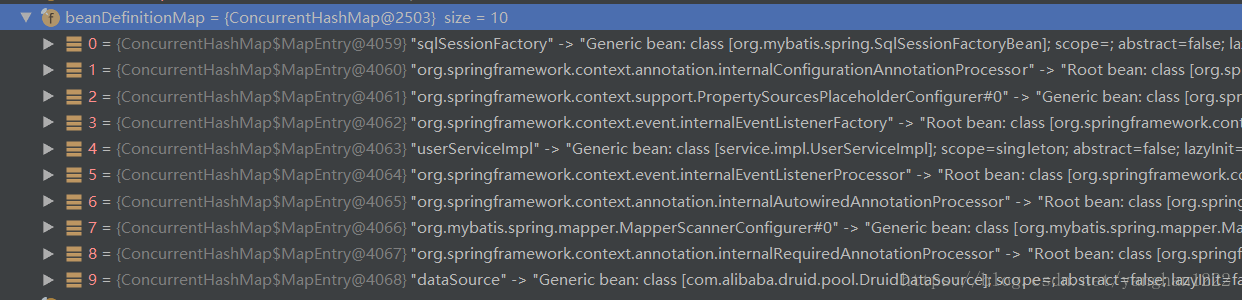

可以看到,BeanDefinitionMap中有10个键值对,大多数都是我们再配置文件中配置的,Spring容器将其转换为了BeanDefinition存储在容器中,以供后续使用。至此,你已经大致了解到了Spring解析XML的全过程,而且可以清楚的知道,Spring在编码时,讲一个功能的任务划分为许多个方法去执行,在真正执行动作的方法之中,方法名都是以do开头的,也就是do开头的方法都是真正去完成功能,其他的方法都是为了给做动作的方法配置环境或者初始化某些组件等等。
最后,我们将Spring解析XML的步骤做一个总结:
①设置路径(也就是我们传入的配置文件名)
②创建DefaultListableBeanFactory对象
③开始验证XML,获取XML的验证信息,是DTD还是XSD
④获取标签,判别标签的类别,是默认标签(只有import,bean,beans,alias)还是自定义标签(除默认标签外的标签)
⑤解析标签得到BeanDefinition对象
⑥通过beanName注册BeanDefinition到DefaultListableBeanFactory的beanDefinitionMap中
⑦循环步骤4,5,6直至所有标签解析完毕