我们这使用四台主机进行编辑和介绍:
10.1.11.34 master\
10.1.11.35 web1\
10.1.11.36 web2\
10.1.11.37 dbserver
学习资源:
马哥教育ansible内部视频教程 https://pan.baidu.com/s/1c2NG4MW 密码: kfdq
学习
马哥教育ansible内部视频教程学习笔记
第一课:自动化运维工具介绍

1.1 自动化工具的介绍和选择
1.2 ansible简介
ansible是新出现的自动化运维工具,基于Python开发,集合了众多运维工具(puppet、cfengine、chef、func、fabric)的优点,实现了批量系统配置、批量程序部署、批量运行命令等功能。
1.3 ansible优点
Agentless,去中心化\
基于python实现,由paramiko,PyYAML,Jinjia2三个关键模块\
Stupied Simple ,上手简单,学习曲线平滑\
SSH by default ,安全,无需安装客户端\
配置简单、功能强大、扩展性强\
支持API及自定义模块,支持各种语言
通过Playbooks来定制强大的配置、状态管理\
提供一个功能强大、操作性强的Web管理界面和REST API接口——AWX平台\
幂等性:一种操作重复多次结果相同
官网介绍
Ansible Tower Version 3.2.5; May 16, 2018; https://access.redhat.com/
目前最新版本时3.2.5

第二课:ansible核心组件介绍
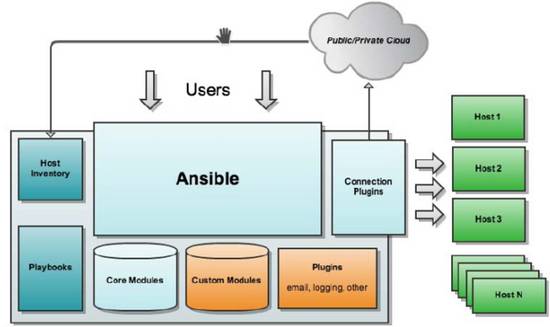
Ansible:Ansible的核心程序\
Host Lnventory:记录了每一个由Ansible管理的主机信息,信息包括ssh端口,root帐号密码,ip地址等等。可以通过file来加载,可以通过CMDB加载\
Playbooks:YAML格式文件,多个任务定义在一个文件中,使用时可以统一调用,“剧本”用来定义那些主机需要调用那些模块来完成的功能.\
Core Modules:Ansible执行任何管理任务都不是由Ansible自己完成,而是由核心模块完成;Ansible管理主机之前,先调用core Modules中的模块,然后指明管理Host Lnventory中的主机,就可以完成管理主机。\
Custom Modules:自定义模块,完成Ansible核心模块无法完成的功能,此模块支持任何语言编写。\
Connection Plugins:连接插件,Ansible和Host通信使用
第三课:安装和基本使用介绍
3.1 ansible安装
安装方式一:yum安装\
yum install -y ansible
安装方式二:pip安装
yum -y install epel-release #添加源码
yum -y install python-pip #安装pip
pip install ansible #pip安装ansible
3.2 核心配置文件介绍
/usr/bin/ansible: # Ansibe AD-Hoc 临时命令执行工具,常用于临时命令的执行\
/usr/bin/ansible-doc: # Ansible 模块功能查看工具\
/usr/bin/ansible-galaxy: # 下载/上传优秀代码或Roles模块的官网平台,基于网络\
/usr/bin/ansible-playbook: # Ansible 定制自动化的任务集编排工具\
/usr/bin/ansible-pull: # Ansible远程执行命令的工具(使用较少,海量机器时使用,对运维的架构能力要求较高)\
/usr/bin/ansible-vault: # Ansible 文件加密工具\
/usr/bin/ansible-console: # Ansible基于Linux Consoble界面可与用户交互的命令执行工具\
/usr/share/ansible_plugins: # Ansible高级自定义插件目录(需要python基础
/etc/ansible/ansible.cfg:配置文件\
/etc/ansible/hosts:主机清单
3.2.1 配置/etc/ansible/hosts主机清单
[webserver]
10.1.11.35
10.1.11.36

[dbserver]
10.1.11.37

[34]
10.1.11.34

[35]
10.1.11.35

[36]
10.1.11.36

[37]
10.1.11.37
3.3 ansible命令应用基础
语法:ansible [options]
-f forks:启动的并发线程数
-m module_name: 要使用的模块
-a args: 模块特有的参数
ansible all -m ping
测试连通性
案例1:
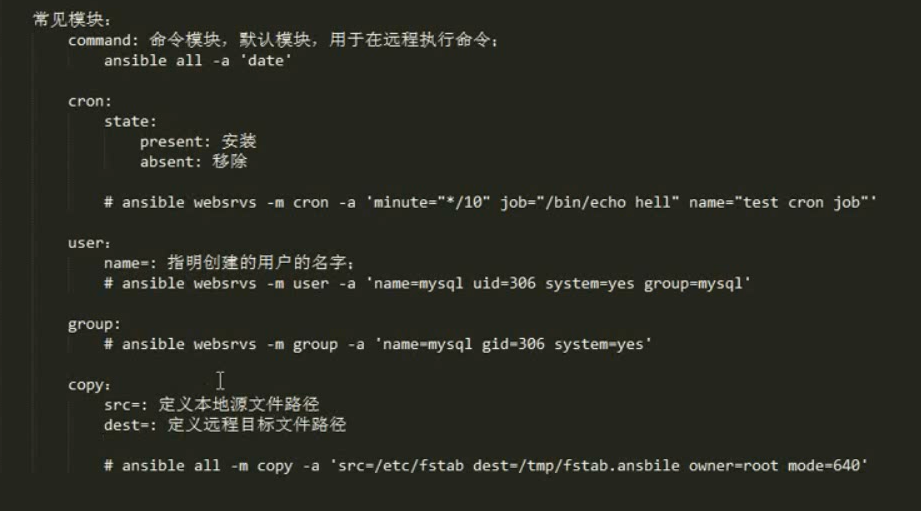
ansible all -m command -a ‘date’ #ansible所有主机 执行date命令
[root@master ansible]#  ansible all -m command -a 'date'
10.1.11.36 | SUCCESS | rc=0 >>
Sat Jul 14 13:03:57 CST 2018

10.1.11.37 | SUCCESS | rc=0 >>
Sat Jul 14 13:04:00 CST 2018

10.1.11.35 | SUCCESS | rc=0 >>
Sat Jul 14 13:03:57 CST 2018案例2:设置webserver下主机每十分钟输出一个Hello World\
ansible webserver -m cron -a 'minute="*/10" job="bin/echo Hello World" name="test cron"'
[root@master ansible]#  ansible webserver -m cron -a 'minute="*/10" job="bin/echo Hello World" name="test cron"'
10.1.11.36 | SUCCESS => {
    "changed": true,
    "envs": [],
    "jobs": [
        "test cron"
    ]
}
10.1.11.35 | SUCCESS => {
    "changed": true,
    "envs": [],
    "jobs": [
        "test cron"
    ]
}移除该定时任务:ansible webserver -m cron -a 'minute="*/10" job="bin/echo Hello World" name="test cron" state=absent'
注:ansible-doc -s cron #查询ansible cron模块用法
案例3 批量添加用户
ansible webserver -m user -a 'name="testuser1" state=absent '
批量修改某用户密码
案例4:
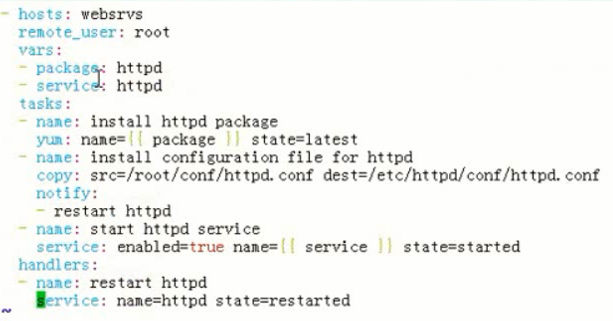
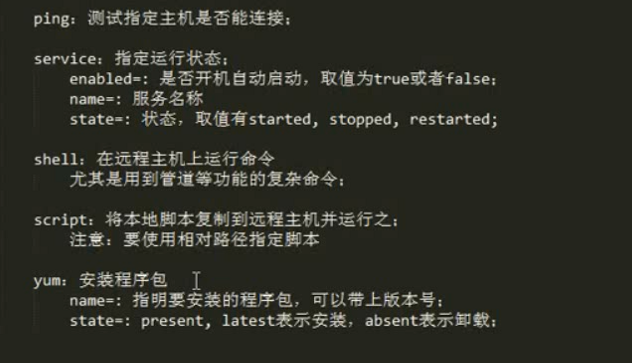
安装httpd并设置为开机自启
ansible all -m shell -a 'yum -y install epel-release' #添加epel源
ansible webserver -a 'yum install httpd -y'
ansible webserver -a 'systemctl status httpd'
ansible webserver -a 'chkconfig --list httpd'
ansible webserver -a 'systemctl enable httpd'
ansible webserver -a 'systemctl restart httpd'
ansible webserver -m shell -a 'echo "test" >>/var/www/html/index.html'
ansible webserver -m shell -a 'curl 127.0.0.1'
测试远程执行脚本:
ansible webserver -m script -a ‘/tmp/script.sh’ #-a 执行的脚本名称
测试在所有主机上安装ack:
ansible all -m shell -a 'yum -y install epel-release' #
ansible all -m yum -a 'name="ack"'  # 一个强大的搜索工具 用来替换grep
 ansible all -m yum -a 'name="lrzsz"' # 一个上传 下载文件的工具
构建playbook:
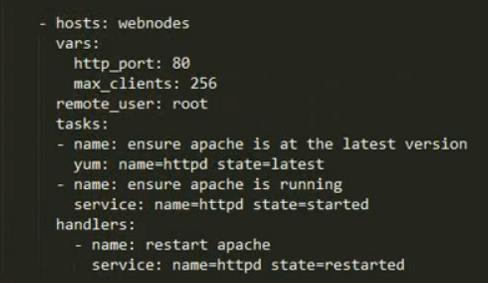
1.YAML介绍:

2.playbook示例

附录1:设置免密登录:
$34 master
ssh-keygen -t rsa
cd /root/.ssh/
ssh-copy-id -i /root/.ssh/id_rsa.pub  root@10.1.11.34
ssh-copy-id -i /root/.ssh/id_rsa.pub  root@10.1.11.35
ssh-copy-id -i /root/.ssh/id_rsa.pub  root@10.1.11.36
ssh-copy-id -i /root/.ssh/id_rsa.pub  root@10.1.11.37
设置.ssh/config文件
Host 34
    StrictHostKeyChecking no
    HostName 10.1.11.34
    Port 22
    ForwardAgent yes
    User root
    Controlpath ~/.ssh/ssh-%r@%h:%p.sock

Host 35
    StrictHostKeyChecking no
    HostName 10.1.11.35
    Port 22
    ForwardAgent yes
    User root
    Controlpath ~/.ssh/ssh-%r@%h:%p.sock

Host 36
    StrictHostKeyChecking no
    HostName 10.1.11.36
    Port 22
    ForwardAgent yes
    User root
    Controlpath ~/.ssh/ssh-%r@%h:%p.sock

Host 37
    StrictHostKeyChecking no
    HostName 10.1.11.37
    Port 22
    ForwardAgent yes
    User root
    Controlpath ~/.ssh/ssh-%r@%h:%p.sock
注:我习惯用主机ip来实现进行定义和跳转 具体使用可以参考我的博客:
实现ssh简便登录和利用Polysh实现多台服务器批量管理