1、设置图片
(1)静态设置
    <ImageView
        android:layout_width="match_parent"
        android:layout_height="match_parent"
android:src="@drawable/abc_btn_check_material"/>- 1
- 2
- 3
- 4
(2)动态设置
    // 从项目的资源中设置图片
    private void setFromResource() {
        imageView.setImageResource(R.drawable.lenna);
    }

    // 设置drawable。此处直接从资源中获取一个图片drawable。
    private void setByDrawable() {
        Drawable drawable = getDrawable(R.drawable.lenna);
        imageView.setImageDrawable(drawable);
    }

    // 从外置存储卡设置图片。此处为了代码演示简洁,直接硬编码了文件路径。
    // 注意:在实际项目中,切记不可如此,某些手机可能不存在外置卡。
    // 此处应使用 Environment.getExternalStorageDirectory().getPath()
    private void setFromPath() {
        Uri uri = Uri.fromFile(new File("/mnt/sdcard/cudgel.png"));
        imageView.setImageURI(uri);
    }

    // 从相册中加载图片。获取content的uri示例代码如下:
    // Intent intent = new Intent(Intent.ACTION_GET_CONTENT);
    // intent.setType("image/*");
    // startActivityForResult(intent, 0);
    // 然后在onActivityResult中从data中获取即可(data.getData())
    private void setFromAlbum() {
        String content = "content://media/external/images/media/32";
        Uri uri = Uri.parse(content);
        imageView.setImageURI(uri);
    }

    // 用Bitmap设置图片。bitmap更多内容请见下一节内容。
    private void setFromBitmap() {
        Bitmap bm = BitmapFactory.decodeFile("/sdcard/cudgel.png");
        imageView.setImageBitmap(bm);
}- 1
- 2
- 3
- 4
- 5
- 6
- 7
- 8
- 9
- 10
- 11
- 12
- 13
- 14
- 15
- 16
- 17
- 18
- 19
- 20
- 21
- 22
- 23
- 24
- 25
- 26
- 27
- 28
- 29
- 30
- 31
- 32
- 33
- 34
- 35
2、src与background区别
background会根据ImageView组件给定的长宽进行拉伸,而src就存放的是原图的大小,居中显示,不会进行拉伸。src是图片内容(前景),bg是背景,可以同时使用。
3、ScaleType的属性
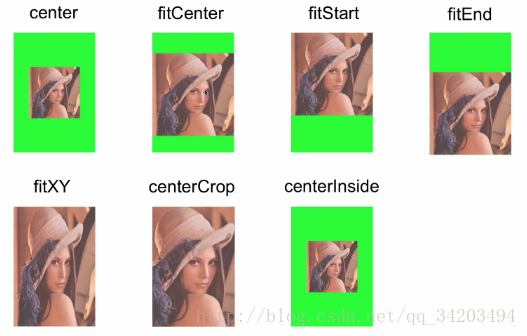
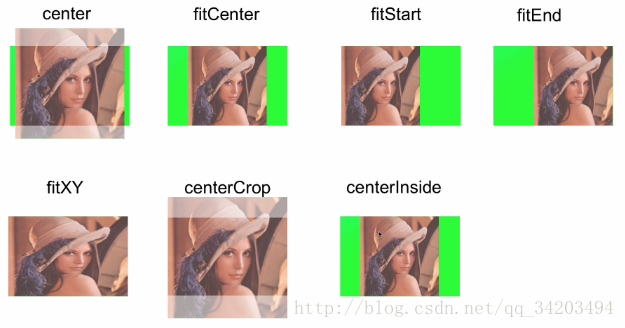
注:
(1)centercrop:保持图片的长宽比,全部显示。
(2)center与centerinside的区别,在于,centerinside有时会根据情况拉伸,center的图片不会做任何拉伸。
4、Matrix
(1)图片放大
        imageView.setScaleType(ImageView.ScaleType.MATRIX);
        Matrix matrix = new Matrix();
        float scale = scale(imageView);
        matrix.setScale(scale, scale);
imageView.setImageMatrix(matrix);- 1
- 2
- 3
- 4
- 5
(2)图片旋转
        imageView.setScaleType(ImageView.ScaleType.MATRIX);
        int viewWidth = imageView.getWidth();
        int viewHeight = imageView.getHeight();
        Matrix matrix = new Matrix();
        matrix.setRotate(45, viewWidth / 2, viewHeight / 2);
imageView.setImageMatrix(matrix);- 1
- 2
- 3
- 4
- 5
- 6
(3)图片先放大再旋转
imageView.setScaleType(ImageView.ScaleType.MATRIX);
        int viewWidth = imageView.getWidth();
        int viewHeight = imageView.getHeight();
        //先放大
        Matrix translate = new Matrix();
        float scale = scale(imageView);
        translate.setScale(scale, scale);
        //再旋转
        Matrix rotate = new Matrix();
        rotate.setRotate(45, viewWidth / 2, viewHeight / 2);
        //将两个Matrix串联起来,也可以使用setConcat
        rotate.postConcat(translate);
imageView.setImageMatrix(rotate);- 1
- 2
- 3
- 4
- 5
- 6
- 7
- 8
- 9
- 10
- 11
- 12
- 13
(4)先放大再旋转最后平移
        imageView.setScaleType(ImageView.ScaleType.MATRIX);
        int viewWidth = imageView.getWidth();
        int viewHeight = imageView.getHeight();
        //先放大
        Matrix scale = new Matrix();
        float ratio = scale(imageView);
        //再旋转
        scale.setScale(ratio, ratio);
        Matrix rotate = new Matrix();
        rotate.setRotate(45, viewWidth / 2, viewHeight / 2);
        //将放大旋转连接起来
        rotate.postConcat(scale);
        //最后平移
        Matrix translate = new Matrix();
        translate.setTranslate(100, -100);
        //将三个连接起来
        rotate.postConcat(translate);

imageView.setImageMatrix(rotate);- 1
- 2
- 3
- 4
- 5
- 6
- 7
- 8
- 9
- 10
- 11
- 12
- 13
- 14
- 15
- 16
- 17
- 18
- 19
5、给图片着色
Tint
示例代码
    <ImageView
        android:id="@+id/image_view_total_tint"
        android:layout_width="200dp"
        android:layout_height="200dp"
        android:src="@drawable/lenna"
        android:tint="#A0FF0000"
        />
    <ImageView
        android:id="@+id/image_view_alpha_tint"
        android:layout_width="200dp"
        android:layout_height="200dp"
        android:src="@android:drawable/ic_btn_speak_now"
        android:tint="#70FF0000"
/>- 1
- 2
- 3
- 4
- 5
- 6
- 7
- 8
- 9
- 10
- 11
- 12
- 13
- 14
- 15
6、adjustViewBounds
让图片根据固定的宽度进行自适应
<ImageView
        android:id="@+id/image_view_base"
        android:layout_width="wrap_content"
        android:layout_height="wrap_content"
        android:maxWidth="100dp"
        android:maxHeight="200dp"
        android:background="#00FF00"
        android:adjustViewBounds="true"
        android:src="@drawable/lenna"
/>- 1
- 2
- 3
- 4
- 5
- 6
- 7
- 8
- 9
- 10
1、设置图片
(1)静态设置
    <ImageView
        android:layout_width="match_parent"
        android:layout_height="match_parent"
android:src="@drawable/abc_btn_check_material"/>- 1
- 2
- 3
- 4
(2)动态设置
    // 从项目的资源中设置图片
    private void setFromResource() {
        imageView.setImageResource(R.drawable.lenna);
    }

    // 设置drawable。此处直接从资源中获取一个图片drawable。
    private void setByDrawable() {
        Drawable drawable = getDrawable(R.drawable.lenna);
        imageView.setImageDrawable(drawable);
    }

    // 从外置存储卡设置图片。此处为了代码演示简洁,直接硬编码了文件路径。
    // 注意:在实际项目中,切记不可如此,某些手机可能不存在外置卡。
    // 此处应使用 Environment.getExternalStorageDirectory().getPath()
    private void setFromPath() {
        Uri uri = Uri.fromFile(new File("/mnt/sdcard/cudgel.png"));
        imageView.setImageURI(uri);
    }

    // 从相册中加载图片。获取content的uri示例代码如下:
    // Intent intent = new Intent(Intent.ACTION_GET_CONTENT);
    // intent.setType("image/*");
    // startActivityForResult(intent, 0);
    // 然后在onActivityResult中从data中获取即可(data.getData())
    private void setFromAlbum() {
        String content = "content://media/external/images/media/32";
        Uri uri = Uri.parse(content);
        imageView.setImageURI(uri);
    }

    // 用Bitmap设置图片。bitmap更多内容请见下一节内容。
    private void setFromBitmap() {
        Bitmap bm = BitmapFactory.decodeFile("/sdcard/cudgel.png");
        imageView.setImageBitmap(bm);
}- 1
- 2
- 3
- 4
- 5
- 6
- 7
- 8
- 9
- 10
- 11
- 12
- 13
- 14
- 15
- 16
- 17
- 18
- 19
- 20
- 21
- 22
- 23
- 24
- 25
- 26
- 27
- 28
- 29
- 30
- 31
- 32
- 33
- 34
- 35
2、src与background区别
background会根据ImageView组件给定的长宽进行拉伸,而src就存放的是原图的大小,居中显示,不会进行拉伸。src是图片内容(前景),bg是背景,可以同时使用。
3、ScaleType的属性
注:
(1)centercrop:保持图片的长宽比,全部显示。
(2)center与centerinside的区别,在于,centerinside有时会根据情况拉伸,center的图片不会做任何拉伸。
4、Matrix
(1)图片放大
        imageView.setScaleType(ImageView.ScaleType.MATRIX);
        Matrix matrix = new Matrix();
        float scale = scale(imageView);
        matrix.setScale(scale, scale);
imageView.setImageMatrix(matrix);- 1
- 2
- 3
- 4
- 5
(2)图片旋转
        imageView.setScaleType(ImageView.ScaleType.MATRIX);
        int viewWidth = imageView.getWidth();
        int viewHeight = imageView.getHeight();
        Matrix matrix = new Matrix();
        matrix.setRotate(45, viewWidth / 2, viewHeight / 2);
imageView.setImageMatrix(matrix);- 1
- 2
- 3
- 4
- 5
- 6
(3)图片先放大再旋转
imageView.setScaleType(ImageView.ScaleType.MATRIX);
        int viewWidth = imageView.getWidth();
        int viewHeight = imageView.getHeight();
        //先放大
        Matrix translate = new Matrix();
        float scale = scale(imageView);
        translate.setScale(scale, scale);
        //再旋转
        Matrix rotate = new Matrix();
        rotate.setRotate(45, viewWidth / 2, viewHeight / 2);
        //将两个Matrix串联起来,也可以使用setConcat
        rotate.postConcat(translate);
imageView.setImageMatrix(rotate);- 1
- 2
- 3
- 4
- 5
- 6
- 7
- 8
- 9
- 10
- 11
- 12
- 13
(4)先放大再旋转最后平移
        imageView.setScaleType(ImageView.ScaleType.MATRIX);
        int viewWidth = imageView.getWidth();
        int viewHeight = imageView.getHeight();
        //先放大
        Matrix scale = new Matrix();
        float ratio = scale(imageView);
        //再旋转
        scale.setScale(ratio, ratio);
        Matrix rotate = new Matrix();
        rotate.setRotate(45, viewWidth / 2, viewHeight / 2);
        //将放大旋转连接起来
        rotate.postConcat(scale);
        //最后平移
        Matrix translate = new Matrix();
        translate.setTranslate(100, -100);
        //将三个连接起来
        rotate.postConcat(translate);

imageView.setImageMatrix(rotate);- 1
- 2
- 3
- 4
- 5
- 6
- 7
- 8
- 9
- 10
- 11
- 12
- 13
- 14
- 15
- 16
- 17
- 18
- 19
5、给图片着色
Tint
示例代码
    <ImageView
        android:id="@+id/image_view_total_tint"
        android:layout_width="200dp"
        android:layout_height="200dp"
        android:src="@drawable/lenna"
        android:tint="#A0FF0000"
        />
    <ImageView
        android:id="@+id/image_view_alpha_tint"
        android:layout_width="200dp"
        android:layout_height="200dp"
        android:src="@android:drawable/ic_btn_speak_now"
        android:tint="#70FF0000"
/>- 1
- 2
- 3
- 4
- 5
- 6
- 7
- 8
- 9
- 10
- 11
- 12
- 13
- 14
- 15
6、adjustViewBounds
让图片根据固定的宽度进行自适应
<ImageView
        android:id="@+id/image_view_base"
        android:layout_width="wrap_content"
        android:layout_height="wrap_content"
        android:maxWidth="100dp"
        android:maxHeight="200dp"
        android:background="#00FF00"
        android:adjustViewBounds="true"
        android:src="@drawable/lenna"
/>- 1
- 2
- 3
- 4
- 5
- 6
- 7
- 8
- 9
- 10