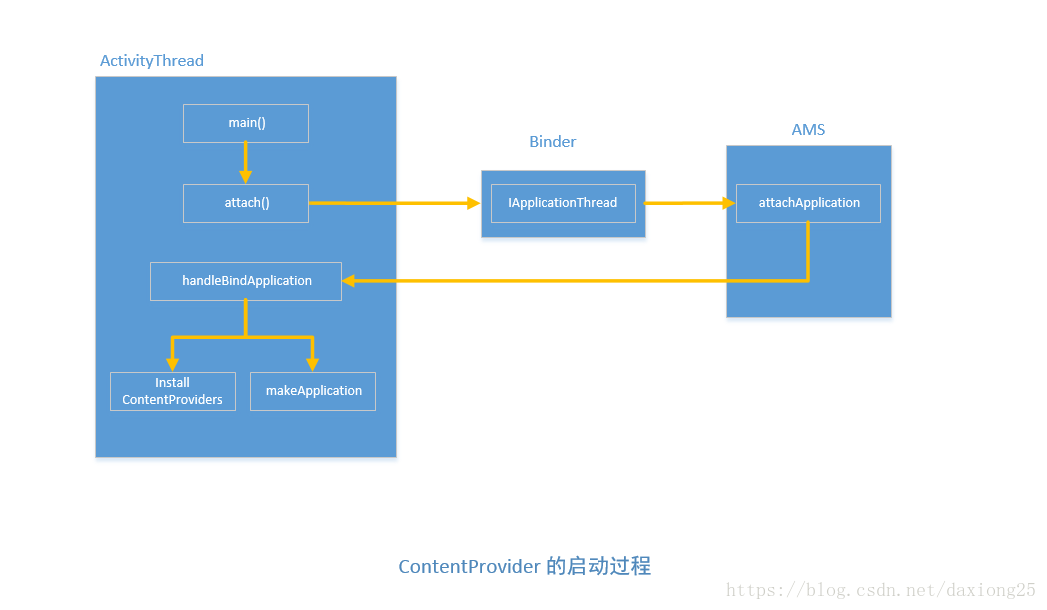
ContentProvider 是一种内容型共享组件,通过Binder 向其他组件乃至其他应用提供数据。当ContentProvider 所在的进程启动时,ContentProvider 会同时启动并被发布到AMS 中。注意:此时ContentProvider 的onCreat 方法要先于Application 的onCreat 方法执行。
当一个应用启动时,入口方法为ActivityThread 的main 方法,main 方法是一个静态方法, 在main 方法中会创建 ActivityThread 的实例并创建主线程的消息队列,然后在 ActivityThread 的attach 方法中会远程调用 AMS 的 attachApplication 方法并将 ApplicationThread 对象提供给 AMS。ApplicationThread 是一个Binder 对象,主要用于ActivityThread 和AMS 之间的通信,在AMS 的attachApplication 中,会调用 ApplicationThread 的 bindApplication 方法,这个过程同样是跨进程完成的,然后经过ActivityThread 的H 切换到 ActivityThread 中执行,具体方法为 handlerBindApplication 。在handlerBindApplication 方法中,ActivityThread 会创建 Application 对象并加载 ContentProvider。注意:ActivityThread 会先加载ContentProvider ,然后再调用Application 的onCreat 方法。
ContentProvider 启动后,外界就可以通过它提供的增删改查四个接口来操作ContentProvider 中的数据源,这四个方法都是通过Binder 来调用的,外界无法直接访问ContentProvider ,只能通过AMS 根据Uri 来获取对应 ContentProvider 的Binder 接口 IContentProvider,然后通过 IContentProvider 来访问ContentProvider 中的数据源。
ContentProvider 可有它的 android:multiprocess 属性来决定是否是单例,当
android:multiprocess 为false 时(默认值),ContentProvider 为单例,当为true 时,ContentProvider 为多实例,这个时候在每个调用者的进程中都存在一个 ContentProvider 对象,但这种场景比较少,因此我们可以简单的认为ContentProvider 都是单例。
访问ContentProvider 需要通过ContentResolver,
ContentResolver 是一个抽象类,它的子类是 ApplicationContentResolver,通过Context 的 getContentResolver 方法实际上获取的是 ApplicationContentResolver 对象。如下所示:
ContextWrapper:
    @Override
    public ContentResolver getContentResolver() {
        return mBase.getContentResolver();
} private final ApplicationContentResolver mContentResolver;
@Override
public ContentResolver getContentResolver() {
return mContentResolver;
}
ContentProvider 的 query 方法中,首先会获取 IContentProvider 对象,不管是通过acquireUnstableProvider 还是直接通过acquireProvider 方法,它们本质都是通过 acquireProvider 获取 ContentProvider 对象,如下所示:
    public final @Nullable Cursor query(final @RequiresPermission.Read @NonNull Uri uri,
            @Nullable String[] projection, @Nullable Bundle queryArgs,
            @Nullable CancellationSignal cancellationSignal) {
        Preconditions.checkNotNull(uri, "uri");
        //实质上还是会调用ApplicationContentResolver 的acquireProvider 获取 ContentProvider 对象
        IContentProvider unstableProvider = acquireUnstableProvider(uri);
        if (unstableProvider == null) {
            return null;
        }
        IContentProvider stableProvider = null;
        Cursor qCursor = null;
        try {
            long startTime = SystemClock.uptimeMillis();

            ICancellationSignal remoteCancellationSignal = null;
            if (cancellationSignal != null) {
                cancellationSignal.throwIfCanceled();
                remoteCancellationSignal = unstableProvider.createCancellationSignal();
                cancellationSignal.setRemote(remoteCancellationSignal);
            }
            try {
                qCursor = unstableProvider.query(mPackageName, uri, projection,
                        queryArgs, remoteCancellationSignal);
            } catch (DeadObjectException e) {
                // The remote process has died...  but we only hold an unstable
                // reference though, so we might recover!!!  Let's try!!!!
                // This is exciting!!1!!1!!!!1
                unstableProviderDied(unstableProvider);
                //获取 ContentProvider 对象
                stableProvider = acquireProvider(uri);
                if (stableProvider == null) {
                    return null;
                }
                //调用query 方法
                qCursor = stableProvider.query(
                        mPackageName, uri, projection, queryArgs, remoteCancellationSignal);
            }
            if (qCursor == null) {
                return null;
            }

            // Force query execution.  Might fail and throw a runtime exception here.
            qCursor.getCount();
            long durationMillis = SystemClock.uptimeMillis() - startTime;
            maybeLogQueryToEventLog(durationMillis, uri, projection, queryArgs);

            // Wrap the cursor object into CursorWrapperInner object.
            final IContentProvider provider = (stableProvider != null) ? stableProvider
                    : acquireProvider(uri);
            final CursorWrapperInner wrapper = new CursorWrapperInner(qCursor, provider);
            stableProvider = null;
            qCursor = null;
            return wrapper;
        } catch (RemoteException e) {
            // Arbitrary and not worth documenting, as Activity
            // Manager will kill this process shortly anyway.
            return null;
        } finally {
            if (qCursor != null) {
                qCursor.close();
            }
            if (cancellationSignal != null) {
                cancellationSignal.setRemote(null);
            }
            if (unstableProvider != null) {
                releaseUnstableProvider(unstableProvider);
            }
            if (stableProvider != null) {
                releaseProvider(stableProvider);
            }
        }
} // ----------------------------------------------------------------------
// ----------------------------------------------------------------------
// ----------------------------------------------------------------------
private static final class ApplicationContentResolver extends ContentResolver {
private final ActivityThread mMainThread;
private final UserHandle mUser;
public ApplicationContentResolver(
Context context, ActivityThread mainThread, UserHandle user) {
super(context);
mMainThread = Preconditions.checkNotNull(mainThread);
mUser = Preconditions.checkNotNull(user);
}
@Override
protected IContentProvider acquireProvider(Context context, String auth) {
return mMainThread.acquireProvider(context,
ContentProvider.getAuthorityWithoutUserId(auth),
resolveUserIdFromAuthority(auth), true);
}
@Override
protected IContentProvider acquireExistingProvider(Context context, String auth) {
return mMainThread.acquireExistingProvider(context,
ContentProvider.getAuthorityWithoutUserId(auth),
resolveUserIdFromAuthority(auth), true);
}
@Override
public boolean releaseProvider(IContentProvider provider) {
return mMainThread.releaseProvider(provider, true);
}
@Override
protected IContentProvider acquireUnstableProvider(Context c, String auth) {
return mMainThread.acquireProvider(c,
ContentProvider.getAuthorityWithoutUserId(auth),
resolveUserIdFromAuthority(auth), false);
}
@Override
public boolean releaseUnstableProvider(IContentProvider icp) {
return mMainThread.releaseProvider(icp, false);
}
@Override
public void unstableProviderDied(IContentProvider icp) {
mMainThread.handleUnstableProviderDied(icp.asBinder(), true);
}
@Override
public void appNotRespondingViaProvider(IContentProvider icp) {
mMainThread.appNotRespondingViaProvider(icp.asBinder());
}
/** @hide */
protected int resolveUserIdFromAuthority(String auth) {
return ContentProvider.getUserIdFromAuthority(auth, mUser.getIdentifier());
}
}
ApplicationContentResolver 的 acquireProvider 方法中直接调用了 ActivityThread 的 acquireProvider 方法,其源码如下:
    public final IContentProvider acquireProvider(
            Context c, String auth, int userId, boolean stable) {
        final IContentProvider provider = acquireExistingProvider(c, auth, userId, stable);
        if (provider != null) {
            return provider;
        }

        // There is a possible race here.  Another thread may try to acquire
        // the same provider at the same time.  When this happens, we want to ensure
        // that the first one wins.
        // Note that we cannot hold the lock while acquiring and installing the
        // provider since it might take a long time to run and it could also potentially
        // be re-entrant in the case where the provider is in the same process.
        IActivityManager.ContentProviderHolder holder = null;
        try {
            //发送请求给 AMS 让其启动目标ContentProvider
            holder = ActivityManagerNative.getDefault().getContentProvider(
                    getApplicationThread(), auth, userId, stable);
        } catch (RemoteException ex) {
        }
        if (holder == null) {
            Slog.e(TAG, "Failed to find provider info for " + auth);
            return null;
        }

        // Install provider will increment the reference count for us, and break
        // any ties in the race.
        //修改计数
        holder = installProvider(c, holder, holder.info,
                true /*noisy*/, holder.noReleaseNeeded, stable);
        return holder.provider;
} // The lock of mProviderMap protects the following variables.
final ArrayMap<ProviderKey, ProviderClientRecord> mProviderMap
= new ArrayMap<ProviderKey, ProviderClientRecord>();
public final IContentProvider acquireExistingProvider(
Context c, String auth, int userId, boolean stable) {
synchronized (mProviderMap) {
final ProviderKey key = new ProviderKey(auth, userId);
final ProviderClientRecord pr = mProviderMap.get(key);
if (pr == null) {
return null;
}
IContentProvider provider = pr.mProvider;
IBinder jBinder = provider.asBinder();
if (!jBinder.isBinderAlive()) {
// The hosting process of the provider has died; we can't
// use this one.
Log.i(TAG, "Acquiring provider " + auth + " for user " + userId
+ ": existing object's process dead");
handleUnstableProviderDiedLocked(jBinder, true);
return null;
}
// Only increment the ref count if we have one. If we don't then the
// provider is not reference counted and never needs to be released.
ProviderRefCount prc = mProviderRefCountMap.get(jBinder);
if (prc != null) {
incProviderRefLocked(prc, stable);
}
return provider;
}
}
如果当前ContentProvider 没有启动,则发送一个进程间请求给 AMS 让其启动目标ContentProvider ,最后通过 installProvider 方法来修改计数。
我们知道ContentProvider 的启动会伴随着进程的启动,在 AMS 中,首先会启动 ContentProvider 所在的进程,然后再启动ContentProvider。启动进程是由AMS 的 startProcessLocked 方法来完成的,其内部主要是通过 Process.start() 方法来完成一个新进程的启动,新进程启动后其入口方法为 ActivityThread 的main 方法,如下所示:
    public static void main(String[] args) {
        Trace.traceBegin(Trace.TRACE_TAG_ACTIVITY_MANAGER, "ActivityThreadMain");
        SamplingProfilerIntegration.start();

        // CloseGuard defaults to true and can be quite spammy.  We
        // disable it here, but selectively enable it later (via
        // StrictMode) on debug builds, but using DropBox, not logs.
        CloseGuard.setEnabled(false);

        Environment.initForCurrentUser();

        // Set the reporter for event logging in libcore
        EventLogger.setReporter(new EventLoggingReporter());

        AndroidKeyStoreProvider.install();

        // Make sure TrustedCertificateStore looks in the right place for CA certificates
        final File configDir = Environment.getUserConfigDirectory(UserHandle.myUserId());
        TrustedCertificateStore.setDefaultUserDirectory(configDir);

        Process.setArgV0("<pre-initialized>");
        //构建mainLooper
        Looper.prepareMainLooper();
        //创建ActivityThread 实例,并调用其attach 方法
        ActivityThread thread = new ActivityThread();
        thread.attach(false);

        if (sMainThreadHandler == null) {
            //获取关联的Handler
            sMainThreadHandler = thread.getHandler();
        }

        if (false) {
            Looper.myLooper().setMessageLogging(new
                    LogPrinter(Log.DEBUG, "ActivityThread"));
        }

        // End of event ActivityThreadMain.
        Trace.traceEnd(Trace.TRACE_TAG_ACTIVITY_MANAGER);
        //启动loop 轮询
        Looper.loop();

        throw new RuntimeException("Main thread loop unexpectedly exited");
} final ApplicationThread mAppThread = new ApplicationThread();
private void attach(boolean system) {
sCurrentActivityThread = this;
mSystemThread = system;
if (!system) {
ViewRootImpl.addFirstDrawHandler(new Runnable() {
@Override
public void run() {
ensureJitEnabled();
}
});
android.ddm.DdmHandleAppName.setAppName("<pre-initialized>",
UserHandle.myUserId());
RuntimeInit.setApplicationObject(mAppThread.asBinder());
//AMS
final IActivityManager mgr = ActivityManagerNative.getDefault();
try {
mgr.attachApplication(mAppThread);
} catch (RemoteException ex) {
// Ignore
}
...
}
    @Override
    public final void attachApplication(IApplicationThread thread) {
        synchronized (this) {
            int callingPid = Binder.getCallingPid();
            final long origId = Binder.clearCallingIdentity();
            attachApplicationLocked(thread, callingPid);
            Binder.restoreCallingIdentity(origId);
        }
    }
在 attachApplicationLocked 中调用了 ApplicationThread 的bindApplication 方法,注意这个过程也是进程间调用如下所示
    private final boolean attachApplicationLocked(IApplicationThread thread,
            int pid) {
        ...
            ProfilerInfo profilerInfo = profileFile == null ? null
                    : new ProfilerInfo(profileFile, profileFd, samplingInterval, profileAutoStop);
            thread.bindApplication(processName, appInfo, providers, app.instrumentationClass,
                    profilerInfo, app.instrumentationArguments, app.instrumentationWatcher,
                    app.instrumentationUiAutomationConnection, testMode, enableOpenGlTrace,
                    isRestrictedBackupMode || !normalMode, app.persistent,
                    new Configuration(mConfiguration), app.compat,
                    getCommonServicesLocked(app.isolated),
                    mCoreSettingsObserver.getCoreSettingsLocked());
            updateLruProcessLocked(app, false, null);
            app.lastRequestedGc = app.lastLowMemory = SystemClock.uptimeMillis();
        ...
        }
ActivityThread 的 bindApplication 方法会发送一个 BIND_APPLICATION 类型的消息给 mH(Handler),bindApplication 发送消息的过程如下所示:
        public final void bindApplication(String processName, ApplicationInfo appInfo,
                List<ProviderInfo> providers, ComponentName instrumentationName,
                ProfilerInfo profilerInfo, Bundle instrumentationArgs,
                IInstrumentationWatcher instrumentationWatcher,
                IUiAutomationConnection instrumentationUiConnection, int debugMode,
                boolean enableOpenGlTrace, boolean isRestrictedBackupMode, boolean persistent,
                Configuration config, CompatibilityInfo compatInfo, Map<String, IBinder> services,
                Bundle coreSettings) {

            if (services != null) {
                // Setup the service cache in the ServiceManager
                ServiceManager.initServiceCache(services);
            }

            setCoreSettings(coreSettings);

            /*
             * Two possible indications that this package could be
             * sharing its runtime with other packages:
             *
             * 1.) the sharedUserId attribute is set in the manifest,
             *     indicating a request to share a VM with other
             *     packages with the same sharedUserId.
             *
             * 2.) the application element of the manifest has an
             *     attribute specifying a non-default process name,
             *     indicating the desire to run in another packages VM.
             *
             * If sharing is enabled we do not have a unique application
             * in a process and therefore cannot rely on the package
             * name inside the runtime.
             */
            IPackageManager pm = getPackageManager();
            android.content.pm.PackageInfo pi = null;
            try {
                pi = pm.getPackageInfo(appInfo.packageName, 0, UserHandle.myUserId());
            } catch (RemoteException e) {
            }
            if (pi != null) {
                boolean sharedUserIdSet = (pi.sharedUserId != null);
                boolean processNameNotDefault =
                (pi.applicationInfo != null &&
                 !appInfo.packageName.equals(pi.applicationInfo.processName));
                boolean sharable = (sharedUserIdSet || processNameNotDefault);

                // Tell the VMRuntime about the application, unless it is shared
                // inside a process.
                if (!sharable) {
                    VMRuntime.registerAppInfo(appInfo.packageName, appInfo.dataDir,
                                            appInfo.processName);
                }
            }

            AppBindData data = new AppBindData();
            data.processName = processName;
            data.appInfo = appInfo;
            data.providers = providers;
            data.instrumentationName = instrumentationName;
            data.instrumentationArgs = instrumentationArgs;
            data.instrumentationWatcher = instrumentationWatcher;
            data.instrumentationUiAutomationConnection = instrumentationUiConnection;
            data.debugMode = debugMode;
            data.enableOpenGlTrace = enableOpenGlTrace;
            data.restrictedBackupMode = isRestrictedBackupMode;
            data.persistent = persistent;
            data.config = config;
            data.compatInfo = compatInfo;
            data.initProfilerInfo = profilerInfo;
            sendMessage(H.BIND_APPLICATION, data);
}mH接收到消息后会调用 ActivityThread 的handleBindApplication 方法,如下所示:
     case BIND_APPLICATION:
                    Trace.traceBegin(Trace.TRACE_TAG_ACTIVITY_MANAGER, "bindApplication");
                    AppBindData data = (AppBindData)msg.obj;
                    handleBindApplication(data);
                    Trace.traceEnd(Trace.TRACE_TAG_ACTIVITY_MANAGER);
                    break;
ActivityThread 的 handleBindApplication 完成了 Application 的创建以及ContentProvider 的创建,可以分为四个步骤,源码如下所示:
    private void handleBindApplication(AppBindData data) {
        mBoundApplication = data;
        mConfiguration = new Configuration(data.config);
        mCompatConfiguration = new Configuration(data.config);
            ...
            mInstrumentationPackageName = ii.packageName;
            mInstrumentationAppDir = ii.sourceDir;
            mInstrumentationSplitAppDirs = ii.splitSourceDirs;
            mInstrumentationLibDir = ii.nativeLibraryDir;
            mInstrumentedAppDir = data.info.getAppDir();
            mInstrumentedSplitAppDirs = data.info.getSplitAppDirs();
            mInstrumentedLibDir = data.info.getLibDir();

            ApplicationInfo instrApp = new ApplicationInfo();
            instrApp.packageName = ii.packageName;
            instrApp.sourceDir = ii.sourceDir;
            instrApp.publicSourceDir = ii.publicSourceDir;
            instrApp.splitSourceDirs = ii.splitSourceDirs;
            instrApp.splitPublicSourceDirs = ii.splitPublicSourceDirs;
            instrApp.dataDir = ii.dataDir;
            instrApp.nativeLibraryDir = ii.nativeLibraryDir;
            LoadedApk pi = getPackageInfo(instrApp, data.compatInfo,
                    appContext.getClassLoader(), false, true, false);
            /**************************1.start 创建ContextImpl 和 Instrumentation*******************/
            ContextImpl instrContext = ContextImpl.createAppContext(this, pi);

            try {
                java.lang.ClassLoader cl = instrContext.getClassLoader();
                mInstrumentation = (Instrumentation)
                    cl.loadClass(data.instrumentationName.getClassName()).newInstance();
            } catch (Exception e) {
                throw new RuntimeException(
                    "Unable to instantiate instrumentation "
                    + data.instrumentationName + ": " + e.toString(), e);
            }

            mInstrumentation.init(this, instrContext, appContext,
                   new ComponentName(ii.packageName, ii.name), data.instrumentationWatcher,
                   data.instrumentationUiAutomationConnection);
           /**************************1.end 创建ContextImpl 和 Instrumentation*******************/
            if (mProfiler.profileFile != null && !ii.handleProfiling
                    && mProfiler.profileFd == null) {
                mProfiler.handlingProfiling = true;
                File file = new File(mProfiler.profileFile);
                file.getParentFile().mkdirs();
                Debug.startMethodTracing(file.toString(), 8 * 1024 * 1024);
            }

        } else {
            mInstrumentation = new Instrumentation();
        }

        if ((data.appInfo.flags&ApplicationInfo.FLAG_LARGE_HEAP) != 0) {
            dalvik.system.VMRuntime.getRuntime().clearGrowthLimit();
        } else {
            // Small heap, clamp to the current growth limit and let the heap release
            // pages after the growth limit to the non growth limit capacity. b/18387825
            dalvik.system.VMRuntime.getRuntime().clampGrowthLimit();
        }

        // Allow disk access during application and provider setup. This could
        // block processing ordered broadcasts, but later processing would
        // probably end up doing the same disk access.
        final StrictMode.ThreadPolicy savedPolicy = StrictMode.allowThreadDiskWrites();
          /**************************2.start Application 对象*******************/
        try {
            // If the app is being launched for full backup or restore, bring it up in
            // a restricted environment with the base application class.
            Application app = data.info.makeApplication(data.restrictedBackupMode, null);
            mInitialApplication = app;
          /**************************2.end Application 对象*******************/
            // don't bring up providers in restricted mode; they may depend on the
            // app's custom Application class

            /**************************3.start 启动当前进程的ContentProvider 并调用其 onCreat 方法 *******************/
            if (!data.restrictedBackupMode) {
                List<ProviderInfo> providers = data.providers;
                if (providers != null) {
                    installContentProviders(app, providers);
                    // For process that contains content providers, we want to
                    // ensure that the JIT is enabled "at some point".
                    mH.sendEmptyMessageDelayed(H.ENABLE_JIT, 10*1000);
                }
            }
             /**************************3.end 启动当前进程的ContentProvider 并调用其 onCreat 方法 *******************/

            // Do this after providers, since instrumentation tests generally start their
            // test thread at this point, and we don't want that racing.
            /**************************4.start 调用Application的 onCreat 方法 *******************/
            try {
                mInstrumentation.onCreate(data.instrumentationArgs);
            }
            catch (Exception e) {
                throw new RuntimeException(
                    "Exception thrown in onCreate() of "
                    + data.instrumentationName + ": " + e.toString(), e);
            }
           /**************************4.end 调用Application的 onCreat 方法 *******************/
            try {
                mInstrumentation.callApplicationOnCreate(app);
            } catch (Exception e) {
                if (!mInstrumentation.onException(app, e)) {
                    throw new RuntimeException(
                        "Unable to create application " + app.getClass().getName()
                        + ": " + e.toString(), e);
                }
            }
        } finally {
            StrictMode.setThreadPolicy(savedPolicy);
        }
    }
installContentProviders 完成了 ContentProvider 的启动工作,它的实现如下所示:
    private void installContentProviders(
            Context context, List<ProviderInfo> providers) {
        final ArrayList<IActivityManager.ContentProviderHolder> results =
            new ArrayList<IActivityManager.ContentProviderHolder>();

        for (ProviderInfo cpi : providers) {
            if (DEBUG_PROVIDER) {
                StringBuilder buf = new StringBuilder(128);
                buf.append("Pub ");
                buf.append(cpi.authority);
                buf.append(": ");
                buf.append(cpi.name);
                Log.i(TAG, buf.toString());
            }
            IActivityManager.ContentProviderHolder cph = installProvider(context, null, cpi,
                    false /*noisy*/, true /*noReleaseNeeded*/, true /*stable*/);
            if (cph != null) {
                cph.noReleaseNeeded = true;
                results.add(cph);
            }
        }

        try {
            ActivityManagerNative.getDefault().publishContentProviders(
                getApplicationThread(), results);
        } catch (RemoteException ex) {
        }
    }
首先会遍历当前进程的 ProviderInfo 列表并一一调用installProvider 方法来启动它们,接着将已经启动的 ContentProvider 发布到AMS 中,AMS 会把它们存储在 ProviderMap 中,这样外部调用者就可以直接从AMS 中获取ContentProvider 了。
在 installProvider 方法汇总,完成了ContentProvider 对象的创建过程,源码如下所示:
    private IActivityManager.ContentProviderHolder installProvider(Context context,
            IActivityManager.ContentProviderHolder holder, ProviderInfo info,
            boolean noisy, boolean noReleaseNeeded, boolean stable) {
        ContentProvider localProvider = null;
        IContentProvider provider;
            ...
            try {
                //通过类加载器完成了ContentProvider 对象的创建
                final java.lang.ClassLoader cl = c.getClassLoader();
                localProvider = (ContentProvider)cl.
                    loadClass(info.name).newInstance();
                provider = localProvider.getIContentProvider();
                if (provider == null) {
                    Slog.e(TAG, "Failed to instantiate class " +
                          info.name + " from sourceDir " +
                          info.applicationInfo.sourceDir);
                    return null;
                }
                if (DEBUG_PROVIDER) Slog.v(
                    TAG, "Instantiating local provider " + info.name);
                // XXX Need to create the correct context for this provider.
                //调用ContentProvider 的attachInfo 方法
                localProvider.attachInfo(c, info);
            } catch (java.lang.Exception e) {
                if (!mInstrumentation.onException(null, e)) {
                    throw new RuntimeException(
                            "Unable to get provider " + info.name
                            + ": " + e.toString(), e);
                }
                return null;
            }
            ...
        }
在完成了ContentProvider 对象的创建,还会通过ContentProvider 的 attachInfo 方法来调用它的 onCreate 方法,如下所示:
    private void attachInfo(Context context, ProviderInfo info, boolean testing) {
        mNoPerms = testing;

        /*
         * Only allow it to be set once, so after the content service gives
         * this to us clients can't change it.
         */
        if (mContext == null) {
            mContext = context;
            if (context != null) {
                mTransport.mAppOpsManager = (AppOpsManager) context.getSystemService(
                        Context.APP_OPS_SERVICE);
            }
            mMyUid = Process.myUid();
            if (info != null) {
                setReadPermission(info.readPermission);
                setWritePermission(info.writePermission);
                setPathPermissions(info.pathPermissions);
                mExported = info.exported;
                mSingleUser = (info.flags & ProviderInfo.FLAG_SINGLE_USER) != 0;
                setAuthorities(info.authority);
            }
            //调用ContentProvider 的onCreate 方法
            ContentProvider.this.onCreate();
        }
    }
至此,ContentProvider 已经被创建并且其 onCreate 方法也已经被调用,意味着ContentProvider 已经启动完成了。
经过以上四个步骤,ContentProvider已经成功启动,且其所在进程AppliCation 也已经启动,即ContentProvider 所在的进程已经完成了整个的启动过程,然后其他应用就可以通过AMS 来访问这个ContentProvider 了。
注意L这里的ContentProvider 并不是原始的ContentProvider ,而是ContentProvider 的Binder 对象 IContentProvider,它的具体实现类是ContentProviderNative 和 ContentProvider.Transport,其中
ContentProvider.Transport 继承了 ContentProviderNative 。因此调用ContentProvider 的query 方法 最终会议进程间通信的方式调用到 ContentProvider.Transport 的query 方法,如下所示:
public abstract class ContentProvider implements ComponentCallbacks2 {
    ...
    class Transport extends ContentProviderNative {
        AppOpsManager mAppOpsManager = null;
        int mReadOp = AppOpsManager.OP_NONE;
        int mWriteOp = AppOpsManager.OP_NONE;

        ContentProvider getContentProvider() {
            return ContentProvider.this;
        }

        @Override
        public String getProviderName() {
            return getContentProvider().getClass().getName();
        }

        @Override
        public Cursor query(String callingPkg, Uri uri, @Nullable String[] projection,
                @Nullable Bundle queryArgs, @Nullable ICancellationSignal cancellationSignal) {
            validateIncomingUri(uri);
            uri = maybeGetUriWithoutUserId(uri);
            if (enforceReadPermission(callingPkg, uri, null) != AppOpsManager.MODE_ALLOWED) {
                // The caller has no access to the data, so return an empty cursor with
                // the columns in the requested order. The caller may ask for an invalid
                // column and we would not catch that but this is not a problem in practice.
                // We do not call ContentProvider#query with a modified where clause since
                // the implementation is not guaranteed to be backed by a SQL database, hence
                // it may not handle properly the tautology where clause we would have created.
                if (projection != null) {
                    return new MatrixCursor(projection, 0);
                }

                // Null projection means all columns but we have no idea which they are.
                // However, the caller may be expecting to access them my index. Hence,
                // we have to execute the query as if allowed to get a cursor with the
                // columns. We then use the column names to return an empty cursor.
                Cursor cursor = ContentProvider.this.query(
                        uri, projection, queryArgs,
                        CancellationSignal.fromTransport(cancellationSignal));
                if (cursor == null) {
                    return null;
                }

                // Return an empty cursor for all columns.
                return new MatrixCursor(cursor.getColumnNames(), 0);
            }
            final String original = setCallingPackage(callingPkg);
            try {
                return ContentProvider.this.query(
                        uri, projection, queryArgs,
                        CancellationSignal.fromTransport(cancellationSignal));
            } finally {
                setCallingPackage(original);
            }
        }
       ...
   }
    ...
}