pom依赖
 <dependency>
     <groupId>org.springframework.boot</groupId>
     <artifactId>spring-boot-starter-actuator</artifactId>
     <version>1.5.6.RELEASE</version>
 </dependency>
Gradle:
compile('org.springframework.boot:spring-boot-starter-actuator')application.yml的配置
server:
  port: 8001
spring:
  application:
    name: microservice-provider-user
  boot:
    admin:
      url: http://localhost:9999        # spring boot admin服务端地址,
                                          搜集客户端监控数据
  jpa:
    generate-ddl: false
    show-sql: true
    hibernate:
      ddl-auto: none
  datasource:                           # 指定数据源
    platform: h2                        # 指定数据源类型
    schema: classpath:schema.sql        # 指定h2数据库的建表脚本
    data: classpath:data.sql            # 指定h2数据库的数据脚本
                                        打印出执行的SQL
  level:
    root: INFO
    org.hibernate: INFO
    org.hibernate.type.descriptor.sql.BasicBinder: TRACE
    org.hibernate.type.descriptor.sql.BasicExtractor: TRACE
eureka:
  client:
    serviceUrl:
      defaultZone: http://localhost:8761/eureka/
  instance:
    prefer-ip-address: true
management:
  security:
    enabled: false  #关掉安全认证
  port: 8899  #管理端口调整成8899,独立的端口可以做安全控制
  context-path: /monitor  #actuator的访问路径
  health:
    mail:
      enabled: false
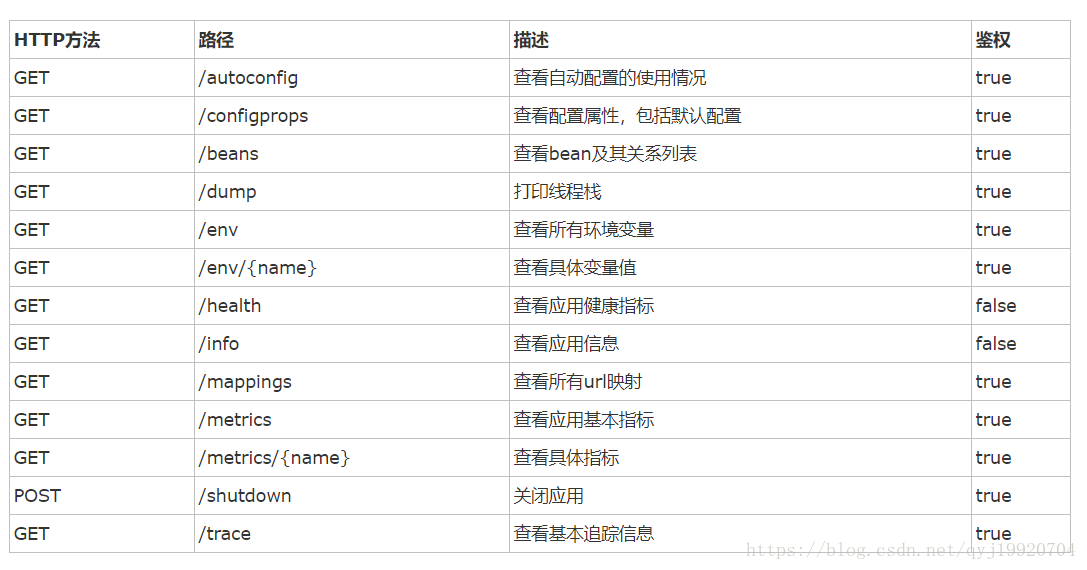
监控数据类型
- management.port:指定访问这些监控方法的端口,与逻辑接口端口分离。如果不想将这些暴露在http中,可以设置 management.port = -1
- management.address:指定地址,比如只能通过本机监控,可以设置 management.address = 127.0.0.1
自定义系统信息
info:
  aaa:
    name: 诸葛
    email: 327782001@qq.com
  bbb:
    age: 25
    hobbies: running
此时访问localhost:8899/info返回一下信息
{
    "aaa": {
        "name": "诸葛",
        "email": "[email protected]"
    },
    "bbb": {
        "age": 25,
        "hobbies": "running"
    }
}