说明:半自动化安装centos6,centos7实验步骤
实验1、半自动化安装centos6
实验2、半自动化安装centos7
实验3:制作启动光盘ISO文件
实验4:制作启动光盘ISO完整版
为何我正在写博客,html编辑器还能变,有在下午更新html模块的吗?更新模块不都是在夜晚12点吗???好不容易标注的颜色全都没了,心里怒骂csdn一万遍:你好任性
centos7中的光盘下面有一个isolinux目录
[root@centos7:cd]# file isolinux/boot.cat
isolinux/boot.cat: data
[root@centos7:cd]# hexdump -C isolinux/boot.cat -v
00000000 01 00 00 00 00 00 00 00 00 00 00 00 00 00 00 00 |................|
00000010 00 00 00 00 00 00 00 00 00 00 00 00 aa 55 55 aa |.............UU.|
55aa是mbr分区中的结束标识
实验1、半自动化安装centos6
centos6提供httpd服务的ip为仅主机模式(192.168.31.6),安装的虚拟机网络模式为仅主机模式
centos6上面配好httpd服务,
yum install httpd
systemctl start httpd
ss -ntl #查看httpd服务 80端口
cd /var/www/html
echo "zhaoliying" > index.html 浏览器打开192.168.31.6可以看到zhaoliying
https://mirrors.aliyun.com 参考目录
并挂载光盘到/var/www/html/centos/6/os/x86_64/ 如图1
图1

centos6
自动化安装应答文件ks.cfg生成
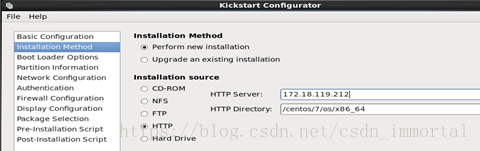
图形界面安装向导,system-config-kickstart,如图2
图2
安装后脚本
rm -rf /etc/yum.repos.d/*
cat > /etc/yum.repos.d/base.repo << EOF
[base]
name=base
baseurl=file:///misc/cd/
gpgcheck=0
EOF
useradd=zhaoli
echo centos|passwd -stdin zhaoli
保存到root下,并且退出
生成的ks.cfg文件的内容如下
[root@centos6 ~ ]#cat ks.cfg
        #platform=x86, AMD64, or Intel EM64T
        #version=DEVEL
        # Firewall configuration
        firewall --disabled
        # Install OS instead of upgrade
        install
        # Use network installation
        url --url="http://192.168.31.6/centos/6/os/x86_64"
        # Root password
        rootpw --plaintext centos
        # System authorization information
        auth  --useshadow  --passalgo=sha512
        # Use text mode install
        text
        firstboot --disable
        # System keyboard
        keyboard us
        # System language
        lang en_US
        # SELinux configuration
        selinux --disabled
        # Installation logging level
        logging --level=info
        # Reboot after installation
        reboot
        # System timezone
        timezone  Asia/Shanghai
        # Network information
        network  --bootproto=dhcp --device=eth0 --onboot=on
        # System bootloader configuration
        bootloader --location=mbr
        # Clear the Master Boot Record
        zerombr
        # Partition clearing information
        clearpart --all --initlabel
        part /boot --fstype=ext4 --size=1024
        part / --fstype=ext4 --size=50000
        part /data --fstype=ext4 --size=30000

        part swap --size=2048

        %packages
        @base
        @core
        autofs
        %end
        %post
        chkconfig autofs on
        rm -rf /etc/yum.repos.d/*
        cat > /etc/yum.repos.d/base.repo <<EOF
        [base]
        name=base
        baseurl=file:///misc/cd/
        gpgcheck=0
        EOF

        useradd zhaoli
        echo centos |passwd --stdin zhaoli

        mkdir /root/.ssh
        echo 'alias cdnet="cd /etc/sysconfig/network-scripts"' >> /root/.bashrc
        %end
[root@centos6 html ]#service httpd start
[root@centos6 html ]#ss -ntl
[root@centos6 html ]#vim /etc/selinux/config
[root@centos6 html ]#setenforce 0启动一个新的虚拟机,并把centos6的光盘挂载上去,如图5
按ESC键,输入如图6的字符
回车,等待自动安装完成
图5


图6 linux ip=192.168.31.100 netmask=255.255.0.0 ks=http://192.168.31.6/ks.cfg

实验2、半自动化安装centos7
ftp服务
[root@centos7:cd]# yum install vsftpd
cd /var/ftp/
cd pub
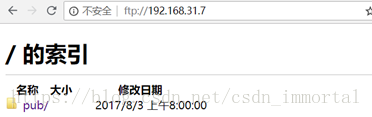
ftp://192.168.31.7
[root@centos7:cd]# systemctl start vsftpd
如图7
图7
关闭selinux和防火墙
iptables -F
getenforce
vim /etc/selinux/config
setenforce 0
以centos7手动安装完成后自动生成的安装文件anaconda为摸版,并修改
[root@centos7:~]# cp anaconda-ks.cfg ks7.cfg
    [root@centos7:~]# cp ks7.cfg /var/ftp/pub
    [root@centos7:pub]# pwd
    /var/ftp/pub
    [root@centos7:pub]# ls
    centos7  ks7.cfg                           #少了一步,把centos7光盘挂载到centos7挂载点下
    [root@centos7:pub]# ksvalidator ks7.cfg    #检查ks7.cfg语法是否正确
    A partition with the mountpoint /boot has already been defined.  #此处写了两个分区信息一样,已经删除一个cp ks7.cfg /var/ftp/pub
    [root@centos7:pub]# pwd
    /var/ftp/pub
    [root@centos7:pub]# ls
    centos7  ks7.cfg                           #少了一步,把centos7光盘挂载到centos7挂载点下
    [root@centos7:pub]# ksvalidator ks7.cfg    #检查ks7.cfg语法是否正确
    A partition with the mountpoint /boot has already been defined.  #此处写了两个分区信息一样,已经删除一个
启动一个新的虚拟机,并且把centos7的光盘加载上去,启动光盘安装,如图8,按ESC键,图9开始安装
boot:linux ip=192.168.31.100 netmask=255.0.0.0 ks=192.168.31.7/pub/ks7.cfg
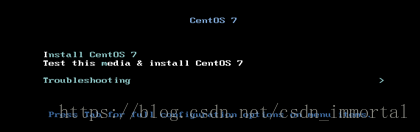

图8
图9
ks7.cfg修改后的内容如下
       [root@centos7 ~ ]#cat ks7.cfg
        #version=DEVEL
        # System authorization information
        auth --enableshadow --passalgo=sha512
        # Use CDROM installation media
        #cdrom修改为
        url --url=ftp://192.168.31.7/pub/centos7/    #此处已经把centos7的光盘挂载到此挂载点
        # Use graphical install
        #graphical
        text                                         #文本界面安装
        # Run the Setup Agent on first boot
        firstboot --enable
        ignoredisk --only-use=sda
        # Keyboard layouts
        keyboard --vckeymap=us --xlayouts='us'
        # System language
        lang en_US.UTF-8

        # Network information
        network  --bootproto=dhcp --device=ens34 --onboot=on --ipv6=auto --activate
        network  --hostname=centos7.zhaoliying

        # Root password
        rootpw --iscrypted $6$oC3Y9WXlG1G/zP2u$kPBr51L0rRKNIkJOVJdI9v2USbWmPudoVSkg.djDH5lmk14zr3ct9gOONECpdeXOvduY5xNZVdr8vd2LzDSt50
        # System services
        services --disabled="chronyd"
        #禁用防火墙和selinux
        selinux --disabled
        firewall --disabled
        reboot                                               #安装完成后自动重启
        # System timezone
        timezone Asia/Shanghai --isUtc --nontp
        # X Window System configuration information
        xconfig  --startxonboot
        # System bootloader configuration
        bootloader --location=mbr --boot-drive=sda
        # Partition clearing information
        clearpart --none --initlabel
        #初始化老硬盘标签
        zerombr
        #安装的时候有个输入版本标签,同意
        eula --agreed
        # Disk partitioning information
        part / --fstype="xfs" --ondisk=sda --size=50775
        part /boot --fstype="xfs" --ondisk=sda --size=1024
        part swap --fstype="swap" --ondisk=sda --size=1024
        part /data --fstype="xfs" --ondisk=sda --size=30720

        %packages
        @core
        autofs
        %end
        #安装后执行的脚本
        %post
        systemctl enable autofs
        rm -rf /etc/yum.repos.d/*
        cat > /etc/yum.repos.d/base.repo <<EOF
        [base]
        name=base
        baseurl=file:///misc/cd/
        gpgcheck=0
        EOF

        useradd zhaoliying
        echo centos |passwd --stdin zhaoliying

        mkdir /root/.ssh
        echo 'alias cdnet="cd /etc/sysconfig/network-scripts"' >> /root/.bashrc

        %end
实验3:制作启动光盘ISO文件
由于上述的实验1,实验2,都是手动填写linux ip=192.168.31.* netmask=255.0.0.0 ks=http:192.168.31.* /ks.cfg,只能说是半自动启动,
利用制作光盘启动,把上述需要手动写入的制作到光盘里面,这样就不用启动安装时手写了
挂载光盘centos6到/media
[root@centos6 boot ]#mkdir boot
[root@centos6 boot ]#mkdir boot
[root@centos6 boot ]#cd boot/
[root@centos6 boot ]#pwd
/data/boot
[root@centos6 boot ]#cp -r /media/isolinux/ /data/boot

[root@centos6 boot ]#tree
.
└── isolinux
    ├── boot.cat
    ├── boot.msg
    ├── grub.conf
    ├── initrd.img
    ├── isolinux.bin
    ├── isolinux.cfg
    ├── memtest
    ├── splash.jpg
    ├── TRANS.TBL
    ├── vesamenu.c32
    └── vmlinuz
1 directory, 11 files

[root@centos6 boot ]#tree
.
├── isolinux
│   ├── boot.cat
│   ├── boot.msg
│   ├── grub.conf
│   ├── initrd.img
│   ├── isolinux.bin
│   ├── isolinux.cfg
│   ├── memtest
│   ├── splash.jpg
│   ├── TRANS.TBL
│   ├── vesamenu.c32
│   └── vmlinuz
└── ksdir
    └── ks6.cfg                       #此处把实验1的ks6.cfg文件复制到/data/boot/ksdir目录下了
2 directories, 12 files/data/boot
[root@centos6 boot ]#cp -r /media/isolinux/ /data/boot

[root@centos6 boot ]#tree
.
└── isolinux
    ├── boot.cat
    ├── boot.msg
    ├── grub.conf
    ├── initrd.img
    ├── isolinux.bin
    ├── isolinux.cfg
    ├── memtest
    ├── splash.jpg
    ├── TRANS.TBL
    ├── vesamenu.c32
    └── vmlinuz
1 directory, 11 files

[root@centos6 boot ]#tree
.
├── isolinux
│   ├── boot.cat
│   ├── boot.msg
│   ├── grub.conf
│   ├── initrd.img
│   ├── isolinux.bin
│   ├── isolinux.cfg
│   ├── memtest
│   ├── splash.jpg
│   ├── TRANS.TBL
│   ├── vesamenu.c32
│   └── vmlinuz
└── ksdir
    └── ks6.cfg                       #此处把实验1的ks6.cfg文件复制到/data/boot/ksdir目录下了
2 directories, 12 files
制作启动菜单
此步骤就是进一步完善实验1,实验2中的linux ip=192.168.31.* netmask=255.0.0.0 ks=http:192.168.31.* /ks.cfg
[root@centos6 boot ]#vim /data/boot/isolinux//isolinux.cfg

        label linux
          menu label ^Auto Install an system                   #^字符相当于一个快捷键,启动菜单中按A会调到此选项
          kernel vmlinuz
          append initrd=initrd.img ks=cdrom:/ksdir/ks6.cfg     #引导文件的路径,ks6.cfg同实验1的ks文件相同
        label vesa                                             #同时开启httpd服务,同实验1的httpd服务,以便安装yum源
          menu label Install manual centos
          kernel vmlinuz
          append initrd=initrd.img repo=http://192.168.31.6/centos/6/os/x86_64/  #手动安装的引导yum源
        label local
          menu label Boot from ^local drive
          menu default
          localboot 0xffffinitrd=initrd.img ks=cdrom:/ksdir/ks6.cfg              #引导文件的路径,ks6.cfg同实验1的ks文件相同
        label vesa                                     #同时开启httpd服务,同实验1的httpd服务,以便安装yum源
          menu label Install manual centos
          kernel vmlinuz
          append initrd=initrd.img repo=http://192.168.31.6/centos/6/os/x86_64/  #手动安装的引导yum源
        label local
          menu label Boot from ^local drive
          menu default
          localboot 0xffff
克隆光盘
[root@centos6 ksdir ]# mkisofs -R -J -T -v --no-emul-boot --boot-load-size 4 --boot-info-table -V "CentOS 6.9 x86_64 boot" -b isolinux/isolinux.bin -c isolinux/boot.cat -o /root/boot.iso /data/boot/
        [root@centos6 ~ ]#file boot.iso
        boot.iso: ISO 9660 CD-ROM filesystem data 'CentOS 6.9 x86_64 boot' (bootable)mkisofs -R -J -T -v --no-emul-boot --boot-load-size 4 --boot-info-table -V "CentOS 6.9 x86_64 boot" -b isolinux/isolinux.bin -c isolinux/boot.cat -o /root/boot.iso /data/boot/
        [root@centos6 ~ ]#file boot.iso
        boot.iso: ISO 9660 CD-ROM filesystem data 'CentOS 6.9 x86_64 boot' (bootable)
把克隆的boot.iso挂载到新建的虚拟机上,光盘启动,并且添加网络适配器,仅主机模式,如图10
图10
实验4:制作启动光盘ISO完整版
复制centos6光盘所有内容到data下并且命名为centos6

        [root@centos6 data ]#ls
        boot
        [root@centos6 data ]#cp -r /media/ /data/centos6
        [root@centos6 data ]#ls
        boot  centos6

        [root@centos6 centos6 ]#ls -a
        .                GPL                       RPM-GPG-KEY-CentOS-6
        ..               images                    RPM-GPG-KEY-CentOS-Debug-6
        CentOS_BuildTag  isolinux                  RPM-GPG-KEY-CentOS-Security-6
        .discinfo        Packages                  RPM-GPG-KEY-CentOS-Testing-6
        EFI              RELEASE-NOTES-en-US.html  TRANS.TBL
        EULA             repodata                  .treeinfo
        [root@centos6 centos6 ]#find -name TRANS.TBL -exec rm {} \;   #删除TBL文件

重新制作repodata文件,yum源元数据,其中是一些包,包的依赖关系,包的分组等信息
        [root@centos6 centos6 ]#ls repodata/
        1cde788f77b08a7eb3dfdba12fa384a5f0214147a717a1e2d4504368037fba90-c6-x86_64-comps.xml.gz
        43d8fd068164b0f042845474d6a22262798b9f0d1f49ad1bf9f95b953089777d-c6-x86_64-comps.xml     #此条信息有用
        594889376c2452dc8178bbaed982deba4dff38a42716ac03fc84576c17b1d79b-filelists.sqlite.bz2
        92299bd89d0ef9e4030e78d31399a96b41712239f032d0092f2345ba5cb01404-other.xml.gz
        9f2ef5087547b18bdccc798b0cad7456047fc69ca17db69d3159b6dd84ed1c11-primary.xml.gz
        ad73b7fa76bb45feea7e4cdb2d896279524039545e8764ceaa515665f897a0c5-primary.sqlite.bz2
        dc8a406c3cc1c5103ff2e22a1b9d3d0d09a13a6fda831ffecebdd55484bf5146-filelists.xml.gz
        f18d3f35ab887f27a5acc563138bd58a0c9b668e8cd79dbb32c4fc610c88e320-other.sqlite.bz2cp -r /media/ /data/centos6
        [root@centos6 data ]#ls
        boot  centos6

        [root@centos6 centos6 ]#ls -a
        .                GPL                       RPM-GPG-KEY-CentOS-6
        ..               images                    RPM-GPG-KEY-CentOS-Debug-6
        CentOS_BuildTag  isolinux                  RPM-GPG-KEY-CentOS-Security-6
        .discinfo        Packages                  RPM-GPG-KEY-CentOS-Testing-6
        EFI              RELEASE-NOTES-en-US.html  TRANS.TBL
        EULA             repodata                  .treeinfo
        [root@centos6 centos6 ]#find -name TRANS.TBL -exec rm {} \;   #删除TBL文件

重新制作repodata文件,yum源元数据,其中是一些包,包的依赖关系,包的分组等信息
        [root@centos6 centos6 ]#ls repodata/
        1cde788f77b08a7eb3dfdba12fa384a5f0214147a717a1e2d4504368037fba90-c6-x86_64-comps.xml.gz
        43d8fd068164b0f042845474d6a22262798b9f0d1f49ad1bf9f95b953089777d-c6-x86_64-comps.xml     #此条信息有用
        594889376c2452dc8178bbaed982deba4dff38a42716ac03fc84576c17b1d79b-filelists.sqlite.bz2
        92299bd89d0ef9e4030e78d31399a96b41712239f032d0092f2345ba5cb01404-other.xml.gz
        9f2ef5087547b18bdccc798b0cad7456047fc69ca17db69d3159b6dd84ed1c11-primary.xml.gz
        ad73b7fa76bb45feea7e4cdb2d896279524039545e8764ceaa515665f897a0c5-primary.sqlite.bz2
        dc8a406c3cc1c5103ff2e22a1b9d3d0d09a13a6fda831ffecebdd55484bf5146-filelists.xml.gz
        f18d3f35ab887f27a5acc563138bd58a0c9b668e8cd79dbb32c4fc610c88e320-other.sqlite.bz2
[root@centos6 centos6 ]#rm -rf repodata/*
重新根据光盘里面的yum源生成reopdata分组信息
[root@centos6 centos6 ]#createrepo -g /media/repodata/43d8fd068164b0f042845474d6a22262798b9f0d1f49ad1bf9f95b953089777d-c6-x86_64-comps.xml .
        Spawning worker 0 with 3240 pkgs
        [root@centos6 centos6 ]#mkdir ksdir

        [root@centos6 centos6 ]#cp /var/www/html/ks6.cfg ksdir/
        [root@centos6 ksdir ]#vim ks6.cfg
        #url --url="http://192.168.31.6/centos/6/os/x86_64"
        cdrom        #改为光盘cdrom即可createrepo -g /media/repodata/43d8fd068164b0f042845474d6a22262798b9f0d1f49ad1bf9f95b953089777d-c6-x86_64-comps.xml .
        Spawning worker 0 with 3240 pkgs
        [root@centos6 centos6 ]#mkdir ksdir

        [root@centos6 centos6 ]#cp /var/www/html/ks6.cfg ksdir/
        [root@centos6 ksdir ]#vim ks6.cfg
        #url --url="http://192.168.31.6/centos/6/os/x86_64"
        cdrom        #改为光盘cdrom即可
[root@centos6 isolinux ]#pwd
/data/centos6/isolinux
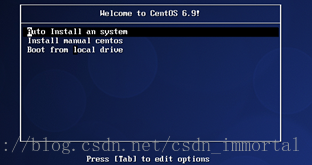
[root@centos6 isolinux ]#vim isolinux.cfg #修改启动菜单
label linux
menu label ^Auto Install an system
kernel vmlinuz
append initrd=initrd.img ks=cdrom:/ksdir/ks6.cfg
label manual
menu label ^Manual install an system
kernel vmlinuz
append initrd=initrd.img
label local
menu default
menu label Boot from ^local drive
localboot 0xffffks=cdrom:/ksdir/ks6.cfg
label manual
menu label ^Manual install an system
kernel vmlinuz
append initrd=initrd.img
label local
menu default
menu label Boot from ^local drive
localboot 0xffff[root@centos6 ksdir ]#mkisofs -R -J -T -v --no-emul-boot --boot-load-size 4 --boot-info-table -V "CentOS 6.9 x86_64 boot" -b isolinux/isolinux.bin -c isolinux/boot.cat -o /root/centos6.9.iso /data/centos6/mkisofs -R -J -T -v --no-emul-boot --boot-load-size 4 --boot-info-table -V "CentOS 6.9 x86_64 boot" -b isolinux/isolinux.bin -c isolinux/boot.cat -o /root/centos6.9.iso /data/centos6/[root@centos6 ksdir ]#mkisofs -R -J -T -v --no-emul-boot --boot-load-size 4 --boot-info-table -V "CentOS 6.9 x86_64 boot" -b isolinux/isolinux.bin -c isolinux/boot.cat -o /root/centos6.9.iso /data/centos6/
此时制作完成一个3.72G的centos6.9光盘启动安装安,但现在一般没有光驱,可以网上下载工具,把此光盘刻录到u盘里面去
新建一个虚拟机,把centos6.9挂到虚拟机上去,光盘启动,选着自动安装选项,则系统自动安装完成