一、PXE
PrebootExcution Environment 预启动执行环境
Intel公司研发基于Client/Server的网络模式,支持远程主机通过网络从远端服务器下载映像,并由此支持通过网络启动操作系统,PXE可以引导和安装Windows,linux等多种操作系统
二、PXE工作原理
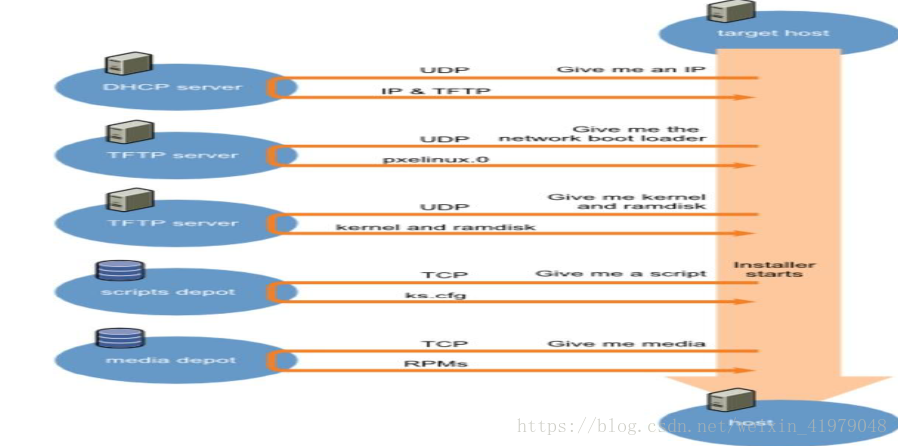
1.Client向PXE Server上的DHCP发送IP地址请求消息,DHCP检测Client是否合法(主要是检测Client的网卡MAC地址),如果合法则返回Client的IP地址,同时将启动文件pxelinux.0的位置信息一并传送给Client
2.Client向PXE Server上的TFTP发送获取pxelinux.0请求消息,TFTP接收到消息之后再向Client发送pxelinux.0大小信息,试探Client是否满意,当TFTP收到Client发回的同意大小信息之后,正式向Client发送pxelinux.0
3.Client执行接收到的pxelinux.0文件
4.Client向TFTP Server发送针对本机的配置信息文件(在TFTP 服务的pxelinux.cfg目录下),TFTP将配置文件发回5.Client,继而Client根据配置文件执行后续操作。
6.Client向TFTP发送Linux内核请求信息,TFTP接收到消息之后将内核文件发送给Client
7.Client向TFTP发送根文件请求信息,TFTP接收到消息之后返回Linux根文件系统
8.Client启动Linux内核
三、PXE实现自动化安装部署centos系统
[root@CentOS7 ~]#systemctl stop firewalld.service  关闭防火墙
[root@CentOS7 ~]systemctl disable firewalld.service 禁止防火墙开机自启动关闭SELINUX
[root@CentOS7 ~]sed -i "s/SELINUX=enforcing/SELINUX=disabled/"  /etc/selinux/config   关闭selinux策略
[root@CentOS7 ~]getenforce  获取linux当前状态
1.安装相关软件包
[root@CentOS7 ~]yum install -y dhcp httpd tftp-server syslinux     一次性安装四个软件包
[root@CentOS7 ~]systemctl  start httpd tftp.socket          启动http和tftp服务
[root@CentOS7 ~]systemctl enable httpd tftp.socket  设置开机自 启动
2.制作CentOS6和CentOS7的yum源
[root@CentOS7 ~]mkdir -pv  /var/www/html/centos/{6,7}
[root@CentOS7 ~]echo /dev/sr0  /var/www/html/centos/7 iso9660 defaults 0 0 >> /etc/fstab
[root@CentOS7 ~]echo /dev/sr1  /var/www/html/centos/6 iso9660 defaults 0 0 >> /etc/fstab
[root@CentOS7 ~]mount -a   使挂载生效
3.制作CentOS6和CentOS7的kickstart文件
[root@CentOS7 ~]mkdir  /var/www/html/ksdir
[root@CentOS7 ~]cp -p /root/anaconda7-ks.cfg /var/www/html/ksdir/ks7_desktop.cfg
[root@CentOS7 ~]cp -p /root/anaconda6-ks.cfg /var/www/html/ksdir/ks6-mini.cfg
[root@CentOS7 ~]ls
---注意应答文件的权限问题
systemctl set-default multi-user.target 默认进入多用户模式
systemctl disable initial-setup.service 自动化centos7
编辑CentOS6的应答文件ks6_mini.cfg
#version=DEVEL
install
url --url=http://192.168.138.130/centos/6     #指定安装使用的yum源路径
lang en_US.UTF-8
keyboard us
network --onboot yes --device eth0 --bootproto dhcp --noipv6
rootpw  --iscrypted $6$KzWQPi7a9pSHtuyE$1/WjqP3tuUdT4etobzIUcPMZzKLQ6M7ekKrarqMJfuqfH2vEl4OdE4KJvJVsbOjQaDeYzULThmRx/HNpnFgAI/
firewall --disabled
authconfig --enableshadow --passalgo=sha512
selinux --disabled
timezone Asia/Shanghai
bootloader --location=mbr --driveorder=sda --append="crashkernel=auto rhgb quiet"
# The following is the partition information you requested
# Note that any partitions you deleted are not expressed
# here so unless you clear all partitions first, this is
# not guaranteed to work
clearpart --all       #清空全部分区
zerombr         #安装时自动清空MBR
reboot       #安装完成后自动重启
text        #使用text文本安装方式
part /boot --fstype=ext4 --size=1024
part / --fstype=ext4 --size=50000
part /data --fstype=ext4 --size=30000

part swap --size=2048

%packages    #要安装的软件包
@core
autofs
%end
%post     #安装后脚本
useradd centos
echo  centos | passwd --stdin  centos
%end
编辑CentOS7的应答文件ks7_desktop.cfg
#version=DEVEL
# System authorization information
auth --enableshadow --passalgo=sha512
# Use CDROM installation media
url --url=http://192.168.138.130/centos/7/
# Use graphical install
firewall --disabled
selinux --disabled
text
reboot
# Run the Setup Agent on first boot
firstboot --disable
ignoredisk --only-use=sda
# Keyboard layouts
keyboard --vckeymap=us --xlayouts='us'
# System language
lang en_US.UTF-8

# Network information
network  --bootproto=dhcp --device=ens33 --onboot=on --ipv6=auto --activate
network  --hostname=localhost.localdomain
# System bootloader configuration
bootloader --location=mbr --boot-drive=sda
# Partition clearing information
zerombr
clearpart --all --initlabel
# Disk partitioning information
part swap --fstype="swap" --ondisk=sda --size=2048
part /boot --fstype="xfs" --ondisk=sda --size=1024
part / --fstype="xfs" --ondisk=sda --size=51200
part /app --fstype="xfs" --ondisk=sda --size=20480
eula --agreed


%packages
@^gnome-desktop-environment
@base
@core
@desktop-debugging
@dial-up
@directory-client
@fonts
@gnome-desktop
@guest-agents
@guest-desktop-agents
@input-methods
@internet-browser
@java-platform
@multimedia
@network-file-system-client
@networkmanager-submodules
@print-client
@x11

%end

%addon com_redhat_kdump --disable --reserve-mb='auto'

%end

%anaconda
pwpolicy root --minlen=6 --minquality=1 --notstrict --nochanges --notempty
pwpolicy user --minlen=6 --minquality=1 --notstrict --nochanges --emptyok
pwpolicy luks --minlen=6 --minquality=1 --notstrict --nochanges --notempty
%end

%post
useradd centos
echo centos | passwd --stdin centos &> /dev/null
systemctl  set-default  multi-user.target
systemctl  disable  initial-setup-graphical.service
%end
4.配置dhcp服务
默认dhcp配置文件内没有配置信息,可以使用配置示例文件将配置文件覆盖后进行修改,dhcp服务必须在更改配置
文件才能启动。
[root@CentOS7 ~]cp /usr/share/doc/dhcp-4.2.5/dhcpd.conf.example /etc/dhcp/dhcpd.conf
[root@CentOS7 ~]vim  /etc/dhcp/dhcpd.conf   编辑配置文件

# DHCP server to understand the network topology.

subnet 192.168.138.0 netmask 255.255.255.0 {
        range 192.168.138.10 192.168.138.199;
        option routers 192.168.138.254;
        next-server 192.168.138.130;
        filename "pxelinux.0";

}
[root@CentOS7 ~]systemctl enable  dhcpd  设置dhcp服务开机自启动
[root@CentOS7 ~]systemctl start dhcpd 启动dhcp服务
[root@CentOS7 ~]ss -ntlu 查看用到的服务端口是否都已开启 dhcp:67 tftp69  http80
5.准备相关文件
[root@CentOS7 ~]mkdir /var/lib/tftpboot/pxelinux.cfg/
[root@CentOS7 ~]mkdir /var/lib/tftpboot/centos{6,7}/      #分别存放各自的内核
[root@CentOS7 ~]cp /var/www/html/centos/6/isolinux/{initrd.img,vmlinuz}   /var/lib/tftpboot/centos6/    #拷贝内核文件
[root@CentOS7 ~]cp /var/www/html/centos/7/isolinux/{initrd.img,vmlinuz}   /var/lib/tftpboot/centos7/
[root@CentOS7 ~]cp /usr/share/syslinux/{pxelinux.0,menu.c32} /var/lib/tftpboot
[root@CentOS7 ~]cp /var/www/html/centos/7/isolinux/isolinux.cfg  /var/lib/tftpboot/pxelinux.cfg/default  拷贝菜单模板
[root@CentOS7 ~]tree /var/lib/tftpboot/
├── centos6
│   ├── initrd.img
│   └── vmlinuz
├── centos7
│   ├── initrd.img
│   └── vmlinuz
├── menu.c32
├── pxelinux.0
└── pxelinux.cfg
    └── default
6.准备启动菜单
[root@CentOS7 ~]vim /var/lib/tftpboot/pxelinux.cfg/default
default vesamenu.c32
timeout 600

menu title  Auto Install CentOS

label centos7
  menu label ^Install  Desktop CentOS  7
  kernel centos7/vmlinuz
  append initrd=centos7/initrd.img ks=http://192.168.138.130/ksdir/ks7_desktop.cfg

label centos6
  menu label install ^Mini CentOS 6
  menu default
  kernel centos6/vmlinuz
  append initrd=centos6/initrd.img ks=http://192.168.138.130/ksdir/ks6_mini.cfg
label local
  menu label Boot from ^local drive
  localboot 0xffff
menu end
tree /var/lib/tftpboot/
7. 客户端测试安装即可