SafeAreaView简介
https://blog.csdn.net/xiangzhihong8/article/details/80692792
ReactNative官方从0.50.1版本开始,加入了针对iPhone X设备齐刘海页面适配的组件SafeAreaView,为ReactNative开发APP时对iPhone X的页面适配提供了很大的方便。目前,SafeAreaView只适合iOS设备。
SafeAreaView的使用也非常简单,只需要将SafeAreaView嵌套在最根级别的视图中即可,并且在style中加上flex:1等页面样式。
<SafeAreaView style={{flex: 1, backgroundColor: '#fff'}}>
  <View style={{flex: 1}}>
    <Text>Hello World!</Text>
  </View>
</SafeAreaView>- 1
- 2
- 3
- 4
- 5
下面是我之前一个项目的关于iPhone X的刘海屏设计的效果。

需要注意的是,使用了RN来开发页面时,不要忘了在RN中修改相应NaviBar/TabBar的高度(如isIOS ? 64 : 42)。
为了完成iPhone X的适配工作,我们还需要某些判断操作,例如下面是判断iPhone X的工具类。
import {
PixelRatio,
Dimensions,
Platform
} from 'react-native';
export let screenW = Dimensions.get('window').width;
export let screenH = Dimensions.get('window').height;
// iPhoneX
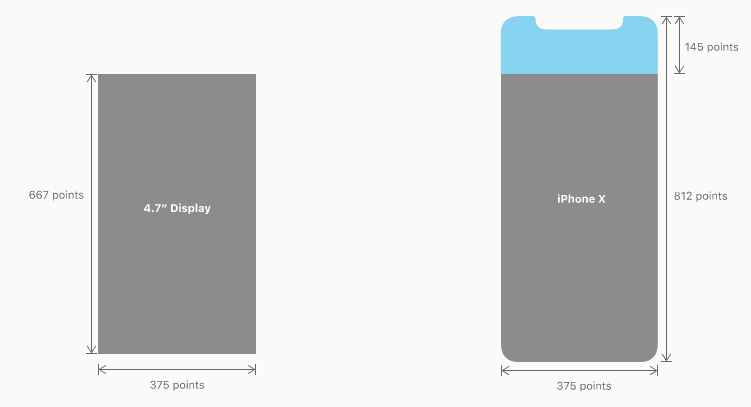
const X_WIDTH = 375;
const X_HEIGHT = 812;
/**
* 判断是否为iphoneX
* @returns {boolean}
*/
export function isIphoneX() {
return (
Platform.OS === 'ios' &&
((screenH === X_HEIGHT && screenW === X_WIDTH) ||
(screenH === X_WIDTH && screenW === X_HEIGHT))
)
}
/**
* 根据是否是iPhoneX返回不同的样式
* @param iphoneXStyle
* @param iosStyle
* @param androidStyle
* @returns {*}
*/
export function ifIphoneX(iphoneXStyle, iosStyle, androidStyle) {
if (isIphoneX()) {
return iphoneXStyle;
} else if (Platform.OS === 'ios') {
return iosStyle
} else {
if (androidStyle) return androidStyle;
return iosStyle
}
}- 1
- 2
- 3
- 4
- 5
- 6
- 7
- 8
- 9
- 10
- 11
- 12
- 13
- 14
- 15
- 16
- 17
- 18
- 19
- 20
- 21
- 22
- 23
- 24
- 25
- 26
- 27
- 28
- 29
- 30
- 31
- 32
- 33
- 34
- 35
- 36
- 37
- 38
- 39
- 40
- 41
- 42
然后我们在适配前进行相关的判断,然后使用SafeAreaView进行适配即可。例如:
export function ifIphoneX (iphoneXStyle, regularStyle) {
    if (isIphoneX()) {
        return iphoneXStyle;
    } else {
        return regularStyle
    }
} - 1
- 2
- 3
- 4
- 5
- 6
- 7
然后根据返回的环境,添加不同的StyleSheet样式即可。
const styles = StyleSheet.create({
    topBar: {
        backgroundColor: '#ffffff',
        ...ifIphoneX({
            paddingTop: 44
        }, {
            paddingTop: 20
        })
    },
}) - 1
- 2
- 3
- 4
- 5
- 6
- 7
- 8
- 9
- 10
SafeAreaView的属性和View组件的属性类似,大家可以参照View的使用来给SafeAreaView进行属性设置。
SafeAreaView组件官方资料
SafeAreaView简介
https://blog.csdn.net/xiangzhihong8/article/details/80692792
ReactNative官方从0.50.1版本开始,加入了针对iPhone X设备齐刘海页面适配的组件SafeAreaView,为ReactNative开发APP时对iPhone X的页面适配提供了很大的方便。目前,SafeAreaView只适合iOS设备。
SafeAreaView的使用也非常简单,只需要将SafeAreaView嵌套在最根级别的视图中即可,并且在style中加上flex:1等页面样式。
<SafeAreaView style={{flex: 1, backgroundColor: '#fff'}}>
  <View style={{flex: 1}}>
    <Text>Hello World!</Text>
  </View>
</SafeAreaView>- 1
- 2
- 3
- 4
- 5
下面是我之前一个项目的关于iPhone X的刘海屏设计的效果。
需要注意的是,使用了RN来开发页面时,不要忘了在RN中修改相应NaviBar/TabBar的高度(如isIOS ? 64 : 42)。
为了完成iPhone X的适配工作,我们还需要某些判断操作,例如下面是判断iPhone X的工具类。
import {
    PixelRatio,
    Dimensions,
    Platform
} from 'react-native';

export let screenW = Dimensions.get('window').width;
export let screenH = Dimensions.get('window').height;
// iPhoneX
const X_WIDTH = 375;
const X_HEIGHT = 812;

/**
 * 判断是否为iphoneX
 * @returns {boolean}
 */
export function isIphoneX() {
    return (
        Platform.OS === 'ios' &&
        ((screenH === X_HEIGHT && screenW === X_WIDTH) ||
            (screenH === X_WIDTH && screenW === X_HEIGHT))
    )
}

/**
 * 根据是否是iPhoneX返回不同的样式
 * @param iphoneXStyle
 * @param iosStyle
 * @param androidStyle
 * @returns {*}
 */

export function ifIphoneX(iphoneXStyle, iosStyle, androidStyle) {
    if (isIphoneX()) {
        return iphoneXStyle;
    } else if (Platform.OS === 'ios') {
        return iosStyle
    } else {
        if (androidStyle) return androidStyle;
        return iosStyle
    }
}- 1
- 2
- 3
- 4
- 5
- 6
- 7
- 8
- 9
- 10
- 11
- 12
- 13
- 14
- 15
- 16
- 17
- 18
- 19
- 20
- 21
- 22
- 23
- 24
- 25
- 26
- 27
- 28
- 29
- 30
- 31
- 32
- 33
- 34
- 35
- 36
- 37
- 38
- 39
- 40
- 41
- 42
然后我们在适配前进行相关的判断,然后使用SafeAreaView进行适配即可。例如:
export function ifIphoneX (iphoneXStyle, regularStyle) {
    if (isIphoneX()) {
        return iphoneXStyle;
    } else {
        return regularStyle
    }
} - 1
- 2
- 3
- 4
- 5
- 6
- 7
然后根据返回的环境,添加不同的StyleSheet样式即可。
const styles = StyleSheet.create({
    topBar: {
        backgroundColor: '#ffffff',
        ...ifIphoneX({
            paddingTop: 44
        }, {
            paddingTop: 20
        })
    },
}) - 1
- 2
- 3
- 4
- 5
- 6
- 7
- 8
- 9
- 10
SafeAreaView的属性和View组件的属性类似,大家可以参照View的使用来给SafeAreaView进行属性设置。
SafeAreaView组件官方资料