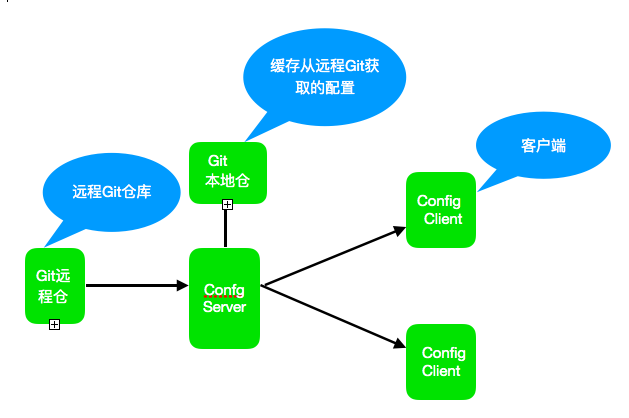
今天来学习如何使用Spring Cloud Config在微服务中搭建一个分布式配置中心,使用了分布式配置中心之后,我们就可以通过它来管理应用资源与业务资源配置内容。Spring Cloud Config分为服务端和客户端两部分。其中服务端用于管理我们的配置内容,它从配置源获取配置内容并缓存在本地,然后提供给客户端,它的配置源可以是从Git、SVN这些版本管理工具中获取,也可以从本地中获取。而客户端集成在我们每个微服务应用中,当微服务启动的时候客户端会自动从服务端获取配置信息。Spring Cloud Config还提供了很多配置,使得我们可以对配置内容进行一些加密/解密操作、安全保护、高可用、动态刷新等灵活的功能。
今天学习目标:
1.以Git作为配置源搭建分布式配置中心
2.每个应用以应用名称单独一个配置目录,并且根据环境名请求获取配置信息
3.具备动态刷新能力
4.整合Spring Security实现对配置中心的安全访问
一、Git目录结构
首先在Git创建一个config-repo目录用于存储我们配置内容,接着创建子目录config-client,该目录专门存储应用名为config-client的配置,最后添加几个不同profile的配置文件,每个配置文件有一个prop.name属性,该属性值为pumpkin-{profile}.properties,用于验证我们之后步骤是否成功。
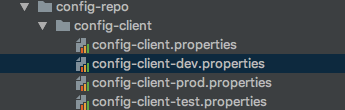
eg:pumpkin-dev.properties文件内容为
prop.name=pumpkin-dev.properties
二、 服务端搭建
服务端搭建涉及文件有pom.xml、Application.java、application.properties。当然有赖于Spring Cloud简易性设计,所有服务端的功能都集中在application.properties配置文件里。接下来我们创建我们的服务端了,应用名称为ConfigService.
pom.xml主要配置
spring-boot-starter-security是为了集成Spring Security做安全认证需要的,下面在会讲到如何在application.properties配置它的安全认证账号,当配置好之后,客户端获取配置时也将需要带上该安全认证账号,否则是获取不到的。
        <dependency>
            <groupId>org.springframework.cloud</groupId>
            <artifactId>spring-cloud-config-server</artifactId>
        </dependency>

        <!--增加安全保护-->
        <dependency>
            <groupId>org.springframework.boot</groupId>
            <artifactId>spring-boot-starter-security</artifactId>
        </dependency>
application.properties
spring.application.name=config-server
server.port=7003

#spring.cloud.config.server.git.uri=https://gitee.com/pumpkingg/Spring-Cloud-Study.git
[email protected]:pumpkingg/Spring-Cloud-Study.git
spring.cloud.config.server.git.searchPaths=config-repo/{application}
#spring.cloud.config.server.git.username=<your username>
#spring.cloud.config.server.git.password=<your password>

#增加spring security安全保护,客户端访问需配置该账号
security.user.name=pumpkingg
security.user.password=pumpkingg
逐一对配置内容讲解下:
spring.cloud.config.server.git.uri设置远程Git地址,这里我是使用SSH方式访问的,如何需要HTTPS方式,uri就需要改成https开头了,并且配置好Git账号、密码。在这里我遇到了第一个坑,采用SSH方式直接把uri改成git开头是不行的(前提是你已经配过ssh key到你Git仓库里了),先看个官网的介绍。
If you do not use HTTPS and user credentials, SSH should also work out of the box when you store keys in the default directories (~/.ssh) and the URI points to an SSH location, such as [email protected]:configuration/cloud-configuration. It is important that an entry for the Git server be present in the ~/.ssh/known_hosts file and that it is in ssh-rsa format. Other formats (such as ecdsa-sha2-nistp256) are not supported. To avoid surprises, you should ensure that only one entry is present in the known_hosts file for the Git server and that it matches the URL you provided to the config server. If you use a hostname in the URL, you want to have exactly that (not the IP) in the known_hosts file. The repository is accessed by using JGit, so any documentation you find on that should be applicable. HTTPS proxy settings can be set in ~/.git/config or (in the same way as for any other JVM process) with system properties (-Dhttps.proxyHost and -Dhttps.proxyPort).
如果看不懂也没关系,万能的网友已经有踩过坑的了,贴下这个网友正确操作吧。https://javablog.net/page/221/spring-cloud-config-read-the-ssh-protocol-git.html
https可以使用,ssh不能访问
ssh协议下springboot访问gitlab报错

Spring Boot Config Server [email protected]:UnknownHostKey: gitlab
先在本地修改 ~/.ssh/config

Host xxxx
    User zhushaolong
    IdentityFile ~/.ssh/id_rsa
    HashKnownHosts no
    HostKeyAlgorithms ssh-rsa,ssh-dss
再 ssh xxxx 连接一次gitlab所在的服务.为了生成known_hosts

或者不校验

Host xxxx
    User zhushaolong
    IdentityFile ~/.ssh/id_rsa
    StrictHostKeyChecking no
spring.cloud.config.server.git.searchPaths 配置Git仓库的搜索路径,也就是指定配置目录的意思。这里我配置的是config-repo/{application},因为我的配置内容是在Git仓库config-repo目录下的,而{application}是个占位符,它的取值是我们的应用名称,这里要对应一个应用一个目录,所以这样配置。
security.user.name=pumpkingg和security.user.password=pumpkingg就是配置Spring Security认证账号的。
Application.java
package com.pumpkin;

import org.springframework.boot.autoconfigure.SpringBootApplication;
import org.springframework.boot.builder.SpringApplicationBuilder;
import org.springframework.cloud.config.server.EnableConfigServer;

@EnableConfigServer
@SpringBootApplication
public class Application {

    public static void main(String[] args) {
        new SpringApplicationBuilder(Application.class).web(true).run(args);
    }

}
三、配置规则介绍
Spring Cloud Config是通过一定的配置规则是Git仓库找到我们需要的配置文件的。当我们访问服务端的URL与Git配置文件存在如下关系。其中application为应用名称、profile是你配置环境、label代表Git分支。根据上面我们服务端的配置,当我们访问http://localhost:7003/config-client/default和http://localhost:7003/config-client/dev就能得到对应Git仓库conf-repo/config-client目录下application.properties和application-dev.properties是配置内容了
/{application}/{profile}[/{label}]
/{application}-{profile}.yml
/{label}/{application}-{profile}.yml
/{application}-{profile}.properties
/{label}/{application}-{profile}.properties
四、客户端搭建
客户端的搭建和服务端差不多,按照上面的套路继续看。
pom.xml
spring-boot-starter-actuator这个依赖包含/refresh端点的实现。通过该端点,每次Git上的配置有更新的时候,我们就可以通过/refresh端点令客户端获取到新的配置值。对的,你没看错,是每次你都需要这么操作才能获取到新的配置值,如果想做到自动化一定的话可以通过Git的Hook技术,每次Git有更新就主动触发对应客户端的/refresh端点,除此之外还可以通过Spring Cloud Bus来处理得更加合理的,关于Spring Cloud Bus内容下周再学习下。
        <dependency>
            <groupId>org.springframework.boot</groupId>
            <artifactId>spring-boot-starter-web</artifactId>
        </dependency>

        <dependency>
            <groupId>org.springframework.cloud</groupId>
            <artifactId>spring-cloud-starter-config</artifactId>
        </dependency>

        <dependency>
            <groupId>org.springframework.boot</groupId>
            <artifactId>spring-boot-starter-actuator</artifactId>
        </dependency>
application.properities
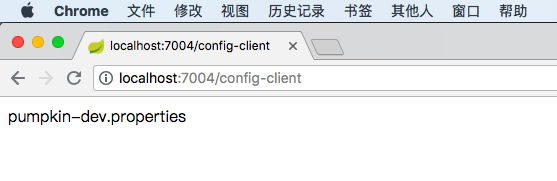
这里我把{application}配置成了config-client、{profile}为dev、{lable}我没有进行配置,默认是master。如无意外的话我们启动客户端就能把属性prop.name=xxx替换成Git仓库的prop.name=pumpkin-dev.properties了
spring.application.name=config-client

spring.cloud.config.profile=dev
spring.cloud.config.uri=http://localhost:7003/

#服务端添加安全保护后,需添加对应检验账号
spring.cloud.config.username=pumpkingg
spring.cloud.config.password=pumpkingg

server.port=7004
prop.name=xxx
TestController.java
提供个http接口,验证我们的结果
package com.pumpkin.web;

import org.springframework.beans.factory.annotation.Value;
import org.springframework.cloud.context.config.annotation.RefreshScope;
import org.springframework.web.bind.annotation.RequestMapping;
import org.springframework.web.bind.annotation.RestController;

@RefreshScope
@RestController
public class TestController {

    @Value("${prop.name}")
    private String propName;

    @RequestMapping("/config-client")
    public String test() {
        return this.propName;
    }
}
测试
五、总结
Spring Cloud Config搭建完成,并且能达到今天的学习目标要求了,更多的内容就留着之后去学习了,相信这套搭起来之后,后面的学习应该是比较顺畅的,加油~去吃感冒药了。。。
六、参考资料
Spring Cloud微服务实战-翟永超。本系列的学习都是参考该书籍学习的,同时源码使用的Spring Boot和Spring Cloud的版本也与该书保持一致。
七、源码
码云地址:[email protected]:pumpkingg/Spring-Cloud-Study.git 该篇随笔对应的代码是master分支下命名为blog5的Tag