ssm环境的搭建
我遇到很多学SSM框架的,一开始整合SSM框架的时候,整合SSM都会遇到很多问题,今天就在这分享一个我整合的SSM框架
第一步:整合MyBatis和Spring
1.加入MyBatis和Spring所需要的架包,
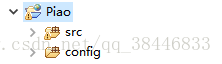
2.在项目新建一个Source Folder的包来放SSM所需要的配置(包名字可以随便命名)
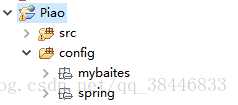
3.在config中分别创建一个放MyBatis和Spring的包
4.接下来就是配置MyBatis
配置MyBatis需要创建一个MyBatis的配置文件和一个log4j日志配置文件

|
MyBatis配置文件的内容
|
<?xml version="1.0" encoding="UTF-8" ?>
<!DOCTYPE configuration
PUBLIC "-//mybatis.org//DTD Config 3.0//EN"
"http://mybatis.org/dtd/mybatis-3-config.dtd">
<configuration>
<typeAliases>
<!-- 批量别名定义
指定包名,mybatis自动扫描包中的po类,自动定义别名,别名就是类名(首字母大写或小写都可以)
-->
<package name="net.hnjzy.po"/>
</typeAliases>
</configuration>
log4j.properties的配置文件 |
# Global logging configuration
log4j.rootLogger=DEBUG, stdout
# Console output...
log4j.appender.stdout=org.apache.log4j.ConsoleAppender
log4j.appender.stdout.layout=org.apache.log4j.PatternLayout
log4j.appender.stdout.layout.ConversionPattern=%5p [%t] - %m%n
5.然后就是配置Spring
配置spring需要配置dao层、Service层、事务

applicationContext-dao.xml文件配置的内容 <?xml version="1.0" encoding="UTF-8"?> 其中数据源需要配置一个数据源的配置信息 |

其中log4j.properties的配置文件内容为
jdbc.driver=com.mysql.jdbc.Driver
jdbc.url=jdbc:mysql://localhost:3306/pioashu?useUnicode=true&characterEncoding=utf-8
jdbc.username=root
jdbc.password=123
applicationContext-Service.xml文件配置的内容
<?xml version="1.0" encoding="UTF-8"?>
<beans xmlns="http://www.springframework.org/schema/beans" xmlns:context="http://www.springframework.org/schema/context" xmlns:p="http://www.springframework.org/schema/p" xmlns:aop="http://www.springframework.org/schema/aop" xmlns:tx="http://www.springframework.org/schema/tx" xmlns:xsi="http://www.w3.org/2001/XMLSchema-instance" xsi:schemaLocation="http://www.springframework.org/schema/beans http://www.springframework.org/schema/beans/spring-beans-4.0.xsd http://www.springframework.org/schema/context http://www.springframework.org/schema/context/spring-context-4.0.xsd http://www.springframework.org/schema/aop http://www.springframework.org/schema/aop/spring-aop-4.0.xsd http://www.springframework.org/schema/tx http://www.springframework.org/schema/tx/spring-tx-4.0.xsd http://www.springframework.org/schema/util http://www.springframework.org/schema/util/spring-util-4.0.xsd">
<context:component-scan base-package="cn.hnjdzy.ssm.service"></context:component-scan>
</beans> |
applicationContext-trans.xml文件配置的内容 <?xml version="1.0" encoding="UTF-8"?> |
第二步:整合SpringMVC
1.加入SpringMVC的架包
2.配置SpringMVC
配置springmvc只需要添加一个springmvc.xml文件和配置web.xml文件即可
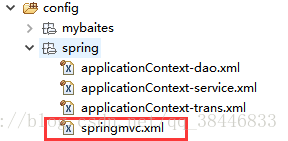
springmvc.xml文件的内容为
<?xml version="1.0" encoding="UTF-8"?>
<beans xmlns="http://www.springframework.org/schema/beans"
 xmlns:xsi="http://www.w3.org/2001/XMLSchema-instance" xmlns:p="http://www.springframework.org/schema/p"
 xmlns:context="http://www.springframework.org/schema/context"
 xmlns:mvc="http://www.springframework.org/schema/mvc"
 xsi:schemaLocation="http://www.springframework.org/schema/beans http://www.springframework.org/schema/beans/spring-beans.xsd
        http://www.springframework.org/schema/mvc http://www.springframework.org/schema/mvc/spring-mvc-4.0.xsd
        http://www.springframework.org/schema/context http://www.springframework.org/schema/context/spring-context.xsd">
 <!-- 配置包扫描器 -->
 <context:component-scan base-package="cn.hnjdzy.ssm.controller"></context:component-scan>
 <!-- 配置注解驱动 -->
 <mvc:annotation-driven />
 <!-- 视图解析器 -->
 <bean
  class="org.springframework.web.servlet.view.InternalResourceViewResolver">
  <property name="prefix" value="/jsp/" />
  <property name="suffix" value=".jsp" />
 </bean>
</beans>
web.xml需要添加的内容为
<!-- 乱码处理 -->
<filter> <filter-name>encodingFilter</filter-name> <filter-class>org.springframework.web.filter.CharacterEncodingFilter</filter-class> <init-param> <param-name>encoding</param-name> <param-value>UTF-8</param-value> </init-param> <init-param> <param-name>forceEncoding</param-name> <param-value>true</param-value> </init-param> </filter> <filter-mapping> <filter-name>encodingFilter</filter-name> <url-pattern>/*</url-pattern> </filter-mapping> <!-- 加载spring容器 --> <context-param> <param-name>contextConfigLocation</param-name> <param-value>classpath:spring/applicationContext-*.xml</param-value> </context-param> <listener> <listener-class>org.springframework.web.context.ContextLoaderListener</listener-class> </listener> <!-- springmvc前端控制器 --> <servlet> <servlet-name>springmvc</servlet-name> <servlet-class>org.springframework.web.servlet.DispatcherServlet</servlet-class> <!-- contextConfigLocation配置springmvc加载的配置文件(配置处理器映射器、适配器等等) 如果不配置contextConfigLocation,默认加载的是/WEB-INF/servlet名称-serlvet.xml(springmvc-servlet.xml) --> <init-param> <param-name>contextConfigLocation</param-name> <param-value>classpath:spring/springmvc.xml</param-value> </init-param> </servlet>
<servlet-mapping>
<servlet-name>springmvc</servlet-name> <!-- 第一种:*.action,访问以.action结尾 由DispatcherServlet进行解析 第二种:/,所以访问的地址都由DispatcherServlet进行解析,对于静态文件的解析需要配置不让DispatcherServlet进行解析 使用此种方式可以实现 RESTful风格的url 第三种:/*,这样配置不对,使用这种配置,最终要转发到一个jsp页面时, 仍然会由DispatcherServlet解析jsp地址,不能根据jsp页面找到handler,会报错。 --> <url-pattern>/</url-pattern> </servlet-mapping> |
最终整合的框架架构图为

这样我们的SSM框架就整合成功了,由于时间问题,我就不演示SSM测试是否整合成功了,如果整合有什么不懂的问题,可以加我联系方式来联系我,我们一起共同进步.