Centos下Elasticsearch安装详细教程
1、Elasticsearch简介
2、Elasticsearch安装
下载官网安装包:https://www.elastic.co/downloads/elasticsearch 
选择linux下的安装包下载,6.0.0目前最新版,遇到好多问题目前没有解决,暂且换为5.5.2版本,下载连接:https://artifacts.elastic.co/downloads/elasticsearch/elasticsearch-5.5.2.tar.gz通过WinScp软件上传到 /usr/local 目录下执行命令如下解压
tar -zxvf elasticsearch-5.5.2.tar.gz
PS:安装elasticsearch软件之前必须安装jdk
3、启动Elasticsearch
sh /usr/local/elasticsearch-6.0.0/bin/elasticsearch
启动失败报如下错误
ERROR: [2] bootstrap checks failed

[1]: max file descriptors [4096] for elasticsearch process is too low, increase to at least [65536]

[2]: max virtual memory areas vm.max_map_count [65530] is too low, increase to at least [262144]
解决办法
问题1:
修改/etc/security/limits.conf配置文件,添加如下两行代码
*                hard    nofile           65536
*                soft    nofile           65536

问题2:
修改/etc/sysctl.conf配置文件
vm.max_map_count = 2621441

让配置文件生效
sudo sysctl -p /etc/sysctl.conf
再次启动如果还报同样的错误,最后重启系统
修改完以上信息重启系统发现又报如下错误
ERROR: bootstrap checks failed
system call filters failed to install; check the logs and fix your configuration or disable system call filters at your own risk
原因是我在Centos6.5系统下安装Elasticsearch,而Centos6不支持SecComp,再次检查
/usr/local/elasticsearch-6.0.0/config/elasticsearch.yml中bootstrap.system_call_filter为true进行检测,所以导致检测失败,失败后直接导致ES不能启动。
修改为如下
bootstrap.memory_lock: false
bootstrap.system_call_filter: false

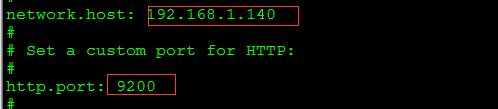
4、修改Elasticsearch外网访问
修改配置文件/usr/local/elasticsearch-6.0.0/config/elasticsearch.yml为本机ip地址
关闭防火墙
systemctl stop firewalld.service

systemctl disable firewalld.service
5、启动访问
才有后台方式启动,如果前台启动,关闭Security服务就被停止了
sh /usr/local/elasticsearch-6.0.0/bin/elasticsearch -d
6、浏览器访问

看到这个界面说明Elasticsearch搭建成功
Centos下Elasticsearch安装详细教程
1、Elasticsearch简介
2、Elasticsearch安装
下载官网安装包:https://www.elastic.co/downloads/elasticsearch
选择linux下的安装包下载,6.0.0目前最新版,遇到好多问题目前没有解决,暂且换为5.5.2版本,下载连接:https://artifacts.elastic.co/downloads/elasticsearch/elasticsearch-5.5.2.tar.gz通过WinScp软件上传到 /usr/local 目录下执行命令如下解压
tar -zxvf elasticsearch-5.5.2.tar.gz
PS:安装elasticsearch软件之前必须安装jdk
3、启动Elasticsearch
sh /usr/local/elasticsearch-6.0.0/bin/elasticsearch
启动失败报如下错误
ERROR: [2] bootstrap checks failed

[1]: max file descriptors [4096] for elasticsearch process is too low, increase to at least [65536]

[2]: max virtual memory areas vm.max_map_count [65530] is too low, increase to at least [262144]
解决办法
问题1:
修改/etc/security/limits.conf配置文件,添加如下两行代码
*                hard    nofile           65536
*                soft    nofile           65536
问题2:
修改/etc/sysctl.conf配置文件
vm.max_map_count = 2621441
让配置文件生效
sudo sysctl -p /etc/sysctl.conf
再次启动如果还报同样的错误,最后重启系统
修改完以上信息重启系统发现又报如下错误
ERROR: bootstrap checks failed
system call filters failed to install; check the logs and fix your configuration or disable system call filters at your own risk
原因是我在Centos6.5系统下安装Elasticsearch,而Centos6不支持SecComp,再次检查
/usr/local/elasticsearch-6.0.0/config/elasticsearch.yml中bootstrap.system_call_filter为true进行检测,所以导致检测失败,失败后直接导致ES不能启动。
修改为如下
bootstrap.memory_lock: false
bootstrap.system_call_filter: false
4、修改Elasticsearch外网访问
修改配置文件/usr/local/elasticsearch-6.0.0/config/elasticsearch.yml为本机ip地址
关闭防火墙
systemctl stop firewalld.service

systemctl disable firewalld.service
5、启动访问
才有后台方式启动,如果前台启动,关闭Security服务就被停止了
sh /usr/local/elasticsearch-6.0.0/bin/elasticsearch -d
6、浏览器访问
看到这个界面说明Elasticsearch搭建成功