MySQL 5.6 基于GTID 进行主从复制
标签(空格分隔): mysql
一、什么是GTID?
GTID全称GTIDs are unique identifiers comprising the server UUID (of the original master) and a transaction number
GITD是唯一标示符是由服务器的UUID(全局唯一标示对于任何一个服务器都是128位随机符)并结合事务ID号来组合成一个唯一的标示,某一个主机上某一个事务的标识码 就叫做**GTID**

自从引入GTID之后 MySQL5.6的binlog在每一个事务的首部都会写上GTID的标示,在二进制文件中,每一个事务的语句记录下来的时候在这个事件首部会把相关联的GTID给记录下来。

因此GTID使得追踪和比较复制事务变得非常简单,而且能够实现从崩溃中快速进行恢复。
尤其是innodb引擎,要想使用高可用功能,必须要依靠GTID实现
二、GTID工作方式
Mysql5.6引入了一个新特性多线程复制,有了gtid相关的功能之后,我们Slave服务器上所谓的多线程复制是我们Master服务器上有多颗cpu,多个事务同时执行的时候,会比Slave服务器读取事务的速度要快,从库存放的只有一个线程。这样在多线程复制的时候Slave服务器会比Master服务器落后很多.
从服务器可以开启多个进程,并行的读取数据存放在本地。但是比如说我们bbs库,2个线程互相读取数据,会造成问题。

Mysql5.6 多线程复制每个数据库也仅能使用一个线程,这样在我们多线程复制的时候只有多个库进行复制,我们的多线程复制才有意义
三、MySQL主从复制原理
这个主从复制原理基本上是mysql的基础知识,我这里在给大家介绍一遍
 MySQL的主从复制是一个异步的复制过程(虽然一般情况下感觉是实时的),数据将从一个Mysql数据库(我们称之为Master)复制到另一个Mysql数据库(我们称之为Slave),在Master与Slave之间实现整个主从复制的过程是由三个线程参与完成的。其中有两个线程(SQL线程和IO线程)在Slave端,另一个线程(I/O线程)在Master端。

  要实现MySQL的主从复制,首先必须打开Master端的binlog记录功能,否则就无法实现。因为整个复制过程实际上就是Slave从aster端获取binlog日志,然后再在Slave上以相同顺序执行获取的binlog日志中的记录的各种SQL操作
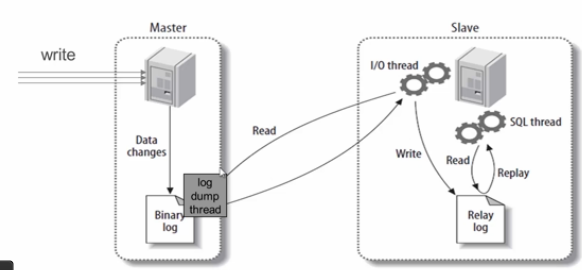
- [ ] 从库生成两个线程,一个I/O线程,一个SQL线程;
- [ ] i/o线程去请求主库 的binlog,并将得到的binlog日志写到relay log(中继日志) 文件中;
- [ ] 主库会生成一个 log dump 线程,用来给从库 i/o线程传binlog;
- [ ] SQL 线程,会读取relay log文件中的日志,并解析成具体操作,来实现主从的操作一致,而最终数据一致;
四、主从节点数据库配置
1.1环境如下
关于MySQL 5.6的安装我就不介绍了,网上太多了,大家自行百度吧!
| IP地址 | mysql版本 | 系统版本 | 作用 | 端口 |
|---|---|---|---|---|
| 192.168.11.11 | MySQL5.6 | CentOS Linux release 7.2.1511 | Master | 3306 |
| 192.168.11.12 | MySQL5.6 | CentOS Linux release 7.2.1511 | Slave | 3306 |
关闭防火墙、Selinux、调整字符集 (2台都请执行,当然一台使用多实例也可以)
systemctl stop firewalld
sed -i 's/SELINUX=enforcing/SELINUX=disabled/' /etc/selinux/config
grep SELINUX=disabled /etc/selinux/config
setenforce 0
echo '*   -    nofile   100000 ' >>/etc/security/limits.conf
1.2配置Master节点my.cnf
[client]
port        = 3306
socket      = /usr/local/mysql/tmp/mysql.sock

[mysqld]

########mysql master  GTID conf##############
binlog-format=ROW
log-bin=master-bin
log-slave-updates=true
gtid-mode=on
enforce-gtid-consistency=true
master-info-repository=TABLE
relay-log-info-repository=TABLE
sync-master-info=1
slave-parallel-workers=2
binlog-checksum=CRC32
master-verify-checksum=1
slave-sql-verify-checksum=1
binlog-rows-query-log_events=1
server-id=1
report-port=3306
report-host=master.abcdocker.com
#######################################

port        = 3306
basedir         = /usr/local/mysql/
socket      = /usr/local/mysql/tmp/mysql.sock
pid-file        = /usr/local/mysql/var/mysql.pid
datadir         = /usr/local/mysql/var/


tmpdir          = /usr/local/mysql/tmp/
slave-load-tmpdir   = /usr/local/mysql/tmp/
!include /usr/local/mysql/etc/mysqld.cnf

# skip lever
skip-name-resolve
skip-symbolic-links
skip-external-locking
skip-slave-start

#thread level


table_open_cache = 2048

#############connect############
back_log                 = 50
max_connections          = 1000
max_connect_errors       = 10000
#open_files_limit         = 10240

##############timeout###########
connect-timeout          = 10
wait-timeout             = 800
interactive-timeout      = 800
slave-net-timeout        = 60
net_read_timeout         = 30
net_write_timeout        = 60
net_retry_count          = 10
net_buffer_length        = 16384
max_allowed_packet       = 64M

################# cache #############
table_open_cache              = 2048
thread_stack             = 192K
thread_cache_size        = 100
thread_concurrency       = 16

# qcache settings
query_cache_size         = 20m
query_cache_limit        = 2M
query_cache_min_res_unit = 2K

# default settings
# time zone
default-time-zone        = system
character-set-server     = utf8
default-storage-engine   = InnoDB

# tmp & heap
tmp_table_size           = 512M
max_heap_table_size      = 512M

log-bin                  = mysql-bin
log-bin-index            = mysql-bin.index
relay-log                = relay-log
relay_log_index          = relay-log.index

# warning & error log
log-warnings             = 1
log-error       = /usr/local/mysql/log/mysql.err

log-output               = FILE

# slow query log
slow_query_log           = 1
long-query-time          = 1
slow_query_log_file      = /usr/local/mysql/log/slow.log
#log-queries-not-using-indexes
#log-slow-slave-statements

general_log              = 1
general_log_file         = /usr/local/mysql/log/mysql.log
max_binlog_size          = 1G
max_relay_log_size       = 1G

# if use auto-ex, set to 0
relay-log-purge          = 1

# max binlog keeps days
expire_logs_days         = 7

binlog_cache_size        = 1M

# replication
replicate-wild-ignore-table     = mysql.%
replicate-wild-ignore-table     = test.%
# slave_skip_errors=all

key_buffer_size                 = 30M
sort_buffer_size                = 2M
read_buffer_size                = 2M
join_buffer_size                = 8M
read_rnd_buffer_size            = 8M
bulk_insert_buffer_size         = 64M
myisam_sort_buffer_size         = 64M
myisam_max_sort_file_size       = 10G
myisam_repair_threads           = 1
myisam_recover

group_concat_max_len            = 64K

transaction_isolation           = REPEATABLE-READ

innodb_file_per_table
#############mysql5.5new################
innodb_file_format = Barracuda
########################################

innodb_additional_mem_pool_size = 10M
innodb_buffer_pool_size         = 200M
innodb_data_home_dir            = /usr/local/mysql/var/
innodb_data_file_path           = ibdata1:100M:autoextend

################mysql5.5new############
innodb_read_io_threads          = 8
innodb_write_io_threads         = 8
innodb_purge_threads            = 1
########################################

innodb_thread_concurrency       = 16
innodb_flush_log_at_trx_commit  = 1

innodb_log_buffer_size          = 16M
innodb_log_file_size            = 50M
innodb_log_files_in_group       = 2
innodb_log_group_home_dir       = /usr/local/mysql/var/

innodb_max_dirty_pages_pct      = 90
innodb_lock_wait_timeout        = 50
#innodb_flush_method            = O_DSYNC


################mysql5.6 new#####################
innodb_buffer_pool_instances    = 16
innodb_change_buffering         = all
innodb_adaptive_flushing        = 1
innodb_io_capacity              = 2000
innodb_old_blocks_time          = 1000
innodb_stats_on_metadata        = 0
#################################################

old-passwords                   = 0

[mysqldump]
quick
max_allowed_packet              = 64M

[mysql]
no-auto-rehash
default-character-set           = utf8
connect-timeout                 = 3

[myisamchk]
key_buffer_size = 256M
sort_buffer_size = 256M
read_buffer = 2M
write_buffer = 2M

[mysqlhotcopy]
interactive-timeout


#提示:配置文件除了上面mysql master  GTID conf注释下的是我们GTID需要用的,其他的大家可以用默认就可以。我这个配置比较全
1.3配置Master详解
[mysqld]
binlog-format=ROW       #行记录
log-bin=master-bin     #二进制文件
log-slave-updates=true  #表示当从服务器从中继日志中读取事件在本地应用的时候,是否把操作记录到本地的二进制文件中(为了GTID复制的安全,我们启用这项) 主服务器必须启用,从服务器可以不启用
gtid-mode=on         #gtid-mode=是否启用GTID功能
enforce-gtid-consistency=true   #是否强制GTID一致性(所谓GTID一致性指的是在记录到二进制的时候有些特殊的语句能够设计数据库修改的语句它是不记录的,但是可以靠其他功能保证数据一致性。主要和临时创建的表语句有关)


在MySQL 5.6.2之前,slave记录的master信息以及slave应用binlog的信息存放在文件中,即master.info与relay-log.info。在5.6.2版本之后,允许记录到table中
master-info-repository=TABLE  #主要用于主服务器记录从服务连接信息和每一个从服务器的二进制文件及其相关事件位置等信息记录到一个文件中(master.info)或一个表
relay-log-info-repository=TABLE      #让从服务器自己记录连接的主服务器是谁,主服务器哪一个二进制文件,及二进制文件的位置等等

对应的表分别为mysql.slave_master_info与mysql.slave_relay_log_info,且这两个表均为innodb引擎表

master info与relay info还有3个参数控制刷新:
sync_relay_log:默认为10000,即每10000次sync_relay_log事件会刷新到磁盘。为0则表示不刷新,交由OS的cache控制。
sync_master_info:若master-info-repository为FILE,当设置为0,则每次sync_master_info事件都会刷新到磁盘,默认为10000次刷新到磁盘;若master-info-repository为TABLE,当设置为0,则表不做任何更新,设置为1,则每次事件会更新表 #默认为10000
sync_relay_log_info:若relay_log_info_repository为FILE,当设置为0,交由OS刷新磁盘,默认为10000次刷新到磁盘;若relay_log_info_repository为TABLE,且为INNODB存储,则无论为任何值,则都每次evnet都会更新表。
建议参数设置如下:

sync_relay_log = 1
sync_master_info = 1
sync_relay_log_info = 1


在GTID模式下,每一个从服务器在连入主服务器的时候,它必须要告诉主服务器自己的主机名和IP地址and端口号这样我们在主服务器使用show slave hosts可以看到当前主服务器连接的从服务器信息
report-port=   从服务器的端口
report-host=   从服务器的主机名
report-host=master.abcdocker.com
report-port=3306

server-id=1     #同一个复制拓扑中的所有服务器的ID号必须唯一

从服务器并行的线程数
slave-parallel-workers=2
workers指的是进程
后面的进程数尽量等于数据库的个数或者小于,大于数据库的数量是没有意义的
如果=0 表示禁用多线程功能


binlog-checksum、master-verify-checksum和slave-sql-verify-checksum:启用复制有关的所有校验功能
binlog-checksum=CRC32    #主服务器端在启动的时候要不要校验binlog本身的校验码
master-verify-checksum=1
slave-sql-verify-checksum=1

binlog-rows-query-log_events=1  #用于在二进制日志详细记录事件相关的信息,可降低故障排除的复杂度;

datadir"/mydata/data
socket=/tmp/mysql.sock   #mysql.sock的作用是server和client在同一台服务器,并且使用localhost进行链接的时候,就会使用socket来进行连接


log-slave-updates、gtid-mode、enforce-gtid-consistency、report-port和report-host:用于启动GTID及满足附属的其他需求;
1.4配置Slave详解
[mysqld]
binlog-format=ROW
log-slave-updates=true
gtid-mode=on
enforce-gtid-consistency=true
master-info-repository=TABLE
relay-log-info-repository=TABLE
sync-master-info=1
slave-parallel-workers=2
binlog-checksum=CRC32
master-verify-checksum=1
slave-sql-verify-checksum=1
binlog-rows-query-log_events=1
server-id=11               #需要和master不一样
report-port=3306
port=3306
log-bin=mysql.bin.log
report-host=slave.abcdocker.com   #名字也要和master不一样

#从节点不需要定义二进制日志,也可以不定义中继日志
1.5配置Slave节点配置my.cnf
[client]
port        = 3306
socket      = /usr/local/mysql/tmp/mysql.sock

[mysqld]
#############slave GTID conf#################################
binlog-format=ROW
log-slave-updates=true
gtid-mode=on
enforce-gtid-consistency=true
master-info-repository=TABLE
relay-log-info-repository=TABLE
sync-master-info=1
slave-parallel-workers=2
binlog-checksum=CRC32
master-verify-checksum=1
slave-sql-verify-checksum=1
binlog-rows-query-log_events=1
server-id=11
report-port=3306
report-host=slave.abcdocker.com
########################################################

port        = 3306
basedir         = /usr/local/mysql/
socket      = /usr/local/mysql/tmp/mysql.sock
pid-file        = /usr/local/mysql/var/mysql.pid
datadir         = /usr/local/mysql/var/


tmpdir          = /usr/local/mysql/tmp/
slave-load-tmpdir   = /usr/local/mysql/tmp/
!include /usr/local/mysql/etc/mysqld.cnf

# skip lever
skip-name-resolve
skip-symbolic-links
skip-external-locking
skip-slave-start

#thread level


table_open_cache = 2048

#############connect############
back_log                 = 50
max_connections          = 1000
max_connect_errors       = 10000
#open_files_limit         = 10240

##############timeout###########
connect-timeout          = 10
wait-timeout             = 800
interactive-timeout      = 800
slave-net-timeout        = 60
net_read_timeout         = 30
net_write_timeout        = 60
net_retry_count          = 10
net_buffer_length        = 16384
max_allowed_packet       = 64M

################# cache #############
table_open_cache              = 2048
thread_stack             = 192K
thread_cache_size        = 100
thread_concurrency       = 16

# qcache settings
query_cache_size         = 20m
query_cache_limit        = 2M
query_cache_min_res_unit = 2K

# default settings
# time zone
default-time-zone        = system
character-set-server     = utf8
default-storage-engine   = InnoDB

# tmp & heap
tmp_table_size           = 512M
max_heap_table_size      = 512M

log-bin                  = mysql-bin
log-bin-index            = mysql-bin.index
relay-log                = relay-log
relay_log_index          = relay-log.index

# warning & error log
log-warnings             = 1
log-error       = /usr/local/mysql/log/mysql.err

log-output               = FILE

# slow query log
slow_query_log           = 1
long-query-time          = 1
slow_query_log_file      = /usr/local/mysql/log/slow.log
#log-queries-not-using-indexes
#log-slow-slave-statements

general_log              = 1
general_log_file         = /usr/local/mysql/log/mysql.log
max_binlog_size          = 1G
max_relay_log_size       = 1G

# if use auto-ex, set to 0
relay-log-purge          = 1

# max binlog keeps days
expire_logs_days         = 7

binlog_cache_size        = 1M

# replication
replicate-wild-ignore-table     = mysql.%
replicate-wild-ignore-table     = test.%
# slave_skip_errors=all

key_buffer_size                 = 30M
sort_buffer_size                = 2M
read_buffer_size                = 2M
join_buffer_size                = 8M
read_rnd_buffer_size            = 8M
bulk_insert_buffer_size         = 64M
myisam_sort_buffer_size         = 64M
myisam_max_sort_file_size       = 10G
myisam_repair_threads           = 1
myisam_recover

group_concat_max_len            = 64K

transaction_isolation           = REPEATABLE-READ

innodb_file_per_table
#############mysql5.5new################
innodb_file_format = Barracuda
########################################

innodb_additional_mem_pool_size = 10M
innodb_buffer_pool_size         = 200M
innodb_data_home_dir            = /usr/local/mysql/var/
innodb_data_file_path           = ibdata1:100M:autoextend

################mysql5.5new############
innodb_read_io_threads          = 8
innodb_write_io_threads         = 8
innodb_purge_threads            = 1
########################################

innodb_thread_concurrency       = 16
innodb_flush_log_at_trx_commit  = 1

innodb_log_buffer_size          = 16M
innodb_log_file_size            = 50M
innodb_log_files_in_group       = 2
innodb_log_group_home_dir       = /usr/local/mysql/var/

innodb_max_dirty_pages_pct      = 90
innodb_lock_wait_timeout        = 50
#innodb_flush_method            = O_DSYNC


################mysql5.6 new#####################
innodb_buffer_pool_instances    = 16
innodb_change_buffering         = all
innodb_adaptive_flushing        = 1
innodb_io_capacity              = 2000
innodb_old_blocks_time          = 1000
innodb_stats_on_metadata        = 0
#################################################

old-passwords                   = 0

[mysqldump]
quick
max_allowed_packet              = 64M

[mysql]
no-auto-rehash
default-character-set           = utf8
connect-timeout                 = 3

[myisamchk]
key_buffer_size = 256M
sort_buffer_size = 256M
read_buffer = 2M
write_buffer = 2M

[mysqlhotcopy]
interactive-timeout
1.6 Master 上创建复制用户
grant replication slave on *.* to repl@192.168.11.12 identified by '123456';说明:192.168.11.12是从节点服务器,如果想一次性授权更多的节点,可以自行根据需要修改。
1.7 为备节点提供初始数据集
锁定主表,备份主节点上的数据,将其还原至从节点;如果没有GTID,在备份时需要在master上使用show master status命令查看二进制文件名称及事件位置,以便后面启动slave节点时使用。
1.8 启动Slave节点的复制线程
如果启动了GTID功能,则使用如下命令;
CHANGE MASTER TO MASTER_HOST='master.abcdocker.com',MASTER_USER='repl',MASTER_PASSWORD='123456',MASTER_AUTO_POSITION=1;[x] MASTER_AUTO_POSITION 该参数在mysql5.6.5版本引入,如果进行change master to时使用MASTER_AUTO_POSITION = 1,slave连接master将使用基于GTID的复制协议。
[x] 使用基于GTID协议的复制,slave会告诉master它已经接收到或执行了哪些事务。计算这个集,slave需要读取全局参数gtid_executed以及通过show slave status获取的参数Retrieved_gtid_set。
[x] 结果集作为初次握手的一部分,发送到master,master发回它已经执行的且不在结果集这部分的所有事务。如果这些事务在master的binlog文件中已经被清除,master将会发送一个
提示:主从服务器节点时间要同步,主机名最好可以解析。
启动从库
mysql> start slave;查看主从状态
mysql> show slave status\G
*************************** 1. row ***************************
               Slave_IO_State: Waiting for master to send event
                  Master_Host: master.abcdocker.com
                  Master_User: repl
                  Master_Port: 3306
                Connect_Retry: 60
              Master_Log_File: mysql-bin.000005
          Read_Master_Log_Pos: 814
               Relay_Log_File: relay-log.000002
                Relay_Log_Pos: 1024
        Relay_Master_Log_File: mysql-bin.000005
             Slave_IO_Running: Yes
            Slave_SQL_Running: Yes
              Replicate_Do_DB:
          Replicate_Ignore_DB:
           Replicate_Do_Table:
       Replicate_Ignore_Table:
      Replicate_Wild_Do_Table:
  Replicate_Wild_Ignore_Table: mysql.%,test.%
                   Last_Errno: 0
                   Last_Error:
                 Skip_Counter: 0
          Exec_Master_Log_Pos: 814
              Relay_Log_Space: 1222
              Until_Condition: None
               Until_Log_File:
                Until_Log_Pos: 0
           Master_SSL_Allowed: No
           Master_SSL_CA_File:
           Master_SSL_CA_Path:
              Master_SSL_Cert:
            Master_SSL_Cipher:
               Master_SSL_Key:
        Seconds_Behind_Master: 0
Master_SSL_Verify_Server_Cert: No
                Last_IO_Errno: 0
                Last_IO_Error:
               Last_SQL_Errno: 0
               Last_SQL_Error:
  Replicate_Ignore_Server_Ids:
             Master_Server_Id: 1
                  Master_UUID: a961eee5-ae7a-11e7-89f1-000c29020966
             Master_Info_File: mysql.slave_master_info
                    SQL_Delay: 0
          SQL_Remaining_Delay: NULL
      Slave_SQL_Running_State: Slave has read all relay log; waiting for the slave I/O thread to update it
           Master_Retry_Count: 86400
                  Master_Bind:
      Last_IO_Error_Timestamp:
     Last_SQL_Error_Timestamp:
               Master_SSL_Crl:
           Master_SSL_Crlpath:
           Retrieved_Gtid_Set: a961eee5-ae7a-11e7-89f1-000c29020966:1-3
            Executed_Gtid_Set: a961eee5-ae7a-11e7-89f1-000c29020966:1-3
                Auto_Position: 1
1 row in set (0.00 sec)
五、演示
1.1 主库创建库
master-mysql> create database shopping;
Query OK, 1 row affected (0.00 sec)
从库查看
slave-mysql> show databases;
+--------------------+
| Database           |
+--------------------+
| information_schema |
| mysql              |
| performance_schema |
| shopping           |
| test               |
+--------------------+
5 rows in set (0.01 sec)
这里已经出来了,我们导入点数据
1.2 导出一份数据
[root@abcdocker ~]#  mysqldump -uroot -p  --hex-blob --routines --triggers --single-transaction --default-character-set=utf8 shopping >slave.sql
Enter password:

关于mysqldump相关参数请前往:https://www.abcdocker.com/abcdocker/20
现在我们已经将数据导入到主库,现在去从库看一下
master-mysql> show tables;
+------------------------------+
| Tables_in_shopping           |
+------------------------------+
| aaaaaa_activity               |
| aaaaaa_activity_detail        |
| aaaaa_address                |
| aaaaa_admin                  |

这时候主库和从库看到的数据应该和我们这里面显示的相同
常用命令
停止从库:
mysql> stop slave;
开启从库
mysql> start slave;
清除主从信息:(关闭从库才可以执行)
mysql> reset slave;
MySQL 复制过滤功能介绍
数据库过滤,数据同步的时候只复制某一个库或者某一个表或某些表的操作
1.1 配置介绍
主 [Master]
[ ] binlog-do-db-d 代表白名单(仅将指定数据库的相关修改操作记入二进制日志) 缺点:如果主服务器宕了,恢复的时候只可以恢复记录到二进制文件日志里面的数据量。
[ ] binlog-ignore-db 代表黑名单(只要和这里面设置相关的库,都不记录到二进制文件 )
- [ ] 不管是do-db还是ignore-db我们都不建议在主端操作,一旦主库挂了,任何不被记录的数据都将无法还原。
我们不开启do和ignore这个功能,这时候我们主库的binlog是完整的。但是在从库会有很多的二进制可以进行过滤
从[Slave]
- [ ] replicate-do-db 白名单(只应用哪个数据库到本地 )
[ ] replicate-ignore-db 黑名单(忽略哪些数据库到本地)
[ ] 过滤的功能还可以在表级别实现
replicate-do-table= 应用那些表到本地
replicate-ignore-table= 忽略哪些表到本地[ ] 在实现表同步的时候还可以使用通配符 replicate-wild-do-table= (abcdocker.tb%)abcdocker下面的所有tb开头的表 replicate-wild-ignore-table=
[ ] 通配符%,_ 我们可以一个指令使用多次,只要每次使用的值不同就可以
1.2 例子
例子:例如我们在mysql主从上,只复制abcdocker上的所有数据
从库设置如下
vim /etc/my.conf
relay-log = relay-log
relay-log-index =relay-log-index
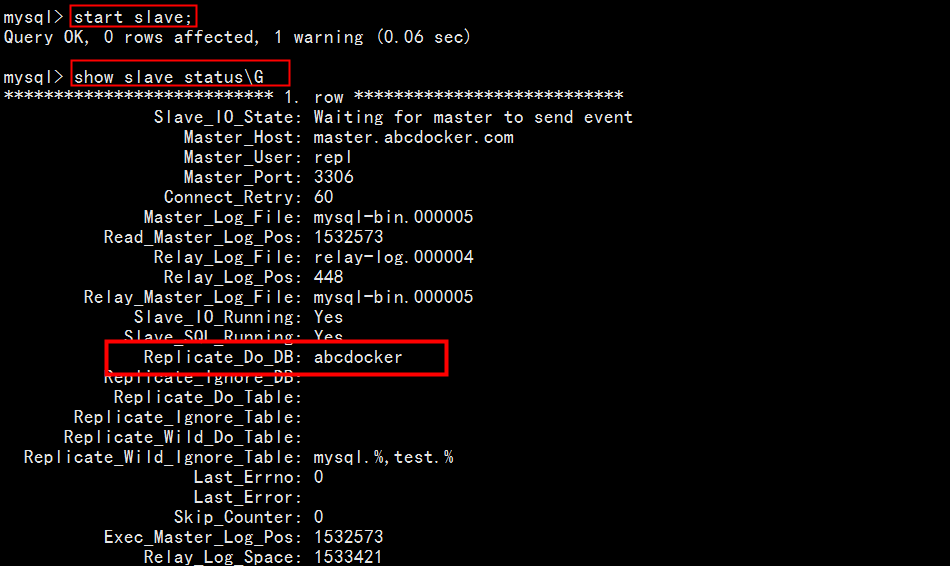
replicate-do-db = abcdocker [库] 重启mysqld
重启从库之后我们需要开启主从连接,在查看就可以看到我们这里只同步abcdocker库
主库设置如下
我们在主库创建2个databases
create database abcdocker;
create database discuz;
因为我们同步discuz库,而不同步abc库。
主库有如下库
master-mysql> show databases;
+--------------------+
| Database           |
+--------------------+
| information_schema |
| abcdocker          |
| discuz             |
| mysql              |
| performance_schema |
| shopping           |
| test               |
+--------------------+
7 rows in set (0.00 sec)
我们在去从库使用show databases;查看库是否有discuz和abcdocker库就可以
此时只有abcdocker库一个,因为我们授权的只有一个
mysql> show databases;
+--------------------+
| Database           |
+--------------------+
| information_schema |
| abcdocker          |
| mysql              |
| performance_schema |
| shopping           |
| test               |
+--------------------+
6 rows in set (0.00 sec)
相关文章
MySQL主从原理