| 建立maven工程 |
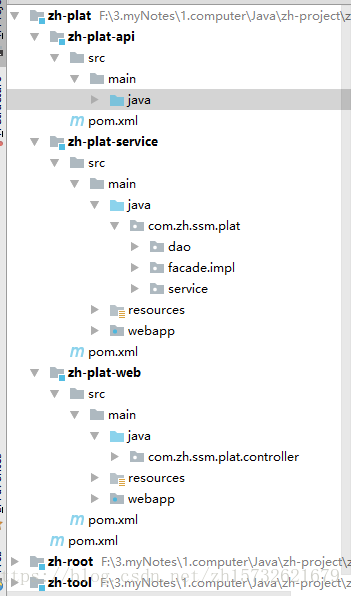
1.zh-plat为项目名称,其下分为api,service,web,其中api是打jar包,service是打war包,web是打war包
2.zh-root为管理jar的工程
3.zh-tool为项目中公共用到的工具类
| 框架搭建 |
本框架会使用druid连接池,整合mybatis,整合swagger,整合p6spy。
首先,只搭建一个只有spring的框架
1.添加jar包依赖
1.1 日志相关,分别添加到service层和web层
- slf4j-api
- slf4j-log4j12
- log4j
1.2 web层相关依赖:
- spring-web(提供@Controller注解) ,此处注意,spring-webmvc中已经依赖了spring-web,因此下方已经引入了spring-webmvc即可不单独添加spring-web的jar包依赖
- spring-context(提供@RequestMapping注解),同spring-web的jar依赖规则
- spring-webmvc,jackson-core,jackson-databind向页面返回json格式对象,可使用@responsebody注解,此处需要注意版本,我使用的spring版本是5.x版本,使用jackson版本较老时会报错,所以建议使用jackson的最新稳定版
1.3 service层相关依赖
- junit 单元测试
- spring-web: 提供@component注解与@service注解
- spring-context: 提供ContextLoaderListener监听器,用来tomcat容器启动时自动加载contextConfigLocation指定的配置文件,如果没有指定,则会默认加载application.xml
- zh-plat-api的依赖,需要用到实体和facade接口
1.4 建立配置文件
1.4.1 web层
建立spring-mvc.xml,配置包扫描:
<?xml version="1.0" encoding="UTF-8"?>
<beans xmlns="http://www.springframework.org/schema/beans"
       xmlns:xsi="http://www.w3.org/2001/XMLSchema-instance" xmlns:mvc="http://www.springframework.org/schema/mvc"
       xmlns:context="http://www.springframework.org/schema/context"
       xsi:schemaLocation="http://www.springframework.org/schema/beans http://www.springframework.org/schema/beans/spring-beans.xsd http://www.springframework.org/schema/mvc http://www.springframework.org/schema/mvc/spring-mvc.xsd http://www.springframework.org/schema/context http://www.springframework.org/schema/context/spring-context.xsd">

    <bean class="org.springframework.beans.factory.config.PropertyPlaceholderConfigurer">
        <property name="ignoreUnresolvablePlaceholders" value="true"/>
        <property name="locations">
            <list>
                <value>classpath:dubbo-server.properties</value>
            </list>
        </property>
    </bean>
    <!--开启注解驱动-->
    <mvc:annotation-driven/>

    <!--配置包扫描-->
    <context:component-scan base-package="com.zh.ssm.plat.controller"/>
配置web.xml,容器启动时装载配置文件:
<?xml version="1.0" encoding="UTF-8"?>
<web-app xmlns:xsi="http://www.w3.org/2001/XMLSchema-instance"
         xmlns="http://java.sun.com/xml/ns/javaee"
         xsi:schemaLocation="http://java.sun.com/xml/ns/javaee http://java.sun.com/xml/ns/javaee/web-app_3_0.xsd"
         version="3.0">
    <!--指定配置文件的位置-->
    <context-param>
        <param-name>contextConfigLocation</param-name>
        <param-value>classpath:spring-mvc.xml</param-value>
    </context-param>
    <!--tomcat启动时自动加载contextConfigLocation指定的配置文件-->
    <listener>
        <listener-class>org.springframework.web.context.ContextLoaderListener</listener-class>
    </listener>
    <!--配置前端控制器用来拦截请求-->
    <servlet>
        <servlet-name>action</servlet-name>
        <servlet-class>org.springframework.web.servlet.DispatcherServlet</servlet-class>
        <init-param>
            <param-name>contextConfigLocation</param-name>
            <param-value>classpath:spring-mvc.xml</param-value>
        </init-param>
        <load-on-startup>1</load-on-startup>
    </servlet>
    <servlet-mapping>
        <servlet-name>action</servlet-name>
        <url-pattern>/</url-pattern>
    </servlet-mapping>
</web-app>
1.4.2 service层
添加spring-context.xml,配置包扫描
<?xml version="1.0" encoding="UTF-8"?>
<beans xmlns="http://www.springframework.org/schema/beans"
       xmlns:xsi="http://www.w3.org/2001/XMLSchema-instance"
       xmlns:context="http://www.springframework.org/schema/context"
       xsi:schemaLocation="http://www.springframework.org/schema/beans http://www.springframework.org/schema/beans/spring-beans.xsd http://www.springframework.org/schema/context http://www.springframework.org/schema/context/spring-context.xsd">
    <!--包扫描-->
    <context:component-scan base-package="com.zh.ssm.plat.dao"/>
    <context:component-scan base-package="com.zh.ssm.plat.service"/>
    <context:component-scan base-package="com.zh.ssm.plat.facade.impl"/>
</beans>
在web.xml中配置监听器:
<?xml version="1.0" encoding="UTF-8"?>
<web-app xmlns:xsi="http://www.w3.org/2001/XMLSchema-instance"
         xmlns="http://java.sun.com/xml/ns/javaee"
         xsi:schemaLocation="http://java.sun.com/xml/ns/javaee http://java.sun.com/xml/ns/javaee/web-app_3_0.xsd"
         version="3.0">
  <context-param>
    <param-name>contextConfigLocation</param-name>
    <param-value>classpath:spring-context.xml</param-value>
  </context-param>

  <listener>
    <listener-class>org.springframework.web.context.ContextLoaderListener</listener-class>
  </listener>
</web-app>
至此,整个架子就搭好了,剩下的就是需要什么往里边整合什么了。
| 整合mybatis及druid |
主要是数据库相关的,因此这些配置都在service层进行:
1.添加jar包依赖
- mybatis相关
- jdbc相关
- mysql连接相关
- druid相关
       <dependency>
            <groupId>org.springframework</groupId>
            <artifactId>spring-tx</artifactId>
        </dependency>
        <dependency>
            <groupId>org.springframework</groupId>
            <artifactId>spring-jdbc</artifactId>
        </dependency>

        <!--mybatis-->
        <dependency>
            <groupId>org.mybatis</groupId>
            <artifactId>mybatis</artifactId>
        </dependency>
        <dependency>
            <groupId>org.mybatis</groupId>
            <artifactId>mybatis-spring</artifactId>
        </dependency>
        <dependency>
            <groupId>mysql</groupId>
            <artifactId>mysql-connector-java</artifactId>
        </dependency>
        <!--druid-->
        <dependency>
            <groupId>com.alibaba</groupId>
            <artifactId>druid</artifactId>
        </dependency>
2.在classpath下新建一个db.properties,用来配置数据库连接相关信息
driver=com.mysql.jdbc.Driver
url=jdbc:mysql://127.0.0.1:3306/mybatis?serverTimezone=UTC
username=root
password=
3.配置数据库连接池,classpath下建立datasource.xml
<?xml version="1.0" encoding="UTF-8"?>
<beans xmlns="http://www.springframework.org/schema/beans"
       xmlns:xsi="http://www.w3.org/2001/XMLSchema-instance"
       xsi:schemaLocation="http://www.springframework.org/schema/beans http://www.springframework.org/schema/beans/spring-beans.xsd">
    <bean id="dataSource" class="com.alibaba.druid.pool.DruidDataSource"
          destroy-method="close">
        <property name="filters" value="stat"/>

        <property name="url" value="${url}" />
        <property name="username" value="${username}" />
        <property name="password" value="${password}" />

        <property name="keepAlive" value="true"/>
        <!--最大连接数-->
        <property name="maxActive" value="20" />
        <property name="initialSize" value="1" />
        <property name="maxWait" value="60000" />
        <property name="minIdle" value="1" />
        <property name="timeBetweenEvictionRunsMillis" value="60000" />
        <property name="minEvictableIdleTimeMillis" value="300000" />

        <property name="testWhileIdle" value="true" />
        <property name="testOnBorrow" value="false" />
        <property name="testOnReturn" value="false" />
        <property name="poolPreparedStatements" value="true" />
        <property name="maxOpenPreparedStatements" value="20" />
        <!--配置>0时,会检查activeCount是否大于onFatalErrorMaxActive,如果大于则抛异常。-->
        <property name="onFatalErrorMaxActive" value="1" />
    </bean>
</beans>
3.配置mybatis相关项,在classpath下新建spring-mybatis.xml
<?xml version="1.0" encoding="UTF-8"?>
<beans xmlns="http://www.springframework.org/schema/beans"
       xmlns:xsi="http://www.w3.org/2001/XMLSchema-instance"
       xsi:schemaLocation="http://www.springframework.org/schema/beans http://www.springframework.org/schema/beans/spring-beans.xsd">

    <bean id="sqlSessionFactory" class="org.mybatis.spring.SqlSessionFactoryBean">
        <property name="dataSource" ref="dataSource"/>
        <property name="mapperLocations" value="classpath:mapper/*.xml"/>
    </bean>

    <!--扫描dao层接口-->
    <bean class="org.mybatis.spring.mapper.MapperScannerConfigurer">
        <property name="basePackage" value="com.zh.ssm.plat.dao"/>
        <property name="sqlSessionFactoryBeanName" value="sqlSessionFactory"></property>
    </bean>
</beans>
4.在spring-context中添加配置PropertyPlaceholderConfigurer
<bean class="org.springframework.beans.factory.config.PropertyPlaceholderConfigurer">
        <property name="ignoreUnresolvablePlaceholders" value="true"/>
        <property name="locations">
            <list>
                <value>classpath:db.properties</value>
            </list>
        </property>
    </bean>
在spring-context.xml中import mybatis的配置文件
<import resource="classpath:spring-mybatis.xml"/>| 整合dubbo |
1.依赖jar包
- dubbo
- curator-recipes dubbo客户端
在web和service的pom中添加依赖:
<!--dubbo-->
        <dependency>
            <groupId>com.alibaba</groupId>
            <artifactId>dubbo</artifactId>
        </dependency>
        <dependency>
            <groupId>org.apache.curator</groupId>
            <artifactId>curator-recipes</artifactId>
        </dependency>
2. service层配置
service层是提供者,在service层的classpath下添加dubbo.xsd文件,这个文件的位置在dubbo源码中dubbo-config/dubbo-config-spring/src/main/resources/META-INF下
在service层的classpath下添加dubbo-server.properties,用于配置dubbo相关参数配置
## local
dubbo.registry.address=zookeeper://192.168.159.140:2181
dubbo.plat.group=local
dubbo.plat.version=1.0.0
dubbo.registry.register=true
添加dubbo.xml配置文件
<?xml version="1.0" encoding="UTF-8"?>
<beans xmlns:xsi="http://www.w3.org/2001/XMLSchema-instance"
       xmlns:dubbo="http://code.alibabatech.com/schema/dubbo" xmlns="http://www.springframework.org/schema/beans"
       xsi:schemaLocation="http://www.springframework.org/schema/beans
                            http://www.springframework.org/schema/beans/spring-beans.xsd
                            http://code.alibabatech.com/schema/dubbo
                            http://code.alibabatech.com/schema/dubbo/dubbo.xsd
                            ">

    <!-- 应用信息,用于计算依赖关系 -->
    <dubbo:application name="platService"/>
    <dubbo:protocol name="dubbo" port="20889"/>

    <!-- 使用zookeeper注册中心暴露服务地址 -->
    <dubbo:registry protocol="zookeeper" address="${dubbo.registry.address}" register="${dubbo.registry.register}"/>
    <!--使用注解方法暴露接口-->
    <dubbo:annotation package="com.zh.ssm.plat.facade"/>
    <dubbo:provider timeout="30000" group="${dubbo.plat.group}"/>
    <dubbo:consumer check="false" timeout="30000" group="${dubbo.plat.group}"/>

</beans>
在spring-context.xml中PropertyPlaceholderConfigurer项中配置dubbo-server.properties的配置:
<bean class="org.springframework.beans.factory.config.PropertyPlaceholderConfigurer">
        <property name="ignoreUnresolvablePlaceholders" value="true"/>
        <property name="locations">
            <list>
                <value>classpath:db.properties</value>
                <value>classpath:dubbo-server.properties</value>
            </list>
        </property>
    </bean>
import dubbo的配置:
<import resource="classpath:dubbo.xml"/>3.web层配置
web层是消费者角色,添加spring-dubbo.xml,配置如下,其他配置同service层,包括dubbo.xsd和dubbo-server.properties的配置:
<?xml version="1.0" encoding="UTF-8"?>
<beans xmlns:xsi="http://www.w3.org/2001/XMLSchema-instance"
       xmlns:dubbo="http://code.alibabatech.com/schema/dubbo"
       xmlns="http://www.springframework.org/schema/beans"
       xsi:schemaLocation="http://www.springframework.org/schema/beans http://www.springframework.org/schema/beans/spring-beans.xsd

        http://code.alibabatech.com/schema/dubbo http://code.alibabatech.com/schema/dubbo/dubbo.xsd">


    <!-- dubbo配置-start -->
    <dubbo:application name="platweb"/>
    <dubbo:registry protocol="zookeeper" address="${dubbo.registry.address}"/>
    <dubbo:protocol name="dubbo" port="20881"/>
    <dubbo:consumer timeout="30000" group="${dubbo.plat.group}"/>
    <dubbo:annotation package="com.zh.ssm.plat.controller"/>
    <!-- dubbo配置-end -->

</beans>