转自:https://blog.csdn.net/dolacmeng/article/details/46291111
先放上我的代码:新建一个CircleView,继承UIView
#import "CircleView.h"

#define ScreenWidth [[UIScreen mainScreen] bounds].size.width
#define ScreenHeight [[UIScreen mainScreen] bounds].size.height
#define circle_btn_width ScreenWidth/6.3
#define circle_radius (ScreenWidth/2 - circle_btn_width + 10)

@interface CircleView()

@property (nonatomic) UIBezierPath *circle;
@property (nonatomic) CAShapeLayer *shapeLayer;
@property (nonatomic) NSTimer *timer;
@property (nonatomic) UIView *circleView;

@end

@implementation CircleView

- (instancetype)initWithFrame:(CGRect)frame{
    self = [super initWithFrame:frame];
    if (self) {

        _circle = [UIBezierPath bezierPathWithOvalInRect:CGRectMake(0, 0, circle_radius*2, circle_radius*2)];
        CAShapeLayer *shape = [CAShapeLayer new];
        shape.frame = CGRectMake(0, 50, circle_radius*2, circle_radius*2);
        shape.position = self.center;
        shape.fillColor = [UIColor clearColor].CGColor;
        shape.lineWidth = 2.f;
        shape.strokeColor = [UIColor grayColor].CGColor;
        shape.strokeStart = 0.f;
        shape.strokeEnd = 1.f;
        shape.path = _circle.CGPath;
        [self.layer addSublayer:shape];

        _shapeLayer = [CAShapeLayer layer];
        _shapeLayer.frame = CGRectMake(0, 0, circle_radius*2, circle_radius*2);
        _shapeLayer.position = self.center;
        _shapeLayer.fillColor = [UIColor clearColor].CGColor;
        _shapeLayer.lineWidth = 2.f;
        _shapeLayer.strokeColor = [UIColor redColor].CGColor;
        _shapeLayer.strokeStart = 0.f;
        _shapeLayer.strokeEnd = 0.f;
        _shapeLayer.path = _circle.CGPath;
        [self.layer addSublayer:_shapeLayer];

        CGAffineTransform transform = CGAffineTransformIdentity;
        self.transform = CGAffineTransformRotate(transform, -M_PI/2);

        _timer = [NSTimer scheduledTimerWithTimeInterval:1.f target:self selector:@selector(animate) userInfo:nil repeats:YES];
    }

    return self;
}

-(void)animate{
    _shapeLayer.strokeEnd += 0.1;
}
调用:
CircleView *circleView = [[CircleView alloc]initWithFrame:CGRectMake(0, 0, circle_radius*2, circle_radius*2)];
circleView.center = self.view.center;
[self.view addSubview:circleView];
原理是下文:
UIBezierPath可以绘制矢量路径,而CAShapeLayer是Layer的子类,可以在屏幕进行绘制,本文主要思想是:CAShapeLayer按照UIBezierPath的矢量路径进行绘制。
效果图如图:
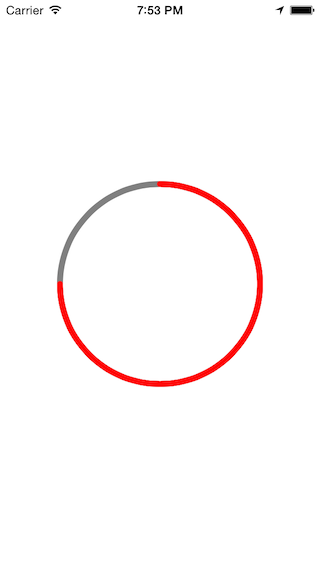
方法如下:
    @interface ViewController (){
        CAShapeLayer *shapeLayer;
        NSTimer *timer;
    }

    @end

    @implementation ViewController

    - (void)viewDidLoad {
        [super viewDidLoad];

        //第一步,通过UIBezierPath设置圆形的矢量路径
        UIBezierPath *circle = [UIBezierPath bezierPathWithOvalInRect:CGRectMake(0, 0, 200, 200)];

        //第二步,用CAShapeLayer沿着第一步的路径画一个完整的环(颜色灰色,起始点0,终结点1)
        CAShapeLayer *bgLayer = [CAShapeLayer layer];
        bgLayer.frame = CGRectMake(0, 0, 200, 200);//设置Frame
        bgLayer.position = self.view.center;//居中显示
        bgLayer.fillColor = [UIColor clearColor].CGColor;//填充颜色=透明色
        bgLayer.lineWidth = 2.f;//线条大小
        bgLayer.strokeColor = [UIColor grayColor].CGColor;//线条颜色
        bgLayer.strokeStart = 0.f;//路径开始位置
        bgLayer.strokeEnd = 1.f;//路径结束位置
        bgLayer.path = circle.CGPath;//设置bgLayer的绘制路径为circle的路径
        [self.view.layer addSublayer:bgLayer];//添加到屏幕上

        //第三步,用CAShapeLayer沿着第一步的路径画一个红色的环形进度条,但是起始点=终结点=0,所以开始不可见
        shapeLayer = [CAShapeLayer layer];
        shapeLayer.frame = CGRectMake(0, 0, 200, 200);
        shapeLayer.position = self.view.center;
        shapeLayer.fillColor = [UIColor clearColor].CGColor;
        shapeLayer.lineWidth = 2.f;
        shapeLayer.strokeColor = [UIColor redColor].CGColor;
        shapeLayer.strokeStart = 0;
        shapeLayer.strokeEnd = 0;
        shapeLayer.path = circle.CGPath;
        [self.view.layer addSublayer:shapeLayer];

        //第四步,用一个定时器进行测试,每一秒,进度加10%
        timer = [NSTimer scheduledTimerWithTimeInterval:1.f target:self selector:@selector(animate) userInfo:nil repeats:YES];
    }

    -(void)animate{
        shapeLayer.strokeEnd += 0.1;
    }
我们可以对以上代码封装为一个CircleView,继承自View,封装后代码如下:
CircleView.h文件
    #import <UIKit/UIKit.h>

    @interface CircleView : UIView

    @property(assign,nonatomic)CGFloat startValue;
    @property(assign,nonatomic)CGFloat lineWidth;
    @property(assign,nonatomic)CGFloat value;
    @property(strong,nonatomic)UIColor *lineColr;

    @end
CircleView.m文件:
    #import "CircleView.h"

    @interface CircleView()
    @property(strong,nonatomic)UIBezierPath *path;
    @property(strong,nonatomic)CAShapeLayer *shapeLayer;
    @property(strong,nonatomic)CAShapeLayer *bgLayer;

    @end

    @implementation CircleView


    - (instancetype)initWithFrame:(CGRect)frame
    {
        self = [super initWithFrame:frame];
        if (self) {
            _path = [UIBezierPath bezierPathWithOvalInRect:self.bounds];

            _bgLayer = [CAShapeLayer layer];
            _bgLayer.frame = self.bounds;
            _bgLayer.fillColor = [UIColor clearColor].CGColor;
            _bgLayer.lineWidth = 2.f;
            _bgLayer.strokeColor = [UIColor grayColor].CGColor;
            _bgLayer.strokeStart = 0.f;
            _bgLayer.strokeEnd = 1.f;
            _bgLayer.path = _path.CGPath;
            [self.layer addSublayer:_bgLayer];

            _shapeLayer = [CAShapeLayer layer];
            _shapeLayer.frame = self.bounds;
            _shapeLayer.fillColor = [UIColor clearColor].CGColor;
            _shapeLayer.lineWidth = 2.f;
            _shapeLayer.lineCap = kCALineCapRound;
            _shapeLayer.strokeColor = [UIColor redColor].CGColor;
            _shapeLayer.strokeStart = 0.f;
            _shapeLayer.strokeEnd = 0.f;


            _shapeLayer.path = _path.CGPath;
            [self.layer addSublayer:_shapeLayer];

        }
        return self;
    }

    @synthesize value = _value;
    -(void)setValue:(CGFloat)value{
        _value = value;
        _shapeLayer.strokeEnd = value;
    }
    -(CGFloat)value{
        return _value;
    }

    @synthesize lineColr = _lineColr;
    -(void)setLineColr:(UIColor *)lineColr{
        _lineColr = lineColr;
        _shapeLayer.strokeColor = lineColr.CGColor;
    }
    -(UIColor*)lineColr{
        return _lineColr;
    }

    @synthesize lineWidth = _lineWidth;
    -(void)setLineWidth:(CGFloat)lineWidth{
        _lineWidth = lineWidth;
        _shapeLayer.lineWidth = lineWidth;
        _bgLayer.lineWidth = lineWidth;
    }
    -(CGFloat)lineWidth{
        return _lineWidth;
    }

    @end
在需要使用的ViewContrller中使用以下代码调用即可:
    CircleView *view = [[CircleView alloc] initWithFrame:CGRectMake(0, 0, 200, 200)];
       [self.view addSubview:view];
       view.center = self.view.center;
       [view setLineWidth:6.f];
       [view setLineColr:[UIColor redColor]];
另外默认的坐标如下图(图来自http://justsee.iteye.com/blog/1972853)
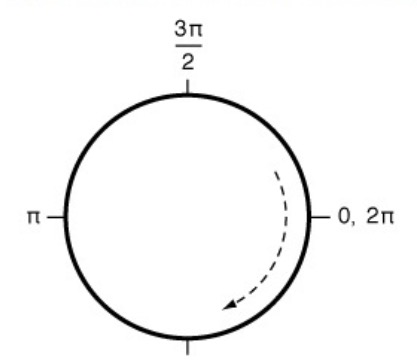
有时候我们需要开始点在顶部,即(3/2)π 处,其中一个思路是将整个View逆时针旋转90度即可,在CircleView.m的initWithFrame中添加以下代码即可:
CGAffineTransform transform = CGAffineTransformIdentity;
self.transform = CGAffineTransformRotate(transform, -M_PI / 2);
注意:变型只能对UIView使用,对CAShapeLayer没有效果
参考:
1.iOS开发贝塞尔曲线UIBezierPath(后记)
https://www.cnblogs.com/ioshe/p/5481841.html