View 绘图机制
本打算看代码的,结果一看光View类一万多行我的天哪从何看起,,然后另寻他法吧。目前水平自己能全看懂才怪嘞!!
那么老套路,看看别人咋整的。
Android LayoutInflater原理分析,带你一步步深入了解View(一)
Android视图绘制流程完全解析,带你一步步深入了解View(二)
Android视图状态及重绘流程分析,带你一步步深入了解View(三)
Android自定义View的实现方法,带你一步步深入了解View(四)
看了上面这个帖子,我感觉绘图流程,被绘制的可以说是view,但是真正引发绘制这个流程的却是ViewRoot,ViewRoot的实现类是ViewRootImpl,,5000来行代码,比View少 。
。
代码太庞大,首先先从一部分截取讲起吧,就是ActivityThread 中对resume生命周期的控制,里面有

其中View 的绘制就是从 ViewRootImpl 的 performTraversals()开始的。然后接下来就是View 的 measure,layout 和 draw这种流程。期间涉及到了不同的view,什么子view,父view,一系列的动作。
看下WindowManagerImpl中的addView方法。这个会在AcitivityThread中被调用,最后这个方法最后调用了mGlobal(WindowManagerGlobal类)的addView()
public void addView(View view, LayoutParams params) {
        this.applyDefaultToken(params);
        this.mGlobal.addView(view, params, this.mContext.getDisplay(), this.mParentWindow);
    }
下面看看WindowManagerGlobal中的addView如何实现:
public void addView(View view, android.view.ViewGroup.LayoutParams params, Display display, Window parentWindow) {
        if(view == null) {//首先进行了一系列的参数合法化操作
            throw new IllegalArgumentException("view must not be null");
        } else if(display == null) {
            throw new IllegalArgumentException("display must not be null");
        } else if(!(params instanceof LayoutParams)) {
            throw new IllegalArgumentException("Params must be WindowManager.LayoutParams");
        } else {
            LayoutParams wparams = (LayoutParams)params;
            if(parentWindow != null) {
                parentWindow.adjustLayoutParamsForSubWindow(wparams);
            } else {
                Context context = view.getContext();
                if(context != null && (context.getApplicationInfo().flags & 536870912) != 0) {
                    wparams.flags |= 16777216;
                }
            }

            View panelParentView = null;
            Object var8 = this.mLock;
            int index;
            ViewRootImpl root;
            synchronized(this.mLock) {
                if(this.mSystemPropertyUpdater == null) {
                    this.mSystemPropertyUpdater = new Runnable() {
                        public void run() {
                            synchronized(WindowManagerGlobal.this.mLock) {
                                for(int i = WindowManagerGlobal.this.mRoots.size() - 1; i >= 0; --i) {
                                    ((ViewRootImpl)WindowManagerGlobal.this.mRoots.get(i)).loadSystemProperties();
                                }

                            }
                        }
                    };
                    SystemProperties.addChangeCallback(this.mSystemPropertyUpdater);
                }

                int index = this.findViewLocked(view, false);
                if(index >= 0) {
                    if(!this.mDyingViews.contains(view)) {
                        throw new IllegalStateException("View " + view + " has already been added to the window manager.");
                    }

                    ((ViewRootImpl)this.mRoots.get(index)).doDie();
                }

                if(wparams.type >= 1000 && wparams.type <= 1999) {
                    index = this.mViews.size();

                    for(int i = 0; i < index; ++i) {
                        if(((ViewRootImpl)this.mRoots.get(i)).mWindow.asBinder() == wparams.token) {
                            panelParentView = (View)this.mViews.get(i);
                        }
                    }
                }

                root = new ViewRootImpl(view.getContext(), display);
                view.setLayoutParams(wparams);
                this.mViews.add(view);//这三个是关键步骤,添加到列表中
                this.mRoots.add(root);
                this.mParams.add(wparams);
            }

            try {
                root.setView(view, wparams, panelParentView);//最终调用到了ViewRootImpl的setView()方法中。这个方法是一个超级长的大方法
            } catch (RuntimeException var15) {
                Object var18 = this.mLock;
                synchronized(this.mLock) {
                    index = this.findViewLocked(view, false);
                    if(index >= 0) {
                        this.removeViewLocked(index, true);
                    }
                }

                throw var15;
            }
        }
}public void setView(View view, LayoutParams attrs, View panelParentView) {
synchronized(this) {
if(this.mView == null) {
this.mView = view;
this.mAttachInfo.mDisplayState = this.mDisplay.getState();
this.mDisplayManager.registerDisplayListener(this.mDisplayListener, this.mHandler);
this.mViewLayoutDirectionInitial = this.mView.getRawLayoutDirection();
this.mFallbackEventHandler.setView(view);
this.mWindowAttributes.copyFrom(attrs);
if(this.mWindowAttributes.packageName == null) {
this.mWindowAttributes.packageName = this.mBasePackageName;
}
attrs = this.mWindowAttributes;
this.setTag();
this.mClientWindowLayoutFlags = attrs.flags;
this.setAccessibilityFocus((View)null, (AccessibilityNodeInfo)null);
if(view instanceof RootViewSurfaceTaker) {
this.mSurfaceHolderCallback = ((RootViewSurfaceTaker)view).willYouTakeTheSurface();
if(this.mSurfaceHolderCallback != null) {
this.mSurfaceHolder = new ViewRootImpl.TakenSurfaceHolder();
this.mSurfaceHolder.setFormat(0);
}
}
if(!attrs.hasManualSurfaceInsets) {
attrs.setSurfaceInsets(view, false, true);
}
CompatibilityInfo compatibilityInfo = this.mDisplay.getDisplayAdjustments().getCompatibilityInfo();
this.mTranslator = compatibilityInfo.getTranslator();
if(this.mSurfaceHolder == null) {
this.enableHardwareAcceleration(attrs);
}
boolean restore = false;
if(this.mTranslator != null) {
this.mSurface.setCompatibilityTranslator(this.mTranslator);
restore = true;
attrs.backup();
this.mTranslator.translateWindowLayout(attrs);
}
if(!compatibilityInfo.supportsScreen()) {
attrs.privateFlags |= 128;
this.mLastInCompatMode = true;
}
this.mSoftInputMode = attrs.softInputMode;
this.mWindowAttributesChanged = true;
this.mWindowAttributesChangesFlag = -1;
this.mAttachInfo.mRootView = view;
this.mAttachInfo.mScalingRequired = this.mTranslator != null;
this.mAttachInfo.mApplicationScale = this.mTranslator == null?1.0F:this.mTranslator.applicationScale;
if(panelParentView != null) {
this.mAttachInfo.mPanelParentWindowToken = panelParentView.getApplicationWindowToken();
}
this.mAdded = true;
this.requestLayout();//关键一句 requestLayout()!
if((this.mWindowAttributes.inputFeatures & 2) == 0) {
this.mInputChannel = new InputChannel();
}
this.mForceDecorViewVisibility = (this.mWindowAttributes.privateFlags & 16384) != 0;
int res;
try {
this.mOrigWindowType = this.mWindowAttributes.type;
this.mAttachInfo.mRecomputeGlobalAttributes = true;
this.collectViewAttributes();//下面一句通过windowSession调用相关方法。 windowSession 是 一个 binder类型的对象。那么作用的话很明显就是IPC
res = this.mWindowSession.addToDisplay(this.mWindow, this.mSeq, this.mWindowAttributes, this.getHostVisibility(), this.mDisplay.getDisplayId(), this.mAttachInfo.mContentInsets, this.mAttachInfo.mStableInsets, this.mAttachInfo.mOutsets, this.mInputChannel);
} catch (RemoteException var19) {
this.mAdded = false;
this.mView = null;
this.mAttachInfo.mRootView = null;
this.mInputChannel = null;
this.mFallbackEventHandler.setView((View)null);
this.unscheduleTraversals();
this.setAccessibilityFocus((View)null, (AccessibilityNodeInfo)null);
throw new RuntimeException("Adding window failed", var19);
} finally {
if(restore) {
attrs.restore();
}
}
if(this.mTranslator != null) {
this.mTranslator.translateRectInScreenToAppWindow(this.mAttachInfo.mContentInsets);
}
this.mPendingOverscanInsets.set(0, 0, 0, 0);
this.mPendingContentInsets.set(this.mAttachInfo.mContentInsets);
this.mPendingStableInsets.set(this.mAttachInfo.mStableInsets);
this.mPendingVisibleInsets.set(0, 0, 0, 0);
this.mAttachInfo.mAlwaysConsumeNavBar = (res & 4) != 0;
this.mPendingAlwaysConsumeNavBar = this.mAttachInfo.mAlwaysConsumeNavBar;
if(res < 0) {
this.mAttachInfo.mRootView = null;
this.mAdded = false;
this.mFallbackEventHandler.setView((View)null);
this.unscheduleTraversals();
this.setAccessibilityFocus((View)null, (AccessibilityNodeInfo)null);
switch(res) {
case -10:
throw new InvalidDisplayException("Unable to add window " + this.mWindow + " -- the specified window type " + this.mWindowAttributes.type + " is not valid");
case -9:
throw new InvalidDisplayException("Unable to add window " + this.mWindow + " -- the specified display can not be found");
case -8:
throw new BadTokenException("Unable to add window " + this.mWindow + " -- permission denied for window type " + this.mWindowAttributes.type);
case -7:
throw new BadTokenException("Unable to add window " + this.mWindow + " -- another window of type " + this.mWindowAttributes.type + " already exists");
case -6:
return;
case -5:
throw new BadTokenException("Unable to add window -- window " + this.mWindow + " has already been added");
case -4:
throw new BadTokenException("Unable to add window -- app for token " + attrs.token + " is exiting");
case -3:
throw new BadTokenException("Unable to add window -- token " + attrs.token + " is not for an application");
case -2:
case -1:
throw new BadTokenException("Unable to add window -- token " + attrs.token + " is not valid; is your activity running?");
default:
throw new RuntimeException("Unable to add window -- unknown error code " + res);
}
}
if(view instanceof RootViewSurfaceTaker) {
this.mInputQueueCallback = ((RootViewSurfaceTaker)view).willYouTakeTheInputQueue();
}
if(this.mInputChannel != null) {
if(this.mInputQueueCallback != null) {
this.mInputQueue = new InputQueue();
this.mInputQueueCallback.onInputQueueCreated(this.mInputQueue);
}
this.mInputEventReceiver = new ViewRootImpl.WindowInputEventReceiver(this.mInputChannel, Looper.myLooper());
}
view.assignParent(this);
this.mAddedTouchMode = (res & 1) != 0;
this.mAppVisible = (res & 2) != 0;
if(this.mAccessibilityManager.isEnabled()) {
this.mAccessibilityInteractionConnectionManager.ensureConnection();
}
if(view.getImportantForAccessibility() == 0) {
view.setImportantForAccessibility(1);
}
CharSequence counterSuffix = attrs.getTitle();
this.mSyntheticInputStage = new ViewRootImpl.SyntheticInputStage();
ViewRootImpl.InputStage viewPostImeStage = new ViewRootImpl.ViewPostImeInputStage(this.mSyntheticInputStage);
ViewRootImpl.InputStage nativePostImeStage = new ViewRootImpl.NativePostImeInputStage(viewPostImeStage, "aq:native-post-ime:" + counterSuffix);
ViewRootImpl.InputStage earlyPostImeStage = new ViewRootImpl.EarlyPostImeInputStage(nativePostImeStage);
ViewRootImpl.InputStage imeStage = new ViewRootImpl.ImeInputStage(earlyPostImeStage, "aq:ime:" + counterSuffix);
ViewRootImpl.InputStage viewPreImeStage = new ViewRootImpl.ViewPreImeInputStage(imeStage);
ViewRootImpl.InputStage nativePreImeStage = new ViewRootImpl.NativePreImeInputStage(viewPreImeStage, "aq:native-pre-ime:" + counterSuffix);
this.mFirstInputStage = nativePreImeStage;
this.mFirstPostImeInputStage = earlyPostImeStage;
this.mPendingInputEventQueueLengthCounterName = "aq:pending:" + counterSuffix;
}
}
} public void requestLayout() {//这个方法在最后调用scheduleTraversals() 是特特特别关键的
if(!this.mHandlingLayoutInLayoutRequest) {
this.checkThread();
this.mLayoutRequested = true;
this.scheduleTraversals();
}
}再看下接下来的:
void scheduleTraversals() {
    if (!mTraversalScheduled) {
        mTraversalScheduled = true;
        //这里很有意思,它首先是加了个同步屏障消息。那么这个意思是说下一个你就执行异步消息好了
        mTraversalBarrier = mHandler.getLooper().getQueue().postSyncBarrier();
        //这一句相当于向消息队列里面添加了一个异步消息,执行体就是第二个参数mTraversalRunnable。
        //这个参数是一个runnable,里面的run方法只执行一个著名的方法:ViewRootImpl的performTraversals()方法
        //是涉及到View measure, layout, draw 过程的 大逻辑。
        mChoreographer.postCallback(
                Choreographer.CALLBACK_TRAVERSAL, mTraversalRunnable, null);
        if (!mUnbufferedInputDispatch) {
            scheduleConsumeBatchedInput();
        }
        notifyRendererOfFramePending();
        pokeDrawLockIfNeeded();
    }
}
final TraversalRunnable mTraversalRunnable = new TraversalRunnable();
final class TraversalRunnable implements Runnable {
    @Override
    public void run() {
        doTraversal();
    }
}
void doTraversal() {
    if (mTraversalScheduled) {
        mTraversalScheduled = false;
        mHandler.getLooper().getQueue().removeSyncBarrier(mTraversalBarrier);

        if (mProfile) {
            Debug.startMethodTracing("ViewAncestor");
        }
        //这里这里!!!View绘图之源
        performTraversals();

        if (mProfile) {
            Debug.stopMethodTracing();
            mProfile = false;
        }
    }
}
所以这么个流程下来,,看看哈
WindowManagerImpl.addView()---->WindouManagerGlobal.addView()---->ViewRootImpl.setView()---->ViewRootImpl.requestLayout()---->ViewRootImpl.schedualTraversals()---->TraversalRunnable.run()---->ViewRootImpl.doTraversal()---->ViewRootImpl.performTraversals()---->炫酷狂拽炸天的View measure,layout, draw 开始。。。。
那么看下ViewRootInple.performTraversals()方法,,大概800来行。。。我的天呐。只看三行重点其他的有时间好好看好好讲:
 // Ask host how big it wants to be
//开始测量的代码
performMeasure(childWidthMeasureSpec, childHeightMeasureSpec);
//开始布局
performLayout(lp, desiredWindowWidth, desiredWindowHeight);
//开始画
performDraw();
1 measure过程:
private void performMeasure(int childWidthMeasureSpec, int childHeightMeasureSpec) {
    Trace.traceBegin(Trace.TRACE_TAG_VIEW, "measure");
    try {
        //调用了View的neasure,
        mView.measure(childWidthMeasureSpec, childHeightMeasureSpec);
    } finally {
        Trace.traceEnd(Trace.TRACE_TAG_VIEW);
    }
}
View measure开始。。。
/**
 * <p>
 * This is called to find out how big a view should be. The parent
 * supplies constraint information in the width and height parameters.
 * </p>
 *
 * <p>
 * The actual measurement work of a view is performed in
 * {@link #onMeasure(int, int)}, called by this method. Therefore, only
 * {@link #onMeasure(int, int)} can and must be overridden by subclasses.
 * </p>
 *
 *
 * @param widthMeasureSpec Horizontal space requirements as imposed by the
 *        parent
 * @param heightMeasureSpec Vertical space requirements as imposed by the
 *        parent
 *
 * @see #onMeasure(int, int)
 */
//final修饰的方法,子类无法重写。
public final void measure(int widthMeasureSpec, int heightMeasureSpec) {
    //判断当前View是不是一个viewgroup并且它有没有特殊的边界修饰之类的。
    boolean optical = isLayoutModeOptical(this);
    if (optical != isLayoutModeOptical(mParent)) {
        Insets insets = getOpticalInsets();
        int oWidth  = insets.left + insets.right;
        int oHeight = insets.top  + insets.bottom;
        widthMeasureSpec  = MeasureSpec.adjust(widthMeasureSpec,  optical ? -oWidth  : oWidth);
        heightMeasureSpec = MeasureSpec.adjust(heightMeasureSpec, optical ? -oHeight : oHeight);
    }

    // Suppress sign extension for the low bytes
    long key = (long) widthMeasureSpec << 32 | (long) heightMeasureSpec & 0xffffffffL;
    //这里可以看出,对尺寸相关信息,会做缓存。如果有了缓存,那么直接借用这个值信息。。但是没有的话,那就得算
    if (mMeasureCache == null) mMeasureCache = new LongSparseLongArray(2);

    if ((mPrivateFlags & PFLAG_FORCE_LAYOUT) == PFLAG_FORCE_LAYOUT ||
            widthMeasureSpec != mOldWidthMeasureSpec ||
            heightMeasureSpec != mOldHeightMeasureSpec) {

        // first clears the measured dimension flag
        mPrivateFlags &= ~PFLAG_MEASURED_DIMENSION_SET;
        //关于一些方向,文字上的设置
        resolveRtlPropertiesIfNeeded();

        int cacheIndex = (mPrivateFlags & PFLAG_FORCE_LAYOUT) == PFLAG_FORCE_LAYOUT ? -1 :
                mMeasureCache.indexOfKey(key);
        //如果缓存里面没有关于当前view的尺寸信息的话,只好连同有没有光学特效之类的 一起算
        if (cacheIndex < 0 || sIgnoreMeasureCache) {
            // measure ourselves, this should set the measured dimension flag back
            onMeasure(widthMeasureSpec, heightMeasureSpec);
            mPrivateFlags3 &= ~PFLAG3_MEASURE_NEEDED_BEFORE_LAYOUT;
        } else {
            //但是有信息的话,就要走捷径喽
            long value = mMeasureCache.valueAt(cacheIndex);
            // Casting a long to int drops the high 32 bits, no mask needed
            setMeasuredDimensionRaw((int) (value >> 32), (int) value);
            mPrivateFlags3 |= PFLAG3_MEASURE_NEEDED_BEFORE_LAYOUT;
        }

        // flag not set, setMeasuredDimension() was not invoked, we raise
        // an exception to warn the developer
        if ((mPrivateFlags & PFLAG_MEASURED_DIMENSION_SET) != PFLAG_MEASURED_DIMENSION_SET) {
            throw new IllegalStateException("View with id " + getId() + ": "
                    + getClass().getName() + "#onMeasure() did not set the"
                    + " measured dimension by calling"
                    + " setMeasuredDimension()");
        }

        mPrivateFlags |= PFLAG_LAYOUT_REQUIRED;
    }

    mOldWidthMeasureSpec = widthMeasureSpec;
    mOldHeightMeasureSpec = heightMeasureSpec;

    mMeasureCache.put(key, ((long) mMeasuredWidth) << 32 |
            (long) mMeasuredHeight & 0xffffffffL); // suppress sign extension
}
划重点,在里面调用到了onMeasure()方法。也就是我们的自定义view里面常常重写的那个方法。
但是针对于onMeasure来说,View有一个onMeasure()方法,但是呢?View的众多子类中,比如ViewGroup底下的那群类里也会重写这个方法。
所以假设当前的view就是一个FrameLayout吧,那我们找找FrameLayout的方法。
/**
 * {@inheritDoc}
 */
//这个在View类的measure方法里面会调用,当然View里也有相应的onmeasure方法,但是作为子类既然重写了
//如果那样调用的话,就会调用到子类的onmeasure方法里面去。ViewGroup这个父类并没有重写onMeasure,但是
//他的好多子类都重写了!!!
@Override
protected void onMeasure(int widthMeasureSpec, int heightMeasureSpec) {
    //获取子view的数量
    int count = getChildCount();

    //找出当前父view的测量方式是不是有matchparent,或者指定了宽或高那样的。
    final boolean measureMatchParentChildren =
            MeasureSpec.getMode(widthMeasureSpec) != MeasureSpec.EXACTLY ||
            MeasureSpec.getMode(heightMeasureSpec) != MeasureSpec.EXACTLY;
    mMatchParentChildren.clear();

    int maxHeight = 0;
    int maxWidth = 0;
    int childState = 0;

    for (int i = 0; i < count; i++) {
        //当前的child 只是父容器直属父子关系的子容器。
        final View child = getChildAt(i);
        if (mMeasureAllChildren || child.getVisibility() != GONE) {
            //这句话会导致所有的view都会计算出大小。因为child会继续measure。并且里面包含了MeasureApec 和 LayoutParams几种
            //模式的综合考量逻辑。
            measureChildWithMargins(child, widthMeasureSpec, 0, heightMeasureSpec, 0);
            final LayoutParams lp = (LayoutParams) child.getLayoutParams();
            maxWidth = Math.max(maxWidth,
                    child.getMeasuredWidth() + lp.leftMargin + lp.rightMargin);
            maxHeight = Math.max(maxHeight,
                    child.getMeasuredHeight() + lp.topMargin + lp.bottomMargin);
            childState = combineMeasuredStates(childState, child.getMeasuredState());
            if (measureMatchParentChildren) {
                if (lp.width == LayoutParams.MATCH_PARENT ||
                        lp.height == LayoutParams.MATCH_PARENT) {
                    mMatchParentChildren.add(child);
                }
            }
        }
    }

    // Account for padding too
    maxWidth += getPaddingLeftWithForeground() + getPaddingRightWithForeground();
    maxHeight += getPaddingTopWithForeground() + getPaddingBottomWithForeground();

    // Check against our minimum height and width
    maxHeight = Math.max(maxHeight, getSuggestedMinimumHeight());
    maxWidth = Math.max(maxWidth, getSuggestedMinimumWidth());

    // Check against our foreground's minimum height and width
    final Drawable drawable = getForeground();
    if (drawable != null) {
        maxHeight = Math.max(maxHeight, drawable.getMinimumHeight());
        maxWidth = Math.max(maxWidth, drawable.getMinimumWidth());
    }
    //最终会通过这个方法设置当前对象的宽高 和 privateFlags。。这个是很关键的。因为整套测量的目的也就是正确的设置这三个参数而已
    //如果你自己写一个view,重写onmeasure的话,,你如果不调用这句方法,,那就白费了。因为这个方法就是赤果果的设置参数。。
    //费劲周折算了一堆,也不过就是为了设置参数而已。
    setMeasuredDimension(resolveSizeAndState(maxWidth, widthMeasureSpec, childState),
            resolveSizeAndState(maxHeight, heightMeasureSpec,
                    childState << MEASURED_HEIGHT_STATE_SHIFT));

    //针对那些属性设置为match_parent的子view们
    //再测量,
    count = mMatchParentChildren.size();
    if (count > 1) {
        for (int i = 0; i < count; i++) {
            final View child = mMatchParentChildren.get(i);
            final MarginLayoutParams lp = (MarginLayoutParams) child.getLayoutParams();

            final int childWidthMeasureSpec;
            if (lp.width == LayoutParams.MATCH_PARENT) {
                final int width = Math.max(0, getMeasuredWidth()
                        - getPaddingLeftWithForeground() - getPaddingRightWithForeground()
                        - lp.leftMargin - lp.rightMargin);
                childWidthMeasureSpec = MeasureSpec.makeMeasureSpec(
                        width, MeasureSpec.EXACTLY);
            } else {
                childWidthMeasureSpec = getChildMeasureSpec(widthMeasureSpec,
                        getPaddingLeftWithForeground() + getPaddingRightWithForeground() +
                        lp.leftMargin + lp.rightMargin,
                        lp.width);
            }

            final int childHeightMeasureSpec;
            if (lp.height == LayoutParams.MATCH_PARENT) {
                final int height = Math.max(0, getMeasuredHeight()
                        - getPaddingTopWithForeground() - getPaddingBottomWithForeground()
                        - lp.topMargin - lp.bottomMargin);
                childHeightMeasureSpec = MeasureSpec.makeMeasureSpec(
                        height, MeasureSpec.EXACTLY);
            } else {
                childHeightMeasureSpec = getChildMeasureSpec(heightMeasureSpec,
                        getPaddingTopWithForeground() + getPaddingBottomWithForeground() +
                        lp.topMargin + lp.bottomMargin,
                        lp.height);
            }

            child.measure(childWidthMeasureSpec, childHeightMeasureSpec);
        }
    }
}
就是在这里调用了很重要的几个方法,也就是加说明的那些。
1 measureChildWithMargins()
2setMeasuredDimension()
3 遍历中调用的的child.measure()
好,一个接一个讲,首先measureChildWithMargins()这个
/**
 * Ask one of the children of this view to measure itself, taking into
 * account both the MeasureSpec requirements for this view and its padding
 * and margins. The child must have MarginLayoutParams The heavy lifting is
 * done in getChildMeasureSpec.
 *
 * @param child The child to measure
 * @param parentWidthMeasureSpec The width requirements for this view
 * @param widthUsed Extra space that has been used up by the parent
 *        horizontally (possibly by other children of the parent)
 * @param parentHeightMeasureSpec The height requirements for this view
 * @param heightUsed Extra space that has been used up by the parent
 *        vertically (possibly by other children of the parent)
 */
protected void measureChildWithMargins(View child,
        int parentWidthMeasureSpec, int widthUsed,
        int parentHeightMeasureSpec, int heightUsed) {
    //获取子view的LayoutParams
    final MarginLayoutParams lp = (MarginLayoutParams) child.getLayoutParams();
    //获取子view的 WidthMeasureSpec,其中传入的参数说明
    //parentWidthMeasureApec父容器的WidthMeasureApec
    //mPaddingLeft + mPaddingRight View本身的Padding值。即内边距值
    //lp.leftMargin + lp.rightMargin View本身的边距值,即外边距
    //widthUsed父容器已经被占用的空间值
    //lp.wdth view本身期望的宽度
    final int childWidthMeasureSpec = getChildMeasureSpec(parentWidthMeasureSpec,
            mPaddingLeft + mPaddingRight + lp.leftMargin + lp.rightMargin
                    + widthUsed, lp.width);
    final int childHeightMeasureSpec = getChildMeasureSpec(parentHeightMeasureSpec,
            mPaddingTop + mPaddingBottom + lp.topMargin + lp.bottomMargin
                    + heightUsed, lp.height);
    //根据获取的子View 的 宽高spec,对子View进行测量。继而有通过这种方式调用子View重写的onMeasure()或者原生的
    //onMeasure,如果还是有子view的话,还是继续调用,周而复始,就这样慢慢的整个View树就都测量出来了
    //最终的目的就是让每一个View的 mMeasureWidth, mMeasureHeight, mprivateFlags 参数 附上正确的值。
    child.measure(childWidthMeasureSpec, childHeightMeasureSpec);
}
这个方法的最后也是调用了child.measure(),就是一层接一层的测量。。但是中间也有一些别的方法,也是比较重要的知识点,倒数第二句第三句的getChildMeasureSpec()方法的调用,这个是根据view本身的测量模式,以及他的layoutParames参数里面的属性定义得出来的综合结果。这个是个比较重要的知识点。
/**
 * Does the hard part of measureChildren: figuring out the MeasureSpec to
 * pass to a particular child. This method figures out the right MeasureSpec
 * for one dimension (height or width) of one child view.
 *
 * The goal is to combine information from our MeasureSpec with the
 * LayoutParams of the child to get the best possible results. For example,
 * if the this view knows its size (because its MeasureSpec has a mode of
 * EXACTLY), and the child has indicated in its LayoutParams that it wants
 * to be the same size as the parent, the parent should ask the child to
 * layout given an exact size.
 *
 * @param spec The requirements for this view
 * @param padding The padding of this view for the current dimension and
 *        margins, if applicable
 * @param childDimension How big the child wants to be in the current
 *        dimension
 * @return a MeasureSpec integer for the child
 */
public static int getChildMeasureSpec(int spec, int padding, int childDimension) {
    //获取父容器的测量模式
    int specMode = MeasureSpec.getMode(spec);
    //获取父容器的尺寸,并且这个尺寸是专门用来约束子View大小的
    int specSize = MeasureSpec.getSize(spec);
    //父容器的尺寸减掉已经被用到的尺寸
    int size = Math.max(0, specSize - padding);

    int resultSize = 0;
    int resultMode = 0;

    switch (specMode) {
    // Parent has imposed an exact size on us
        //父亲的mode是精准测量模式
    case MeasureSpec.EXACTLY:
        if (childDimension >= 0) {
            //这里代表 childDimension 被指定精确的值了,那么该多大是多大
            resultSize = childDimension;
            //mode 被指定是exactly  这里是精确值的意思
            resultMode = MeasureSpec.EXACTLY;
        } else if (childDimension == LayoutParams.MATCH_PARENT) {//如果子view被指定的恰巧就是match_parent,那么mode毋庸置疑,仍然是exactly
            // Child wants to be our size. So be it.
            //那就把他的最大值设置为父容器的最大可用值,也就是随爹
            resultSize = size;
            resultMode = MeasureSpec.EXACTLY;
        } else if (childDimension == LayoutParams.WRAP_CONTENT) {//子容器被写成是适应里面内容,包裹内容
            // Child wants to determine its own size. It can't be
            // bigger than us.
            //这样的搭配会让不确定子容器的大小,,因为子容器是自适应里面的内容。
            //but 那就给他一个最大值吧,,顶天也不会超过父容器的。
            resultSize = size;
            //然后mode设置为 at_most意思是,,随你内容怎么变,,但是顶天不能超过它的父容器
            resultMode = MeasureSpec.AT_MOST;
        }
        break;

    // Parent has imposed a maximum size on us
        //如果父容器有个指定值,子容器不能超过这么大
    case MeasureSpec.AT_MOST:
        if (childDimension >= 0) {
            // Child wants a specific size... so be it
            //指定确切的大小了,该多大还是多大
            resultSize = childDimension;
            resultMode = MeasureSpec.EXACTLY;
        } else if (childDimension == LayoutParams.MATCH_PARENT) {
            // Child wants to be our size, but our size is not fixed.
            // Constrain child to not be bigger than us.
            //父容器本身是适应子容器大小的,她连最后自己的大小都不确定呢,,但是子容器设置是match——parent,
            //好矛盾的一组搭配
            //那好吧,最大值是 父容器目前的可用空间值
            resultSize = size;
            //但是你的子容器你要管住了,,撑死不能比你的size大
            resultMode = MeasureSpec.AT_MOST;
        } else if (childDimension == LayoutParams.WRAP_CONTENT) {
            // Child wants to determine its own size. It can't be
            // bigger than us.
            resultSize = size;
            resultMode = MeasureSpec.AT_MOST;
        }
        break;

    // Parent asked to see how big we want to be
        //要多大就给多大!!!
    case MeasureSpec.UNSPECIFIED:
        if (childDimension >= 0) {
            // Child wants a specific size... let him have it
            resultSize = childDimension;
            resultMode = MeasureSpec.EXACTLY;
        } else if (childDimension == LayoutParams.MATCH_PARENT) {
            // Child wants to be our size... find out how big it should
            // be
            resultSize = View.sUseZeroUnspecifiedMeasureSpec ? 0 : size;
            resultMode = MeasureSpec.UNSPECIFIED;
        } else if (childDimension == LayoutParams.WRAP_CONTENT) {
            // Child wants to determine its own size.... find out how
            // big it should be
            resultSize = View.sUseZeroUnspecifiedMeasureSpec ? 0 : size;
            resultMode = MeasureSpec.UNSPECIFIED;
        }
        break;
    }
    return MeasureSpec.makeMeasureSpec(resultSize, resultMode);
    /**
     * 总结:

     当 View 采用固定宽高时,不管父容器的 MeasureSpec 是什么,View 的 MeasureSpec 都是精确模式,并且大小是LayoutParams 中的大小。
     当 View 的宽高是 match_parent 时,如果父容器的模式是精确模式,那么 View 也是精确模式,并且大小是父容器的剩余空间;如果父容器是最大模式,那么 View 也是最大模式,并且大小是不会超过父容器的剩余空间。
     当 View 的宽高是 wrap_content 时,不管父容器的模式是精确模式还是最大模式,View 的模式总是最大模式,并且大小不超过父容器的剩余空间。
     */
}
然后就是2setMeasuredDimension()这个方法。其根本目的就是设置三个非常重要的参数:
/**
 * <p>This method must be called by {@link #onMeasure(int, int)} to store the
 * measured width and measured height. Failing to do so will trigger an
 * exception at measurement time.</p>
 *
 * @param measuredWidth The measured width of this view.  May be a complex
 * bit mask as defined by {@link #MEASURED_SIZE_MASK} and
 * {@link #MEASURED_STATE_TOO_SMALL}.
 * @param measuredHeight The measured height of this view.  May be a complex
 * bit mask as defined by {@link #MEASURED_SIZE_MASK} and
 * {@link #MEASURED_STATE_TOO_SMALL}.
 */
protected final void setMeasuredDimension(int measuredWidth, int measuredHeight) {
    boolean optical = isLayoutModeOptical(this);
    if (optical != isLayoutModeOptical(mParent)) {
        Insets insets = getOpticalInsets();
        int opticalWidth  = insets.left + insets.right;
        int opticalHeight = insets.top  + insets.bottom;

        measuredWidth  += optical ? opticalWidth  : -opticalWidth;
        measuredHeight += optical ? opticalHeight : -opticalHeight;
    }
    setMeasuredDimensionRaw(measuredWidth, measuredHeight);
}
/**
 * Sets the measured dimension without extra processing for things like optical bounds.
 * Useful for reapplying consistent values that have already been cooked with adjustments
 * for optical bounds, etc. such as those from the measurement cache.
 *
 * @param measuredWidth The measured width of this view.  May be a complex
 * bit mask as defined by {@link #MEASURED_SIZE_MASK} and
 * {@link #MEASURED_STATE_TOO_SMALL}.
 * @param measuredHeight The measured height of this view.  May be a complex
 * bit mask as defined by {@link #MEASURED_SIZE_MASK} and
 * {@link #MEASURED_STATE_TOO_SMALL}.
 */
private void setMeasuredDimensionRaw(int measuredWidth, int measuredHeight) {
    mMeasuredWidth = measuredWidth;
    mMeasuredHeight = measuredHeight;

    mPrivateFlags |= PFLAG_MEASURED_DIMENSION_SET;
}
仅此而已。。。。
然后最后一点3 遍历中调用的的child.measure(),,实则就是导致一个重复性过程使其不断的执行onMeasure(),,递归,直到计算完所有View的参数。。
那么,,通过这样的计算,我们迟早会算到最里层的view,,而且这种view估计也不是ViewGroup了,很可能就是一个View的其他子类,不是容器。。那么这样的话,就有可能调用到View原生的onMeasure()方法里面去,那我们看看原生的onMeasure():
protected void onMeasure(int widthMeasureSpec, int heightMeasureSpec) {
    //Dimension汉语意思 尺寸。
    setMeasuredDimension(getDefaultSize(getSuggestedMinimumWidth(), widthMeasureSpec), getDefaultSize(getSuggestedMinimumHeight(), heightMeasureSpec));
}
/**
 * <p>This method must be called by {@link #onMeasure(int, int)} to store the
 * measured width and measured height. Failing to do so will trigger an
 * exception at measurement time.</p>
 *
 * @param measuredWidth The measured width of this view.  May be a complex
 * bit mask as defined by {@link #MEASURED_SIZE_MASK} and
 * {@link #MEASURED_STATE_TOO_SMALL}.
 * @param measuredHeight The measured height of this view.  May be a complex
 * bit mask as defined by {@link #MEASURED_SIZE_MASK} and
 * {@link #MEASURED_STATE_TOO_SMALL}.
 */
protected final void setMeasuredDimension(int measuredWidth, int measuredHeight) {
    boolean optical = isLayoutModeOptical(this);
    if (optical != isLayoutModeOptical(mParent)) {
        Insets insets = getOpticalInsets();
        int opticalWidth  = insets.left + insets.right;
        int opticalHeight = insets.top  + insets.bottom;

        measuredWidth  += optical ? opticalWidth  : -opticalWidth;
        measuredHeight += optical ? opticalHeight : -opticalHeight;
    }
    setMeasuredDimensionRaw(measuredWidth, measuredHeight);
}
看到了吧,还是那种套路,设置参数,
private void setMeasuredDimensionRaw(int measuredWidth, int measuredHeight) {
    mMeasuredWidth = measuredWidth;
    mMeasuredHeight = measuredHeight;

    mPrivateFlags |= PFLAG_MEASURED_DIMENSION_SET;
}
与FrameLayout设置参数的方法,,是一样的,套路!。
那么measure的基本就成大概就是这样的,如果大家对其他的ViewGroup子类测量感兴趣,可以看看其他的onMeasure()是怎么重写的。这里不做概述了。其实总结下来,measure的根本目的就是为了计算出合适的 measuredWidth 和 measyredHeight。最后设置一下当前的标志位。
2 Layout过程
上面我们对所有的View进行测量之后,接下来就是对所有的View进行位置的确定。
先从ViewRootImpl 中说起,,首先经过
WindowManagerImpl.addView()---->WindouManagerGlobal.addView()---->ViewRootImpl.setView()---->ViewRootImpl.requestLayout()---->ViewRootImpl.schedualTraversals()---->TraversalRunnable.run()---->ViewRootImpl.doTraversal()---->ViewRootImpl.performTraversals()---->炫酷狂拽炸天的View measure,layout, draw 开始。。。。这么一波开始,与layout相关的方法便调用到了ViewRootImpl.performLayout()方法:
private void performLayout(WindowManager.LayoutParams lp, int desiredWindowWidth,
        int desiredWindowHeight) {
    mLayoutRequested = false;
    mScrollMayChange = true;
    mInLayout = true;

    final View host = mView;
    if (DEBUG_ORIENTATION || DEBUG_LAYOUT) {
        Log.v(TAG, "Laying out " + host + " to (" +
                host.getMeasuredWidth() + ", " + host.getMeasuredHeight() + ")");
    }

    Trace.traceBegin(Trace.TRACE_TAG_VIEW, "layout");
    try {
        //调用顶级父view的Layout方法
        host.layout(0, 0, host.getMeasuredWidth(), host.getMeasuredHeight());


        mInLayout = false;
截取片段,我们首先看见了,没走几步就开始调用host.layout(。。。。。)这波东西了。那么看看这个layout()方法,但是注意的是 这个layout 是一个公共方法。
/**
 * Assign a size and position to a view and all of its
 * descendants
 *
 * <p>This is the second phase of the layout mechanism.
 * (The first is measuring). In this phase, each parent calls
 * layout on all of its children to position them.
 * This is typically done using the child measurements
 * that were stored in the measure pass().</p>
 *
 * <p>Derived classes should not override this method.
 * Derived classes with children should override
 * onLayout. In that method, they should
 * call layout on each of their children.</p>
 *
 * @param l Left position, relative to parent
 * @param t Top position, relative to parent
 * @param r Right position, relative to parent
 * @param b Bottom position, relative to parent
 */
@SuppressWarnings({"unchecked"})
public void layout(int l, int t, int r, int b) {
    if ((mPrivateFlags3 & PFLAG3_MEASURE_NEEDED_BEFORE_LAYOUT) != 0) {
        onMeasure(mOldWidthMeasureSpec, mOldHeightMeasureSpec);
        mPrivateFlags3 &= ~PFLAG3_MEASURE_NEEDED_BEFORE_LAYOUT;
    }

    int oldL = mLeft;
    int oldT = mTop;
    int oldB = mBottom;
    int oldR = mRight;
    //父容器有边界特效吗?有的话还得算一遍也就是计算四个顶点位置
    //再明白点就是 重新设置 mLeft, mTop, mBootom, mRight的位置。
    //得到的结果 changed 就是表明View布局有没有发生改变
    boolean changed = isLayoutModeOptical(mParent) ?
            setOpticalFrame(l, t, r, b) : setFrame(l, t, r, b);
    //如果发生了改变的话
    if (changed || (mPrivateFlags & PFLAG_LAYOUT_REQUIRED) == PFLAG_LAYOUT_REQUIRED) {
        //调用onLayout
        onLayout(changed, l, t, r, b);
        mPrivateFlags &= ~PFLAG_LAYOUT_REQUIRED;
        //关于监听器的调用。。
        ListenerInfo li = mListenerInfo;
        if (li != null && li.mOnLayoutChangeListeners != null) {
            ArrayList<OnLayoutChangeListener> listenersCopy =
                    (ArrayList<OnLayoutChangeListener>)li.mOnLayoutChangeListeners.clone();
            int numListeners = listenersCopy.size();
            for (int i = 0; i < numListeners; ++i) {
                listenersCopy.get(i).onLayoutChange(this, l, t, r, b, oldL, oldT, oldR, oldB);
            }
        }
    }

    mPrivateFlags &= ~PFLAG_FORCE_LAYOUT;
    mPrivateFlags3 |= PFLAG3_IS_LAID_OUT;
}
里面调用了一个很关键的方法,就是onLayout(),
/**
 * Called from layout when this view should
 * assign a size and position to each of its children.
 *
 * Derived classes with children should override
 * this method and call layout on each of
 * their children.
 * @param changed This is a new size or position for this view
 * @param left Left position, relative to parent
 * @param top Top position, relative to parent
 * @param right Right position, relative to parent
 * @param bottom Bottom position, relative to parent
 */
protected void onLayout(boolean changed, int left, int top, int right, int bottom) {
}
但是onLayout()在View中,没有写内容。然而它有好多子类重写了这个方法。比如LinearLayout,那么看看LinearLayout中是如何实现的:
  @Override
  protected void onLayout(boolean changed, int l, int t, int r, int b) {
      if (mOrientation == VERTICAL) {//两种排列方式的判断,一种是垂直排列,另一种是水平排列。
          layoutVertical(l, t, r, b);
      } else {
          layoutHorizontal(l, t, r, b);
      }
  }
 /**
  * Position the children during a layout pass if the orientation of this
  * LinearLayout is set to {@link #VERTICAL}.
  *
  * @see #getOrientation()
  * @see #setOrientation(int)
  * @see #onLayout(boolean, int, int, int, int)
  * @param left
  * @param top
  * @param right
  * @param bottom
  */
 void layoutVertical(int left, int top, int right, int bottom) {
     final int paddingLeft = mPaddingLeft;
     //子View上边缘相对于父容器上边缘的距离
     int childTop;
     //子View左边缘相对于父容器左边缘的距离
     int childLeft;

     // Where right end of child should go
     final int width = right - left;//此时要了宽度值,是为了计算 水平居中这种情况。
     int childRight = width - mPaddingRight;

     // Space available for child
     int childSpace = width - paddingLeft - mPaddingRight;

     final int count = getVirtualChildCount();

     final int majorGravity = mGravity & Gravity.VERTICAL_GRAVITY_MASK;
     final int minorGravity = mGravity & Gravity.RELATIVE_HORIZONTAL_GRAVITY_MASK;
     //根据不同的gravity确定元素的top位置
     switch (majorGravity) {
        case Gravity.BOTTOM:
            // mTotalLength contains the padding already
            childTop = mPaddingTop + bottom - top - mTotalLength;
            break;

            // mTotalLength contains the padding already
        case Gravity.CENTER_VERTICAL:
            childTop = mPaddingTop + (bottom - top - mTotalLength) / 2;
            break;

        case Gravity.TOP:
        default:
            childTop = mPaddingTop;
            break;
     }
     //接下来遍历子View
     for (int i = 0; i < count; i++) {
         final View child = getVirtualChildAt(i);
         if (child == null) {
             childTop += measureNullChild(i);
         } else if (child.getVisibility() != GONE) {
             final int childWidth = child.getMeasuredWidth();
             final int childHeight = child.getMeasuredHeight();

             final LinearLayout.LayoutParams lp =
                     (LinearLayout.LayoutParams) child.getLayoutParams();

             int gravity = lp.gravity;
             if (gravity < 0) {
                 gravity = minorGravity;
             }
             final int layoutDirection = getLayoutDirection();
             final int absoluteGravity = Gravity.getAbsoluteGravity(gravity, layoutDirection);
             switch (absoluteGravity & Gravity.HORIZONTAL_GRAVITY_MASK) {
                 //横向居中
                 case Gravity.CENTER_HORIZONTAL:
                     childLeft = paddingLeft + ((childSpace - childWidth) / 2)
                             + lp.leftMargin - lp.rightMargin;
                     break;
                  //居右
                 case Gravity.RIGHT:
                     childLeft = childRight - childWidth - lp.rightMargin;
                     break;
                  //居左
                 case Gravity.LEFT:
                 default:
                     childLeft = paddingLeft + lp.leftMargin;
                     break;
             }

             if (hasDividerBeforeChildAt(i)) {
                 childTop += mDividerHeight;
             }

             childTop += lp.topMargin;
             //里面调用了子view的layout位置
             setChildFrame(child, childLeft, childTop + getLocationOffset(child),
                     childWidth, childHeight);
             //childTop累加,这样的话,以后的child循环到此,top位置是依次向下的。所以就是从上往下排了。
             childTop += childHeight + lp.bottomMargin + getNextLocationOffset(child);

             i += getChildrenSkipCount(child, i);
         }
     }
 }
private void setChildFrame(View child, int left, int top, int width, int height) {
    //又调用了layout,,这样的话,会导致所有的子view都会找位置
    child.layout(left, top, left + width, top + height);
}
其实他和measure的套路如出一辙,,但是他的目的就是设置位置相关的参数。
int oldL = mLeft;
int oldT = mTop;
int oldB = mBottom;
int oldR = mRight;
就这几个紫色的变量,,,当所有的View遍历完后,,他们各自的这四个属性也便有了正确的值!
赋一张图片:
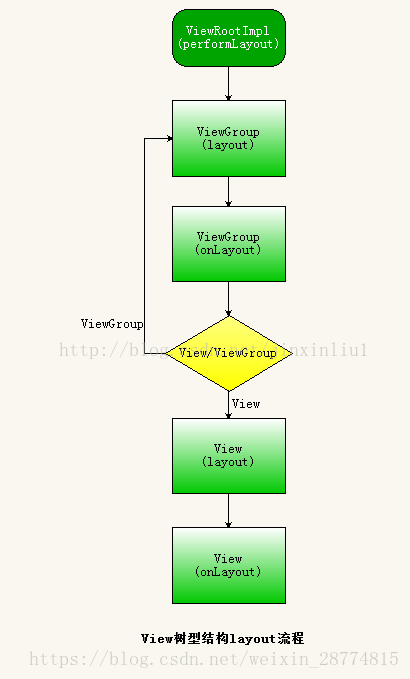
当然不同的ViewGroup子类的onLayout()实现逻辑是不同的,感兴趣的就看看其他的ViewGroup子类是怎么实现的。
3 Draw。。。
Draw的根本目的是 用canvas这个类的对象将经过各种计算的界面传入到native,让相关驱动进行绘画。但是android层面的draw的大部分逻辑着重写,,我该画什么样的东西,把这个“东西”通过各种逻辑计算出来。涉及了相关的遍历,递归计算。背景,动画等等复杂的过程。
但是这个过程也是有些清晰明了的,首先ViewRootImpl()中的调用开始,当performTraversals()中进行完测量,布局这个过程之后,就开始draw的过程。
private void performDraw() {
    if (mAttachInfo.mDisplayState == Display.STATE_OFF && !mReportNextDraw) {
        return;
    }

    final boolean fullRedrawNeeded = mFullRedrawNeeded;
    mFullRedrawNeeded = false;

    mIsDrawing = true;
    Trace.traceBegin(Trace.TRACE_TAG_VIEW, "draw");
    try {
        //重點代碼
        draw(fullRedrawNeeded);
    } finally {
        mIsDrawing = false;
        Trace.traceEnd(Trace.TRACE_TAG_VIEW);
    }

    // For whatever reason we didn't create a HardwareRenderer, end any
    // hardware animations that are now dangling
    if (mAttachInfo.mPendingAnimatingRenderNodes != null) {
        final int count = mAttachInfo.mPendingAnimatingRenderNodes.size();
        for (int i = 0; i < count; i++) {
            mAttachInfo.mPendingAnimatingRenderNodes.get(i).endAllAnimators();
        }
        mAttachInfo.mPendingAnimatingRenderNodes.clear();
    }

    if (mReportNextDraw) {
        mReportNextDraw = false;
        if (mAttachInfo.mHardwareRenderer != null) {
            mAttachInfo.mHardwareRenderer.fence();
        }

        if (LOCAL_LOGV) {
            Log.v(TAG, "FINISHED DRAWING: " + mWindowAttributes.getTitle());
        }
        if (mSurfaceHolder != null && mSurface.isValid()) {
            mSurfaceHolderCallback.surfaceRedrawNeeded(mSurfaceHolder);
            SurfaceHolder.Callback callbacks[] = mSurfaceHolder.getCallbacks();
            if (callbacks != null) {
                for (SurfaceHolder.Callback c : callbacks) {
                    if (c instanceof SurfaceHolder.Callback2) {
                        ((SurfaceHolder.Callback2)c).surfaceRedrawNeeded(
                                mSurfaceHolder);
                    }
                }
            }
        }
        try {
            mWindowSession.finishDrawing(mWindow);
        } catch (RemoteException e) {
        }
    }
}
重点就是调用了本类的draw方法
//进行一些前端处理然后调用真正根视图的draw()
private void draw(boolean fullRedrawNeeded) {
    //surface按照底层的驱动模式可以分为两种,一种是显卡,另一种是CPU。视图会根据不同的sueface采用不同的方式获取canvas对象。并将
    //这个canvas派发到整个视图中。
    Surface surface = mSurface;
    //检查surface是否有效
    if (!surface.isValid()) {
        return;
    }

    if (DEBUG_FPS) {
        trackFPS();
    }
    //执行注册过的runnable对象。
    if (!sFirstDrawComplete) {
        synchronized (sFirstDrawHandlers) {
            sFirstDrawComplete = true;
            final int count = sFirstDrawHandlers.size();
            for (int i = 0; i< count; i++) {
                mHandler.post(sFirstDrawHandlers.get(i));
            }
        }
    }
    //几乎所有情况下,这个函数内部不会执行什么,该函数的设计目的就是对mScrollY变量进行调整,其依据是调整到第一个focus视图中。
    scrollToRectOrFocus(null, false);

    if (mAttachInfo.mViewScrollChanged) {
        mAttachInfo.mViewScrollChanged = false;
        mAttachInfo.mTreeObserver.dispatchOnScrollChanged();
    }

    //如果根视图的内部含有scroller对象的话,则调用computeScrollOffset获取新的滚动值
    boolean animating = mScroller != null && mScroller.computeScrollOffset();
    final int curScrollY;
    if (animating) {
        curScrollY = mScroller.getCurrY();
    } else {
        curScrollY = mScrollY;
    }
    if (mCurScrollY != curScrollY) {
        mCurScrollY = curScrollY;
        fullRedrawNeeded = true;
        if (mView instanceof RootViewSurfaceTaker) {
            ((RootViewSurfaceTaker) mView).onRootViewScrollYChanged(mCurScrollY);
        }
    }

    final float appScale = mAttachInfo.mApplicationScale;
    final boolean scalingRequired = mAttachInfo.mScalingRequired;

    int resizeAlpha = 0;
    if (mResizeBuffer != null) {
        long deltaTime = SystemClock.uptimeMillis() - mResizeBufferStartTime;
        if (deltaTime < mResizeBufferDuration) {
            float amt = deltaTime/(float) mResizeBufferDuration;
            amt = mResizeInterpolator.getInterpolation(amt);
            animating = true;
            resizeAlpha = 255 - (int)(amt*255);
        } else {
            disposeResizeBuffer();
        }
    }

    final Rect dirty = mDirty;
    //判断surface是否有surfaceholder对象,如果有的话,意味着当前surface是由应用程序创建的。因此绘图应该由
    //应用程序自身去负责,于是view系统退出绘制。如果不是的话,才开始view绘制
    if (mSurfaceHolder != null) {
        // The app owns the surface, we won't draw.
        dirty.setEmpty();
        if (animating) {
            if (mScroller != null) {
                mScroller.abortAnimation();
            }
            disposeResizeBuffer();
        }
        return;
    }

    if (fullRedrawNeeded) {
        mAttachInfo.mIgnoreDirtyState = true;
        dirty.set(0, 0, (int) (mWidth * appScale + 0.5f), (int) (mHeight * appScale + 0.5f));
    }

    if (DEBUG_ORIENTATION || DEBUG_DRAW) {
        Log.v(TAG, "Draw " + mView + "/"
                + mWindowAttributes.getTitle()
                + ": dirty={" + dirty.left + "," + dirty.top
                + "," + dirty.right + "," + dirty.bottom + "} surface="
                + surface + " surface.isValid()=" + surface.isValid() + ", appScale:" +
                appScale + ", width=" + mWidth + ", height=" + mHeight);
    }

    mAttachInfo.mTreeObserver.dispatchOnDraw();

    int xOffset = 0;
    int yOffset = curScrollY;
    final WindowManager.LayoutParams params = mWindowAttributes;
    final Rect surfaceInsets = params != null ? params.surfaceInsets : null;
    if (surfaceInsets != null) {
        xOffset -= surfaceInsets.left;
        yOffset -= surfaceInsets.top;

        // Offset dirty rect for surface insets.
        dirty.offset(surfaceInsets.left, surfaceInsets.right);
    }

    boolean accessibilityFocusDirty = false;
    final Drawable drawable = mAttachInfo.mAccessibilityFocusDrawable;
    if (drawable != null) {
        final Rect bounds = mAttachInfo.mTmpInvalRect;
        final boolean hasFocus = getAccessibilityFocusedRect(bounds);
        if (!hasFocus) {
            bounds.setEmpty();
        }
        if (!bounds.equals(drawable.getBounds())) {
            accessibilityFocusDirty = true;
        }
    }

    mAttachInfo.mDrawingTime =
            mChoreographer.getFrameTimeNanos() / TimeUtils.NANOS_PER_MS;

    if (!dirty.isEmpty() || mIsAnimating || accessibilityFocusDirty) {
        if (mAttachInfo.mHardwareRenderer != null && mAttachInfo.mHardwareRenderer.isEnabled()) {
            // If accessibility focus moved, always invalidate the root.
            boolean invalidateRoot = accessibilityFocusDirty;

            // Draw with hardware renderer.
            mIsAnimating = false;

            if (mHardwareYOffset != yOffset || mHardwareXOffset != xOffset) {
                mHardwareYOffset = yOffset;
                mHardwareXOffset = xOffset;
                invalidateRoot = true;
            }
            mResizeAlpha = resizeAlpha;

            if (invalidateRoot) {
                mAttachInfo.mHardwareRenderer.invalidateRoot();
            }

            dirty.setEmpty();

            mBlockResizeBuffer = false;
            mAttachInfo.mHardwareRenderer.draw(mView, mAttachInfo, this);
        } else {
            // If we get here with a disabled & requested hardware renderer, something went
            // wrong (an invalidate posted right before we destroyed the hardware surface
            // for instance) so we should just bail out. Locking the surface with software
            // rendering at this point would lock it forever and prevent hardware renderer
            // from doing its job when it comes back.
            // Before we request a new frame we must however attempt to reinitiliaze the
            // hardware renderer if it's in requested state. This would happen after an
            // eglTerminate() for instance.
            if (mAttachInfo.mHardwareRenderer != null &&
                    !mAttachInfo.mHardwareRenderer.isEnabled() &&
                    mAttachInfo.mHardwareRenderer.isRequested()) {

                try {
                    mAttachInfo.mHardwareRenderer.initializeIfNeeded(
                            mWidth, mHeight, mAttachInfo, mSurface, surfaceInsets);
                } catch (OutOfResourcesException e) {
                    handleOutOfResourcesException(e);
                    return;
                }

                mFullRedrawNeeded = true;
                scheduleTraversals();
                return;
            }
//重点代码;
            if (!drawSoftware(surface, mAttachInfo, xOffset, yOffset, scalingRequired, dirty)) {
                return;
            }
        }
    }

    if (animating) {
        mFullRedrawNeeded = true;
        scheduleTraversals();
    }
}
/**
 * @return true if drawing was successful, false if an error occurred
 */
private boolean drawSoftware(Surface surface, AttachInfo attachInfo, int xoff, int yoff,
        boolean scalingRequired, Rect dirty) {

    // Draw with software renderer.
    final Canvas canvas;
    try {
        final int left = dirty.left;
        final int top = dirty.top;
        final int right = dirty.right;
        final int bottom = dirty.bottom;

        canvas = mSurface.lockCanvas(dirty);

        // The dirty rectangle can be modified by Surface.lockCanvas()
        //noinspection ConstantConditions
        if (left != dirty.left || top != dirty.top || right != dirty.right
                || bottom != dirty.bottom) {
            attachInfo.mIgnoreDirtyState = true;
        }

        // TODO: Do this in native
        //设置密度,有了密度可以保证在不同分辨率的屏幕上画出的视觉上的大小是差不多的。
        canvas.setDensity(mDensity);
    } catch (Surface.OutOfResourcesException e) {
        handleOutOfResourcesException(e);
        return false;
    } catch (IllegalArgumentException e) {
        Log.e(TAG, "Could not lock surface", e);
        // Don't assume this is due to out of memory, it could be
        // something else, and if it is something else then we could
        // kill stuff (or ourself) for no reason.
        mLayoutRequested = true;    // ask wm for a new surface next time.
        return false;
    }

    try {
        if (DEBUG_ORIENTATION || DEBUG_DRAW) {
            Log.v(TAG, "Surface " + surface + " drawing to bitmap w="
                    + canvas.getWidth() + ", h=" + canvas.getHeight());
            //canvas.drawARGB(255, 255, 0, 0);
        }

        // If this bitmap's format includes an alpha channel, we
        // need to clear it before drawing so that the child will
        // properly re-composite its drawing on a transparent
        // background. This automatically respects the clip/dirty region
        // or
        // If we are applying an offset, we need to clear the area
        // where the offset doesn't appear to avoid having garbage
        // left in the blank areas.
        //如果是不透明的
        if (!canvas.isOpaque() || yoff != 0 || xoff != 0) {
            canvas.drawColor(0, PorterDuff.Mode.CLEAR);
        }

        dirty.setEmpty();
        mIsAnimating = false;
        //设置当前状态是draw
        mView.mPrivateFlags |= View.PFLAG_DRAWN;

        if (DEBUG_DRAW) {
            Context cxt = mView.getContext();
            Log.i(TAG, "Drawing: package:" + cxt.getPackageName() +
                    ", metrics=" + cxt.getResources().getDisplayMetrics() +
                    ", compatibilityInfo=" + cxt.getResources().getCompatibilityInfo());
        }
        try {
            //转化,应该是吧xoff之类的变为屏幕专用的那种
            //有的解释是说调整画布的位置
            canvas.translate(-xoff, -yoff);
            if (mTranslator != null) {
                mTranslator.translateCanvas(canvas);
            }
            canvas.setScreenDensity(scalingRequired ? mNoncompatDensity : 0);
            attachInfo.mSetIgnoreDirtyState = false;
            //调用View类中的成员方法 draw 开始绘制View视图。
            mView.draw(canvas);

            drawAccessibilityFocusedDrawableIfNeeded(canvas);
        } finally {
            if (!attachInfo.mSetIgnoreDirtyState) {
                // Only clear the flag if it was not set during the mView.draw() call
                attachInfo.mIgnoreDirtyState = false;
            }
        }
    } finally {
        try {
            surface.unlockCanvasAndPost(canvas);
        } catch (IllegalArgumentException e) {
            Log.e(TAG, "Could not unlock surface", e);
            mLayoutRequested = true;    // ask wm for a new surface next time.
            //noinspection ReturnInsideFinallyBlock
            return false;
        }

        if (LOCAL_LOGV) {
            Log.v(TAG, "Surface " + surface + " unlockCanvasAndPost");
        }
    }
    return true;
}
走到这里才开始用到view的draw()方法。对于这个方法,view已经实现了。
/**
 * Manually render this view (and all of its children) to the given Canvas.
 * The view must have already done a full layout before this function is
 * called.  When implementing a view, implement
 * {@link #onDraw(android.graphics.Canvas)} instead of overriding this method.
 * If you do need to override this method, call the superclass version.
 *
 * @param canvas The Canvas to which the View is rendered.
 */
@CallSuper
public void draw(Canvas canvas) {
    final int privateFlags = mPrivateFlags;
    //dirty区是否是不透明,只有透明的时候才需要绘制背景
    final boolean dirtyOpaque = (privateFlags & PFLAG_DIRTY_MASK) == PFLAG_DIRTY_OPAQUE &&
            (mAttachInfo == null || !mAttachInfo.mIgnoreDirtyState);
    mPrivateFlags = (privateFlags & ~PFLAG_DIRTY_MASK) | PFLAG_DRAWN;

    /*d
     * Draw traversal performs several drawing steps which must be executed
     * in the appropriate order:
     *
     *      1. Draw the background
     *      2. If necessary, save the canvas' layers to prepare for fading
     *      3. Draw view's content
     *      4. Draw children
     *      5. If necessary, draw the fading edges and restore layers
     *      6. Draw decorations (scrollbars for instance)
     */

    // Step 1, draw the background, if needed
    int saveCount;

    if (!dirtyOpaque) {
        drawBackground(canvas);
    }

    // skip step 2 & 5 if possible (common case)
    final int viewFlags = mViewFlags;
    boolean horizontalEdges = (viewFlags & FADING_EDGE_HORIZONTAL) != 0;
    boolean verticalEdges = (viewFlags & FADING_EDGE_VERTICAL) != 0;
    if (!verticalEdges && !horizontalEdges) {
        // Step 3, draw the content
        //调用自身的onDraw,本身View类并没有写方法中的逻辑。
        //因为每个视图的内容部分肯定是各不相同的。这部分的功能需要交给子类去实现
        //如果是自定义View的话,需要重载该方法来完成绘制工作。
        if (!dirtyOpaque) onDraw(canvas);

        // Step 4, draw the children
        //绘制子视图。View中也没有实现这个方法,但是他的子类,比如ViewGroup等,
        //都实现了这个方法。
        dispatchDraw(canvas);

        // Overlay is part of the content and draws beneath Foreground
        if (mOverlay != null && !mOverlay.isEmpty()) {
            mOverlay.getOverlayView().dispatchDraw(canvas);
        }

        // Step 6, draw decorations (foreground, scrollbars)
        //绘制装饰
        //对视图的滚动条进行绘制。实际上任何一个视图都有滚动条,只是一般情况下不会让他显示出来
        //而例如像ListView等控件是进行了展示而已。
        onDrawForeground(canvas);

        // we're done...
        return;
    }
其中有两个很关键的步骤,就是调用自身的onDraw()方法,和 调用自身的dispatchDraw()方法。我们知道 View有一个很重要的子类是ViewGroup,当然还有其他类。但是ViewGroup很明显就是一个view容器,它很可能里面有子view,,这个dispatchDraw()方法,在非容器view一般不会实现,当然view里面也啥都没写,,但是ViewGroup这类的就必须实现了。这个方法是专门将canvas分发给子view用的。
看看view中的 这个方法,啥也没写
/**
 * Called by draw to draw the child views. This may be overridden
 * by derived classes to gain control just before its children are drawn
 * (but after its own view has been drawn).
 * @param canvas the canvas on which to draw the view
 */
protected void dispatchDraw(Canvas canvas) {

}
但是他的子类viewgroup重载了这个方法:
/**
 * {@inheritDoc}
 */
//該方法的本質作用是給不同的子視圖分配合適的畫布(canvas)至於子視圖如何進行繪製,會
//遞歸調用到子視圖的draw()方法,然後子視圖又會調用自己實現的onDraw()方法,如果它還有子視圖的話
//則會繼續進行派發。直至完畢。
@Override
protected void dispatchDraw(Canvas canvas) {
    boolean usingRenderNodeProperties = canvas.isRecordingFor(mRenderNode);
    final int childrenCount = mChildrenCount;
    final View[] children = mChildren;
    int flags = mGroupFlags;
    //如果ViewGroup包含layout动画的话,就根据这个动画参数为每一个子视图设置动画参数。
    if ((flags & FLAG_RUN_ANIMATION) != 0 && canAnimate()) {
        final boolean buildCache = !isHardwareAccelerated();
        for (int i = 0; i < childrenCount; i++) {
            final View child = children[i];
            if ((child.mViewFlags & VISIBILITY_MASK) == VISIBLE) {
                final LayoutParams params = child.getLayoutParams();
                attachLayoutAnimationParameters(child, params, i, childrenCount);
                bindLayoutAnimation(child);
            }
        }

        final LayoutAnimationController controller = mLayoutAnimationController;
        if (controller.willOverlap()) {
            mGroupFlags |= FLAG_OPTIMIZE_INVALIDATE;
        }

        controller.start();

        mGroupFlags &= ~FLAG_RUN_ANIMATION;
        mGroupFlags &= ~FLAG_ANIMATION_DONE;

        if (mAnimationListener != null) {
            mAnimationListener.onAnimationStart(controller.getAnimation());
        }
    }

    //接下來處理padding屬性,並且該padding屬性是viewgroup特有的!
    int clipSaveCount = 0;
    final boolean clipToPadding = (flags & CLIP_TO_PADDING_MASK) == CLIP_TO_PADDING_MASK;
    //首先調用一下 save() 保存當前畫布的內部狀態。
    if (clipToPadding) {
        clipSaveCount = canvas.save();
        //然後進行剪切
        //從而縮小剪切區。但是 Viewgroup的大小並不會因此受到影響。
        canvas.clipRect(mScrollX + mPaddingLeft, mScrollY + mPaddingTop,
                mScrollX + mRight - mLeft - mPaddingRight,
                mScrollY + mBottom - mTop - mPaddingBottom);
    }

    // We will draw our child's animation, let's reset the flag
    //清除標誌,因為接下來就會真正的畫了
    mPrivateFlags &= ~PFLAG_DRAW_ANIMATION;
    mGroupFlags &= ~FLAG_INVALIDATE_REQUIRED;

    boolean more = false;
    final long drawingTime = getDrawingTime();

    if (usingRenderNodeProperties) canvas.insertReorderBarrier();
    final int transientCount = mTransientIndices == null ? 0 : mTransientIndices.size();
    int transientIndex = transientCount != 0 ? 0 : -1;
    // Only use the preordered list if not HW accelerated, since the HW pipeline will do the
    // draw reordering internally
    final ArrayList<View> preorderedList = usingRenderNodeProperties
            ? null : buildOrderedChildList();
    final boolean customOrder = preorderedList == null
            && isChildrenDrawingOrderEnabled();
    //挨個畫子視圖
    for (int i = 0; i < childrenCount; i++) {
        while (transientIndex >= 0 && mTransientIndices.get(transientIndex) == i) {
            final View transientChild = mTransientViews.get(transientIndex);
            if ((transientChild.mViewFlags & VISIBILITY_MASK) == VISIBLE ||
                    transientChild.getAnimation() != null) {
                more |= drawChild(canvas, transientChild, drawingTime);//核心代码段。。。
            }
            transientIndex++;
            if (transientIndex >= transientCount) {
                transientIndex = -1;
            }
        }
        int childIndex = customOrder ? getChildDrawingOrder(childrenCount, i) : i;
        final View child = (preorderedList == null)
                ? children[childIndex] : preorderedList.get(childIndex);
        if ((child.mViewFlags & VISIBILITY_MASK) == VISIBLE || child.getAnimation() != null) {
            more |= drawChild(canvas, child, drawingTime);//核心代码段、、、
        }
    }
    while (transientIndex >= 0) {
        // there may be additional transient views after the normal views
        final View transientChild = mTransientViews.get(transientIndex);
        if ((transientChild.mViewFlags & VISIBILITY_MASK) == VISIBLE ||
                transientChild.getAnimation() != null) {
            more |= drawChild(canvas, transientChild, drawingTime);
        }
        transientIndex++;
        if (transientIndex >= transientCount) {
            break;
        }
    }
    if (preorderedList != null) preorderedList.clear();

    // Draw any disappearing views that have animations
    //移除view的時候,有時候這個被移除的view需要一個動畫表現被刪除了。此時被移除的view就會
    //添加到 mDisappaearingChildren中去。
    //這樣的話,這一步應該是和 刪除view中涉及的動畫有關
    if (mDisappearingChildren != null) {
        final ArrayList<View> disappearingChildren = mDisappearingChildren;
        final int disappearingCount = disappearingChildren.size() - 1;
        // Go backwards -- we may delete as animations finish
        for (int i = disappearingCount; i >= 0; i--) {
            final View child = disappearingChildren.get(i);
            more |= drawChild(canvas, child, drawingTime);
        }
    }
    if (usingRenderNodeProperties) canvas.insertInorderBarrier();

    if (debugDraw()) {
        onDebugDraw(canvas);
    }

    if (clipToPadding) {
        canvas.restoreToCount(clipSaveCount);
    }

    // mGroupFlags might have been updated by drawChild()
    flags = mGroupFlags;
    //重新檢查mGroupFlags中是否含有 這個判斷的標誌。因為drawChild()中可能需要重新繪製該viewgroup。
    //如果需要的話,就調用重繪指令
    if ((flags & FLAG_INVALIDATE_REQUIRED) == FLAG_INVALIDATE_REQUIRED) {
        invalidate(true);
    }

    if ((flags & FLAG_ANIMATION_DONE) == 0 && (flags & FLAG_NOTIFY_ANIMATION_LISTENER) == 0 &&
            mLayoutAnimationController.isDone() && !more) {
        // We want to erase the drawing cache and notify the listener after the
        // next frame is drawn because one extra invalidate() is caused by
        // drawChild() after the animation is over
        mGroupFlags |= FLAG_NOTIFY_ANIMATION_LISTENER;
        //這塊代碼涉及到回調,通知程序佈局動畫完成了
        final Runnable end = new Runnable() {
           public void run() {
               notifyAnimationListener();
           }
        };
        post(end);
    }
}
在这里我们得知了,分发的过程中,有一个很重要的过程就是drawChild(),这个方法会调用指定view的draw()方法。这样的话,就形成了递归的效果,因为draw方法又会调用ondraw()和 dispatchDraw()这些方法。一层接一层直到画完。那么他们到底是怎么画的呢?这就得看这个onDraw()是怎样实现的了。因为源码这么费劲的来递归无非就是让所有的view走onDraw()这个流程。但是onDraw呢,View这个类压根就没实现
/**
 * Implement this to do your drawing.
 *
 * @param canvas the canvas on which the background will be drawn
 */
protected void onDraw(Canvas canvas) {
}
很明显,这个方法就是被用来重载的。这也就是我们写自定义view的时候需要重载ondraw()的原因。1 Draw的目的就是让所有的view都onDraw(),2 你写的view到底是怎么个模样,系统不care,只调用ondraw(),反正canvas传给你了,画成什么个样子随你便。 那既然这样的话,咱们平常用的各种view应该都实现了这个方法。
View的重绘
提到重绘,想必大家第一个想到的就是 invalidate() 和 requestLayout()这类方法。当然更为常见的一种是 setVisibility(), setEnabled(),setSelected()等方法,间接导致重绘。但是其内部也是通过invalidate()这个步骤来实现的。所以如果要搞清重绘重点还是得看 invalidate()方法是如何实现的。这个看源码吧,反正最终又调用到了ViewRootImpl 的performTraversals()那里。但是invalidate()调用的时候,,这个方法会进行一些逻辑判断从而导致只走到了onDraw()方法。 如果要全部流程走一遍,就调用requestLayout()方法。
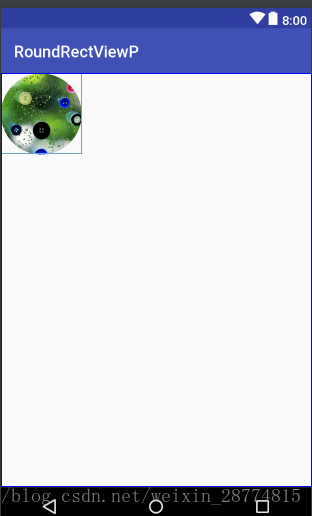
自定义View示例简单的圆角头像:
实际上实现原理很简单,只需要继承自imagview然后对onDraw做手脚即可:
/**
 * Created by yayali on 2018/6/28.
 */

@SuppressLint("AppCompatCustomView")
public class RoundRectImg extends ImageView{

    private Paint mPaint;
    public RoundRectImg(Context context) {
        super(context);
    }

    public RoundRectImg(Context context, @Nullable AttributeSet attrs) {
        super(context, attrs);
        //初始化画笔
        mPaint = new Paint();
    }

    public RoundRectImg(Context context, @Nullable AttributeSet attrs, int defStyleAttr) {
        super(context, attrs, defStyleAttr);

    }

    @Override
    protected void onDraw(Canvas canvas) {
        //在这里将图片画成一个圆圈
        //得到图片drawable
        //得到drawable对应的bitmap
        //对bitmap做处理,使其成为圆角
        //画出来
        Drawable drawable = getDrawable();
        if (drawable != null) {
            Bitmap bitmap = dealBitMap(((BitmapDrawable) drawable).getBitmap());
            mPaint.reset();
            int viewx = getWidth() > getHeight() ? getHeight() : getWidth();
            int bitMapx = bitmap.getWidth() > bitmap.getHeight() ? bitmap.getHeight() : bitmap.getWidth();
            Rect viewRect = new Rect(0, 0, viewx, viewx);
            Rect bitMapRect = new Rect(0, 0, bitMapx, bitMapx);
            //将bitMapRect 大小的 bitMap 画到 View大小的纸里面
            canvas.drawBitmap(bitmap, bitMapRect, viewRect, mPaint);
        } else {
            super.onDraw(canvas);
        }

    }

    private Bitmap dealBitMap(Bitmap bit) {
        Bitmap output = Bitmap.createBitmap(bit.getWidth(),
                bit.getHeight(), Bitmap.Config.ARGB_8888);
        //将canvas与一个啥也没有的bitmap绑定
        Canvas canvas = new Canvas(output);
        final int color = 0xff424242;
        int x = bit.getWidth() < bit.getHeight() ? bit.getWidth() : bit.getHeight();
        final Rect rect1 = new Rect(0, 0, x, x);
        mPaint.setAntiAlias(true);
        mPaint.setColor(color);
        //将与canvas绑定的图片先搞成全部透明的
        canvas.drawARGB(0, 0, 0, 0);
        canvas.drawCircle(x / 2, x / 2, x / 2, mPaint);
        //SRC_IN:只在源图像和目标图像相交的地方绘制【源图像】
        mPaint.setXfermode(new PorterDuffXfermode(PorterDuff.Mode.SRC_IN));
        //bit是源图像
        canvas.drawBitmap(bit, rect1, rect1, mPaint);
        return output;
    }
}
<?xml version="1.0" encoding="utf-8"?>
<android.support.constraint.ConstraintLayout xmlns:android="http://schemas.android.com/apk/res/android"
    xmlns:app="http://schemas.android.com/apk/res-auto"
    xmlns:tools="http://schemas.android.com/tools"
    android:layout_width="match_parent"
    android:layout_height="match_parent"
    tools:context="com.example.forev.roundrectviewp.MainActivity">

    <!--此处指定的资源时src的,否则getdrawable得到的东西是null原因之后考究-->
    <com.example.forev.roundrectviewp.RoundRectImg
        android:layout_width="100dp"
        android:layout_height="100dp"
        android:src="@drawable/sougougou"/>

</android.support.constraint.ConstraintLayout>