最近自学了一周springMVC,做了个小东西,分享一下。
首先是web.xml。这里我用了指定的位置和名称来映射springmvc配置文件(即springMVC.xml)。存在src目录下。
<?xml version="1.0" encoding="UTF-8"?>
<web-app version="2.5" xmlns="http://java.sun.com/xml/ns/javaee"
	xmlns:xsi="http://www.w3.org/2001/XMLSchema-instance"
	xsi:schemaLocation="http://java.sun.com/xml/ns/javaee
	http://java.sun.com/xml/ns/javaee/web-app_2_5.xsd">
   <display-name>Spring MVC Application</display-name>
   <servlet>
      <servlet-name>springMVC</servlet-name>
      <servlet-class>org.springframework.web.servlet.DispatcherServlet</servlet-class>
      <!-- 通过初始化参数,指定xml文件的位置 -->
        <init-param>
            <param-name>contextConfigLocation</param-name>
            <param-value>classpath:springMVC.xml</param-value>
        </init-param>
   </servlet>
   <servlet-mapping>
      <servlet-name>springMVC</servlet-name>
      <url-pattern>/</url-pattern>
   </servlet-mapping>

   //解决中文乱码的
   <filter>
        <filter-name>characterEncodingFilter</filter-name>
        <filter-class>org.springframework.web.filter.CharacterEncodingFilter</filter-class>
        <init-param>
            <param-name>encoding</param-name>
            <param-value>UTF-8</param-value>
        </init-param>
        <init-param>
            <param-name>forceEncoding</param-name>
            <param-value>true</param-value>
        </init-param>
    </filter>
    <filter-mapping>
        <filter-name>characterEncodingFilter</filter-name>
        <url-pattern>/*</url-pattern>
    </filter-mapping>
</web-app><?xml version="1.0" encoding="UTF-8"?>
<beans xmlns="http://www.springframework.org/schema/beans"
xmlns:xsi="http://www.w3.org/2001/XMLSchema-instance" xmlns:context="http://www.springframework.org/schema/context"
xmlns:p="http://www.springframework.org/schema/p"
xsi:schemaLocation="http://www.springframework.org/schema/beans
http://www.springframework.org/schema/beans/spring-beans.xsd
http://www.springframework.org/schema/context http://www.springframework.org/schema/context/spring-context-3.0.xsd">
<!-- 启用spring mvc注解 -->
<context:annotation-config></context:annotation-config>
<!-- 扫描包 -->
<context:component-scan base-package="com.keerqin"></context:component-scan>
<!-- 返回页面的前后缀设置 -->
<bean class="org.springframework.web.servlet.view.InternalResourceViewResolver">
<property name="prefix" value="/WEB-INF/jsp/" />
<property name="suffix" value=".jsp" />
</bean>
<!-- 请求的编码格式,必须和jSP的pageEncoding属性一致,以便正确读取表单的内容,默认为ISO-8859-1 -->
<property name="defaultEncoding">
<value>UTF-8</value>
</property>
</bean>
</beans>jar包都一样,多了一个jstl.jar,commons-el.jar。
启动服务器,先进入index.jsp。。
<%@ page language="java" import="java.util.*" pageEncoding="UTF-8"%>
<!DOCTYPE HTML PUBLIC "-//W3C//DTD HTML 4.01 Transitional//EN">
<html>
<head>
<title>index</title>
</head>
<body>
	<a href="getAll">getAll</a>
</body>
</html>
然后是重头戏Controller.java。
package com.keerqin.handler;

import java.lang.reflect.Field;
import java.util.LinkedHashMap;
import java.util.Map;
import java.util.Map.Entry;
import java.util.Set;

import javax.servlet.http.HttpServletRequest;
import javax.servlet.http.HttpSession;

import org.springframework.web.bind.annotation.PathVariable;
import org.springframework.web.bind.annotation.RequestMapping;
import org.springframework.web.bind.annotation.RequestMethod;
import org.springframework.web.context.request.RequestContextHolder;
import org.springframework.web.context.request.ServletRequestAttributes;
import org.springframework.web.servlet.ModelAndView;

import com.keerqin.entities.User;

@org.springframework.stereotype.Controller
public class Controller {
	private static final String SUCCESS = "success";

	public void init(){
		Map<Integer,User> map = new LinkedHashMap();
		HttpSession session = getSession();
		map.put(1, new User(1,18,"三星"));
		map.put(2, new User(2,20,"苹果"));
		map.put(3, new User(3,21,"华为"));
		session.setAttribute("map", map);
	}

	@RequestMapping("/getAll")
	public ModelAndView getAll(){
		init();
		HttpSession session = getSession();
		ModelAndView mv = new ModelAndView(SUCCESS);
		mv.addObject("map",(Map<Integer, User>)session.getAttribute("map"));
		return mv;
	}

	@RequestMapping(value="/addOne")
	public ModelAndView addOne(User user) {
		HttpSession session = getSession();
		ModelAndView mv = new ModelAndView(SUCCESS);
		Map<Integer,User> map = (Map<Integer, User>) session.getAttribute("map");
		int lastKey = getLastKeyOfMap(map);
		map.put(lastKey+1, user);
		mv.addObject("map",map);
		session.setAttribute("map", map);
		return mv;
	}
       @RequestMapping(value="/delete/{id}")
    public ModelAndView delete(@PathVariable String id){
        HttpSession session = getSession();
        Map<Integer,User> map = (Map<Integer, User>) session.getAttribute("map");
        map.remove(Integer.parseInt(id));
        ModelAndView mv = new ModelAndView(SUCCESS);
        mv.addObject("map", map);
        session.setAttribute("map", map);
        return mv;
    }
	public int getLastKeyOfMap(Map map){
		Set<Entry<Integer, String>> mapValues = map.entrySet();//map -> set
		int maplength = mapValues.size(); //set.size()
		Entry<Integer,String>[] test = new Entry[maplength];//new entry() []
		mapValues.toArray(test);//  set -> array
		return test[maplength-1].getKey();
	}

	public static HttpSession getSession() {
		HttpSession session = null;
		try {
			session = getRequest().getSession();
		} catch (Exception e) {}
		return session;
	}

	public static HttpServletRequest getRequest() {
		ServletRequestAttributes attrs =(ServletRequestAttributes) RequestContextHolder.getRequestAttributes();
		return attrs.getRequest();
	}

}
package com.keerqin.entities;

public class User {
	private int id;
	private int age;
	private String name;
	public int getId() {
		return id;
	}
	public void setId(int id) {
		this.id = id;
	}
	public int getAge() {
		return age;
	}
	public void setAge(int age) {
		this.age = age;
	}
	public String getName() {
		return name;
	}
	public void setName(String name) {
		this.name = name;
	}
	@Override
	public String toString() {
		return "User [id=" + id + ", age=" + age + ", name=" + name + "]";
	}
	public User(int id, int age, String name) {
		super();
		this.id = id;
		this.age = age;
		this.name = name;
	}
	public User() {
		super();
		// TODO Auto-generated constructor stub
	}


}
很普通,没什么说的。
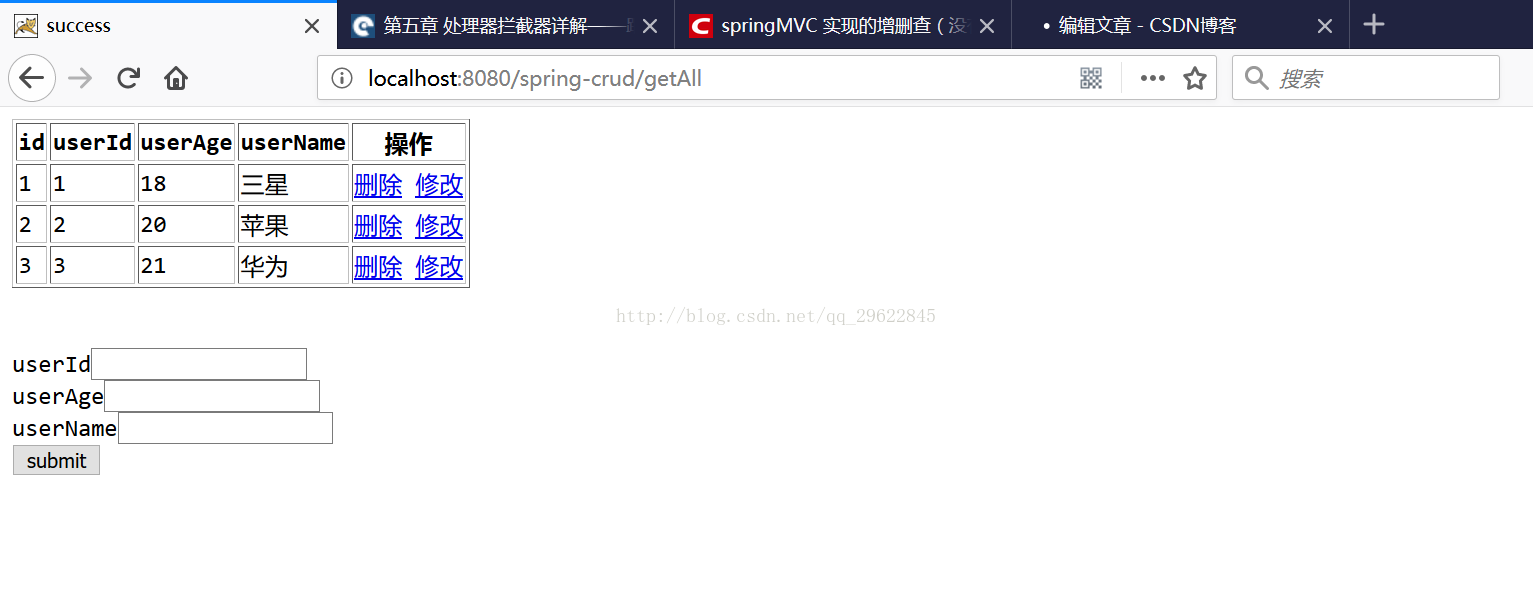
先点击index.jsp 的超链接,
<a href="getAll">getAll</a>然后再把从init中获取的map存到ModelAndView 中,返回到success.jsp页面中。如下所示:
<%@ page language="java" import="java.util.*" pageEncoding="UTF-8"%>
<%@ taglib uri="http://java.sun.com/jsp/jstl/core" prefix="c"%>
<!DOCTYPE HTML PUBLIC "-//W3C//DTD HTML 4.01 Transitional//EN">
<html>
<head>
<title>success</title>
</head>
<body>
	<table border="1">
		<tr>
			<th>id</th>
			<th>userId</th>
			<th>userAge</th>
			<th>userName</th>
			<th>操作</th>
		</tr>
		<c:forEach items="${map}" var="node">
			<tr>
				<td><c:out value="${node.key}"></c:out></td>
				<td><c:out value="${node.value.id}"></c:out></td>
				<td><c:out value="${node.value.age}"></c:out></td>
				<td><c:out value="${node.value.name}"></c:out></td>
				<td><a href="delete/${node.key}">删除</a> <a href="${node.key}">修改</a>
				</td>
			</tr>
		</c:forEach>
	</table>
	<br>
	<br>
	<form action="addOne" method="post">
		userId<input type="text" name="id"><br>
		userAge<input type="text" name="age"><br>
		userName<input type="text" name="name"><br>
		<input type="submit" value="submit"><br>
	</form>
</body>
</html>
jsp页面使用jstl进行输出。以上算是查询操作。显示如下:
表格下面还有输入userId,userAge,userName的文本框,这个是添加操作。输入之后submit会跳转到Controller.java的addOne()。接收参数的直接获取user对象,会把三个值直接填充到对象,但是名称不能写错,不然会接收不到。接收参数后,再从session获取init()中定义的map。之后调用getLasKeyOfMap()方法获取map的最后一个键的值,再根据这个值添加新的属性到map中,存到ModelAndView,返回页面。
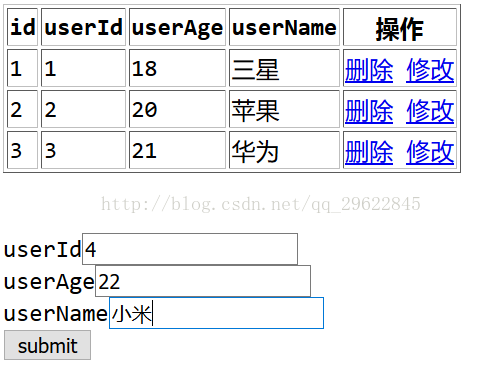
提交后

至此,增加功能完成。之后是删除。
点击任意一栏的删除按钮,会跳转到Controller.java的delete()方法。删除操作是个超链接,链接后面带有id属性即map的key值。后台通过spring的@PathVariable注解获取到该值,再通过map的remove(key)方法删除该entry。再返回到succes.jsp。这样就实现了删除操作。
修改操作没来得及写,有时间再补上。
这是项目:链接:https://pan.baidu.com/s/1gfzWYRL 密码:lclp
这是我第一次写博客,不足的地方希望大家指正,谢谢。