本以为是很简单的,结果弄了一上午,很多小问题,专门给创建SpringMVC写一篇博客,希望能帮到大家:
新建一个project,选择spring MVC,然后点击next:

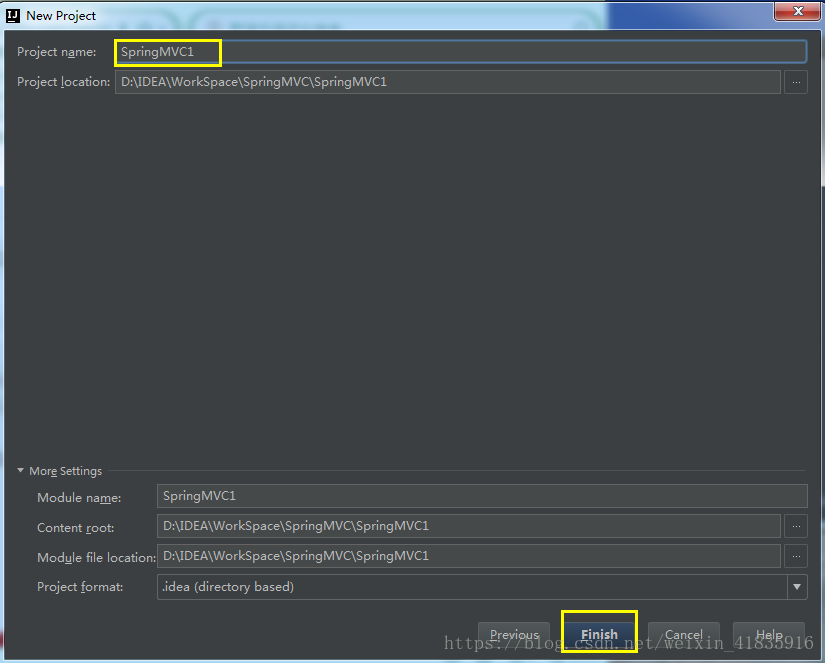
给工程起一个名字,点击finish:
加载完成后:

接下来是一通配置,很多代码在工程创建的时候就自动生成了:
web.xml:
<?xml version="1.0" encoding="UTF-8"?>
<web-app xmlns="http://xmlns.jcp.org/xml/ns/javaee"
         xmlns:xsi="http://www.w3.org/2001/XMLSchema-instance"
         xsi:schemaLocation="http://xmlns.jcp.org/xml/ns/javaee http://xmlns.jcp.org/xml/ns/javaee/web-app_3_1.xsd"
         version="3.1">
    <context-param>
        <param-name>contextConfigLocation</param-name>
        <param-value>/WEB-INF/applicationContext.xml</param-value>
    </context-param>
    <listener>
        <listener-class>org.springframework.web.context.ContextLoaderListener</listener-class>
    </listener>
    <servlet>
        <servlet-name>dispatcher</servlet-name>
        <servlet-class>org.springframework.web.servlet.DispatcherServlet</servlet-class>
        <load-on-startup>1</load-on-startup>
    </servlet>
    <servlet-mapping>
        <servlet-name>dispatcher</servlet-name>
        <url-pattern>/</url-pattern>
    </servlet-mapping>
</web-app>
dispatcher-servlet.xml:
<?xml version="1.0" encoding="UTF-8"?>
<beans xmlns="http://www.springframework.org/schema/beans"
       xmlns:xsi="http://www.w3.org/2001/XMLSchema-instance"
       xmlns:context="http://www.springframework.org/schema/context"
       xmlns:mvc="http://www.springframework.org/schema/mvc"
       xsi:schemaLocation="http://www.springframework.org/schema/beans http://www.springframework.org/schema/beans/spring-beans.xsd http://www.springframework.org/schema/context http://www.springframework.org/schema/context/spring-context.xsd http://www.springframework.org/schema/mvc http://www.springframework.org/schema/mvc/spring-mvc.xsd">

    <context:component-scan base-package="controller"/>

    <!-- 只把动态信息当做controller处理,忽略静态信息 -->
    <mvc:default-servlet-handler/>

    <!-- 开启注解 -->
    <mvc:annotation-driven/>

    <!--ViewResolver 视图解析器-->
    <!--用于支持Servlet、JSP视图解析-->
    <bean id="jspViewResolver" class="org.springframework.web.servlet.view.InternalResourceViewResolver">
        <property name="viewClass" value="org.springframework.web.servlet.view.JstlView"/>
        <property name="prefix" value="//"/>
        <property name="suffix" value=".jsp"/>
    </bean>

</beans>
HelloController:
package controller;

import org.springframework.stereotype.Controller;
import org.springframework.ui.ModelMap;
import org.springframework.web.bind.annotation.RequestMapping;
import org.springframework.web.bind.annotation.RequestMethod;

@Controller      //@Controller注解:采用注解的方式定义该类为处理请求的Controller类
public class HelloController {
    @RequestMapping(value = "/hello", method = RequestMethod.GET)
    public String printHello(ModelMap model) {
        model.addAttribute("msg"," Hello Spring MVC");
        //处理完该请求后返回的页面,此请求返回 hello.jsp页面。
        return "long";
    }
}
long.jsp:
<%@ page contentType="text/html;charset=UTF-8" language="java" %>
<html>
<head>
<title>$Title$</title>
</head>
<body>
Hello
${msg}
</body>
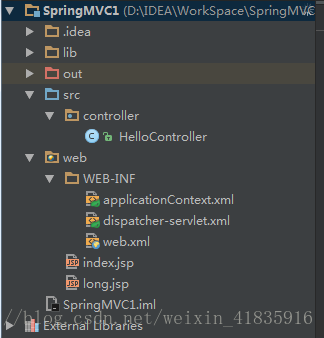
</html>文件结构如下:
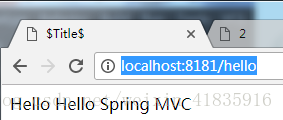
项目跑起来:
遇到问题:
遇到问题1、java.lang.UnsatisfiedLinkError: D:\Tomcat\apache-tomcat-7.0.37\bin\tcnative-1.dll: Can’t load AMD 64
解决办法:找到tomcat的bin目录下的 tcnative-1.dll,将其删除就好
遇到问题:2、jar包:jstl和standrad:
解决办法:Jar包地址,如果没有积分的话,评论我直接发给你吧。
转载请标明出处,原文地址:https://blog.csdn.net/weixin_41835916
总结整理不容易,如果觉得本文对您有帮助,请点击顶支持一下,您的支持是我写作最大的动力,谢谢。