①创建SpringMVC项目


②在WEB-INF目录下新建web目录,在里面添加SpringMVC所用到的包,并部署到项目里面(用自动创建的可能会报404)。


③配置web.xml文件
<?xml version="1.0" encoding="utf-8"?>
<web-app xmlns="http://xmlns.jcp.org/xml/ns/javaee"
         xmlns:xsi="http://www.w3.org/2001/XMLSchema-instance"
         xsi:schemaLocation="http://xmlns.jcp.org/xml/ns/javaee
                      http://xmlns.jcp.org/xml/ns/javaee/web-app_3_1.xsd"
         version="3.1"
         metadata-complete="true">

    <servlet>
        <servlet-name>SpringMVC</servlet-name>
        <servlet-class>org.springframework.web.servlet.DispatcherServlet</servlet-class>
        <!-- 初始化参数,告诉DispatcherServlet去那里寻找配置文件
                        :默认去WEB-INF目录中找
                        :默认寻找<servlet-name>元素问本内容-servlet.xml文件(SpringMVC-servlet.xml)
         -->
        <init-param>
            <param-name>ContextConfigLocation</param-name>
            <param-value>classpath:mvc.xml</param-value>
        </init-param>
        <!-- 在Tomcat启动的时候就初始化SpringMVC容器 -->
        <load-on-startup>1</load-on-startup>
    </servlet>
    <servlet-mapping>
        <servlet-name>SpringMVC</servlet-name>
        <url-pattern>/</url-pattern>
    </servlet-mapping>

</web-app>
④配置SpringMVC配置文件,SpringMVC默认配置文件名称为SpringMVC-servlet.xml,放在WEB-INF目录下,如果需要放到资
源目录,新建config目录并右键设置为资源跟目录,可自定义名字(推荐spring-mvc.xml),并在web.xml文件中配置。


<?xml version="1.0" encoding="UTF-8"?>
<beans xmlns="http://www.springframework.org/schema/beans"
       xmlns:xsi="http://www.w3.org/2001/XMLSchema-instance"
       xmlns:context="http://www.springframework.org/schema/context"
       xmlns:mvc="http://www.springframework.org/schema/mvc"
       xsi:schemaLocation="http://www.springframework.org/schema/beans
	http://www.springframework.org/schema/beans/spring-beans.xsd
	http://www.springframework.org/schema/context
	http://www.springframework.org/schema/context/spring-context.xsd
	http://www.springframework.org/schema/mvc
	http://www.springframework.org/schema/mvc/spring-mvc.xsd
	">

    <!-- IOC注解解析器 -->
    <context:component-scan base-package="cn.xmddop"/>

    <!-- MVC注解注解器 -->
    <mvc:annotation-driven/>

    <!-- 处理静态资源文件请求 -->
    <mvc:default-servlet-handler/>


</beans>
⑤编写Controller并建好跳转目录
package cn.xmddop;

import org.springframework.stereotype.Controller;
import org.springframework.web.bind.annotation.RequestMapping;

@Controller
public class HelloController {

    @RequestMapping("/hello")
    public String hello(){
        return "/WEB-INF/views/hello.jsp";
    }
}

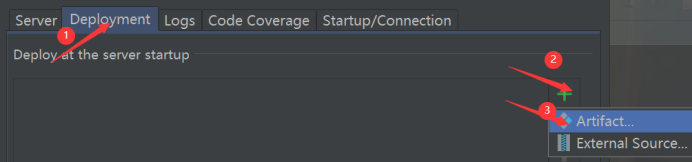
⑥配置Tomcat服务器并将项目发布到服务器


⑦运行项目

