
我们先看下OkHttpClient的内部类Builder()方法。
public Builder() {
/**
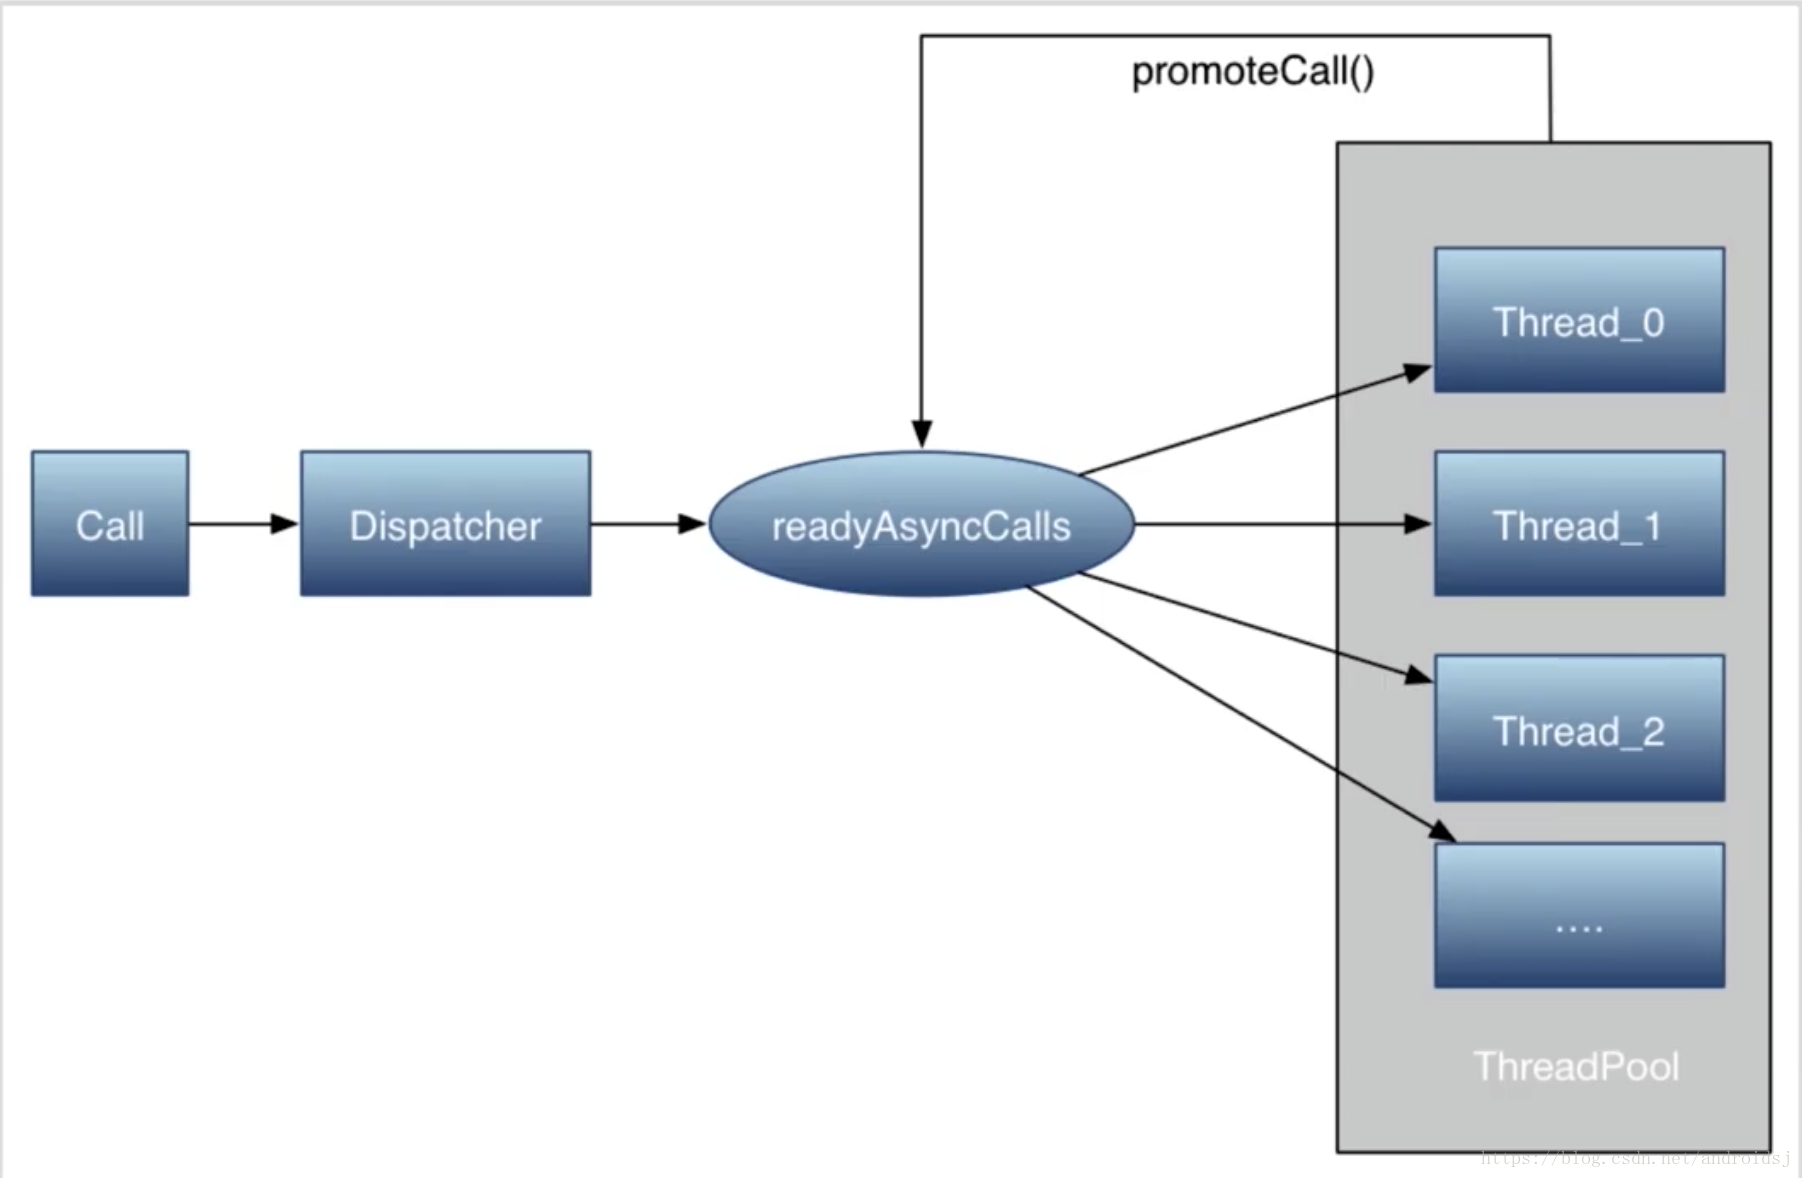
* 核心之一,分发器类,会接收到同步、异步的请求队列,
* 根据它所要的条件,来进行相应的同步、异步请求的分发。
*/
dispatcher = new Dispatcher();
protocols = DEFAULT_PROTOCOLS;
connectionSpecs = DEFAULT_CONNECTION_SPECS;
eventListenerFactory = EventListener.factory(EventListener.NONE);
proxySelector = ProxySelector.getDefault();
cookieJar = CookieJar.NO_COOKIES;
socketFactory = SocketFactory.getDefault();
hostnameVerifier = OkHostnameVerifier.INSTANCE;
certificatePinner = CertificatePinner.DEFAULT;
proxyAuthenticator = Authenticator.NONE;
authenticator = Authenticator.NONE;
/**
* 是一个连接池
*
* 客户端和服务端之间的连接,我们把它抽象成为一个Connection,
* 而每一个Connection,我们都会放在ConnectionPool连接池当中,
* 由它来进行统一的管理。
*
* 作用1:当请求的URL是相同的时候,就可以选择复用。
*
* 作用2:ConnectionPool()它实现了哪些连接?可以保存打开状态,哪些是用来以后复用的。
* 这些策略的设置。这都是用ConnectionPool连接池来进行管理的。
*/
connectionPool = new ConnectionPool();
dns = Dns.SYSTEM;
followSslRedirects = true;
followRedirects = true;
retryOnConnectionFailure = true;
connectTimeout = 10_000;
readTimeout = 10_000;
writeTimeout = 10_000;
pingInterval = 0;
}
这么多参数在后面的一些请求流程当中都会使用到,这就是Build对象的创建对象的模式,也就是用Build对象来封装OkHttpClient初始化所需要的参数,然后传递我们这个Build的对象,到我们的OkHttpClient构造方法里,完成整个属性对象的初始化。
接下来我们来看下Request.Builder的方法
public Builder() {
      this.method = "GET";   // 请求方式
      // 创建了Headers内部类Builder对象,进行保存Headers头部信息
      this.headers = new Headers.Builder();
    }

// Request的构造方法
  Request(Builder builder) {
    this.url = builder.url; // 请求的网络地址
    this.method = builder.method;
    this.headers = builder.headers.build(); // 头部信息
    this.body = builder.body;
    this.tag = builder.tag != null ? builder.tag : this;
  }
同步请求前两步:1)创建一个OkHttpClient对象。
2)构建了携带请求信息的Request对象。


// 同步方法
  @Override public Response execute() throws IOException {
    synchronized (this) {
      // 同一个HTTP请求只能执行一次,如果没有执行就设置成true,如果执行过,就会抛出这个异常。
      if (executed) throw new IllegalStateException("Already Executed");
      executed = true;
    }
    // 扑捉一些异常信息的堆栈信息
    captureCallStackTrace();
    // 开启一个监听事件,没到call调用execute方法或者enqueue,就会开启这个Listener。
    eventListener.callStart(this);
    try {
      client.dispatcher().executed(this);
      Response result = getResponseWithInterceptorChain();
      if (result == null) throw new IOException("Canceled");
      return result;
    } catch (IOException e) {
      eventListener.callFailed(this, e);
      throw e;
    } finally {
      // 主动回收某些同步请求
      client.dispatcher().finished(this);
    }
  }

同步总结
1)创建一个OkHttpClient对象。
2)构建一个Request对象,通过OkHttpClient和Request对象,构建出Call对象。
3)执行call的execute方法。